Ice Cream Taco: Artisan Honey-Crisp Shells Recipe
- The Artisan Ice Cream Taco: Nostalgia Refined
- The Science of the Perfect Crunch: Flavor and Texture Pairing
- Required Components: Detailed Ingredient Notes and Chef Swaps
- Crafting Your Ice Cream Tacos: A Step-by-Step Method
- Mastering the Tuile: Essential Tips and Troubleshooting
- Optimizing Cold Storage: Maintaining Shell Integrity
- Beyond the Drizzle: Creative Ways to Serve Your Treat
- Recipe FAQs
- 📝 Recipe Card
The Artisan Ice Cream Taco: Nostalgia Refined
That incredible sensory moment when the deep, dark chocolate coating fractures, revealing the crisp, cinnamon laced shell beneath that’s the sound of a perfect ice cream taco . It’s the ultimate dessert nostalgia trip, only this time, we're doing it right.
Forget flimsy factory wrappers; we’re talking artisan snap and premium filling that truly transforms the whole experience.
Look, summer is brutal, and sometimes you just need something fast, cold, and impressive without spending hours churning custard or fussing over a layer cake. This is it. While the shaping requires speed, the ingredient list is short, making this homemade easy ice cream taco recipe surprisingly manageable and wildly satisfying.
This is comfort food dessert taken up a serious notch.
I spent years trying to replicate that classic drive thru treat, only to realize the key wasn't replication; it was refinement . Ready to upgrade your dessert game?
Let’s dive into making the absolute best version of the ice cream taco you’ve ever crunched into, focusing on that crucial crisp-to-cold ratio.
The Science of the Perfect Crunch: Flavor and Texture Pairing
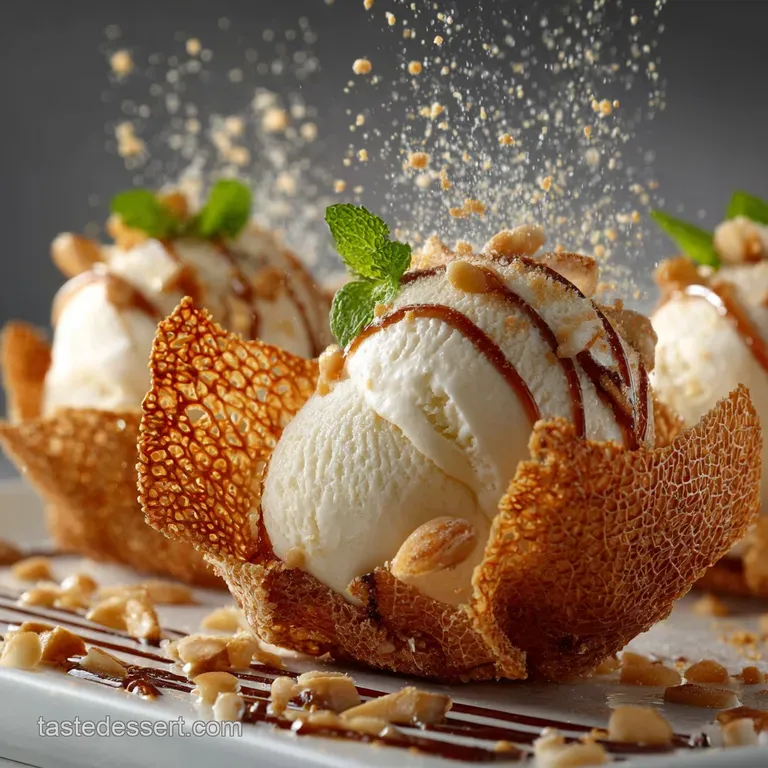
The magic of the ice cream taco isn't complex flavor profiles; it’s about textures fighting each other in the best way possible. You need the satisfying snap of the shell, the immediate chill of the filling, and the instant, brittle crackle of the chocolate coating.
If any of those textures are off if the shell is chewy or the chocolate is soft the whole experience collapses.
This recipe works because we are leveraging two key pieces of kitchen science: the tuile method and the magic shell effect. The tuile, a thin cookie usually made with a high sugar and egg white content, guarantees that beautiful, brittle snap, especially when flavored deeply with honey and cinnamon.
Then, the careful balancing of the chocolate dip with coconut oil ensures it sets immediately upon hitting the frozen filling, creating that instantaneous, thin, protective, and delicious layer that defines the best ice cream taco .
The Elevated Experience: Why Homemade Tuile Shells Matter
Listen, you could just buy pre-made wafer shells, but where is the fun in that? The tuile shells are what elevates this entire dish, moving it from basic novelty to a genuinely impressive dessert. They allow us to introduce warmth the subtle, complex flavor of baked honey and cinnamon which is a necessary contrast to the plain vanilla chill. If you love the structure of a good handheld meal, whether it’s this sweet ice cream taco or something savory like my Steak Tacos: Smoky Flank Steak Recipe with Guacamole Crema , you know the shell is everything.
The Timeline Snapshot: Balancing Prep, Chill, and Freeze Time
The biggest mistake people make with this easy ice cream taco recipe is not respecting the timeline. It’s not a race, but it does require staged patience. You have active work (mixing and shaping the shells) followed by long periods of crucial inactive chilling.
The shells must be completely cool and rigid before filling. The filling must be rock solid before dipping in the chocolate. Skipping the freezing steps results in a gooey, collapsing mess, and no one wants a sad, melting ice cream taco experience.
Moving Beyond Mass Produced Nostalgia
The nostalgia factor is huge, but let’s be honest, the original was mostly corn syrup and freezer burn. This is the ice cream taco upgrade that your adult self deserves.
We are utilizing high-quality ingredients, specifically dark chocolate (70% cacao, please) and premium ice cream, which makes a massive difference in the depth of flavor. This isn't just a frozen snack; it’s a sweet dishes recipe that deserves to be showcased.
The Tuile's Snap: Achieving Crispness with Honey and Cinnamon
The secret to achieving that perfect, satisfying snap in your ice cream taco shells lies in the ratio of sugar to flour and the use of honey. Honey is hygroscopic, meaning it attracts moisture. In baking thin cookies like tuiles, this can sometimes lead to chewiness.
But when combined with a low flour ratio and baked until deep golden brown, the sugar caramelizes, creating a brittle, glass like texture that resists moisture much longer than a standard cookie. The cinnamon, of course, just makes everything smell and taste like a warm hug.
Tempering the Chocolate: Avoiding Cracks and Flakes
We aren't strictly tempering the chocolate in the classic sense (which is complicated and messy), but the addition of refined coconut oil mimics a quick set shell. The goal is a rich, thin coating that sets instantly and cracks when you bite it.
Crucially, ensure your coconut oil is refined, which has a neutral flavor, unless you love the taste of tropical sunscreen in your dark chocolate. If you skip the oil, your chocolate will be too thick to dip easily and won't set fast enough, leading to weeping ice cream.
The Ideal Filling Temperature for Scooping
When you scoop the ice cream, it must be pliable enough to pack into the delicate ice cream taco shells without crushing them. If the ice cream is frozen solid, you’ll apply too much pressure and crack the shell.
I pull the ice cream out of the freezer for exactly 10 minutes no more, no less to reach that Goldilocks consistency: soft enough to scoop, firm enough to hold its shape. Pre-scooping the ice cream onto a tray and refreezing is a brilliant shortcut I always use!
Required Components: Detailed Ingredient Notes and Chef Swaps
For a dessert facile like this, the quality of your few ingredients truly matters. Don't skimp on the chocolate or the ice cream.
| Ingredient | Role | Chef’s Swap/Substitution |
|---|---|---|
| All-Purpose Flour | Structure for the tuile | Use a certified GF cup-for-cup blend (requires Xylitol or other gum) |
| Honey | Flavor, browning, crispness | Maple syrup (adds slight maple flavor) or golden syrup (classic for structure) |
| Egg Whites | Binding and lift | Cannot easily substitute; essential for tuile texture. Use liquid carton egg whites if preferred. |
| Premium Ice Cream | The cool filling | Sorbet (needs faster filling to prevent shell sogginess) or plant based cream alternative |
| Dark Chocolate (70%) | The defining outer shell | Milk chocolate (sweeter) or use high-quality chocolate chips instead of bars |
| Refined Coconut Oil | Instant hardening agent | Do NOT substitute. This is mandatory for the magic shell effect. |
Shell Essentials: Flour Type and Honey Quality
I always recommend standard All-Purpose Flour because it provides the right amount of gluten stretch without being too dense. As for the honey, use something flavorful, like clover or orange blossom honey. Avoid highly crystallized or processed honey, which can change the liquid-to-solid ratio of the batter.
The honey gives these ice cream taco shells their signature chewy crisp depth.
Choosing Your Ice Cream Base (Fat Content Matters)
Go premium here. I know it costs more, but the fat content in higher end ice cream melts slower and provides a smoother, creamier texture that feels luxurious against the crisp shell. If you use low-fat or airy ice cream, it melts rapidly, turning the inside of your shell soggy before you can even dip it.
Trust me, the best homemade ice cream tacos start with quality ingredients.
Substitutions for the Tuile (gluten-free Options)
If you need a gluten-free option, you absolutely can make these shells. The structure changes slightly, so expect them to be more delicate. Swap the flour 1:1 with a GF blend that contains xanthan gum, as I mentioned.
Alternatively, you can simplify and use thin, large waffle cones that you briefly soften in the microwave (10 seconds!) and quickly shape a true dessert facile cheat.
Optimal Dipping Chocolate Selection
While I recommend 70% dark chocolate for that classic contrast, use what you love. If you’re catering to kids, milk chocolate works perfectly but might feel overly sweet against the honey shell. The key is chopping it finely before melting; this ensures it melts quickly and evenly without scorching.
Scorched chocolate is grainy chocolate, and that simply ruins the beautiful coating of the crispy ice cream taco .
Crafting Your Ice Cream Tacos: A step-by-step Method
This is where the rubber meets the road. Pay attention to the temperature cues!
Forming the Honey Cinnamon Batter
Once you’ve whisked the wet ingredients and gently folded in the dry, let that batter rest for about ten minutes. This pause allows the flour to fully hydrate and the batter to thicken just slightly.
This thickening prevents the batter from running too far when you spread it, resulting in consistently sized ice cream taco shells . If it’s too runny, they will be too thin and break instantly upon removal.
The Critical Shaping Window (Working Quickly)
This is the hardest part, the moment I made mistakes countless times learning this recipe. You have about 15 to 30 seconds after removing the shells from the oven to shape them before they become too brittle. If they cool flat, they stay flat. Wear heat resistant gloves, seriously.
Pull the tray out, use the offset spatula to lift a hot tuile, and immediately drape it over your shaping mold (like the rolling pin or the rack). Hold it in place for five seconds to set the curve. If one cools too fast, pop it back in the oven for 30 seconds it softens right up!
Chilling, Filling, and Sealing the Taco
Once the shells are fully cooled and rigid, they are ready to fill. Use that slightly softened, pre-scooped ice cream and pack it in tightly. Wipe off any excess ice cream around the edges.
This filling needs to be neat because if you leave smears of ice cream around the rim, the chocolate won’t adhere properly in the next step. Place the filled ice cream tacos on a flat tray and freeze until they are completely solid, which takes a minimum of two hours.
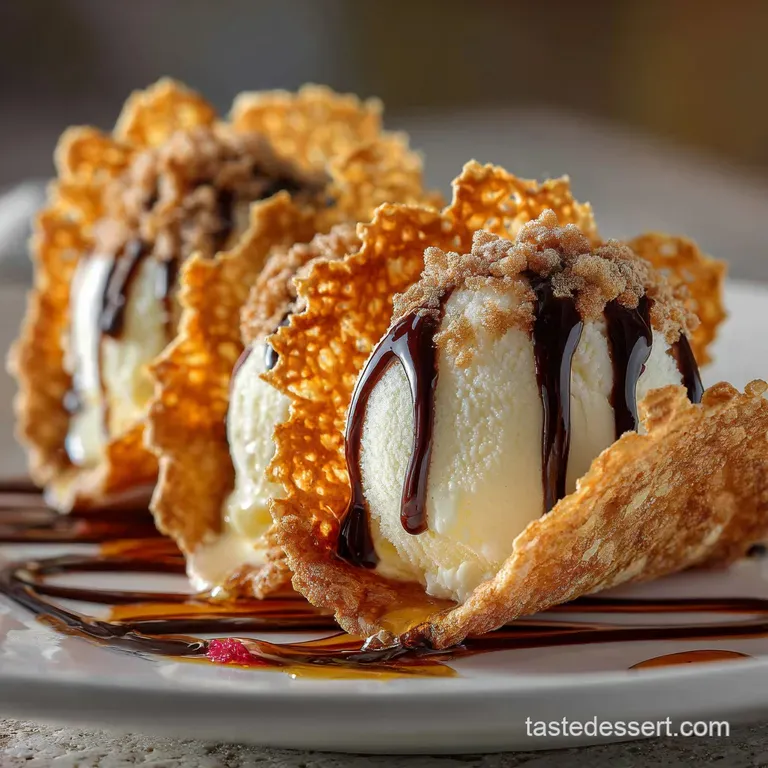
Applying the Tempered Chocolate Coating
When the tacos are truly frozen, melt your chocolate and coconut oil mix. It needs to be warm, smooth, and liquid. Remove the tacos one or two at a time from the freezer. Dip the open edge (the top arc) quickly into the chocolate mix, allowing the excess to drip off before the chocolate sets.
This is where the magic happens: the cold filling instantly sets the chocolate into a firm, brittle coating. Immediately press the coated edge into your chopped nuts or other topping for maximum stickiness.
Mastering the Tuile: Essential Tips and Troubleshooting
Even after years of baking, tuiles can be tricky. Don's despair if your first batch is a disaster; mine was too!
Preventing Stickiness: Correctly Greasing the Template
For tuiles, using a silicone baking mat is non-negotiable. Parchment paper wrinkles and creates uneven spots. If you absolutely must use parchment, clip the corners to the tray so it lies perfectly flat, and still grease it lightly.
Never grease a silicone mat , as it can make the batter spread too thin and pool.
Why Your Shells Are Breaking (Over Baking vs. Under Shaping)
There are two main reasons your beautiful ice cream taco shells are snapping. First, you might have baked them too long, making them too thin and delicate. They should be deeply golden at the edges but still slightly flexible in the center when removed. Second, you waited too long to shape them.
Once they are out of the heat, the sugar quickly cools and hardens. If it resists the shaping mold even slightly, pop it back in!
Speed is Key: Working in Small Batches
Unless you are a professional baker with four hands and an oven the size of a car, only bake 2 3 tuiles at a time. You need to remove them and shape them sequentially. If you try to bake six, four of them will be rigid before you get to them.
Once you master the flow, you can move up to four, but start small to ensure every single crispy ice cream taco shell is perfect.
Chef's Note: If you want a thicker, chewier shell (closer to a waffle cone texture), increase the flour to 1/3 cup and reduce the sugar to 1/4 cup. It won't have the intense brittle snap, but it will be easier to shape for beginner cooks attempting this sweet dishes recipe.
Optimizing Cold Storage: Maintaining Shell Integrity
You’ve done all this hard work to create a beautiful, crunchy shell. Don’t ruin it with bad storage practices! Maintaining the crunch is the final, crucial step in this ice cream taco recipe .
Long Term Freezing Best Practices
Once the final chocolate dip is set, these tacos can live happily in the freezer for about 4 6 weeks. The secret is wrapping them correctly. First, wrap each individual taco tightly in plastic wrap (Saran wrap). This protects the delicate shell structure from direct contact with cold air.
Then, place the wrapped tacos inside an airtight, freezer safe container.
Preventing Freezer Burn and Ice Crystals
Freezer burn happens when moisture in the food evaporates and refreezes as ice crystals on the surface. Because the chocolate dip contains fat (from the coconut oil), it helps seal the ice cream, reducing evaporation. However, the plastic wrap step is essential for the shell itself.
If the shell is exposed to temperature fluctuations, it absorbs moisture and becomes chewy and sad. No one wants a soggy ice cream taco .
Dusting and Finishing Touches (Cacao Nibs vs. Flaked Salt)
While the chopped nuts are traditional, consider the finishing touches carefully. Flaked sea salt sprinkled directly onto the wet chocolate dip provides a spectacular counterpoint to the sweetness. If you skip the nuts, try using crushed freeze dried strawberries or cacao nibs.
Cacao nibs add a wonderful, slightly bitter crunch that pairs beautifully with the dark chocolate and honey cinnamon notes of the ice cream taco upgrade .
Beyond the Drizzle: Creative Ways to Serve Your Treat
These homemade ice cream tacos are a showstopper all on their own, but a little garnish never hurt anyone.
For a dramatic presentation, place the finished tacos on a long serving platter. Instead of a drizzle, try a smear. A vibrant, tart raspberry or strawberry coulis spooned onto the plate beneath the taco adds color and a necessary acidic lift to cut through the richness.
It’s like a fancy plate presentation for what is essentially comfort food dessert.
If you want to really lean into the sweet side, serve them alongside a small bowl of my low-fat Cream Cheese Frosting: Featherlight, Guilt Free Easy for an optional dipping sauce, though honestly, they are perfect standalone. These are definitely a step above the drive thru. Enjoy the crunch!

Recipe FAQs
Why are my tuile shells soft or chewy instead of crisp?
This usually means the batter wasn't baked long enough to evaporate all the moisture, or they cooled too slowly. Ensure your oven temperature is precise and that you shape them immediately after baking. Letting them cool completely on a wire rack promotes air circulation and maximum crispness.
My tuile shells crack when I try to fold them into the taco shape. What should I do?
Tuile batter sets very quickly once removed from the heat, so speed is essential during the shaping process. If they crack, they have cooled too much; place them back in the warm oven for 30 60 seconds to soften them slightly before attempting to fold again.
Work in small batches, shaping perhaps only 2-3 shells at a time.
How far in advance can I make and shape the tuile shells?
You can bake and shape the shells up to a week ahead of time, provided they are stored correctly. Place them immediately into a completely airtight container at room temperature, ensuring they are protected from humidity, as moisture is the enemy of crispness.
What is the best technique for dipping the assembled tacos without major melting?
Ensure the assembled tacos are fully frozen ideally for at least four hours before the dipping stage. Use a tall, narrow container for your melted chocolate and work extremely quickly, dipping the taco and immediately placing it back on a parchment lined sheet in the freezer.
Can I substitute the honey cinnamon tuile for a simpler shell, like a regular waffle cone?
Yes, you can substitute a standard waffle cone recipe, though the texture will be thicker and less delicate than the artisan tuile. Alternatively, you can use store-bought flat bottomed waffle bowls, cut them in half, and slightly reshape them while warm to form a rudimentary taco shell.
Can I make the tuile shell gluten-free or dairy-free?
For a gluten-free tuile, substitute a specialized GF flour blend that includes xanthan gum for necessary structure. To make it dairy-free, replace the melted butter with a neutral flavored vegan butter substitute or a refined coconut oil, ensuring consistency remains the same.
How long can the fully assembled Ice Cream Tacos be stored in the freezer?
When properly wrapped to prevent moisture loss and freezer burn, the finished tacos can be stored in the freezer for up to one month. First, wrap each taco tightly in plastic wrap, then place them inside a secondary airtight container before freezing.
Artisan Ice Cream Taco Upgrade

Ingredients:
Instructions:
Nutrition Facts:
| Calories | 1407 kcal |
|---|---|
| Protein | 28.8 g |
| Fat | 87.3 g |
| Carbs | 140.5 g |
