Better Than Box Mix Brownies: Rich and Fudgy
- Time: Active 15 minutes, Passive 30 minutes, Total 45 minutes
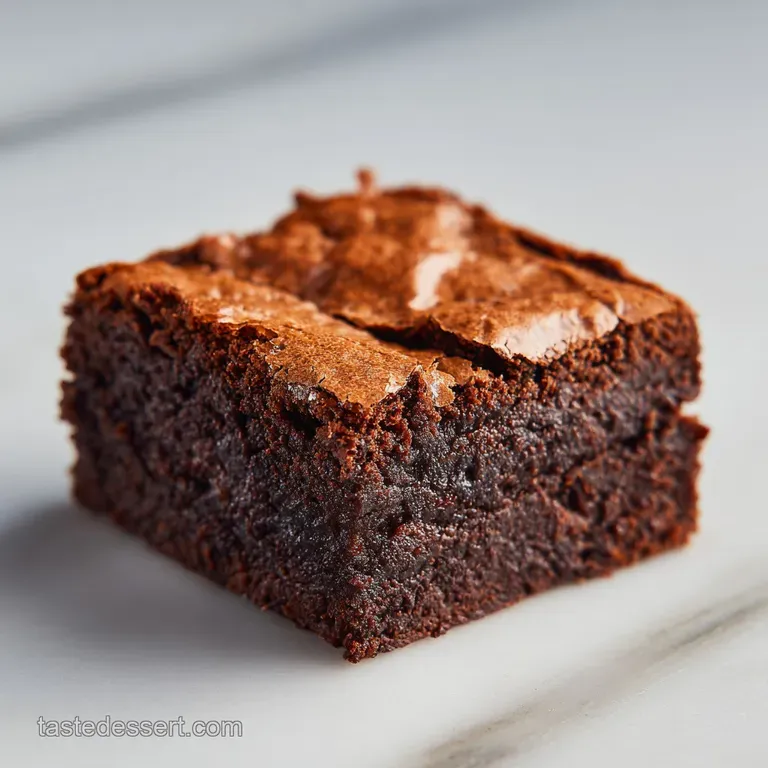
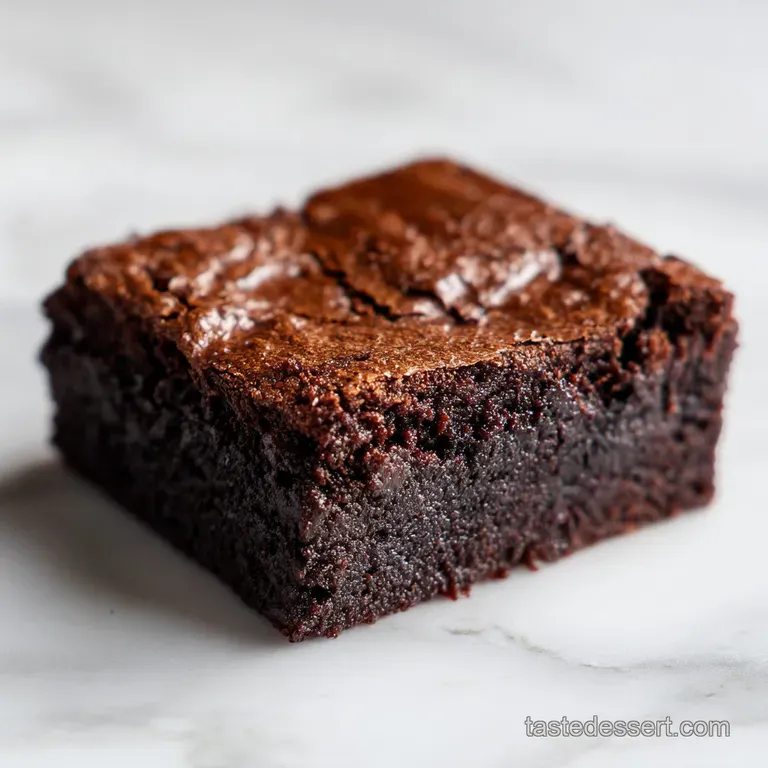
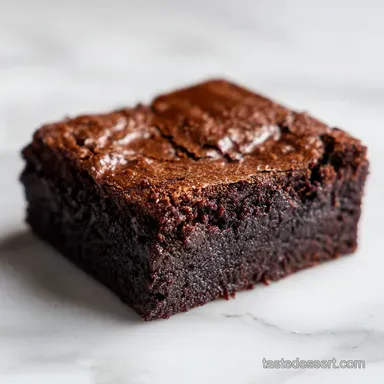
- Flavor/Texture Hook: Velvety fudgy center with a crackly, shatter thin top
- Perfect for: Impressing friends at a potluck or late night cravings
- Secrets to Making the Best better than box mix brownies
- Why This Works
- Component Analysis Deep Dive
- Official Timing and Serving Size Breakdown
- Choosing High Quality Elements for Rich Results
- Essential Tools for a Successful Bake
- Mastering the Method for Fudgy Chocolate Success
- Solving Common Baking Disasters and Texture Issues
- Creative Flavor Twists and Easy Dietary Swaps
- Storing and Keeping Your Sweets Fresh Longer
- Perfect Pairings for Your Homemade Chocolate Treats
- Recipe FAQs
- 📝 Recipe Card
Secrets to Making the Best better than box mix brownies
The moment the scent of Dutch processed cocoa hits hot, melted butter, your kitchen transforms into a professional patisserie. I remember the first time I realized that "boxed" wasn't actually the gold standard for fudginess.
I was standing in my tiny first apartment, frustrated by a batch of scratch brownies that came out like dry chocolate bread. I wanted that specific, dense, almost truffle like middle that makes your teeth sink in, paired with a top that shatters like a delicate stained glass window.
This recipe is the result of realizing that the order of operations matters just as much as the ingredients themselves.
We aren't just mixing things in a bowl here, we're actually performing a bit of kitchen magic. The real win is how quickly this comes together. You don't need a stand mixer or any fancy gadgets, just a sturdy whisk and a little bit of arm strength.
When you pull these out of the oven, the surface will be shimmering and metallic, a clear sign that you've achieved the ultimate chocolate goal. It's a quick victory for anyone who thinks they don't have time to bake from scratch, and the payoff is significantly better than any paper box could ever offer.
You'll notice that the batter for these better than box mix brownies is thick, glossy, and smells intensely of dark chocolate. That is because we aren't relying on chemical leaveners like baking powder to do the work. Instead, we are building structure through the way we incorporate the eggs and sugar.
It’s a process that feels intentional but remains incredibly simple. Once you see that first square come out of the pan, perfectly intact and deeply dark, you'll never look back at the baking aisle the same way again.
Why This Works
- The Cocoa Bloom: Adding cocoa powder directly to hot melted butter "blooms" the chocolate, which means the heat releases trapped flavor compounds for a much more intense taste.
- Sugar Dissolution: Whisking the sugars into the hot butter cocoa mixture starts the melting process early, which is the secret to getting that shiny, crinkly skin on top.
- Albumin Aeration: Beating the eggs vigorously for exactly two minutes incorporates just enough air to lift the brownies without making them cakey or dry.
- Gluten Suppression: Using a silicone spatula to fold in the flour ensures we don't overwork the batter, keeping the crumb silky and velvety rather than tough.
| Method | Time | Texture | Best For |
|---|---|---|---|
| Oven (Standard) | 30 minutes | Fudgy with crinkle top | Classic, reliable results every single time |
| Stovetop (Melting) | 5 minutes | Smooth, liquid base | Initial step to bloom cocoa and melt butter |
| Air Fryer | 22 minutes | Extra crispy edges | Small batches or quick summer baking |
The difference between a "good" brownie and one that people talk about for weeks usually comes down to the fat and sugar interaction. When we melt the butter completely, we are ensuring a dense, tight crumb. If we were to cream room temperature butter with sugar like a cake, we'd end up with far too much air.
By keeping the fats liquid and the flour count low, we lean into that decadent, fudge like consistency that everyone craves.
Component Analysis Deep Dive
| Ingredient | Science Role | Pro Secret |
|---|---|---|
| Dutch Cocoa | Neutralized acidity | Provides the dark, "Oreo like" color and mellow flavor |
| Espresso Powder | Flavor enhancer | Doesn't taste like coffee, it just makes chocolate taste "more" like chocolate |
| Granulated Sugar | Structure & Crust | Essential for the meringue like top layer that shatters when bitten |
| Sea Salt | Flavor balancer | Sharpens the sweetness and cuts through the heavy fat of the butter |
When you are looking to achieve the ultimate texture, the type of cocoa you choose is the most important decision. Most grocery stores carry "Natural" cocoa powder, which is lighter and more acidic. However, for that professional look and deep flavor, Dutch processed is non negotiable.
It has been treated with an alkalizing agent that makes it darker and much easier to dissolve in the butter.
Official Timing and Serving Size Breakdown
This recipe is designed for an 8x8 inch square metal baking pan, which provides the ideal thickness for 16 generous squares. Using a metal pan is actually a tiny trick in itself; metal conducts heat much faster than glass or ceramic. This means the edges will set and become slightly chewy while the center remains soft.
If you only have a glass dish, you might find the edges take longer to crisp up, and you may need to add about 5 minutes to the total time.
When it comes to the timeline, don't rush the cooling process. I know it's tempting to dive in the second they come out of the oven, but brownies are one of the few desserts that actually finish "cooking" on the counter.
As they cool, the fats solidify and the starches set, which gives you those clean, sharp edges when you slice them. If you cut them while hot, they will likely fall apart into a (very tasty) pile of chocolate mush.
| Servings | Ingredient Adjustments | Pan Size | Cook Time |
|---|---|---|---|
| 16 People | Standard recipe (see below) | 8x8 inch square | 30 minutes |
| 32 People | Double all ingredients | 9x13 inch rectangle | 35-40 minutes |
| 8 People | Halve all (use 1 large egg) | 9x5 inch loaf pan | 25 minutes |
Choosing high-quality Elements for Rich Results
For this better than box mix brownies recipe, you'll need the following ingredients. Note the specific types mentioned, as they truly impact the final result.
- Unsalted Butter (1/2 cup / 113g): Melted and hot. Why this? Hot butter is essential for blooming the cocoa and dissolving the sugars effectively.
- Dutch process Cocoa Powder (3/4 cup / 75g): Unsweetened. Why this? It provides a darker color and a smoother, less acidic chocolate flavor.
- Granulated White Sugar (1 cup / 200g): Standard white sugar. Why this? It dissolves to create the shiny top we all love.
- Light Brown Sugar (1/4 cup / 50g): Packed. Why this? Adds moisture and a slight molasses depth for a chewier texture.
- Large Eggs (2): Must be at room temperature. Why this? Cold eggs can seize the melted butter, making the batter lumpy.
- Pure Vanilla Extract (1 tablespoon / 13g): Quality matters here. Why this? Vanilla acts as a flavor "salt" for sweets, making the chocolate pop.
- Espresso Powder (1 teaspoon / 2g): Instant espresso. Why this? It acts as a background note that intensifies the cocoa solids.
- All purpose Flour (1/2 cup / 65g): Just a small amount. Why this? Keeps the ratio of fat to flour high for maximum fudginess.
- Sea Salt (1/2 teaspoon / 3g): Fine grain. Why this? Balances the sugar and enhances the chocolate's natural complexity.
- Semi sweet Chocolate Chips (1/2 cup / 90g): Or chopped chocolate. Why this? Provides pockets of melted chocolate for extra decadence.
| Original Ingredient | Substitute | Why It Works |
|---|---|---|
| Unsalted Butter | Salted Butter | Works well, just omit the 1/2 tsp sea salt from the recipe |
| Dutch process Cocoa | Natural Cocoa | Lighter color and more acidic. Note: Result will be less "dark" |
| Espresso Powder | Instant Coffee | Use 1.5 tsp. Note: Less intense than espresso but still works |
| Chocolate Chips | Chopped Walnuts | Adds crunch. Note: Changes the texture from gooey to nutty |
While this recipe is designed to be the ultimate version, I often find myself tweaking things based on what is in my pantry. If you are out of chocolate chips, you can easily use a chopped up chocolate bar. In fact, if you want to see how this compares to a slightly different texture profile, you might enjoy reading about how fudgy chewy brownies use different fat ratios to achieve a more elastic bite.
Essential Tools for a Successful Bake
You don't need a pantry full of equipment to make these, but a few specific items make the process much smoother. First and foremost, a 8x8 inch square metal pan is your best friend. Metal is the superior choice for brownies because it creates those sought after crisp edges.
If you use a dark coated metal pan, keep an eye on them a few minutes early, as dark metal absorbs heat more aggressively.
A large glass mixing bowl is also a smart choice. Glass retains heat well, so when you combine the hot butter and cocoa, the bowl stays warm enough to help the sugar dissolve as you whisk.
You'll also need a sturdy wire whisk for the aeration step and a silicone spatula for the final folding of the flour. Don't use the whisk for the flour step; we want to be gentle there to avoid making the brownies tough.
Finally, parchment paper is the one tool you should never skip. It isn't just about preventing sticking. If you leave an "overhang" or "sling" of paper on two sides, you can lift the entire block of brownies out of the pan once they are cool.
This allows you to cut them on a flat cutting board, giving you those perfectly straight, bakery style squares without scratching your pan.
Mastering the Method for Fudgy Chocolate Success
- Preheat and Prep: Set your oven to 350°F (175°C). Line your 8x8 inch pan with parchment paper so it covers the bottom and hangs over two sides.
- Bloom the Cocoa: Combine the hot melted butter and Dutch process cocoa in your glass bowl. Whisk vigorously until the mixture is smooth, glossy, and fragrant.
- Incorporate Sugars: Add the granulated sugar and light brown sugar to the chocolate butter. Whisk until the grains are mostly submerged and the mixture looks like wet sand.
- Aeration Step: Add the room temperature eggs, vanilla, and espresso powder. Whisk by hand for a full 2 minutes until the batter turns a lighter shade of brown and thickens slightly. Note: This creates the crinkle top.
- Fold the Flour: Switch to your spatula and gently stir in the flour and sea salt. Stop the moment no white streaks are visible to keep the texture velvety.
- Add the Gems: Fold in the semi sweet chocolate chips until they are just distributed throughout the batter.
- Transfer and Smooth: Pour the thick batter into your pan. Use the spatula to push it into the corners and level the surface.
- The Bake: Slide the pan into the center of the oven. Bake for 25-30 minutes until the edges are firm but the center still has a slight wobble.
- Check for Doneness: Insert a toothpick into the center. It should come out with a few moist, sticky crumbs attached, but not liquid batter.
- Cool and Set: Place the pan on a wire rack. Allow them to cool for at least 1 hour until the pan is cool to the touch before lifting and slicing.
Solving Common Baking Disasters and Texture Issues
Why Your Brownies Are Cakey
This is usually the result of one of two things: too much flour or too much air. If you accidentally measured your flour by scooping it with the cup instead of spooning it in, you likely used way too much. Also, if you keep whisking after adding the flour, you develop gluten.
Gluten creates a bread like structure, which is the enemy of a fudgy brownie. Always switch to a spatula for that final step to keep things dense.
Why the Top Isn't Crinkly
That beautiful, papery thin crust is actually a very thin layer of meringue. It forms when the sugar dissolves into the egg whites during that vigorous 2 minute whisking step. If your eggs were cold, the sugar might not have dissolved properly. Or, if you didn't whisk long enough, the emulsion didn't form.
Next time, set a timer for the egg whisking step it feels like a long time, but it’s the difference between a dull top and a shimmering one.
| Problem | Root Cause | Solution |
|---|---|---|
| Greasy Bottom | Butter was too hot or not emulsified | Ensure eggs are room temp to help the fat bond with the sugars |
| Brittle/Dry Edges | Overbaked or oven was too hot | Pull them out when the center still wobbles slightly |
| Sunken Middle | Taken out too early or too much air whipped in | Check with a toothpick; it should have moist crumbs, not liquid |
Common Mistakes Checklist
- ✓ Use room temperature eggs so they don't seize the butter.
- ✓ Whisk the egg and sugar mixture for a full 2 minutes to get that crinkle.
- ✓ Use a metal baking pan for the best heat conduction and crispy edges.
- ✓ Don't over measure the flour; spoon it into the measuring cup and level it off.
- ✓ Let them cool completely; they need this time to set their internal structure.
Creative Flavor Twists and Easy Dietary Swaps
If you want to move even further away from the standard box mix brownies flavor, there are endless ways to customize this base. For a Mexican Chocolate twist, add 1 teaspoon of ground cinnamon and a tiny pinch of cayenne pepper to the dry ingredients.
The heat from the pepper highlights the fruitiness of the Dutch cocoa in a really surprising and delightful way. It’s a sophisticated upgrade that feels very high end.
For those who love a salty sweet combo, try swirling in a quarter cup of creamy peanut butter or salted caramel right before baking. Just dollop it on top of the batter in the pan and use a butter knife to create swirls.
If you are looking for a gluten-free option, this specific recipe works remarkably well with a 1:1 gluten-free flour blend. Since the flour content is so low to begin with, the texture remains almost identical to the original.
| Premium | Budget | Flavor Impact | Savings |
|---|---|---|---|
| Vanilla Bean Paste | Pure Vanilla Extract | Minimal; bean flecks are pretty but flavor is similar | Save $15 |
| Valrhona Cocoa | Hershey’s Special Dark | Noticeable; Valrhona is richer and smoother | Save $10 |
| Chopped Lindt Bar | Nestle Chocolate Chips | Moderate; bar chocolate melts into "pools" | Save $4 |
If you enjoy experimenting with different chocolate bases, you might also be interested in how a homemade hot chocolate mix uses similar "blooming" principles to create a rich beverage. It’s another great way to use up that Dutch process cocoa powder you just bought.
Storing and Keeping Your Sweets Fresh Longer
Brownies are incredibly hardy, which makes them the perfect candidate for meal prep or gifting. At room temperature, they will stay fresh in an airtight container for about 4 to 5 days. Interestingly, many people (myself included) think they actually taste better on day two.
The flavors have more time to meld, and the fudginess becomes even more pronounced. Just make sure the container is truly airtight, or they will start to pick up the dreaded "stale" taste.
For long term storage, these better than box mix brownies freeze beautifully. I recommend slicing them first, then wrapping each individual square in plastic wrap before placing them all in a gallon sized freezer bag. They will keep their quality for up to 3 months.
When you're ready for a treat, you can let one thaw on the counter for 30 minutes, or pop it in the microwave for 15 seconds for a "just out of the oven" experience.
Zero Waste Tip: If you ever end up with brownie edges that are a bit too hard, or a batch that you overbaked, don't throw them away! Crumble them up and use them as a topping for vanilla ice cream.
You can also pulse them in a food processor to create a "brownie dirt" that makes an incredible base for a chocolate cheesecake or a decadent truffle filling.
Perfect Pairings for Your Homemade Chocolate Treats
While a square of this better than box mix brownies is a triumph on its own, a few simple additions can turn it into a full blown dessert course. The classic choice is, of course, a cold glass of whole milk.
The fat in the milk cleanses the palate after the heavy hit of chocolate, making every bite feel like the first one. If you're feeling fancy, a dollop of barely sweetened whipped cream with a few raspberries provides a tart contrast to the richness.
For a more "grown up" pairing, try serving a warm brownie with a small glass of ruby port or a stout beer. The dark, roasted notes in a stout mirror the espresso powder and cocoa in the recipe perfectly.
If you are hosting a party, you can set up a "brownie bar" with various toppings like sea salt flakes, toasted pecans, and warm fudge sauce. It’s an interactive way to let everyone customize their experience.
The Myth of Searing the Sugar
Many people believe that the crinkle top comes from "searing" the sugar in the oven, but that isn't quite right. The top is actually a result of the sugar dissolving into the eggs and then drying out as it bakes, creating a wafer thin layer of meringue.
If you don't dissolve the sugar enough during the mixing phase, you'll never get that characteristic shine, no matter how hot your oven is.
The Sifting Misconception
You might see recipes that insist you sift your flour and cocoa powder to avoid lumps. While sifting doesn't hurt, it's often unnecessary if you are using a whisk and hot butter. The heat from the butter combined with the mechanical action of the whisk is usually more than enough to break down any stubborn cocoa clumps.
Save yourself the extra dish to wash and just whisk thoroughly.

Recipe FAQs
How to ensure a crackly top on these brownies?
Whisk the eggs, sugar, and vanilla vigorously for exactly two minutes. This process incorporates air and creates a meringue like film on the surface that bakes into that signature shiny, paper thin crust.
Can I use regular cocoa powder instead of Dutch process?
No, Dutch process is essential for the intended depth of flavor and color. Regular cocoa is more acidic and will react differently with the other ingredients, resulting in a less intense chocolate experience.
How to tell when the brownies are perfectly baked?
Insert a toothpick into the center and look for a few moist crumbs attached. If the toothpick comes out completely clean, the brownies are overbaked; if it has liquid batter, they need a few more minutes.
Is it necessary to bloom the cocoa powder in hot butter?
Yes, blooming the cocoa in the hot melted butter releases volatile aromatics. If you enjoyed mastering this Brownies in 32 Minutes recipe here, you will find it equally effective for building complex flavor profiles in other chocolate desserts.
How to prevent the brownies from becoming cakey?
Fold in the flour gently with a spatula and stop as soon as the streaks disappear. Overmixing develops gluten, which turns a dense, fudgy brownie into a light, airy cake.
How to store brownies to keep them moist?
Place them in an airtight container at room temperature for up to five days. They actually develop a better, more pronounced fudginess on the second day as the ingredients meld together.
Can I freeze these brownies for later?
Yes, wrap the cooled, uncut brownies tightly in plastic wrap and store them in the freezer for up to three months. Thawing them at room temperature will maintain their original fudgy texture perfectly.
Better Than Box Mix Brownies
Ingredients:
Instructions:
Nutrition Facts:
| Calories | 175 kcal |
|---|---|
| Protein | 2.4 g |
| Fat | 8.5 g |
| Carbs | 25.2 g |
| Fiber | 1.6 g |
| Sugar | 19.3 g |
| Sodium | 76 mg |
