Black Forest Cheesecake Bars
- Time: Active 20 minutes, Passive 35 minutes, Total 55 minutes
- Flavor/Texture Hook: Shattering chocolate crust with a silky, velvet smooth cheesecake center.
- Perfect for: Holiday parties, weekend baking, or budget-friendly dinner party finales.
- Master These Authentic Black Forest Cheesecake Bars
- The Science Behind Perfect Results
- Component Analysis for Cheesecake Success
- Sourcing Quality Elements for Fudgy Squares
- Essential Tools for Seamless Bar Prep
- Step-by-Step Guide to Cocoa Perfection
- Solving Common Forest Cheesecake Bar Pitfalls
- Smart Swaps for Every Dietary Need
- Storing Your Sweets for Maximum Freshness
- Creative Ways to Present Your Dessert
- Myths About Cheesecake Baking
- Recipe FAQs
- 📝 Recipe Card
Master These Authentic Black Forest Cheesecake Bars
The first time I tried to bake a traditional Black Forest cake, it was a literal disaster. The layers slid, the whipped cream wilted in the heat, and I ended up serving what looked like a chocolate cherry soup.
But that aroma, the scent of tart cherries simmering with a splash of Kirsch and dark chocolate, stayed with me. I knew I had to find a way to get those iconic German flavors into a format that was actually stable enough for a backyard picnic or a busy weeknight.
That is how these bars were born. I traded the finicky sponge cake for a sturdy, buttery chocolate sandwich cookie base and swapped the unstable whipped cream for a rich, dense cheesecake layer. When you pull these out of the oven, the smell is intoxicating, like a high end chocolate boutique.
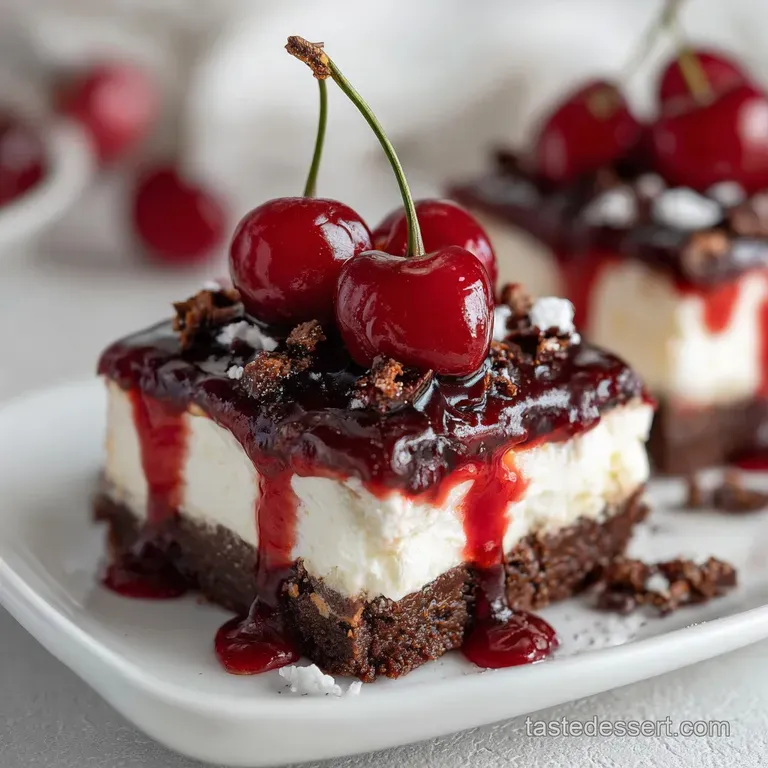
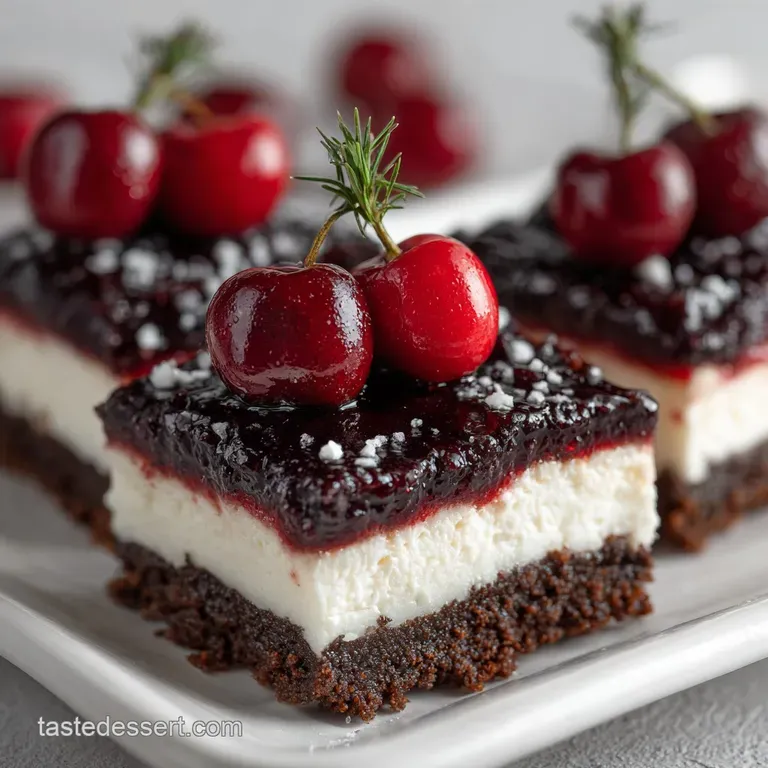
There is something so satisfying about the way the tart cherry sauce swirls into the creamy white filling, creating a marble effect that looks far more difficult than it actually is.
We are keeping things smart and budget friendly here. You do not need expensive imported cherries to get that signature "Forest" flavor. Frozen cherries or even standard canned ones work beautifully when we treat them right with a bit of lemon juice and sugar.
Let us get into the kitchen and transform these simple ingredients into something truly special.
The Science Behind Perfect Results
The Emulsification Secret: Using room temperature cream cheese and eggs ensures the fat and protein molecules bond smoothly, preventing a lumpy texture or unappealing oil beads on the surface.
Starch Stabilization: Cornstarch in the cherry topping acts as a thickening agent that traps moisture, ensuring the sauce stays glossy and thick rather than soaking into the cheesecake layer and making it soggy.
Timing Your Perfect Bake
| Pan Depth | Internal Visual | Edge Texture | Cooling Time |
|---|---|---|---|
| 2 cm | Slight jiggle in center | Set and matte | 2 hours minimum |
| 3 cm | Firm but soft center | Slightly pulled away | 3 hours minimum |
| 4 cm | Dense and set | Deep golden brown | 4 hours minimum |
One of the best things about this bar format is the reliability. If you love this flavor profile but want something even more festive, you might enjoy the techniques used in my Southern Pecan Pie recipe which also focuses on achieving that perfect contrast between a crunchy base and a soft, flavorful filling.
Component Analysis for Cheesecake Success
| Ingredient | Science Role | Pro Secret |
|---|---|---|
| Cream Cheese | Provides structure and fat | Use full fat blocks only; tub spreads contain too much air and water for a dense bar. |
| Sour Cream | Adds acidity and creaminess | The acid softens the proteins in the cheese, resulting in a velvety "melt in-your mouth" feel. |
| Cornstarch | Binds the fruit juices | Whisk with cold water first to prevent "fish eyes" or starch clumps in your cherry topping. |
| Kirsch | Enhances cherry aromatics | If skipping alcohol, use a drop of almond extract to mimic that traditional stone fruit pit flavor. |
Sourcing Quality Elements for Fudgy Squares
The beauty of this recipe lies in how it uses common items to create a luxury result. I always keep a bag of chocolate sandwich cookies in the pantry specifically for this crust. It provides a much deeper cocoa flavor than a standard graham cracker crust.
- 2 cups chocolate sandwich cookie crumbs: These provide the dark, crunchy base.
- 5 tbsp unsalted butter, melted: This acts as the glue for our foundation.
- 1/4 tsp sea salt: A tiny pinch to balance the sugar.
- 16 oz full fat cream cheese: (450g) Ensure this is very soft before mixing. Why this? Full fat provides the necessary stability and rich mouthfeel required for bars.
- 1/2 cup granulated sugar: Standard white sugar works best here.
- 1/2 cup sour cream: (120ml) Adds that essential tang.
- 2 large eggs: These provide the lift and structure.
- 1 tsp pure vanilla extract: Always use pure for the best aroma.
- 4 oz semi sweet chocolate: (113g) Melted and cooled slightly.
- 2 cups dark sweet cherries: (Approx 300g) Pitted and halved.
- 2 tbsp granulated sugar: To macerate the fruit.
- 1 tbsp cornstarch: For that glossy, thick topping.
- 1 tbsp water: To create the cornstarch slurry.
- 1 tsp lemon juice: Brightens the fruit flavors.
- 1 tbsp Kirsch (optional): For an authentic German touch.
Chef Tip: Freeze your butter for 10 minutes before melting it. This might sound odd, but it helps the butter stay emulsified as it cools into the cookie crumbs, leading to a crust that doesn't leak oil in the pan.
Essential Tools for Seamless Bar Prep
You do not need a professional bakery setup to master these Black Forest Cheesecake Bars. A standard 20cm square baking pan (8x8 inch) is your best friend here. I highly recommend lining it with parchment paper, leaving an overhang on the sides.
This "sling" method allows you to lift the entire block of bars out once they are chilled, making for much cleaner cuts.
A stand mixer is helpful for getting the cream cheese perfectly smooth, but a hand mixer works just as well. Just avoid over mixing once you add the eggs; we want a dense, velvety texture, not a puffy, soufflé like one.
For the cherry topping, a small heavy bottomed saucepan is better than a thin one to prevent the sugars from scorching.
step-by-step Guide to Cocoa Perfection
- Prepare the base. Combine 2 cups chocolate sandwich cookie crumbs with 5 tbsp melted unsalted butter and 1/4 tsp sea salt. Note: Press this firmly into the bottom of your lined pan to ensure it doesn't crumble later.
- Blind bake the crust. Bake at 175°C (350°F) for 10 minutes until the kitchen smells like toasted cocoa.
- Cream the cheese. Beat 16 oz softened cream cheese and 1/2 cup sugar in a large bowl until completely smooth and glossy.
- Add liquids. Mix in 1/2 cup sour cream and 1 tsp vanilla extract. Note: Scrape the sides of the bowl often to prevent hidden lumps.
- Incorporate eggs. Add 2 large eggs one at a time, mixing on low speed until just combined.
- Create the chocolate swirl. Remove 1 cup of the plain batter and stir in 4 oz melted semi sweet chocolate.
- Marble the layers. Pour the plain batter over the crust, then dollop the chocolate batter on top, swirling with a knife until a beautiful marble pattern emerges.
- Bake the cheesecake. Bake for 30-35 minutes at 165°C (325°F) until the edges are set but the center still wobbles slightly.
- Cook the topping. Simmer 2 cups pitted cherries, 2 tbsp sugar, 1 tsp lemon juice, and the Kirsch (if using) in a saucepan for 5 minutes.
- Thicken the glaze. Whisk 1 tbsp cornstarch with 1 tbsp water and stir into the cherries, boiling for 1 minute until the sauce becomes thick and transparent.
If you find yourself with extra cherries, they make a delightful topping for other treats, similar to the fruit focus in an Authentic Homemade Croissants recipe where fruit preserves often play a starring role.
Solving Common Forest Cheesecake Bar Pitfalls
One of the biggest heartbreaks is pulling a cheesecake out of the oven only to see a giant canyon forming down the middle. This usually happens because the oven was too hot or the cake cooled too quickly.
To avoid this, I always turn off the oven when the bars are done, crack the door open, and let them sit inside for another 30 minutes.
Why Your Cheesecake Surface Cracked
Cracks are almost always a result of trapped air or thermal shock. When you over beat the eggs, you incorporate air bubbles that expand and then collapse. Similarly, moving a hot pan directly to a cold counter causes the structure to shrink too fast.
| Problem | Root Cause | Solution |
|---|---|---|
| Lumpy filling | Cold cream cheese | Ensure cheese is at room temp for at least 2 hours before mixing. |
| Runny topping | Under cooked starch | The cherry mixture must reach a full boil for the cornstarch to activate. |
| Soggy crust | Not pre baking | Always blind bake the cookie base to create a moisture barrier. |
Common Mistakes Checklist
- ✓ Tap the filled pan firmly on the counter before baking to release trapped air bubbles.
- ✓ Use a water bath (optional but helpful) by placing the pan inside a larger tray with 2cm of hot water.
- ✓ Never skip the cooling time; these bars need at least 4 hours in the fridge to set properly.
- ✓ Wipe your knife with a warm, damp cloth between every single cut for those professional, sharp edges.
Smart Swaps for Every Dietary Need
Baking on a budget often means working with what you have. If you don't have chocolate sandwich cookies, you can use plain chocolate wafers or even crushed graham crackers mixed with 2 tablespoons of cocoa powder.
| Original Ingredient | Substitute | Why It Works |
|---|---|---|
| Sour Cream | Greek Yogurt (Full fat) | Similar acidity and fat content. Note: Result may be slightly tangier. |
| Fresh Cherries | Frozen Cherries | Flash frozen at peak ripeness. Note: Do not thaw before cooking the topping. |
| Kirsch | Cherry Juice + Almond Extract | Provides the fruitiness and the nutty note of the traditional brandy. |
Designing Your Perfect Texture
- If you want a firmer bar, add an extra tablespoon of cornstarch to the cheesecake batter.
- If you want a fudgier bar, replace the sour cream with an equal amount of melted semi sweet chocolate.
- If you want a lighter bar, use Neufchâtel cheese instead of full fat cream cheese.
Storing Your Sweets for Maximum Freshness
These bars are actually better on the second day! The flavors have time to meld, and the crust softens just enough to become fudgy while maintaining its structure. Store them in an airtight container in the refrigerator for up to 5 days.
For long term storage, you can freeze the bars (without the cherry topping is best, but with it is fine). Wrap individual squares in plastic wrap and then foil. They will stay fresh for up to 2 months. To serve, thaw them in the fridge overnight. If you have leftover cookie crumbs, don't toss them!
Keep them in a jar to sprinkle over vanilla ice cream for a quick "deconstructed" dessert.
Creative Ways to Present Your Dessert
To truly honor the Black Forest tradition, I like to add a few chocolate shavings on top of the cherry glaze just before serving. You can do this easily by running a vegetable peeler along the edge of a room temperature chocolate bar. It adds a "shatter" of texture that contrasts beautifully with the velvety filling.
If you are serving these at a party, try cutting them into smaller "two bite" squares. This makes them feel more like an elegant mignardise. You can also serve them with a dollop of lightly sweetened whipped cream to cut through the richness of the chocolate. No matter how you serve them, the combination of dark cocoa and bright cherries is a timeless winner that never fails to impress. For another classic that relies on a perfect crust, check out the Maple Pecan Pie recipe — it is another one of my go to crowd pleasers.
Myths About Cheesecake Baking
Myth: You must use a springform pan for cheesecake. Truth: While traditional, it is not necessary. A square pan with a parchment sling is actually easier for beginners and produces more servings (bars) that are easier to handle and transport.
Myth: Over mixing makes cheesecake "fluffy." Truth: Over mixing incorporates too much air, which leads to a cake that rises like a souffle and then collapses into a dense, cracked mess. Mix on low speed for a smooth, dense, professional result.

Recipe FAQs
Can I use frozen cherries for the topping?
Yes, frozen cherries work perfectly. They are often picked at peak ripeness and will provide excellent flavor. Just be sure not to thaw them before cooking the topping.
What's the best way to get clean cuts on my cheesecake bars?
Use a warm, damp knife and wipe it clean between each cut. For professional looking edges, ensure the bars are fully chilled before slicing, and use the parchment paper overhang to lift the entire block out of the pan.
Why did my cheesecake bar surface crack?
Cracking is usually caused by over mixing or rapid temperature changes. Incorporating too much air into the batter or cooling the cheesecake too quickly can lead to cracks. Try mixing on low speed and allowing the bars to cool gradually in the turned off oven.
Can I substitute the chocolate sandwich cookie crust?
Yes, you can substitute with other cookies or crackers. Chocolate wafers or graham crackers mixed with cocoa powder can work, but chocolate sandwich cookies offer a deeper cocoa flavor that complements the cheesecake. This substitution is similar to how we use different bases in recipes like our Southern Pecan Pie recipe.
How long do Black Forest Cheesecake Bars need to chill before serving?
At least 4 hours is ideal for proper setting. While they can be eaten sooner, chilling allows the cheesecake to firm up completely and the flavors to meld, resulting in the best texture.
Is it possible to make these bars dairy-free?
Achieving a truly dairy-free cheesecake bar is challenging due to the core ingredients. However, for similar decadent chocolate flavors, you could explore recipes that use dairy-free cream cheese alternatives and plant based creams, like those found in some vegan dessert recipes.
How do I store leftover cheesecake bars?
Store them in an airtight container in the refrigerator for up to 5 days. They actually improve in flavor after the first day, as the ingredients meld beautifully. For longer storage, you can freeze them wrapped well for up to 2 months.
Black Forest Cheesecake Bars

Ingredients:
Instructions:
Nutrition Facts:
| Calories | 312 kcal |
|---|---|
| Protein | 3.8 g |
| Fat | 21.1 g |
| Carbs | 27.4 g |
| Fiber | 1.2 g |
| Sugar | 19.5 g |
| Sodium | 198 mg |
