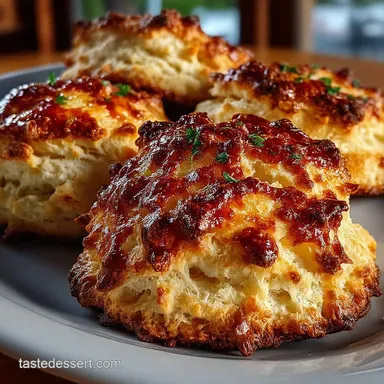
Brown Butter Bliss the Ultimate Chocolate Chip Cookie

- Beyond Basic: Why Brown Butter Defines These Cookies
- The Quest for the Perfect Chocolate Chip Cookie Experience
- Essential Components for Next-Level Dough
- Curating Your Chocolate Chip Arsenal
- Mastering the Brown Butter Technique
- Assembling Your Dough: From Ingredients to Chill Time
- Troubleshooting and Next-Level Cookie Variations
- Recipe FAQs
- 📝 Recipe Card
Beyond Basic: Why Brown Butter Defines These Cookies
When embarking on the journey to create truly exceptional Cookies , the temptation is always to rely on the tried and-true classic formula. However, the difference between a standard batch and something truly memorable often lies in a single, transformative step: browning the butter.
This technique, which involves carefully melting butter until the milk solids toast to a deep amber, introduces a complex, nutty, almost toffee like flavour profile that cannot be achieved any other way.
This nuanced flavour becomes the bedrock upon which we build these yummy cookies , moving them far beyond the realm of everyday sweet recipes .
If you are chasing that perfect bite, embracing this method is essential for crafting yummy sweets that satisfy deep cravings.
The Quest for the Perfect Chocolate Chip Cookie Experience
Our goal here is ambitious yet achievable: to craft Cookies that marry the irresistible chewiness in the centre with distinct, slightly crisp edges. This balance is the holy grail of home baking, often elusive, but entirely possible with precision and the right methodology.
Achieving this texture alongside that profound depth of flavour means paying attention to every component, from the initial melting of the fat to the final few minutes in the oven.
Unlocking Nutty Depth: The Magic of Browning Butter
The act of browning butter a process where moisture evaporates and the milk solids caramelize injects an immediate layer of sophisticated flavour into the dough. This toasted essence beautifully complements the sweetness of the sugars and the richness of the chocolate, creating a profound taste experience.
This preparation is what elevates these from simple homemade treats to something akin to just desserts . The rich, nutty notes hint at complexity, suggesting hours of patient development even though the actual process is quick.
A Texture Revelation: Targeting Crispy Edges and Chewy Centers
Achieving textural perfection relies heavily on the ratio of sugars and the temperature of the fat entering the mixer. We use a combination of light brown sugar (for moisture and chew) and granulated sugar (for spread and crispness).
On top of that,, incorporating the brown butter while it is only slightly warm ensures the mixture emulsifies correctly without scrambling the eggs, leading directly to that desired dichotomy of a set edge cradling a gorgeously soft interior.
Setting Expectations: What Makes This Recipe Truly Ultimate
This Cookies recipe is categorized as medium difficulty, not because the mixing is complicated, but because the browning of the butter demands active attention to prevent burning. Success hinges on watching the colour and smelling the distinct aroma of toasted hazelnuts.
By following the precise methodology especially the cooling and chilling times you are guaranteed to produce soft bakes that rival any professional offering.
Essential Components for Next Level Dough
The foundational quality of any baked good rests squarely on the shoulders of its ingredients. Since the recipe is relatively simple, there is nowhere to hide; every choice matters.
We are looking for high-quality components that contribute meaningfully to the final structure, flavour, and texture of these phenomenal Cookies .
Related Recipes Worth Trying
- The Ultimate Brown Butter Pretzel MM Cookies Recipe — Upgrade your cookie game These addictive Brown Butter Pretzel MM Cookies feature nutty depth and perfect saltysweet crunch Get the foolproof method
- Easy White Chocolate Covered Pretzel Cookies Recipe — These White Chocolate Covered Pretzel Cookies blend salty crunch with buttery shortbreadthe perfect Salty Sweet Cookies for any occasion Get the simple recipe
- Salted Caramel Swirl Blondie Bars The Ultimate Pin on Cookies Brownies Bars — These fudgy chewy blondie bars layer a buttery base with homemade salted caramela perfect addition to your collection of yummy treats Get the foolproof recipe
Curating Your Chocolate Chip Arsenal

Selecting the right inclusions and structural elements is crucial. Think of the chocolate not just as an add-in, but as an integral part of the dough matrix that melts and flows during baking.
Mandatory Tools for Precision Baking
While a simple bowl and spoon can manage basic mixing, achieving consistency requires reliable tools. A heavy bottomed saucepan is non-negotiable for even butter browning, preventing scorching on the bottom while the rest of the fat catches up.
Likewise, using a medium cookie scoop ensures uniform size, which is the single most important factor in achieving even baking across all your batches.
Selecting the Right Flour and Sugars for Structure
We utilize standard all-purpose flour, measured carefully by spooning and leveling to avoid compacting too much, which would result in tough Cookies . The sugar balance is key: the high proportion of packed light brown sugar retains moisture, delivering that essential chewiness, while the granulated sugar encourages the edges to spread just enough to crisp up nicely.
Why Quality Salt Matters in Sweet Treats
Salt is the flavour amplifier, balancing the overwhelming sweetness inherent in sweet recipes . We incorporate fine sea salt into the dry ingredients to season the dough throughout.
Crucially, a light sprinkling of flaky sea salt, such as Maldon, applied just before baking, provides a delightful textural crunch and a burst of salinity that cuts through the richness a hallmark of sophisticated yummy cookies .
Mastering the Brown Butter Technique
This is where we invest our active preparation time to reap maximum flavour rewards. To successfully brown the butter, melt one cup (227g) of unsalted butter in a light coloured, heavy bottomed saucepan over medium heat. The light colour allows you to monitor the change in hue effectively.
Swirl the pan gently as the butter melts, foams, and then subsides. You are waiting for the milk solids to sink and toast, turning from pale white to deep golden brown. Once you notice these browned flecks and the aroma shifts from creamy to distinctly nutty, immediately pour the entire contents into a heatproof bowl to halt the cooking process.
If you wait until it’s dark brown, it’s burnt, so vigilance is key! Allow this intensely flavoured fat to cool slightly until it is merely warm before proceeding.
Assembling Your Dough: From Ingredients to Chill Time
With our flavour base established, the remaining steps involve methodical mixing to incorporate air and structure without developing excessive gluten, which would result in tough Cookies .
The Crucial Step: Achieving Golden Brown Perfection
Once the brown butter has cooled to a manageable warmth, it is whisked vigorously with the packed light brown sugar and the granulated sugar. This process begins to cream the fats and sugars, incorporating essential air that contributes to lift and texture.
Integrating Wet and Dry Components Seamlessly
The two large eggs and a full tablespoon of quality vanilla extract are added next, one egg at a time, ensuring full emulsification after each addition. In a separate bowl, the flour, baking soda, and fine sea salt are whisked together.
The dry mixture is then introduced slowly to the wet base, mixing only until the last streaks of flour disappear. Overmixing at this stage is the enemy of a chewy centre. Finally, fold in 1.5 cups of semi sweet or dark chocolate chips and chunks using a rubber spatula.
Why An Overnight Chill Transforms These Cookies
While a 30-minute chill is sufficient to prevent catastrophic spreading, for the ultimate result, chilling the dough for several hours, or even overnight, is transformative. This resting period allows the flour to fully hydrate with the fat and moisture, deepening the flavour and resulting in a chewier, more complex dough structure, perfect for making truly yummy sweets .
Baking Calibration: Temperature and Timing Secrets
Preheat your oven to 350° F ( 175° C) and line your baking sheets with parchment paper. Scoop the chilled dough into generous portions about three tablespoons each spacing them well apart. Sprinkle immediately with flaky salt if using.
Bake for 10 to 12 minutes. The key to soft bakes is pulling them out when the edges look golden brown and set, but the very centre still appears slightly pale and underdone. They will continue to bake on the hot tray for another few minutes as they rest.
Troubleshooting and Next Level Cookie Variations
Even with the best preparation, sometimes things go slightly astray, or inspiration strikes for a new flavour profile. Having a plan for adjustments ensures your baking adventure always ends deliciously.
How to salvage dough that spread too thin
If your dough spreads excessively during baking (often due to insufficient chilling or an oven that runs too cool), quickly remove the tray and use a round cookie cutter or spatula to nudge the edges back toward the centre while the cookie is still hot and pliable.
For future batches, ensure the dough is thoroughly chilled before scooping.
Flavor Swaps: Incorporating Toffee or Espresso Powder
To move into the realm of incredible Cookies and cream inspired treats or deeper chocolate profiles, consider these simple swaps. Replace a quarter cup of the chocolate chips with finely chopped toffee bits, which melt beautifully.
Alternatively, adding one teaspoon of instant espresso powder to the dry ingredients deepens the chocolate flavour without making the Cookies taste overtly like coffee a trick beloved by bakers of just desserts .
Freezing Dough for Future Cookie Emergencies
One of the greatest advantages of making a large batch of dough is preservation. Scoop the dough onto a baking sheet and freeze until solid. Then, transfer the frozen balls to an airtight freezer bag.
When the craving hits, you can bake these rock hard portions straight from the freezer; simply add 2– 3 minutes to the baking time.
Nutritional Spotlight: Calorie Considerations
It is important to acknowledge that these rich, brown butter-infused Cookies recipe delights are an indulgent treat. Given the generous amount of high-quality butter and sugar required for their perfect texture and flavour, they naturally fall on the higher end of the calorie spectrum for baked goods.
Enjoying these yummy cookies should be viewed as a luxurious moment, perhaps paired with that tall glass of milk.

Recipe FAQs
My cookies always spread out into thin, greasy puddles. What am I doing wrong with these cookies?
That's the dreaded 'cookie puddle,' and it usually happens for two main reasons: the butter was too warm when mixing, or the dough wasn't chilled. Ensure your brown butter has cooled down significantly before adding the eggs, and always chill the dough for at least 30 minutes; this firms up the fat so the cookies hold their shape beautifully during baking.
What is the secret to getting those perfectly chewy centres you mentioned in the recipe?
The chewiness comes down to sugar balance and bake time it’s a bit of a balancing act, much like getting the right shade of tan! We use more brown sugar than white sugar because the molasses in brown sugar attracts moisture, keeping the centre soft.
Also, pull them out of the oven when they still look a tad gooey in the middle; carry over cooking does the rest of the magic.
I’ve never browned butter before; is it really worth the fuss for these cookies?
Absolutely! Browning the butter is the star player here; it transforms the flavour from plain buttery to something deep, nutty, and reminiscent of toffee it's a proper game changer.
Just keep a close eye on it; once you see the milk solids toast to a deep amber, whisk it off the heat immediately before it burns, or you'll end up with charcoal, not caramel!
How long can I store the cookie dough, and can I freeze the baked cookies?
You can store the dough wrapped tightly in the fridge for up to three days, and the flavour will actually improve over that time! For freezing, baked cookies store brilliantly in an airtight container at room temperature for about a week, but freezing them unbaked (scooped onto a tray, flash frozen, then bagged) is even better; just add a couple of minutes to the baking time when cooking from frozen.
Can I substitute any of the flour for something else, or are these strictly all-purpose flour cookies?
For the very best texture in this specific recipe, all-purpose flour is recommended as it provides the right balance of structure and spread. If you must substitute, use a quality 1:1 gluten-free blend as suggested in the variations, but be aware that whole wheat or oat flour will absorb more moisture and create a denser, less classic cookie texture.
Brown Butter Cookies
Ingredients:
Instructions:
Nutrition Facts:
| Calories | 180 kcal |
|---|---|
| Protein | 1.7 g |
| Fat | 7.0 g |
| Carbs | 18.9 g |
| Fiber | 0.4 g |
| Sodium | 3755 mg |
