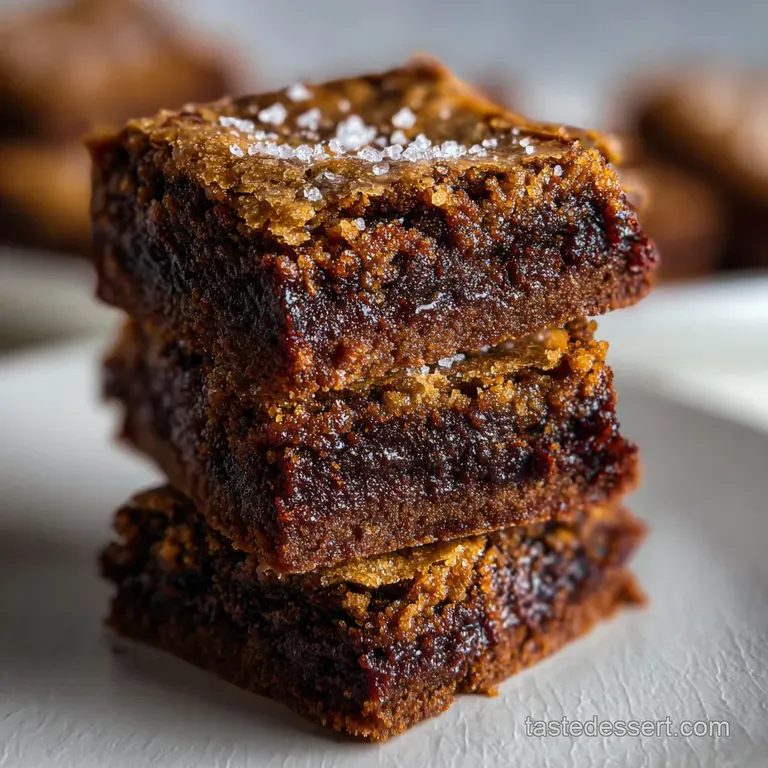
Brown Sugar Brownies: Crackly Top
- Time: Active 10 mins, Passive 22 mins, Total 32 mins
- Flavor/Texture Hook: Deep toffee notes with a shatter crisp surface and velvety center.
- Perfect for: Last minute entertaining or late night chocolate cravings.
- Master the Ultimate Brown Sugar Brownies
- Understanding the Chemistry of Fudgy Textures
- Precise Timing and Temperature Specs
- Choosing Your Core Baking Elements
- Necessary Baking Equipment List
- The Batch Baking Process
- Correcting Common Texture and Rise Issues
- Flavor Twists and Easy Ingredient Swaps
- Guidelines for Freshness and Storage
- Plating Techniques for Beautiful Results
- Recipe FAQs
- 📝 Recipe Card
Master the Ultimate Brown Sugar Brownies
The smell of light brown sugar hitting 170g of melted butter is something that takes me back to my grandmother's kitchen every single time. It's a deep, toffee like aroma that fills the house before the pan even hits the oven.
I've spent years chasing the ultimate fudge factor, and I finally realized that the secret wasn't more chocolate, but the specific way the sugar interacts with the fat.
You're looking for that specific texture that's bendy in the middle but has a top that cracks like thin ice under your thumb. This Brown Sugar Brownies recipe skips the white sugar entirely to lean into those caramel notes.
It's a focused, technique driven bake that transforms basic pantry staples into something truly velvety.
We've all had those brownies that turn out more like dry cake or, worse, greasy bricks. By understanding the timing and the "why" behind each stir, you'll nail that crinkle top every time. Trust me on this, once you see that first crackle appear in the oven, you'll never go back to a box mix.
Understanding the Chemistry of Fudgy Textures
The Molasses Moisture Trap: Brown sugar is naturally hygroscopic, meaning it attracts and holds onto water molecules, which keeps the crumb dense and bendy rather than airy. This prevents the flour from drying out, resulting in a superior chew that lingers on the palate.
- Fat Emulsification: Whisking the eggs into the warm butter sugar mixture creates a stable emulsion, much like a Fudgy Chewy Brownies recipe, ensuring the fat doesn't leak out during the bake.
- Protein Structure: The 2 large eggs provide the necessary protein to bind the cocoa and flour without the need for chemical leaveners like baking powder.
- Maillard Reaction: The high sugar to flour ratio encourages browning at the edges, creating a chewy, caramelized perimeter that contrasts the soft center.
| Cooking Method | Active Time | Resulting Texture | Best For |
|---|---|---|---|
| Standard Oven | 32 mins | Shatter crisp top | Traditional results |
| Toaster Oven | 35 mins | Extra chewy edges | Small batches |
| Air Fryer | 20 mins | Deeply caramelized | Quick cravings |
The choice of heat source impacts how quickly that sugar crust forms on the surface. While the air fryer is fast, the traditional oven provides the most even heat distribution for that uniform, crackly appearance we all crave.
Precise Timing and Temperature Specs
To get these Brown Sugar Brownies right, you need to hit specific numeric markers. Precision is what separates a soggy middle from a fudgy masterpiece. I always use a digital scale for the butter and flour to ensure the ratio is exactly as intended.
- Butter Temp: Melted butter should be roughly 110°F to 120°F when adding sugar; too hot and it will cook the eggs, too cold and the sugar won't dissolve properly.
- Bake Duration: 22 minutes exactly in a 350°F oven is the sweet spot for a 8x8 inch pan.
- Cooling Window: 10 minutes in the pan is mandatory to allow the starches to set, otherwise, the brownies will fall apart when sliced.
| Component | Science Role | Pro Secret |
|---|---|---|
| Light Brown Sugar | Moisture retention | Pack it tight to ensure the correct volume to weight ratio. |
| Cocoa Powder | Structural acidity | Sift it twice to remove stubborn clumps that cause dry pockets. |
| Unsalted Butter | Fat medium | Use high-quality European butter for a higher fat to water ratio. |
Selecting the right sugar is the foundation here. Light brown sugar provides that hint of molasses without overpowering the cocoa, whereas dark brown sugar can sometimes make the batter too acidic and heavy.
Choosing Your Core Baking Elements
Gathering your ingredients is the first real step in the process. Each item plays a specific role in the final texture, so don't try to eyeball the measurements.
- Unsalted Butter (3/4 cup): Melted and cooled. Why this? Provides the base fat for a melt in-the mouth texture.
- Light Brown Sugar (1.5 cups): Packed firmly. Why this? Creates the characteristic chew and caramel flavor profile.
- Large Eggs (2): Room temperature. Why this? Emulsifies the batter and provides lift without baking powder.
- Vanilla Extract (1 tbsp): Pure is best. Why this? Rounds out the sharp notes of the unsweetened cocoa.
- Unsweetened Cocoa Powder (3/4 cup): Dutch processed or natural. Why this? Delivers the intense chocolate hit without added sweetness.
- All Purpose Flour (3/4 cup): Levelled off. Why this? Provides just enough structure to hold the fat and sugar together.
- Sea Salt (1/2 tsp): Fine grain. Why this? Balances the heavy sugar content and intensifies chocolate flavor.
- Semi Sweet Chocolate Chips (1/2 cup): High cocoa percentage. Why this? Adds pockets of melted texture throughout the brownie.
If you find yourself out of chocolate chips, you can easily use a chopped chocolate bar. For those looking for a different spin, you might find inspiration in a Homemade Brownies recipe that uses similar base ratios.
Necessary Baking Equipment List
You don't need a kitchen full of gadgets, but a few specific tools will make your life much easier. Using a metal pan instead of glass, for instance, is a total secret for better heat conduction.
- 8x8 inch Square Pan: Metal is preferred for sharper, crispier edges.
- Parchment Paper: Leave an overhang for easy removal.
- Large Mixing Bowl: Heat safe for the melted butter.
- Whisk and Silicone Spatula: For aeration and folding.
- Wire Cooling Rack: Prevents the bottom from becoming soggy.
Chef's Tip: Freeze your chocolate chips for 15 minutes before folding them in. This prevents them from melting instantly into the batter, ensuring you get distinct, velvety pools of chocolate in every bite.
The Batch Baking Process
Step 1: Prep and Melt
Preheat your oven to 350°F and line your pan with parchment paper. Melt the 3/4 cup butter in a microwave safe bowl until liquid but not bubbling. Note: Bubbling butter means water is evaporating, which can change the recipe's hydration.
Step 2: The Sugar Bind
Whisk the 1.5 cups packed light brown sugar into the warm butter for about 2 minutes. Cook 2 mins until the mixture looks like wet sand.
Step 3: Aeration Phase
Add the 2 large eggs and 1 tablespoon vanilla extract. Whisk vigorously for 3 full minutes. Whisk until the batter lightens in color and becomes glossy. Note: This creates the meringue like top.
Step 4: Incorporating Drys
Sift in the 3/4 cup cocoa powder, 3/4 cup all purpose flour, and 1/2 teaspoon sea salt. Fold gently with a spatula. Fold until no streaks of white flour remain.
Step 5: The Chocolate Fold
Toss in the 1/2 cup semi sweet chocolate chips. Use only three or four folds to distribute them. Note: Over mixing at this stage will develop gluten and make the brownies tough.
Step 6: Pan Transfer
Pour the thick batter into the prepared pan. Smooth the top with the back of a spoon. Spread until the batter reaches all four corners evenly.
Step 7: The Precision Bake
Slide the pan into the center rack of the oven. Bake for exactly 22 minutes. Bake until the edges are set and the center barely wobbles.
Step 8: The Setting Stage
Remove from the oven and place on a wire rack. Let them sit for at least 10 minutes. Rest until the pan is cool enough to touch with bare hands.
Correcting Common Texture and Rise Issues
Why Your Brownies Are Greasy
If you see oil pooling on top, it usually means the emulsion broke. This happens if the butter was too hot when the eggs were added, or if you didn't whisk long enough during the egg stage. The fat needs to be fully suspended in the sugar egg foam to stay inside the brownie.
To Fix a Dull Matte Top
A matte top is often the result of sugar not dissolving. To get that shiny, crackly crust, you must whisk the sugar and eggs until the mixture is thick and pale. This process moves the sugar to the surface where it dehydrates during baking, forming that beautiful "paper" crust.
| Problem | Root Cause | Solution |
|---|---|---|
| Dry/Crumbly | Too much flour | Use a scale to measure 95g precisely. |
| Raw Middle | Underbaked | Bake until a toothpick comes out with moist crumbs. |
| Hard Edges | Overbaked | Reduce oven temp by 25°F or check 3 mins early. |
Common Mistakes Checklist:
- ✓ Never skip sifting the cocoa powder; clumps will never bake out.
- ✓ Use room temperature eggs to ensure they bond properly with the fat.
- ✓ Don't over mix once the flour is added, or you'll lose the fudgy texture.
- ✓ Resist the urge to cut them while hot; the structure needs to set.
- ✓ Use a metal pan for even browning and a superior crust.
Flavor Twists and Easy Ingredient Swaps
If you want a deeper flavor, add 1 teaspoon of espresso powder to the dry ingredients. It won't make the brownies taste like coffee, but it will make the chocolate taste more like itself. It's a trick I learned from a pastry chef years ago, and I use it in almost all my chocolate bakes.
| Original Ingredient | Substitute | Why It Works |
|---|---|---|
| Unsalted Butter | Coconut Oil (refined) | Same fat ratio but adds a very subtle tropical note. |
| Light Brown Sugar | Dark Brown Sugar | More molasses; results in a much deeper, stickier brownie. |
| All Purpose Flour | 1:1 gluten-free Blend | Rice based blends mimic the structure well in fudgy bakes. |
If you are looking for a more traditional profile, you might enjoy comparing this to a Rich Classic Brownies recipe, which often uses a mix of sugars.
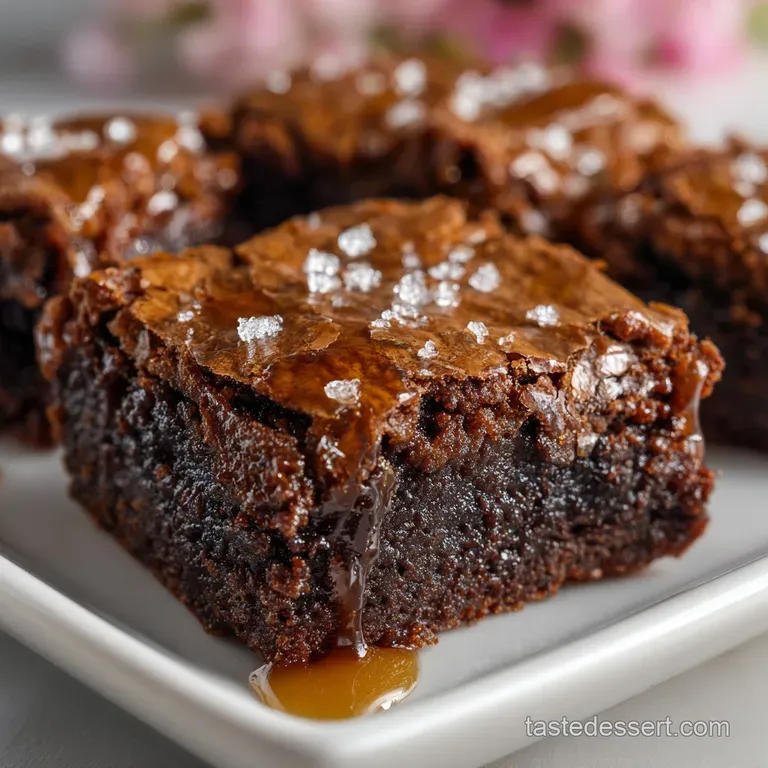
- If you want a Salted Caramel vibe, swirl in 2 tablespoons of caramel sauce before baking.
- If you want a Nutty Crunch, fold in 1/2 cup of toasted pecans or walnuts.
- If you want Cakey Centers, add an extra egg and a 1/4 teaspoon of baking powder.
Guidelines for Freshness and Storage
Keep these Brown Sugar Brownies in an airtight container at room temperature for up to 4 days. If you find they are losing their moisture, a quick 10 second zap in the microwave will bring back that "just baked" velvety feel. They actually get even fudgier on day two as the flavors have time to meld.
For long term storage, wrap individual squares in plastic wrap and place them in a freezer bag. They will stay fresh for up to 3 months. To eat, just let them thaw on the counter for an hour.
Don't throw away any scraps or crumbs; they make an incredible topping for vanilla bean ice cream or can be folded into a milkshake for a zero waste treat.
Plating Techniques for Beautiful Results
For the cleanest cuts, use a large chef's knife and wipe it clean with a damp cloth between every single slice. This prevents the fudgy center from sticking to the blade and ruining the sharp edges of the next square.
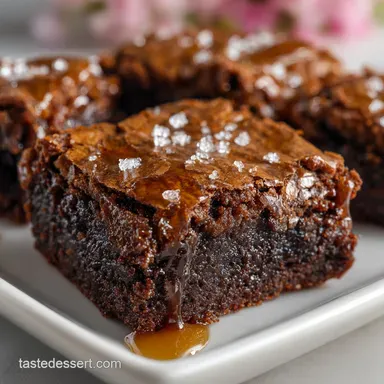
I like to serve these slightly warm with a tiny pinch of extra sea salt on top to really make the chocolate pop.
If you are hosting a dinner party, place a square in the center of a white plate, add a small scoop of chantilly cream, and shave a little dark chocolate over the top. It looks like a restaurant quality dessert but takes almost no extra effort.
The contrast between the dark brownie and the white cream is always a visual winner.

Recipe FAQs
Can I substitute white sugar for the light brown sugar in this recipe?
No, this will drastically change the texture. Brown sugar’s molasses content is hygroscopic, meaning it retains moisture, which creates the dense, fudgy interior you want. White sugar results in a cake like crumb.
How do I achieve the signature shiny, crackly top layer?
Whisk the eggs into the warm butter and sugar for three full minutes until glossy. This vigorous whisking creates a stable, meringue like surface structure that dehydrates during baking into that desirable thin, crisp shell.
My brownies are too greasy; what did I do wrong?
The emulsion likely broke during mixing. This typically happens if the melted butter was too hot when the eggs were incorporated, essentially scrambling them slightly and causing the fat to separate.
How long must the brownies cool before slicing to prevent sticking?
Allow the pan to cool on a wire rack for a mandatory 10 minutes. This crucial rest period allows the starches to set; slicing them immediately will result in the centers immediately collapsing and sticking to your knife.
What is the best method for cutting perfectly clean squares?
Wipe a large chef’s knife with a damp cloth between every single cut. This prevents the moist, fudgy interior from dragging across the blade, ensuring your edges remain sharp and professional.
Can I use dark brown sugar instead of light brown sugar for a deeper flavor?
Yes, but expect a denser, chewier result. Dark brown sugar contains more molasses, which adds moisture and a more intense caramel flavor profile, similar to the richness you achieve when making a sauce like the English Toffee Sauce recipe.
How can I ensure the butter is the correct temperature before adding eggs?
Measure the melted butter to be between 110°F and 120°F. Use a digital thermometer if you can; if you don't have one, the butter should feel warm to the touch but not hot enough to cause discomfort.
Brown Sugar Brownies Recipe
Ingredients:
Instructions:
Nutrition Facts:
| Calories | 224 kcal |
|---|---|
| Protein | 2.5 g |
| Fat | 11.4 g |
| Carbs | 30.9 g |
| Fiber | 1.7 g |
| Sugar | 23.2 g |
| Sodium | 78 mg |
