The Proper Crumb Chewy Chocolate Chip Cookies
- Why This Chocolate Chip Recipe Stands Above All Others
- The Secret to Truly Satisfying Baked Goodness
- Mastering the Component List for Ultimate Cookies
- The Step-by-Step Journey to Golden Perfection
- Baking Secrets for Even Spread and Maximum Rise
- Troubleshooting and Elevating Your Next Batch
- Storing Your Treasures for Ongoing Enjoyment
- Recipe FAQs
- 📝 Recipe Card
Why This Chocolate Chip Recipe Stands Above All Others
Forget everything you thought you knew about Basic Chocolate Chip Cookies . As an expert baker, I’m thrilled to share the ultimate blueprint for a cookie that transcends the everyday. We aren’t aiming for thin, brittle discs, nor are we settling for dense, cakey rounds.
Our goal is pure textural alchemy: edges that shatter delicately, giving way to a deeply satisfying, chewy centre studded with molten pockets of chocolate. This recipe, focused on crafting the "Proper Crumb" Chewy Chocolate Chip Cookie, relies on a few key, non-negotiable steps most notably, browning the butter which infuses the final product with a rich, toffee like complexity you simply won't find in standard mixes.
These are the gold standard biscuits that redefine comfort baking and elevate your afternoon tea experience to something truly memorable.
The Secret to Truly Satisfying Baked Goodness
Achieving perfection in a cookie hinges not just on the ingredients, but on the precise execution of technique. While this recipe is designated as Medium difficulty due to the careful steps involved, the payoff is extraordinary.
This recipe yields approximately 18 large, impressive cookies, requiring about 25 minutes of active preparation time, though I strongly advise planning for a crucial 12 24 hour chilling period to maximize flavour depth.
The initial prep focuses on harnessing deep, nutty flavours before we even consider incorporating the flour.
Defining the Perfect Chew Factor
The key to that glorious, pliable centre lies primarily in two factors: the ratio of brown sugar to granulated sugar and the precise temperature management during the mixing stage.
Brown sugar, being hygroscopic (moisture attracting), is our champion here, ensuring the cookies remain soft long after they leave the oven. We utilize two sticks of unsalted butter, melted and then deliberately browned, which locks in incredible depth.
This richness, combined with the slight acidity from the brown sugar, directly counteracts the tendency for the cookies to become dry, guaranteeing that signature chewiness that keeps you reaching for another one.
Our Promise: A Cookie That Delights Every Palate
Whether you are a seasoned Peanut Butter Lovers enthusiast looking for a side biscuit, or someone dedicated to pure chocolate decadence, this base recipe sets the stage for excellence.
While this specific formula targets the quintessential chocolate chip experience, the underlying structure allows for seamless transformation into other varieties, perhaps even Sandwich Cookies once cooled, or scaled down into delightful Bite Size Cookies for parties.
The complexity achieved through browned butter makes this a recipe worthy of gifting or sharing, though you may find yourself hoarding them all!
Setting the Stage for Bakery Quality Results
To ensure our Chocolate Chip Cookie Dough reaches its zenith, we must respect the process. The baking sheets must be lined with parchment paper or silicone mats this is non-negotiable as it promotes even heating and prevents sticking, which can sometimes lead to uneven spreading.
We also rely on a cookie scoop of about three tablespoons; this consistency in size is vital for ensuring every single cookie bakes at the same rate, resulting in uniform golden edges and perfectly gooey interiors.
Mastering the Component List for Ultimate Cookies
Success starts long before the oven is hot. Every item on our list plays a specific role, from the choice of sugar that dictates moisture retention to the leavening agent that dictates rise.
We are aiming for a dough with incredible structural integrity, built upon a foundation of flavour derived from perfectly handled fats.
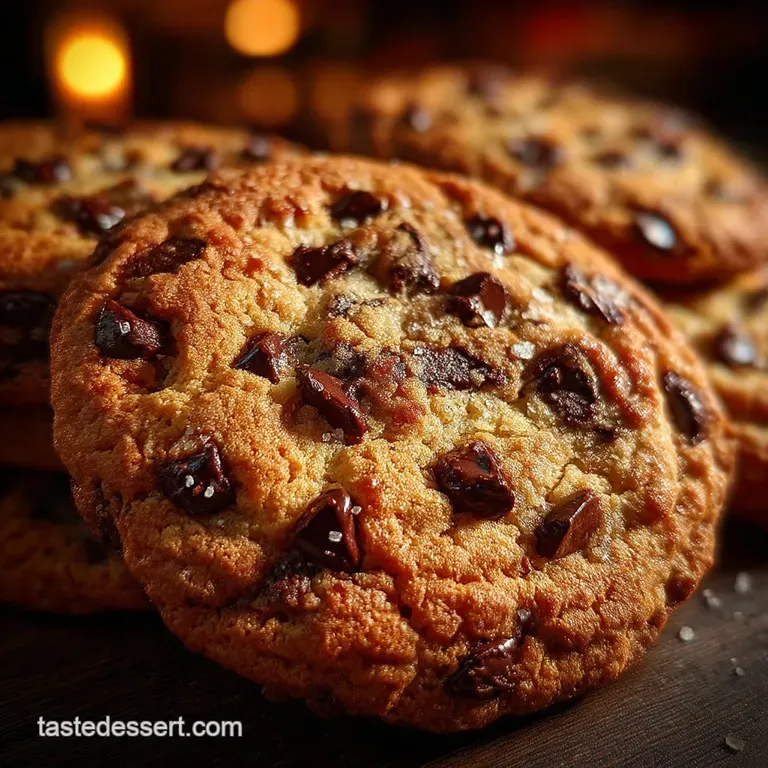
Choosing Your Chocolate: Chips vs. Chunks vs. Shavings
For the absolute best visual appeal and texture, avoid standard small chips if possible. We recommend using a generous 1 1/2 cups of high-quality chocolate, aiming for a mix of approximately 60 70% cocoa solids.
The combination of semi sweet chocolate chunks (which melt into glorious pools) and perhaps a handful of milk chocolate chips (for added sweetness) provides both visual intrigue and textural variation within the finished cookies recipe .
The Butter Temperature Conundrum: Why It Matters So Much
The first critical step involves melting two sticks of unsalted butter and cooking it down until the milk solids turn a deep, nutty amber brown. This is the browning process. Once achieved, you must immediately pour the butter into a heatproof bowl to halt the cooking.
Allowing it to cool for about 15 minutes before proceeding is essential; if you add the sugars to piping hot butter, you risk scrambling the eggs later, leading to a tough cookie texture.
Flour Fundamentals: Measuring Techniques That Count
When it comes to the 2 1/2 cups of all-purpose flour, the method of measurement is paramount. Do not scoop directly from the bag. Instead, lightly spoon the flour into your measuring cup, then use a straight edge (like a knife) to level off the excess.
This technique prevents compaction, ensuring you don't inadvertently add up to 25% too much flour, which is the number one cause of dry, cakey Butter Cookies rather than chewy ones.
Related Recipes Worth Trying
- The Best Thick Chewy Gingersnaps Recipe Soft Molasses Cookies — Forget thin crackers Master these thick puffy gingersnap cookies that stay wonderfully soft in the centre A truly comforting classic
- The Ultimate Chewy Triple Chocolate Chip Cookies Recipe — Master the perfect soft bake with this recipe for gooey Triple Chocolate Chip Cookies Learn the secret to chewy centers and crisp edges Get baking
- The Ultimate Chewy BrownButter Chocolate Chip Cookies — Level up your baking with this Chewy Chocolate Chip Cookies Recipe Browned butter adds incredible depth for truly gourmet cookies Get the foolproof method now
The step-by-step Journey to Golden Perfection

Once your brown butter is slightly cooled, the mixing process begins. We first combine the cooled, nutty butter with the 1 cup of packed light brown sugar and 1/2 cup of granulated sugar. Whisk vigorously until the mixture is smooth and glossy.
Next, incorporate two large room temperature eggs, one at a time, followed by 2 teaspoons of pure vanilla extract. In a separate bowl, quickly whisk together the measured flour, 1 teaspoon of baking soda, and 1 teaspoon of fine sea salt before gently introducing this dry blend to the wet ingredients.
Baking Secrets for Even Spread and Maximum Rise
The mixing phase demands attention to detail to ensure we maintain the delicate air pockets created early on while incorporating flavour boosting elements.
Creaming the Fats and Sugars: Getting That Initial Lift
While traditional recipes often call for creaming softened butter and sugar, our browned butter method bypasses this initial aeration step by relying on the vigorous whisking of the slightly cooled brown butter and sugars.
This action helps emulsify the fat and sugar, setting up the structure that allows the baking soda to create a necessary initial lift when heated.
Folding in the Mix-Ins Without Overworking the Dough
Once the flour is just incorporated meaning no dry streaks remain it’s time for the chocolate. Use a rubber spatula to gently fold in your 1 1/2 cups of chocolate chunks and chips.
Overmixing dough after the flour is added develops gluten, leading directly to tough, flavourless cookies recipe results. We want tender tenderness, so stop mixing the moment the chocolate is evenly distributed.
The Crucial Chill Time: Patience Yields Better Cookies
This is arguably the most important non-baking step. Cover the finished dough tightly and refrigerate it for a minimum of three hours, but optimally for a full 24 hours.
This resting period allows the flour to fully hydrate and the complex flavors developed by the browned butter to meld and deepen. On top of that,, chilled dough spreads significantly less during baking, resulting in those thick, beautiful cookies you crave.
This step is key if you plan to make Frozen Cookies for later baking.
Oven Placement and Timing for That Ideal Edge
Preheat your oven to 375° F ( 190° C). Scoop your dough balls onto lined sheets, ensuring ample space (at least two inches) between them for spreading. Bake for 10 to 13 minutes.
Watch closely: the edges should look gloriously golden and set, but the centres must appear slightly puffy and perhaps even a touch underdone. They will continue to cook on the hot baking sheet after removal.
Troubleshooting and Elevating Your Next Batch
Even experts occasionally face rogue batches. Understanding why a cookie behaved a certain way allows you to tailor the next batch perfectly to your oven and taste preferences.
Fixing Flat Cookies: Common Pitfalls Explained
Flat cookies usually stem from two errors: insufficient chilling time or dough that was too warm when it entered the oven. If you find them spreading too much, your immediate solution for the next batch is a longer chill (aim for 36 hours) or adding just a tablespoon or two more of flour to the dough.
Another quick fix for an already scooped, flat looking ball is to press the edges up slightly with your fingers before baking to encourage loft.
Sweet Variations: Introducing New Flavor Dimensions
This sturdy base recipe opens the door to endless creativity. For the ultimate experience, try sprinkling the tops of the dough balls with flaky sea salt just before baking this enhances the caramel notes from the browned butter beautifully.
You could also swap out the vanilla for almond extract, or incorporate finely chopped toasted pecans for added crunch alongside the chocolate.
Storing Your Treasures for Ongoing Enjoyment
The greatest challenge with exceptional cookies recipe batches is ensuring they maintain their just baked texture over several days.
Optimal Air-Tight Storage for Maximum Freshness
Once fully cooled on the wire rack, transfer your cookies to an airtight container. Storing them at room temperature is perfectly fine for up to five days. If you want to keep them soft and chewy for longer, place a small piece of white bread (or a half slice of apple) inside the container with the cookies; the moisture from the bread will migrate to the cookies, keeping them soft, especially helpful if you’ve made a large batch of Frozen Cookies that you are thawing out gradually.
Serving Suggestions That Complement These Cookies
These rich, chewy treats require accompaniments that can stand up to their flavour profile. A tall, ice-cold glass of whole milk remains the timeless partner. For a more grown-up approach, the deep notes of the browned butter pair exceptionally well with a strong, malty brew like English Breakfast tea or even a dark roast coffee.
Enjoy every bite you’ve earned this moment of baked perfection!

Recipe FAQs
My chocolate chip cookies always spread out flat like a pancake! What gives?
Ah, the dreaded 'cookie puddle'! This usually happens for two main reasons: your butter might have been too warm, or you skipped the chilling time. Make sure your browned butter is only lukewarm before mixing, and definitely chill the dough for at least 3 hours; this solidifies the fats, ensuring your cookies hold their shape beautifully while baking.
Why do I have to brown the butter for these Cookies, and is it really worth the effort?
Browned butter, or beurre noisette, adds a seriously complex, nutty, toffee like depth that you just can't get from soft butter it's our secret weapon for making them taste like they came from a fancy bakery.
While it adds a few minutes of active cooking time, the flavour payoff is absolutely worth the extra fuss; it elevates them from standard biscuits to something truly special.
How long should I bake these cookies for to get that perfect chewy centre?
The trick to chewiness is slightly underbaking! Aim for 10 to 13 minutes at 375°F (190°C). You want the edges to look golden brown and set, but the very centre should still appear slightly pale and puffy.
They will continue to cook and firm up on the hot baking sheet after you pull them out, guaranteeing that glorious, soft middle.
Can I freeze the cookie dough, and if so, what’s the best way to bake them from frozen?
Absolutely, freezing the dough balls is a brilliant trick for having fresh cookies on hand whenever the craving strikes! Simply roll the dough into balls, place them on a parchment lined tray, and freeze until solid. Once frozen, transfer them to a freezer bag.
When baking, just add an extra 2 4 minutes to the baking time; don't bother thawing them first, or you risk spreading.
My cookies are always too cakey or dry. Did I mess up the flour measurement?
That's a common culprit! If you scoop flour directly out of the bag with your measuring cup, you're packing it in, which adds far too much. For light, chewy Cookies, always use the 'spoon and level' method: gently spoon the flour into your measuring cup and level off the excess with a straight edge.
Overmixing the dough after adding flour is another factor, so stop mixing as soon as the streaks disappear!
Chewy Chocolate Chip Cookies

Ingredients:
Instructions:
Nutrition Facts:
| Calories | 187 kcal |
|---|---|
| Protein | 2.6 g |
| Fat | 8.0 g |
| Carbs | 17.0 g |
| Fiber | 0.5 g |
| Sodium | 3765 mg |
