Cream Wafer Cookie Sandwiches: Our Classic Recipe for Afternoon Tea

- Classic Vanilla Cream Wafer Sandwich Cookies: The Ultimate Tea-Time Treat
- The Timeless Elegance of Classic Vanilla Cream Wafer Sandwiches
- Mastering the Delicate Structure: Why These Cream Wafers Snap and Melt
- Essential Ingredients for Crisp Wafers and Luscious Filling
- The Art of Assembly: How to Make Perfect Cream Wafer Cookie Sandwiches
- Troubleshooting Your Bake: Expert Tips for Wafer Success
- Maintaining Freshness: Storage and Prep Ahead Strategies
- Elevating Your Tea Spread: Presentation and Pairing Ideas
- Recipe FAQs
- 📝 Recipe Card
Classic Vanilla Cream Wafer Sandwich Cookies: The Ultimate Tea-Time Treat
The Timeless Elegance of Classic Vanilla Cream Wafer Sandwiches
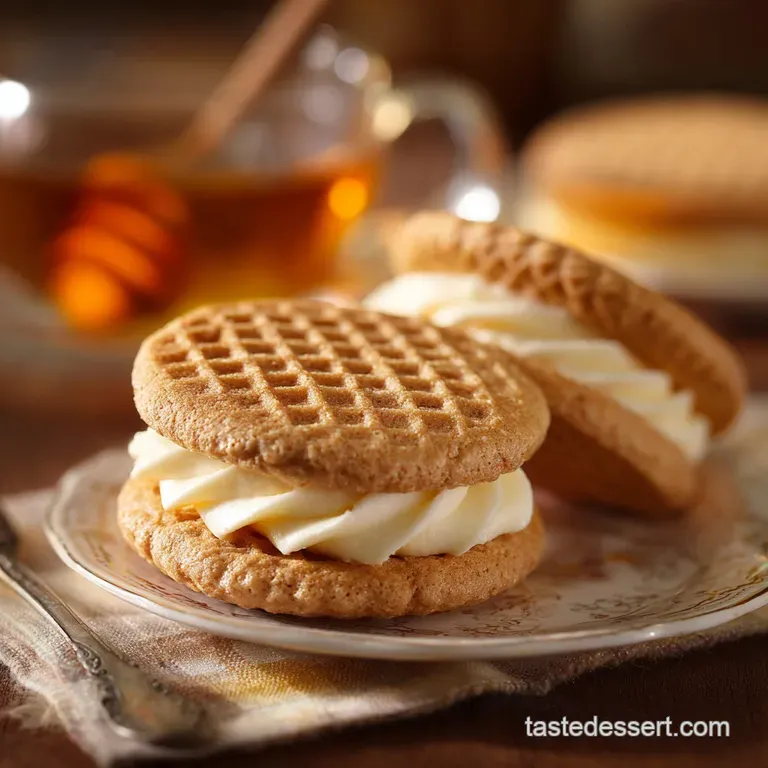
Hear that crisp, satisfying snap ? That’s the sound of a perfectly baked wafer, the foundation for these classic Cream Wafer Cookie Sandwiches. These delicate biscuits are an absolute masterclass in refined sweetness, offering a buttery crunch that immediately dissolves into a rich, cloud like vanilla cream filling.
The texture contrast is genuinely addictive, taking you right back to your grandmother’s parlor.
I know they look like something only a professional bakery can achieve, but honestly, this recipe is a lifesaver for elegant entertaining. The ingredients are ridiculously basic, making them incredibly cheap to scale up for a crowd.
Plus, they look so beautifully sophisticated on a plate, immediately elevating any gathering without requiring complicated frosting techniques or tricky components.
We’re going deep into the secrets today how to roll the dough paper thin, how to ensure the wafers bake flat and stay crisp, and the crucial technique for a perfectly stable, piped filling. Forget those dry, crumbly store-bought versions forever.
Let’s crack on and make a batch of truly exceptional Wafer Sandwich Cookies .
Mastering the Delicate Structure: Why These Cream Wafers Snap and Melt
The genius of this recipe is the incredible contrast we create between the two parts. We’re essentially making a very high fat, low-moisture shortbread cookie, designed specifically to be rolled aggressively thin. This deliberate structure means the wafer is designed to shatter when bitten, not crumble or bend.
The Joy of a Proper Afternoon Tea Biscuit
These are, without a doubt, the definition of an elegant biscuit, demanding to be served with a crisp linen napkin. They’re light enough not to weigh you down, yet rich enough to feel like a proper indulgence. If you’re hosting, they offer a perfect, petite sweetness alongside heartier options.
A Quick History of European Wafer Cookies
Wafer cookies have been around for centuries, tracing their roots back to medieval times when they were pressed thin using specialized irons. While our modern ovens make the job much easier, the core goal remains pure and simple: showcasing the incredible flavor of good butter and vanilla.
It’s a testament to how perfection lies in quality and simplicity.
Defining the Perfect Crisp-to-Cream Ratio
The ratio is honestly everything here; you must respect the balance. You want a wafer that is shatteringly crisp, contrasted by a buttercream filling that is undeniably smooth and substantial enough to provide structural integrity.
Because the wafers are so thin, you taste the filling and the pure butter immediately, without fighting through a thick cookie base.
The Role of Resting Dough for Ultimate Flakiness
Do not skip the chill time I mean it! That hour is mandatory, non-negotiable, end of discussion. Cold dough rolls evenly, resists shrinking in the oven, and results in a flaky, non-tough cookie. It stabilizes the butter, which is the absolute secret to that delicate, almost crumbly snap.
Achieving the Ultra Thin Wafer Texture
We are aiming for ultra thin, almost like heavy construction paper, around 1/8 inch (3mm). Use spacers on your rolling pin if you have them, because consistency in thickness is crucial for the perfect bake. If they are too thick, they won't snap; they’ll just chew sadly.
Stabilizing the Cloud Like Vanilla Cream Filling
We need a stable, light cream that holds its shape under pressure, not something runny that oozes out the sides. Whipping the butter long enough is crucial to incorporating enough air and making it truly fluffy.
My secret tip is using clear vanilla extract: it keeps the filling bright white, offering a stunning color contrast that looks very professional.
Essential Ingredients for Crisp Wafers and Luscious Filling
| Ingredient Need | Our Choice | Viable Substitution |
|---|---|---|
| Butter (Dough) | Unsalted, Softened | high-quality baking shortening or plant based baking block |
| Powdered Sugar | Sifted Icing Sugar | You must use powdered sugar here; granulated ruins the texture |
| All-Purpose Flour | Sifted | Cake flour (reduce amount by 2 Tbsp per cup for maximum tenderness) |
| Egg Yolk | Large Yolk | 1 Tbsp of milk or cream (will lose slight tenderness) |
| Cream (Filling) | Heavy Cream or Milk | Evaporated milk or unsweetened non-dairy creamer |
Selecting high-quality European Butter for the Dough
Since butter is 90% of the flavor profile, use the good stuff. Higher fat European style butter will give you a richer depth and a noticeably better texture in the final Buttery Wafer Cookie Recipe .
I learned this the hard way when I cheaped out once; the difference was instantly noticeable in the way the dough handled.
Ingredient Deep Dive: Which Flour Guarantees the Crispness?
We use all-purpose flour, but always sift it! If you want an even more delicate crumb, you can absolutely substitute with cake flour. Cake flour has a lower protein content, which limits gluten development, resulting in a wafer that is even more tender and quick to dissolve on the tongue.
Vanilla Bean Paste vs. Extract: Maximizing Filling Flavor
I love vanilla bean paste for the filling because those beautiful black specks scream quality and homemade goodness. However, if you are going for that classic, bright white look (like those Old Fashioned Wafer Cookies you remember), use clear vanilla extract instead.
The flavor is slightly milder, but the visual effect is worth it.
Strategic Substitutions for Dietary Needs
For a dairy-free filling, ensure you use a baking block substitute for the butter that’s high fat. For the milk in the filling, any rich non-dairy creamer works brilliantly. Just remember that the texture relies heavily on the fat content, so skip the watery skim milk options!
The Art of Assembly: How to Make Perfect Cream Wafer Cookie Sandwiches
Phase 1: Preparing and Chilling the Wafer Dough
- Cream Until Pale: Beat the softened butter until smooth, then gradually add the sifted powdered sugar and salt, creaming thoroughly. You must whip this mixture for a solid 3– 4 minutes until it becomes almost white and very fluffy.
- Add Wet Ingredients: Beat in the egg yolk and vanilla extract until fully incorporated. Scrape down the bowl religiously.
- Combine Dry Ingredients: Add the sifted flour on the lowest speed. Stop mixing the second the flour streak disappears. Mixing too much is the fastest route to tough wafers.
- Shape and Chill: Divide the dough in half, flatten each into a disc, wrap tightly, and chill for a minimum of 60 minutes.
Phase 2: Rolling Dough to Paper Thin Perfection
- Roll Between Parchment: Remove one disc. Place it between two sheets of parchment paper and roll to a uniform thickness of 1/8 inch (3 mm). This method eliminates the need for extra flour, keeping the dough pure.
- Cut and Transfer: Use your small, sharp cookie cutter to punch out shapes. If the wafers feel too soft to handle, slide the entire rolled sheet (still on the parchment) into the freezer for 5 minutes to firm them up before transferring.
- Prick the Wafers: Use a fork or toothpick to gently prick the surface of each wafer 3 4 times. This venting prevents steam from puffing them up, guaranteeing a flat, crisp bake.
Phase 3: Baking and Cooling the Crisp Wafer Shells
- Bake: Bake the wafers at 350°F (175°C) for 10– 12 minutes. They should be very pale, just slightly golden around the edges.
- Cool Quickly: Immediately transfer the baked wafers to a wire rack. This rapid cooling is vital to ensure they reach maximum crispness. Leaving them on the hot pan will continue the cooking process and potentially make them tough.
Phase 4: Constructing the Sandwiches with Piped Cream
- Whip the Filling: Beat the softened butter until creamy, then slowly add the sifted powdered sugar, alternating with the heavy cream/milk and vanilla. Whip on medium high for 3– 5 minutes until the buttercream is noticeably light and fluffy, holding stiff peaks.
- Match and Fill: Match wafers of similar size for assembly. Transfer the buttercream to a piping bag fitted with a star or round tip.
- Assemble: Pipe a generous dollop or swirl of cream onto the flat side of one wafer, then gently press the second wafer on top. The cream should reach the edges but not squish out uncontrollably.
- Set: Let the finished sandwiches rest at room temperature for 15 minutes before stacking or serving; this allows the filling to fully set.
Chef’s Note: Want to ensure a truly elegant finish? After assembly, lightly run an offset spatula around the edges to scrape off any excess cream that might have squeezed out. This makes the finished Cream Wafer Cookies look immaculate.
Troubleshooting Your Bake: Expert Tips for Wafer Success
Preventing Wafer Cracking During Rolling
Wafers crack usually because the dough is either too cold or you’re trying to roll too much at once. If your dough is cracking around the edges as you roll, let it sit out for 5 minutes to slightly warm up.
Alternatively, use the two-parchment method: the parchment paper helps distribute the pressure more evenly, making the dough less likely to rip.
Why Your Cream Filling Might Be Too Runny (And How to Fix It)
A runny filling is a temperature issue, almost always. Either your butter was too warm when you started, or you added too much liquid. If it’s too loose, simply add another 1/4 cup of sifted powdered sugar and whip for another two minutes.
If that doesn't work, chill the entire bowl in the fridge for 15 minutes, then re-whip it.
The Critical Importance of Uniform Thickness
I know I’ve said it, but I’ll say it again: uniform thickness is king. If one wafer is 1/8 inch and the next is 1/4 inch, the thinner one will burn before the thicker one is cooked through. This leads to sad, chewy batches.
Seriously, invest in a rolling pin with thickness guides if you plan on making these [Tea Party Cookies] regularly!
Cutting Edges: Achieving Professional, Neat Sandwiches
Using a very small cutter (1.5 to 2 inches) creates the perfect bite size for these delicate treats. For a truly professional look, once they’re baked and cooled, you can use a fine microplane or rasp to lightly smooth any jagged or uneven edges before you fill them.
It cleans up the perimeter beautifully.
Maintaining Freshness: Storage and Prep Ahead Strategies
Avoiding Soggy Wafers: Airtight Storage Secrets
Unfilled wafers are your best friends for prep ahead! Once completely cooled, store the crisp, individual wafers in an airtight container at cool room temperature for up to 5 days. The cream filling should be stored separately in the fridge for up to 4 days.
Assemble them only a few hours before serving to maintain the maximum crunch.
Can You Freeze Assembled Cream Wafer Sandwiches?
Technically, yes, you can freeze assembled Cream Wafer Cookie Sandwiches , but the texture will suffer slightly. The wafer will absorb some moisture from the cream as it thaws, leading to a slight loss of crispness.
If you must freeze them, place them in a single layer in an airtight container for up to 1 month. Thaw them overnight in the fridge and serve immediately don't try to reheat them! They are a frozen dessert at that point.
Elevating Your Tea Spread: Presentation and Pairing Ideas
These classic wafer sandwiches are sophisticated enough to be the star, but they pair wonderfully with other simple, creamy desserts. I often serve them alongside something slightly more complex, like a slice of my make-ahead Thanksgiving Desserts: Creamy Speculoos Pumpkin Cheesecake .
The rich spice of the cheesecake is a great foil for the delicate vanilla wafer.
For the ultimate classic presentation, try these easy twists:
- Pistachio Crush: Finely crush pistachios and gently roll the edges of the assembled sandwiches in the nuts for a pop of color and flavor.
- Simple Dust: Use a fine mesh sieve to dust the finished sandwiches with a light layer of powdered sugar just before serving.
Serve these with a clean, strong cup of hot Earl Grey or a light, chilled glass of Moscato d’Asti. They are the perfect little bite of classic elegance. Enjoy!

Recipe FAQs
Why didn't my cream wafers turn out crisp and delicate?
This is usually due to thickness or insufficient baking time. Ensure you roll the dough incredibly thin almost transparent and bake until the edges are a deep golden brown, not just pale. Humidity can also soften them quickly, so cooling them completely on a wire rack before assembly is essential.
Can I make the wafer cookies and filling vegan?
Yes, you can substitute the dairy butter with a high-quality, firm vegan butter stick in both the wafer dough and the filling. For the buttercream, ensure you are using a plant based shortening or a firm butter replacement for the best structural texture.
Note that the resulting wafer texture might be slightly less rich than the traditional version.
My vanilla buttercream filling is grainy. How do I fix that?
Graininess indicates that the powdered sugar has not fully dissolved into the butter and liquid ingredients. To correct this, place the filling mixture over a gentle bain marie (or microwave 5 seconds at a time) and whip vigorously until the heat helps the sugar melt completely.
Be very careful not to fully melt the butter, only soften it slightly.
How should I store the finished Cream Wafer Cookie Sandwiches?
Store the assembled sandwiches in an airtight container at a cool room temperature for up to 5 days, or they can be refrigerated for up to 10 days. If refrigerated, allow them to come to room temperature for about 15 minutes before serving; this ensures the filling reaches its proper cloud like consistency.
Do I need to chill the wafer cookie dough before rolling?
Absolutely; chilling is mandatory for these very thin wafers. The dough must be chilled for at least two hours, or until quite firm, to allow the butter to solidify and prevent excessive spreading in the oven. If the dough warms up and becomes sticky while rolling, place it back in the fridge for 10 minutes.
Can I use different flavour variations for the filling?
The neutral wafer base pairs beautifully with many flavours; try substituting the vanilla extract with peppermint, almond, or lemon zest and juice. For a richer filling, consider incorporating a teaspoon of instant espresso powder or switching the vanilla for high-quality cocoa powder to achieve a classic chocolate cream.
Can I freeze the assembled cream wafer cookies?
It is not recommended to freeze the assembled cookies, as the high moisture content of the filling can quickly compromise the desired crispness of the thin wafer upon thawing. Instead, you can freeze the unbaked dough wrapped tightly for up to three months, or freeze the finished wafer halves and assemble them freshly when needed.
Classic Cream Wafer Cookie Sandwiches

Ingredients:
Instructions:
Nutrition Facts:
| Calories | 91 kcal |
|---|---|
| Protein | 1.0 g |
| Fat | 7.0 g |
| Carbs | 8.0 g |
