The Chefs Classic Pumpkin Pie: Dangerously Creamy and Deeply Spiced
- Moving Beyond Basic Pies: The Quest for the Perfect Slice
- Essential Components: The Pantry Checklist for Superior Flavor
- Constructing the Foundation: Mastering the All and Butter Crust
- The Bake and Cool Down: Ensuring a Crack and Free Pumpkin Pie Center
- Troubleshooting Common Baking Errors: Expert Solutions
- Elevation Techniques: Taking Your Dessert to the Next Level
- Recipe FAQs
- 📝 Recipe Card
Moving Beyond Basic Pies: The Quest for the Perfect Slice
Let’s be honest. We’ve all been there. You spend hours making a beautiful pie, only for the filling to be just a little bit too... bland, or worse, the crust turns into a damp sponge beneath the gorgeous American Pumpkin Pie Filling. It’s soul and crushing.
But listen up, because after years of testing (and a few disasters, trust me), I finally cracked the code to what I sincerely believe is the best Homemade Pumpkin Pie you will ever put in your mouth.
This isn't just about mixing ingredients; it’s about balancing texture, hitting maximum spice depth, and ensuring that foundational crust is rock solid. We are chasing pie perfection here.
Eliminating the Soggy Bottom: Our Crust Philosophy
The soggy bottom is the villain of every holiday dessert table. It absolutely ruins the experience. My philosophy is simple: we’re using an all and butter crust, and we are not messing around with the blind and baking step. You need to treat the butter like it’s a temperamental celebrity.
It must stay cold, cold, cold.
A common mistake is thinking you can rush the chilling time. Nope. That chilling period is non and negotiable. It allows the butter to reset and the gluten to relax. If you skip it, the crust shrinks up the sides of the dish like a frightened turtle.
The key to a truly flaky, sturdy base is the full blind bake until the dough is dry, not just set. It’s brilliant.
Why Dark Rum is the Secret Weapon in This Pumpkin Pie
This is my favourite trick in the whole recipe. You might look at the ingredients and think, "Rum? Is she trying to get me tipsy?" No, friend, I promise! We’re only adding one teaspoon, but it does phenomenal work.
Alcohol acts as a flavour carrier. Dark rum, or even a good bourbon, has those beautiful, deep molasses and caramel notes. When it hits the custard, the alcohol evaporates instantly in the heat, leaving behind this incredible complexity. It doesn't taste boozy at all.
Instead, it just makes all the other spices the cinnamon, the ginger, the clove sing louder and deeper. It cuts through the sweetness and richness of the heavy cream beautifully. Trust me on this one; you’ll never make a pumpkin pie without it again.
Essential Components: The Pantry Checklist for Superior Flavor
We are aiming for complex flavour here, not just 'sweet orange mush.' Every single ingredient in this pumpkin pie recipe is chosen because it enhances the others. If you rush through the shopping list, you’re compromising the final result.
Choosing Your Pumpkin Purée: Canned vs. Fresh Squash Dynamics
Look, let’s be real. Unless you have hours to roast, peel, drain, and process your own pumpkin, canned pumpkin purée is absolutely the way to go for this particular Homemade Pumpkin Pie. It’s consistent, perfectly smooth, and its moisture content is reliably low, which prevents a watery filling.
CRUCIAL WARNING: Make absolutely sure the can says "100% Pure Pumpkin" or "Pumpkin Purée." Do not accidentally grab "Pumpkin Pie Filling." That stuff is already spiced and sugared, and it will throw off all our careful flavour balancing. Check the label twice, seriously.
If you must use fresh squash (go for something dense like Butternut or Hokkaido, not carving pumpkin), you have to drain the living daylights out of it. Press it through cheesecloth until you think you’ve pressed too much. Then press it again.
The Ultimate Spiced Blend: Crafting Our Signature Flavor Profile
Don't even bother dragging out that dusty jar of pumpkin pie spice you bought three years ago. It’s stale. It’s sad. We are mixing our own signature blend.
We are using slightly more ginger and cinnamon than you might expect, but the real star is freshly grated nutmeg. If you own a whole nutmeg and a microplane, please use them. The flavour difference between fresh and pre and ground nutmeg is enormous, and it really defines the quality of this pumpkin pie filling.
A little touch of clove keeps everything grounded and warm.
Gathering the Hardware: Essential Baking Tools for Success
You don't need a fancy stand mixer for this one; a good whisk is enough. But there are a few non and negotiable pieces of equipment that make the process smoother and guarantee a better result.
- Deep and Dish Pie Plate: Use a 9 inch ceramic or glass plate. Metal conducts heat too fast and can sometimes over and brown the base. Ceramic heats slowly and evenly.
- Pie Weights: Please don’t try to blind and bake without them. Dried beans, rice, or actual ceramic weights anything heavy will work. They stop the crust from bubbling up and sinking back down the sides during baking.
- Pie Shield: This is crucial. It's a small ring of foil or silicone that protects the crimped edges of your crust. The edges are thin and will burn to a crisp while the filling bakes unless you shield them. You can easily make one from aluminum foil.
Constructing the Foundation: Mastering the All and Butter Crust
The best flaky crust relies on the relationship between cold fat and minimal handling. When you add the cold, cubed butter to the flour, you only want to process or cut it in until you have pieces ranging from sand to small peas.
Those pea and sized chunks are what release steam in the oven, creating those beautiful, flaky layers.
When adding the ice water (and yes, it must be ice water), pour in a tablespoon at a time. The dough should just barely come together. If you mix it until it looks smooth and uniform, you’ve developed the gluten too much, and the resulting crust will be tough, not flaky. Stop when it's shaggy.
Trust your gut (and your fridge).
Related Recipes Worth Trying
- Apple Pie: The Classic Recipe for a Flaky Crust (No Soggy Bottom!) — Master the perfect Apple Pie with our expert guide to an all-butter flaky crust and a deeply spiced, non-runny filling. This Homemade Apple Pie is the Best...
- Apple Pie: Classic Double Crust Recipe for the Flakiest Bake — This Apple Pie recipe guarantees a perfect, non-soggy, flaky double crust and rich filling. Master this Classic Apple Pie with our expert temperature...
- Apple Pie Recipe: Best Homemade Flaky Crust (Butter Shortening) — This truly great Apple Pie recipe guarantees a sublimely flaky, buttery crust and an intensely spiced filling. Master the technique for the Best Homemade...
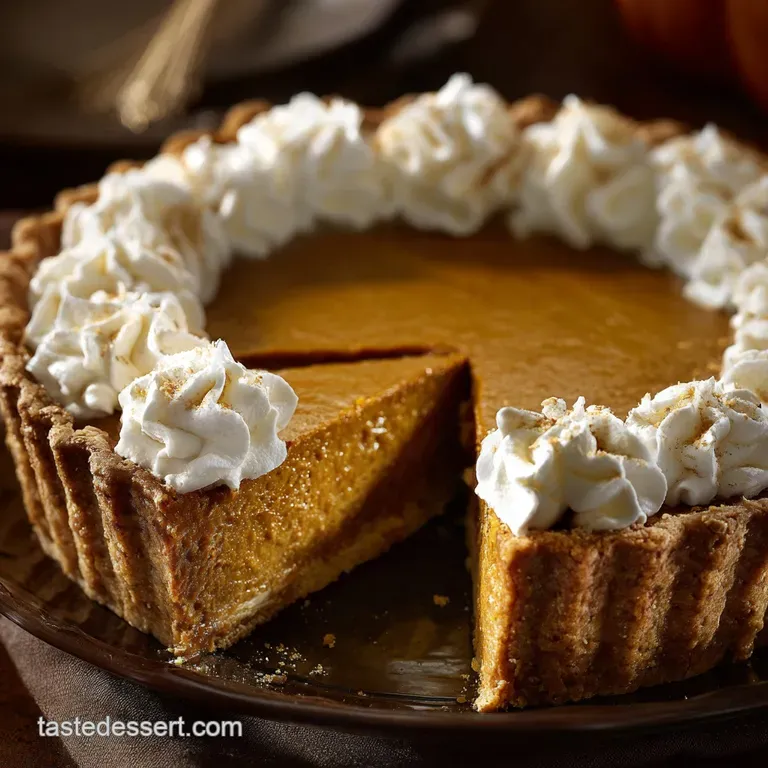
The Bake and Cool Down: Ensuring a Crack and Free Pumpkin Pie Center
Okay, this is where we prevent the dreaded surface crack. A pie cracks because the outer edges cook and set much faster than the centre, and as the rest of the custard finally sets, it pulls apart the cooked surface. The solution is simple: bake low and slow, and never overbake.
Blind Baking Technique: Achieving a Crisp, Unyielding Base
Remember how we said the crust needs to be dry? Here’s the trickiest part of the entire process, but it’s worth the effort.
- After you’ve rolled the dough and placed it in the pie dish, freeze the whole thing for 15 minutes. This locks the butter structure in place.
- Bake with the weights in a hot oven (400°F/200°C) for the first 15 minutes. This sets the structure quickly.
- Remove the weights, poke the base a few times with a fork (venting is essential!), and bake naked for another 5 to 8 minutes until it looks matte and dry.
Once that crust is dry, drop the oven temperature immediately to 350°F (175°C) before you even think about pouring in the filling.
Preparing the Filling: Achieving Maximum Smoothness
Our goal here is zero lumps and zero bubbles. Whisk together the pumpkin purée, sugars, salt, and spices first. Make sure the brown sugar dissolves completely. Once that mixture is smooth, add the eggs, cream, molasses, and that splash of dark rum.
Whisk gently, using deliberate movements that incorporate the ingredients without dragging a bunch of air into the mix. Tiny air bubbles create a foamy texture at the top, which can sometimes lead to cracking or a less creamy mouthfeel. Keep it smooth.
Monitoring the Internal Temperature for Perfect Set
How do you know when your American Pumpkin Pie Filling is perfectly set? The jiggle test is useful, but a thermometer is foolproof.
When you think the pie is nearing the end (around 45– 50 minutes), give it a gentle nudge. The outer two inches should look set and puffed slightly. The very centre (about the size of a large coin) should still wobble like very soft jelly.
That wobble means there’s still moisture in the centre to evaporate and set as it cools.
If you want precision, the internal temperature should hit 175°F (80°C). Pull it out at 175°F. It will finish setting as the residual heat works its magic.
Troubleshooting Common Baking Errors: Expert Solutions
Stuff happens. Here are the issues I hear about most often and how to fix them mid and bake or next time.
- Shrinking Crust: Did you skip the chilling stage? If your dough is shrinking, next time, chill the rolled dough in the pie plate for at least an hour, or even freeze it for 15 minutes just before baking.
- Filling is Bumpy/Grainy: This is usually due to the eggs curdling (overcooked). See the dedicated section below, but essentially, reduce the oven temperature and maybe pull the pie out a little earlier next time.
- The Crust Edges are Burning: Get that foil shield on immediately! If you catch it happening, grab some strips of aluminum foil and carefully wrap the edges mid and bake.
Elevation Techniques: Taking Your Dessert to the Next Level
We’ve nailed the basics. Now let’s add some flair. This section is about making your pie look and taste like it came from a fancy bakery.
Preventing Graininess: The Custard's Critical Mixing Stage
Graininess happens when the egg proteins in your filling cook too quickly and clump up. This is a temperature problem, not a mixing problem.
The key solution is managing the oven heat, which we already covered (350°F is your friend). But you also need to ensure the eggs are fully integrated and that the filling hasn't sat too long before baking.
If you mix the filling and let it sit for half an hour, the acid in the pumpkin starts to interact with the cream and eggs. Mix, pour, and bake. Do it quickly.
Safe Storage and Reheating Guidelines
Because this pumpkin pie recipe includes a custard filling (eggs and dairy), it is definitely not safe to leave out on the counter overnight. It must be refrigerated once completely cool.
- To Store: Once fully cooled, wrap the pie loosely in plastic wrap or foil. It keeps well in the fridge for 3 4 days.
- Reheating: Pumpkin pie is best served chilled or at room temperature. But if you insist on warming it (especially great if you made a brown butter crust!), slice the piece and place it in a moderate oven (300°F/150°C) for about 8– 10 minutes. The whole pie is tricky to reheat without drying out the crust.
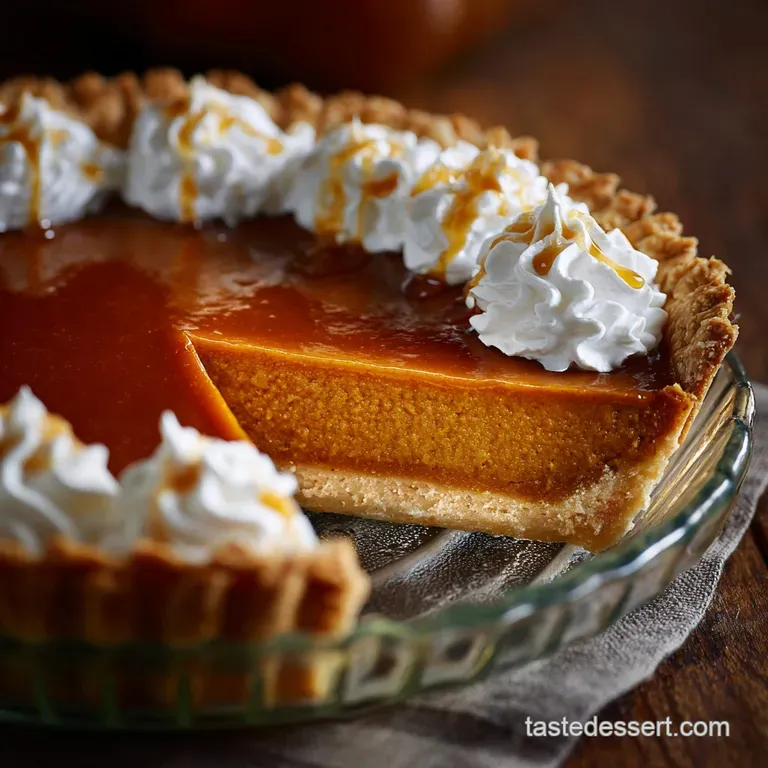
Whipped Cream Variations to Complement This Deeply Spiced Pumpkin Pie
Just plain whipped cream is fine, but we can do better, right? Because this is a deeply spiced pie, the topping needs to cut through the richness and warm spices.
| Variation | Key Ingredients | Flavour Profile |
|---|---|---|
| Bourbon Maple Cream | Heavy cream, pure maple syrup, splash of bourbon | Smoky, sweet, rich |
| Ginger Mascarpone | Heavy cream, mascarpone cheese, finely grated fresh ginger | Tangy, vibrant, light |
| Cinnamon and Brown Sugar | Heavy cream, vanilla, dark brown sugar (instead of white sugar) | Deep, caramelised, classic |
Scaling the Recipe: Adjusting for Large Gatherings
If you need two pies for a major event (like Thanksgiving, naturally), simply double all the ingredients. However, you need to be very mindful of oven space and temperature stability. Never put two large pies side and by-side in one oven.
If you can’t bake them on separate racks, one will block the heat from the other, leading to uneven cooking. Bake them one at a time, or use two smaller, shallow pies instead of two deep and dish ones. Timing is everything when cooking for a crowd.

Recipe FAQs
Oh no, my crust edges are burning, but the middle isn't set! What's the trick?
This is a classic dilemma, easily solved by protecting your pastry! Use a purpose made pie shield or fashion a quick ring out of aluminium foil to cover the edges about halfway through the bake; this allows the dense centre to catch up without scorching the crust.
Help! I’ve got a massive crack across the top of my Pumpkin Pie. What went wrong?
Cracking is usually caused by overbaking, or allowing the pie to cool too rapidly. Ensure you stick strictly to the lower oven temperature (350°F/175°C) and let the pie cool slowly on the counter, away from cold draughts, allowing the filling to contract gradually.
I've heard of the dreaded 'soggy bottom.' How do I make sure my pastry stays crisp?
You defeat the dreaded soggy bottom by thoroughly blind baking the crust until the base is dry and lightly golden before the wet filling goes in. Also, the quick 15-minute freeze step right before baking ensures the butter is rock hard, helping the pastry hold its structure.
How do I know when the filling is perfectly cooked and not going to wobble everywhere?
The pie is done when the edges look completely set and slightly puffed, but the very centre (about 1 2 inches) still has a slight, minor tremble, like soft custard. Remove it immediately, as it will firm up entirely during the necessary 3 4 hours of cooling time.
Can I make this pie ahead of time, and how long does it keep in the fridge?
Absolutely, this dessert is a champion for advance prep! Store cooled leftovers or a pre-made pie tightly covered (to prevent drying out) in the refrigerator for up to 4 days, though for peak crispness, we suggest serving it within 48 hours.
I don't have canned pumpkin. Can I use fresh pumpkin purée instead?
Yes, but you must remove excess moisture first, or the resulting pie will be watery. Simmer your homemade purée until it thickens considerably, or let it drain in a sieve lined with cheesecloth for at least 30 minutes before mixing the filling ingredients.
Classic Spiced Pumpkin Pie Recipe
Ingredients:
Instructions:
Nutrition Facts:
| Calories | 744 kcal |
|---|---|
| Protein | 2.9 g |
| Fat | 40.4 g |
| Carbs | 92.3 g |
