Old Bay Chicken Wings: Crispy Baked Perfection
- Tapping into the Flavor of the Chesapeake: The Ultimate Crispy Old Bay Wings
- The Science of Crisp: Achieving Maximum Crunch Without the Fryer
- Essential Components for Baked Wings Perfection
- Master the Method: Step-by-Step for Crispy Baked Old Bay Wings
- Troubleshooting and Expert Tips for the Crispiest Finish
- Handling Leftovers: Reheating, Storing, and Freezing Wings
- Complementary Pairings: What to Serve Alongside Old Bay Wings
- Recipe FAQs
- 📝 Recipe Card
Tapping into the Flavor of the Chesapeake: The Ultimate Crispy Old Bay Wings
Okay, friend, listen up. When those classic savory, salty aromas hit the air, you know exactly what’s happening: we’re making Old Bay Chicken Wings .
The smell of that coastal seasoning, mingled with melting butter and a hint of lemon, is totally intoxicating, but the real secret to these wings is the crunch factor. This isn't your grandma's soggy, baked then-sauced mess; these wings shatter when you bite into them.
I spent years trying to get that deep fried restaurant crisp without the gallons of oil and the subsequent cleanup nightmare. This method is the ultimate lifesaver for game day, a last minute party, or that emergency Friday night snack attack.
It's fast, incredibly affordable, and uses only one secret ingredient already sitting in your pantry to achieve maximum, non-negotiable crispness.
So, let's skip the deep fryer trauma and dive straight into the simple, repeatable technique that guarantees the absolute best, most flavor packed Crispy Baked Old Bay Chicken Wings you'll ever pull out of your oven.
The Science of Crisp: Achieving Maximum Crunch Without the Fryer
Achieving a truly crispy wing skin in the oven feels like culinary magic, but honestly, it’s just chemistry. You need to understand three things: moisture removal, surface alteration, and temperature control.
This is the foundation for making excellent Roasted Chicken Wings of any flavor, but it’s crucial for that distinctive Old Bay seasoning adherence.
Why Old Bay Seasoning is the Secret to Coastal Flavor
If you've ever had a crab boil or visited the Chesapeake region, you know Old Bay is more than just a spice blend it’s an experience. It brings layers of celery salt, mustard, paprika, and a whisper of fiery heat that hits all the pleasure centers.
We use it twice in this Old Bay Chicken Wings Recipe : first in the dry rub to build depth, and again in the butter toss to deliver that powerful, signature punch. Trust me, the double application makes all the difference.
A Guide to Achieving Restaurant Quality Wings at Home
Most people fail at baked wings because they skip the prep work. The key to that restaurant level crunch lies in ensuring the wing skin is bone dry before it ever sees the oven heat. If you put moist wings in a hot oven, you are steaming them, not roasting them, resulting in that disappointing, rubbery texture.
We address this moisture issue with the "crisping agent" and the crucial chilling time.
The Legacy of the "Governor's Favourite" Wing
I first learned this technique from a retired chef who swore by dry-rubbing wings before a over high heat bake. He called them the "Governor's Favourite" because they were so addictive, you couldn't stop eating them.
The core principle for these fantastic Old Bay Chicken Wings remains the same: treat the skin like bacon, not like stew meat.
The Critical Role of the Secret Skin Drying Process
Here is the one non-negotiable step: mixing aluminum free baking powder with your salt and pepper, then letting the wings chill uncovered in the fridge for at least 45 minutes. The baking powder raises the pH level on the skin's surface, accelerating the browning and drying process.
It’s what gives the skin structure and stability, ensuring maximum crunch when the heat hits.
Layering Flavor: Pre-Bake Seasoning vs. Post Toss Coating
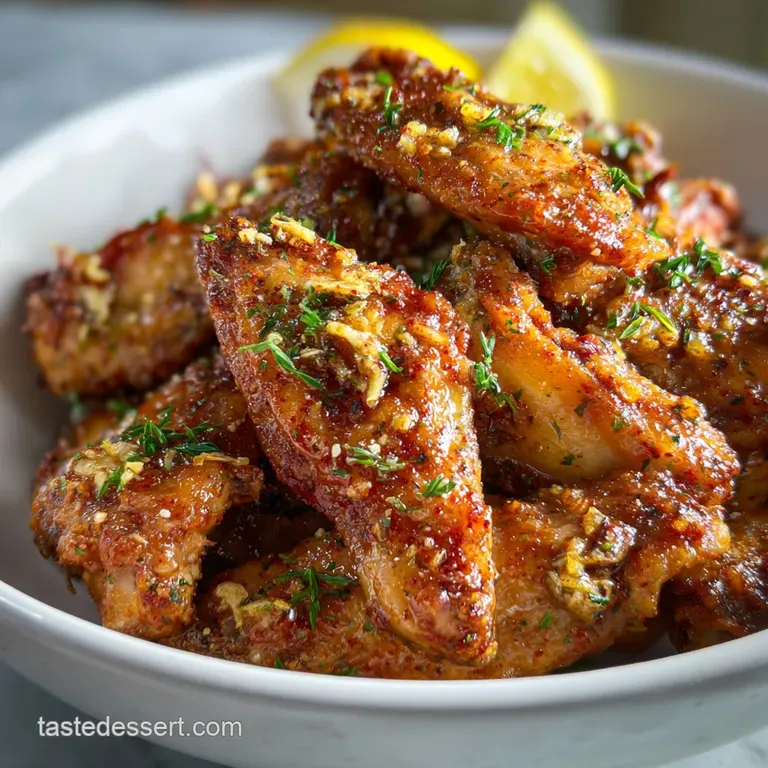
We use a delicate balance here. The first application of Old Bay is mixed directly into the baking powder rub. This seasoning gets baked into the fat, creating an aromatic crust. However, the majority of the Old Bay flavor goes into the melted butter toss at the very end.
That second, generous coating is what makes these taste overwhelmingly and gloriously of the sea and spice. This layering ensures deep flavor penetration without burning the delicate spices during the long roast.
The Perfect Balance of Heat, Salt, and Citrus in the Lemon Garlic Finish
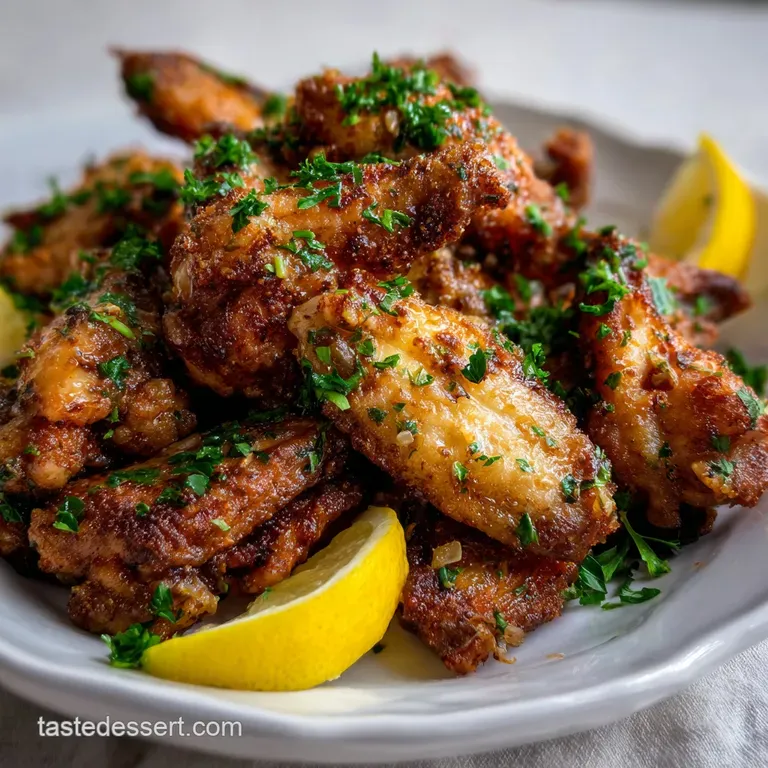
The finishing glaze is the soul of these Bay Chicken Wings . Melting the butter with fresh minced garlic, vibrant lemon zest, and a pinch of cayenne pepper (if you like heat) does three things. One, it adds much needed moisture back into the dried skin.
Two, the acidity of the lemon cuts through the richness of the fat and the intense saltiness of the seasoning. Three, the garlic introduces a pungent, savory base note that is just irresistible.
Essential Components for Baked Wings Perfection
You might think you know wings, but using the right ingredients and prepping them correctly is vital for the best Old Bay Chicken Wings in Oven technique. Don't cheap out on the few ingredients you need, especially the butter and the seasoning blend itself.
Breaking Down the Chicken Wing Sections (Flats vs. Drums)
I always recommend separating the wings into flats (the middle section, also called the wingette) and drumettes. They cook more evenly this way, and honestly, the flats absorb that finishing butter toss better than the drums do.
If you buy whole wings, simply find the joint and cut through the cartilage with a sharp knife. Discard the tiny, pointy wing tips, or save them for making stock!
Beyond the Can: Understanding Quality Old Bay Seasoning
While the classic yellow and blue tin is mandatory for authenticity, recognize that Old Bay is high in sodium. If you are watching your salt intake, look for lower sodium versions or make your own blend using celery salt, paprika, and dried mustard as the base.
But for that classic taste, you must use the original formula; nothing else quite Brings a Flavorful Kick to These Baked Chicken Wings .
Preparing the Bright Lemon Garlic Finishing Butter
This part is simple, but don't rush it. When melting your butter, keep the heat low we aren't browning the butter here. We just want it liquid enough to infuse the minced garlic and lemon zest deeply.
Using fresh lemon zest is key because it contains the oils that provide brightness and aroma, which is much more potent than just using juice alone.
Ingredient Swaps for Dietary Needs (e.g., lower sodium alternatives)
We all have dietary constraints, but that shouldn't stop us from enjoying phenomenal wings! Here are a few essential swaps that still guarantee a great result:
| Original Ingredient | Viable Substitution | Notes |
|---|---|---|
| Unsalted Butter | Ghee or high-quality Vegan Butter | Maintains necessary fat content and richness for the toss. |
| Kosher Salt | Low-Sodium Seasoning Salt or Skip it | The Old Bay is highly salted, so skipping added salt is possible. |
| Aluminum Free Baking Powder | Potato Starch (for texture) | Potato starch helps with crisping, but the baking powder chemical reaction is superior. |
| Cayenne Pepper | Smoked Paprika | Swapping in smoked paprika adds warmth and depth without significant heat. |
Master the Method: step-by-step for Crispy Baked Old Bay Wings
This is where the magic happens. Stick to the timing and the temperatures, and you will be rewarded with a batch of the best Old Bay Chicken Wings ever.
Prep Stage: Ensuring Bone Dry Skin for Optimal Crunch
- Pat them Dry: I mean really dry. Take paper towels and aggressively dry every single wing piece. Any residual moisture will sabotage your efforts. This is the foundation for the whole recipe.
- The Baking Powder Rub: In a large bowl, combine your baking powder, salt, pepper, and the first tablespoon of Old Bay seasoning. Add the dried wings and toss until they look ghostly white and fully coated.
- The Mandatory Chill: Place the coated wings on a wire rack set over a baking sheet. Do not cover them. Pop them in the fridge for 45 to 60 minutes. This chilling time lets the surface dry out completely and allows the baking powder to start working its crisping power.
Chef's Note: I once skipped the chilling step because I was ravenous. Disaster. The wings were chewy and the coating slid off. Never skip the chill.
The Baking Schedule: Temperature Shifts for Internal Doneness and Exterior Crisp
- Preheat High: Crank your oven up to 425°F (220°C). This high heat immediately starts rendering the fat under the skin.
- Initial Blast: Bake the chilled wings for 25 minutes. You should already hear the fat sizzling. This sets the initial, fragile crust.
- Flip and Finish: Using tongs, carefully flip every wing. Lower the heat slightly to 400°F (200°C) and continue baking for another 15 to 20 minutes, or until the wings are deep golden brown. When done, they should register 165°F (74°C) internally. These Roasted Chicken Wings should sound crispy when they rattle against the pan.
The Final Toss: Infusing the Lemon Garlic Finishing Glaze
- Melt the Flavor: While the wings are finishing, melt your butter and stir in the remaining Old Bay seasoning, minced garlic, lemon zest, and cayenne. Keep it warm so it coats the wings easily.
- Immediate Toss: As soon as the wings are out of the oven, slide the piping hot pieces directly into a clean, large mixing bowl. The key here is speed we want them hot for maximum absorption.
- Glaze and Serve: Pour the warm lemon garlic mixture over the hot wings and toss quickly. The seasoning will adhere instantly, creating a glorious, glistening finish. Transfer the finished Old Bay Chicken Wings to a serving platter, garnish with parsley, and serve immediately. This method Brings a Flavorful Kick to These Baked Chicken Wings right at the end.
Troubleshooting and Expert Tips for the Crispiest Finish
Even seasoned cooks hit snags, especially with baked wings. Here are the most common pitfalls and my favorite fixes.
Why Crowding the Baking Sheet is the Enemy of Crispness
This is where most people fail! If your wings are touching, they will release moisture into each other, creating steam. This immediately turns your carefully dried skin into a wet mess. Use two separate baking sheets if necessary!
Proper spacing ensures every single wing is exposed to circulating hot air, making them perfectly crispy all the way around.
Dealing with Soggy Wings (A Common Baking Mistake)
If you pull your wings out and they feel rubbery or wet, it almost certainly means you skipped the pre-bake drying/chilling, or you crowded the pan. The only way to fix slightly soggy wings without adding more flavor is to increase the heat to 450°F (230°C) and bake for 5 7 more minutes, specifically targeting the drying of the skin.
Be watchful so they don’t burn.
Advanced Tip: Achieving a Smoke Free Baking Environment
Because wings render so much fat, you might find your oven gets a bit smoky. To combat this, line your baking sheet (under the wire rack) with aluminum foil to catch the drippings. You can also pour a thin layer of water onto the foil to instantly cool the dripping fat, preventing smoke while the wings cook above.
This will keep your fire alarm quiet while you perfect your Old Bay Chicken Wings Dry Rub .
Handling Leftovers: Reheating, Storing, and Freezing Wings
Leftover wings? What is this mythical concept? Still, if you somehow manage to have some remaining, here’s how to save them without sacrificing that glorious crunch.
Best Way to Store Baked Wings for Maximum Freshness
Store your cooled wings in an airtight container in the refrigerator. They will last safely for 3 to 4 days. When storing, lay a single sheet of paper towel beneath them to absorb any residual moisture that could make them sticky or soggy while they sit.
Reheating Wings to Restore the Crunch (Oven vs. Air Fryer)
Never, ever microwave baked wings. It’s a tragedy. To restore the crispness, you must use dry heat.
- Air Fryer: This is the gold standard. Place wings in a single layer and cook at 350°F (175°C) for 4– 6 minutes. They will sound crunchy again when shaken. If you used the [Old Bay Chicken Wings Air Fryer Recipe] variation initially, this step is even faster.
- Oven: Place wings on a baking sheet (no rack needed this time) and bake at 375°F (190°C) for about 8– 10 minutes. They should be hot all the way through and crispy on the outside.
Can You Freeze Cooked Wings? (Freezing Logistics)
But does it freeze well? You bet. Cooked Bay Chicken Wings freeze surprisingly well. Lay them on a tray and freeze them for an hour (this is called flash freezing), then transfer them to a freezer safe zip-top bag. They will keep for up to 3 months.
When ready to reheat, thaw them overnight in the fridge and then follow the over high heat oven or air fryer instructions above.
Complementary Pairings: What to Serve Alongside Old Bay Wings
These wings are salty, savory, and rich, so you need sides that offer coolness, acidity, or crunch to balance the flavor profile.
For a great counterbalance to the intense seasoning, try a creamy blue cheese dip or a sharp, vinegar based coleslaw. I find that the sharpness of the vinegar and the coolness of the dairy provides the perfect break from the heat and salt. When I’m hosting a huge game day party, I often serve these alongside something completely different, like my Jack and Coke BBQ Pulled Chicken Sliders Recipe to offer guests variety.
If you like to vary the rub itself, remember the principles we used for the initial coating the dry rub is critical. You could even swap the initial Old Bay dry rub for the spices found in my Chicken Marinade: Ultimate Smoked Paprika Honey Recipe for a sweeter twist before finishing with the classic Old Bay butter toss.
Making these Old Bay Chicken Wings at home is seriously such a treat. It Brings a Flavorful Kick to These Baked Chicken Wings every single time, giving you that incredible texture and unforgettable coastal flavor without the deep fried fuss. Enjoy!

Recipe FAQs
Why aren't my wings crispy, even though I baked them at a high temperature?
Crispiness failure is almost always related to surface moisture. Ensure the wings are completely dry (the chilling/drying step is key) before they enter the oven, and avoid overcrowding the baking sheet, which generates steam instead of dry heat.
I don't have Old Bay seasoning. What is the closest substitute?
Old Bay has a distinct flavor profile, but you can approximate it by combining equal parts paprika, celery salt, mustard powder, and black pepper, adding a pinch of cayenne for heat. Alternatively, look for a regional seafood seasoning blend, as these often share similar aromatic qualities.
Can I prepare the wings ahead of time?
You absolutely can, and in fact, it is recommended to maximize the crispiness. After patting them dry, place the raw wings uncovered on a wire rack in the refrigerator for up to 24 hours; this prolonged air-drying process extracts maximum surface moisture.
How do I best store and reheat leftover wings to maintain crunch?
Store cooled leftovers in an airtight container in the refrigerator for up to four days. To reheat, avoid the microwave entirely, and instead place the wings on a wire rack in a 350°F (175°C) oven for 10-15 minutes until heated through.
This dry heat method re-renders any absorbed fat and helps restore the skin's texture.
The recipe calls for a lemon garlic butter toss. Can I skip the lemon?
While optional, the acidity of the lemon zest and juice is crucial for balancing the rich, salty flavors of the Old Bay and butter. If you dislike lemon, substitute the juice with a splash of white wine vinegar or a high-quality distilled hot sauce to provide the necessary cutting contrast.
Does the final butter toss make the wings soggy?
If executed correctly, the final toss should coat the wings lightly without compromising the crunch. Ensure the wings are piping hot when you toss them, and use the smallest amount of melted butter necessary to coat the exterior. Do not let the wings sit in the butter mixture; toss immediately and serve.
Can I use baking powder to help achieve an even crispier skin?
Yes, baking powder is an excellent technique for baked wings as it raises the skin's pH, breaking down proteins and increasing surface area. Before baking, lightly dust the dried wings with 1 teaspoon of aluminum free baking powder mixed with the Old Bay seasoning, ensuring an even, fine coating.
Crispy Baked Old Bay Wings

Ingredients:
Instructions:
Nutrition Facts:
| Calories | 243 kcal |
|---|---|
| Protein | 1.4 g |
| Fat | 23.3 g |
| Carbs | 7.0 g |
