Chicken Parmesan: the Crispy, Classic, Restaurant-Quality Home Recipe
- Achieving Crispy Classic Chicken Parmesan Perfection at Home
- The Science of Crunch: Why This Chicken Parmesan Recipe Delivers
- Essential Components: Sourcing the Best Crust and Topping Ingredients
- Method: From Pounding to Plating — Mastering the Chicken Parmesan Technique
- Troubleshooting Your Parm: Common Errors and Expert Fixes
- Make Ahead and Storage Guide: Keeping Your Leftovers Crispy
- Perfect Pairings: What to Serve Alongside Classic Chicken Parmesan
- Recipe FAQs
- 📝 Recipe Card
Achieving Crispy Classic Chicken Parmesan Perfection at Home
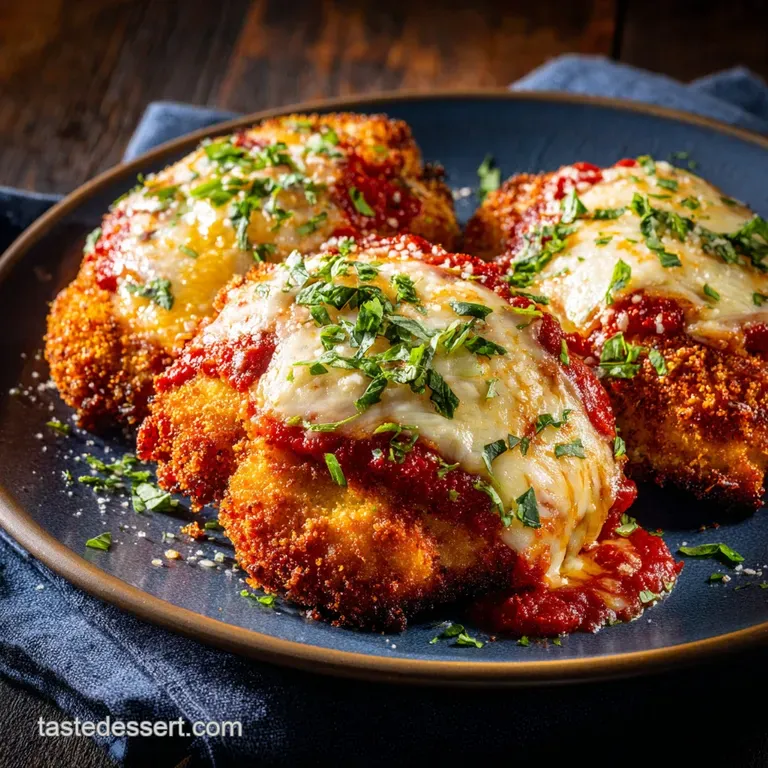
The smell alone is enough to stop you dead in your tracks. We’re talking about that rich tomato aroma mingled with melting, bubbling mozzarella and the nutty scent of toasted breadcrumbs and parmesan.
When you cut into the dish, you need to hear that satisfying crunch before you hit the tender, juicy interior.
Forget those dry, floppy versions you’ve suffered through at mediocre restaurants. This recipe for crispy classic chicken parmesan is a serious game changer, giving you restaurant quality results using simple techniques.
It’s perfect for a weekend dinner, but honestly, because we use thin breaded cutlets , it comes together so fast you could totally nail this on a busy Tuesday night.
I’ve made every mistake in the book (hello, soggy crust!) but I finally cracked the code on retaining maximum crunch while achieving perfect internal moisture. We are ditching the slow bake and embracing a high impact, two-stage cooking process. Trust me on this: this recipe delivers.
The Science of Crunch: Why This Chicken Parmesan Recipe Delivers
Defining the Ultimate Texture: Golden Crust vs. Moist Center
The secret to a great Chicken Parm isn't just the cheese; it's the textural contrast. We want a loud, aggressive crunch on the outside that yields instantly to a moist, perfectly cooked protein core.
The only way to guarantee this is to use thin cutlets , which cook incredibly quickly. Thinness ensures the center is cooked through exactly when the cheese is perfectly melted, preventing the tragic scenario of a finished crust hiding raw meat.
A Note on Difficulty: Setting Expectations for Medium Level Cooking
Look, I’m not going to lie and say this is a dump and go meal like a simple casserole. (If you want easy pasta, you should check out my recipe for Chicken Bacon Ranch Casserole: The Ultimate Creamy Weeknight Pasta Bake sometime!) This dish requires a little bit of focus, specifically during the dredging and frying phases. If you follow the rules about keeping your hands clean and not rushing the chilling step, however, you will achieve perfection easily.
Prep Checklist: Getting Organized for Seamless Cooking
Mise en place is your best friend when making baked chicken parmesan . Before you even get the oil hot, make sure your three dredging stations are lined up and ready to go. I once tried to prep the flour and the eggs while the oil was heating, resulting in burned breading and a small kitchen fire scare.
Don't rush the setup.
Panko Power: Maximizing Adhesion and Surface Area
Standard breadcrumbs absorb moisture and fat too quickly, which is why your cutlets turn soft. Panko breadcrumbs, however, are made from crustless bread and have a much flakier, lighter texture. This structure provides exponentially more surface area for crispness and resists turning soggy when hit with sauce or oil.
We mix Parmigiano Reggiano right into the Panko to give the crust a rich, nutty depth before it even hits the pan. That’s the true secret to a great chicken parm .
The Two-Stage Cooking Process (Pan-Fry then Bake)
This is the non-negotiable technique. You must pan-fry the breaded chicken cutlets first, for only a few minutes per side, just to set the crust and achieve that deep golden colour. The intense, direct heat creates a perfect seal.
We then finish the cooking gently in the oven, allowing the interior to reach temperature without burning the crust or drying out the meat.
The Critical Role of Sauce Temperature
You worked so hard for that golden shell, only to have it melt into a sad, squishy puddle because your sauce was straight out of the fridge. It's a tragedy! Always ensure your marinara is at room temperature or slightly warmed before you use it in the assembly stage.
This prevents a drastic thermal shock which causes rapid steam build-up right under your beautiful, crispy crust.
Essential Components: Sourcing the Best Crust and Topping Ingredients
Choosing the Ideal Italian Cheese Blend
We need high-quality here, especially for the topping. Low-moisture Mozzarella is vital because it melts beautifully without releasing a ton of water, which would inevitably ruin the crispness.
For the hard cheese, you must use real Parmigiano Reggiano or Grana Padano; avoid the powdered stuff in the shaker bottle if you possibly can.
| Ingredient | Why We Use It | Substitution Suggestion |
|---|---|---|
| Panko Breadcrumbs | Maximum crispness, resists sogginess. | gluten-free Panko, if necessary. (Standard breadcrumbs not recommended.) |
| Low-Moisture Mozzarella | Melts without releasing excess water. | Fresh mozzarella, but slice very thinly and pat aggressively dry. |
| Parmigiano Reggiano | Essential salty, nutty flavour in the crust. | Grana Padano, or Pecorino Romano (if you prefer a sharper taste). |
Selecting the Perfect Tomato Marinara Base
I always preach that simple is best when it comes to Italian sauce. Grab a high-quality jarred marinara one that actually tastes like sweet tomatoes and fresh basil or make your own simple sauce. Just make sure it’s not too thin or watery.
If it seems thin, simmer it uncovered for 10 minutes to reduce it slightly before use.
Flour, Egg Wash, and Panko Ratios
The ratio listed in the recipe outline gives you exactly enough for four medium cutlets. Remember the golden rule of dredging: the flour coats the meat (dry layer), the egg acts as the glue (wet layer), and the panko seals the deal (final dry layer). Don’t skip the flour stage, or the egg will slide right off.
Method: From Pounding to Plating Mastering the Chicken Parmesan Technique
Prep: Achieving Uniform Thickness for Even Cooking
Pounding out the cutlets ensures every piece cooks at the exact same rate. If your cutlets are thicker than 1/4 inch, they might take too long to cook, resulting in a burned crust or dried out meat. Use the smooth side of your meat mallet and be gentle; we don't want holes!
The Breading Station Setup: The Dredging Sequence
Set up your dishes: Flour, Egg, Panko. Use one hand (the "dry hand") only for the flour and panko dishes. Use your other hand (the "wet hand") only for dipping in the egg. This technique prevents the dreaded "cement hand" situation where your fingers become encased in thick, gummy breading.
Achieving the Golden Seal: Pan Frying Guidelines
Heat your oil until it shimmers but isn't smoking. If the oil is too cool, the cutlets will soak it up, becoming greasy. If it's too hot, the Panko will burn immediately. Fry until they reach a deep, satisfying golden brown (about 2- 3 minutes per side).
This step is only for colour and crispness; the interior is not yet cooked.
Final Assembly and Oven Baking Times
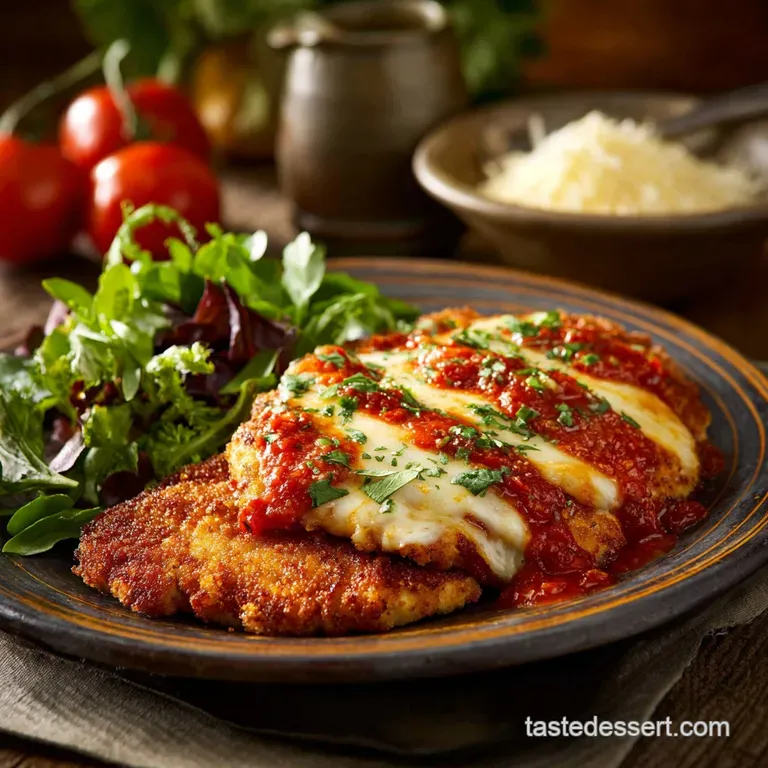
Chef's Note: When spooning the sauce onto the fried cutlets, be surgical. Spoon it gently over the center of the cutlet, leaving a clear, untouched border of golden Panko around the edge. This guarantees a perpetually crunchy perimeter.
Transfer the cutlets to the dish, layer with cheese, and bake. The baking time is short 12 to 15 minutes max just enough time for the Mozzarella to melt into gooey submission and for the internal temperature to hit that safe 165°F (74°C).
Troubleshooting Your Parm: Common Errors and Expert Fixes
Preventing a Soggy Undercrust
Sogginess happens when moisture gets trapped beneath the crust. Solution: Use the pre-chilling step, ensure your oil is hot enough during the initial fry, and spread only a thin layer of sauce on the baking dish floor. Less moisture contact equals more crunch.
Why Your Breading is Falling Off
This is almost always due to rushing or poor technique. Did you forget to dust the cutlet in flour first? Did you skip the crucial 15 minute chill time? The chill allows the egg mixture to solidify slightly, creating a stronger adhesive bond between the protein and the Panko.
Temperature Management for Thorough Cooking
If you’re worried about whether the cutlets are done, invest in a simple instant read thermometer. Aim for 165°F (74°C). Because we started with thin cutlets and a hot pan-fry, this temperature should be reached easily without drying out the meat.
make-ahead and Storage Guide: Keeping Your Leftovers Crispy
Freezing Instructions (Pre-Cooked vs. Uncooked)
You can freeze these cutlets either way, but uncooked is superior if crunch is your priority.
- Uncooked: Prepare and bread the cutlets completely (through Step 4), then flash freeze them on the baking sheet until solid. Transfer to a zip-top freezer bag for up to 2 months. Cook from frozen, adding 5- 7 minutes to the frying time.
- Pre-Cooked: Bake the assembled baked chicken parmesan completely, cool it, and freeze the whole dish. This is much easier for later reheating but the crust will suffer slightly.
The Best Way to Reheat Without Loss of Crunch
Absolutely, positively, do not microwave leftovers. The steam will instantly kill your crispiness. The best way to revive leftover chicken parmesan is to use an air fryer set to 350°F (175°C) for 5- 7 minutes, or place it uncovered in a preheated oven until hot through.
Perfect Pairings: What to Serve Alongside Classic Chicken Parmesan
Complementary Starches and Pasta Options
While the cutlet is the star, you definitely need something to soak up that beautiful marinara. A classic pairing is linguine or spaghetti, tossed simply in a little olive oil and fresh basil, maybe with a spoonful of the extra sauce. If you're going low-carb, this dish is fantastic served over zucchini noodles or beside a delicious side of my Chicken Enchilada Stuffed Zucchini Boats Healthy Low Carb Dinner (if you happen to have extra ground meat lying around).
Salad and Veggies
Because the crispy classic chicken parmesan is so rich, you need a bright, acidic counterpoint. A simple Arugula salad dressed with lemon juice, salt, and good olive oil works miracles. Or, stick with tradition: a Caesar salad is always a guaranteed hit.

Recipe FAQs
Why does the breading get soggy when I add the tomato sauce?
The key to a crispy finish is to apply the sauce judiciously and at the right time. Only place sauce directly over the chicken breast and not underneath the cutlet, leaving the crunchy edges exposed. Ensure the sauce is warm before application, minimizing the time the chicken needs to bake to melt the cheese.
Can I prepare the chicken cutlets ahead of time?
Yes, you can bread the chicken breasts up to 12 hours in advance for maximum efficiency. Store them uncovered on a wire rack in the refrigerator so air can circulate, which prevents the coating from becoming damp or sticky. Do not add the sauce or cheese until you are ready for the final bake.
What is a good substitute if I don't have fresh mozzarella?
Provolone cheese is an excellent alternative, offering a sharper, tangier profile that complements the tomato sauce beautifully and melts very well. If using standard mozzarella, opt for high-quality, low-moisture block mozzarella and shred it yourself, as pre-shredded varieties often contain anti caking agents that hinder proper melting.
How do I prevent the chicken from becoming dry during the baking process?
Ensure the chicken cutlets are pounded to an even 1/2 inch thickness so they cook uniformly and quickly. The goal of the pan-fry step is to cook the chicken most of the way through, allowing for only a brief 10 to 15-minute bake time solely dedicated to melting the cheese.
Can I bake the chicken instead of pan-frying it?
While pan-frying yields the crispiest result, you can bake the breaded cutlets at 400°F (200°C) for about 15 minutes before adding the sauce and cheese. To encourage browning, spray the chicken cutlets liberally with cooking oil or olive oil spray before placing them in the oven.
How do I know when the Chicken Parmesan is fully cooked and safe to eat?
The internal temperature of the thickest part of the chicken must register 165°F (74°C) using an instant read thermometer. Visually, the juices should run clear when pierced, and the crust should be deeply golden brown and firm to the touch.
Can I freeze leftover or unbaked Chicken Parmesan?
Leftovers can be frozen; wrap individual portions tightly in foil, then store them in an airtight container for up to two months. Ideally, freeze the crispy, pan-fried cutlets before they are topped with sauce and cheese, as this prevents the breading from becoming excessively mushy upon reheating.
Crispy Classic Chicken Parmesan Recipe

Ingredients:
Instructions:
Nutrition Facts:
| Calories | 893 kcal |
|---|---|
| Protein | 41.4 g |
| Fat | 50.2 g |
| Carbs | 70.6 g |
