Golden Crunchers Crispy Homemade Mozzarella Cheese Sticks with Zesty Marinara

- Ditching the Freezer Aisle: Why Homemade Cheese Sticks Reign Supreme
- The Anatomy of the Perfect Golden Crunch
- Essential Provisions for Superior Homemade Cheese Sticks
- The Critical Freezing Phase: Preventing the Meltdown Calamity
- Mastering the Battering and Coating
- Achieving Golden-Brown Bliss: Frying Techniques Explained
- Troubleshooting Common Issues with Homemade Cheese Sticks
- Serving Suggestions Beyond Basic Marinara
- Storing Leftover Crispy Creations
- Recipe FAQs
- 📝 Recipe Card
Ditching the Freezer Aisle: Why Homemade Cheese Sticks Reign Supreme
There’s a certain magic that happens when you take humble ingredients and transform them into something utterly spectacular. We’ve all reached for those frozen, pre-packaged cheese sticks on a desperate weeknight, but let’s be honest: they rarely deliver that satisfying, pull apart, molten core we crave.
As an expert in creating culinary hits from scratch, I can assure you that elevating your snack game with Homemade Cheese Sticks is surprisingly simple and rewards you tenfold in flavour and texture.
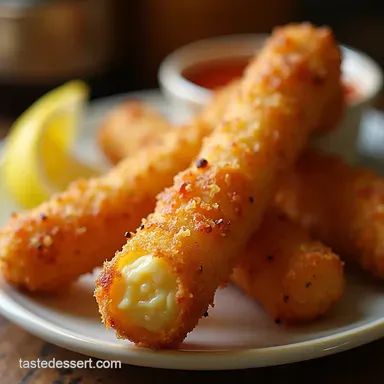
We’re talking about achieving a shatteringly crisp crust that gives way to gloriously gooey mozzarella a true triumph in the world of Hot Appetizers Bites . Forget the pale, limp imitations; today we master the definitive Homemade Cheese Sticks Recipe .
The Anatomy of the Perfect Golden Crunch
Creating the ideal fried mozzarella stick hinges on managing the temperature differential between the exterior coating and the interior cheese. Our goal is to cook the crust quickly and perfectly brown it before the heat has a chance to fully melt the mozzarella and force it out of its casing.
This delicate dance requires precision in preparation, particularly concerning the cheese itself and the protective barrier we build around it.
Our Secret to Non-Leaky, Gloriously Gooey Centers
The key to avoiding the dreaded "cheese blowout" lies in aggressive chilling. We start by cutting our cheese ideally low-moisture mozzarella into uniform sticks, roughly three inches long. Before they even think about touching flour, these beauties must be thoroughly patted dry with paper towels.
Any residual moisture on the surface is an invitation for the breading to slip off once submerged in hot oil. After the initial breading, they go straight back to the freezer. This crucial chilling phase hardens the exterior crust before cooking, providing structural integrity when they hit the heat, ensuring a gloriously gooey center without leakage.
The Ultimate Appetizer for Any Occasion
These sticks aren’t just for movie night, although they certainly excel there. Because this Homemade Cheese Sticks Recipe is so robust, they transition seamlessly from a casual backyard barbecue accompaniment to a sophisticated addition to a game day spread.
When executed correctly, these Cheesy Sticks become the star of any platter, proving that the Best Cheese for Cheese Sticks is the one you treat right during preparation.
Why This Recipe Guarantees a Superior Snack Experience
What sets this approach apart from other Easy Cheese Sticks Recipes is the triple threat breading system combined with flavour infused coatings. We aren't just using plain breadcrumbs; we are fortifying our Panko layer with finely grated Parmesan, garlic powder, and Italian seasoning.
This not only enhances crunch but builds a flavour profile deep into the crust, meaning every single bite delivers seasoning, not just empty crispness. If you’ve wondered How to Make Cheese Sticks that actually taste as good as they look, the answer lies in this flavourful layering process.
Essential Provisions for Superior Homemade Cheese Sticks
To achieve the textural perfection we are aiming for, attention to the specific ingredients used is paramount. This recipe relies on a balance of dryness, binder, and flavour. For our core, we need about one pound of low-moisture mozzarella, cut precisely into half inch thick sticks.
Alongside the cheese, we compile our three essential components for the breading station.
Selecting the Best Melting Cheese Core
When debating the Best Cheese for Cheese Sticks , mozzarella reigns supreme due to its fantastic stretch and relatively mild flavour profile, which pairs well with dipping sauces.
Ensure you select low-moisture mozzarella, often sold in blocks or pre-cut sticks, rather than fresh mozzarella packed in water, as the excess liquid will sabotage your efforts.
The drier the cheese, the better the final result will be, making these some of the most reliable Mozzarella Recipes Easy to execute successfully.
Required Utensils for Flawless Formation
While this recipe avoids complex machinery, a few items are essential for achieving that uniform, professional look. You’ll need three shallow dishes to accommodate the flour, egg wash, and breadcrumbs.
For cooking, a large, heavy bottomed skillet or Dutch oven is necessary to maintain oil temperature during the shallow fry. If you opt for the baking or air frying route, ensure you have parchment paper and a reliable non-stick spray. A set of tongs is indispensable for safely turning the sticks in the hot oil.
The Magic Ratio for Seasoned Panko Perfection
Our coating mixture is where serious flavour is injected. We use 1 ½ cups of Panko breadcrumbs the flaky Japanese style because they absorb less oil and create a significantly lighter, crunchier shell than standard fine breadcrumbs.
To this, we blend in a generous ½ cup of finely grated Parmesan cheese for saltiness and umami, one teaspoon of dried Italian seasoning, and ½ teaspoon of garlic powder. This combination ensures that the final product is seasoned throughout, not just on the surface.
The Critical Freezing Phase: Preventing the Meltdown Calamity
The single most important step in How to Make Cheese Sticks that don't explode is temperature management. Once your raw mozzarella sticks are cut, pat them completely dry and arrange them on a lined baking sheet.
They must spend at least 20 to 30 minutes in the freezer before breading begins. This initial hardening ensures the cheese remains firm enough to withstand the dredging process without deforming.
After the sticks have been fully coated in the three step breading process, they require a second , equally important chill another 15 minutes in the freezer.
This final freeze sets the entire crust structure in place, making these ready for high heat cooking without fear of structural collapse.
Related Recipes Worth Trying
- The Proper Pint Smoky Sweet Homemade BBQ Sauce Recipe — Ditch the jarred stuff Learn how to make easy homemade BBQ sauce thats tangy and richperfect for your next batch of ribs or pulled pork
- The Patisserie Classic Homemade Fruit Tart Recipe — Stop buying disappointing storebought versions Nail this foolproof Homemade Fruit Tart recipe featuring crisp pastry and creamy vanilla bean custard
- The Ultimate Homemade Ranch Dressing Recipe Better Than StoreBought — Tired of thin flavourless bottled dressing Learn how to make the best Homemade Ranch Dip using fresh herbsits easy and infinitely better
Mastering the Battering and Coating

Our breading station is a classic three part assembly line designed for maximum adhesion. In the first dish, we combine one cup of all-purpose flour with a small amount of salt and pepper. This acts as the initial dry anchor.
The second dish holds three large eggs lightly whisked with two tablespoons of milk; this binder loosens the flour just enough to grip the Panko mixture effectively. Finally, the third dish contains our seasoned Panko mix described previously.
When coating, work one cold stick at a time. Press it firmly into the flour, shaking off any visible excess. Next, submerge it completely in the egg wash, allowing the drips to fall back into the dish.
Finally, press the egg-coated stick vigorously into the Panko mixture, rolling it around to ensure every millimeter is encased in the seasoned crust. For the absolute best insurance against leaks, I highly recommend an optional fourth step: dipping the stick again into the egg wash and then back into the Panko for a double crusted effect.
Achieving Golden Brown Bliss: Frying Techniques Explained
While techniques for Homemade Cheese Sticks in Air Fryer are popular for a lighter approach, traditional shallow frying yields the most authentic, shatteringly crisp result in the shortest time.
step-by-step Guide to Perfectly Shaped Logs
Once fully chilled and crusted, heat about an inch of high smoke-point oil (like canola or vegetable) in a heavy bottomed pan. The temperature is key, so use a thermometer if you have one. We are looking for a steady 350° F ( 175° C).
Using tongs, gently lower 3 to 4 sticks into the oil, ensuring you do not overcrowd the pan, which would cause the oil temperature to plummet.
Temperature Control: The Key to Crispiness
If the oil is too cool, the breading becomes saturated with fat, resulting in soggy exteriors. If it’s too hot, the crust burns before the cheese softens. Keep that thermometer reading steady at 350° F.
The sticks only need 2 to 3 minutes total cook time, flipping halfway through, until they achieve a rich, deep golden brown hue.
Draining and Seasoning Immediately Post Fry
As soon as they emerge from the oil, transfer the cooked sticks directly onto a wire cooling rack set over a baking sheet. This prevents the bottom crust from steaming and losing its crispness against a flat plate.
A light sprinkle of fine sea salt over the hot exterior immediately after frying enhances the flavour immensely. Serve these exceptional Homemade Cheese Sticks piping hot!
Troubleshooting Common Issues with Homemade Cheese Sticks
Even with careful preparation, things can sometimes go awry. The most common issue is the cheese leaking out. If this happens, it’s almost always due to two things: the cheese not being cold enough before breading, or the oil temperature being too low.
If the crust seems patchy after frying, it usually means the initial flour dredge was insufficient or you didn't press the Panko firmly enough. Remember, the firmer the cheese is when it hits the oil, the better your results will be.
Serving Suggestions Beyond Basic Marinara
While a classic zesty marinara is the undisputed partner to these mozzarella delights, we can certainly expand the dipping horizons. These sticks deserve sauces that can match their savoury, rich profile. Consider serving them alongside a creamy, homemade garlic aioli or a cool, herbaceous buttermilk ranch.
For those who love a sweet and spicy contrast, a small bowl of sweet chili dipping sauce or even a drizzle of spicy honey provides an excellent counterpoint to the richness.
Storing Leftover Crispy Creations
Ideally, these are best consumed seconds after they leave the heat source. However, if you find yourself with leftovers perhaps a few sticks survived the onslaught proper storage is vital.
Allow them to cool completely, then store them in a single layer in an airtight container in the refrigerator for up to two days.
Baking or Air-Frying Your Cheese Sticks: Healthy Swaps
If you prefer a less oily path, the Homemade Cheese Sticks in Air Fryer method is incredibly effective. After breading, place the sticks in a single layer in the air fryer basket and spray them lightly with cooking oil.
Cook at 380° F ( 195° C) for about 8 to 10 minutes, flipping halfway, until deeply golden. This yields results remarkably close to the fried version, offering a lighter take on these superb Hot Appetizers Bites .
Baking on a rack in a 400° F oven for 10- 12 minutes also works beautifully.
Creative Dipping Sauces to Elevate Your Snack Game
To truly elevate this classic snack, think beyond the jarred red sauce. A vibrant pesto infused with toasted pine nuts, or perhaps a smoky chipotle lime crema, can transform the experience entirely. These custom dips make your Homemade Cheese Sticks feel restaurant quality.
Shelf Life and Reheating Secrets
Reheating requires care to avoid turning the crust soggy. The best method is utilizing the same oven or air fryer used for the initial cooking. Spread the cooled sticks on a lined baking sheet and reheat at 350° F ( 175° C) for about 5– 7 minutes.
This crisps the exterior again without overheating the cheese core to the point of melting out.

Recipe FAQs
My Homemade Cheese Sticks always leak cheese everywhere when I fry them! What gives?
Ah, the dreaded cheese blowout! This usually happens because the cheese wasn't cold enough or the breading wasn't tight. Make sure you pat your mozzarella sticks bone dry before breading, and crucially, give them a minimum of 15 minutes in the freezer after breading to set that crust firm.
A double dip in the egg and panko offers extra insurance, too!
Can I make these Homemade Cheese Sticks ahead of time, or do they need to be cooked fresh?
You absolutely can prep them ahead, which is brilliant for when guests are coming over! Once breaded, lay the sticks on a baking sheet and freeze them solid for at least an hour. You can then transfer them to an airtight container in the freezer for up to a month.
When ready to cook, fry or bake them directly from frozen just add an extra minute or two to the cooking time.
Is frying these really necessary, or can I bake or air-fry them without ruining the crunch?
Baking or air-frying is certainly an option if you’re trying to keep things lighter, like a Sunday roast without all the fuss. For the best crunch, spray them very generously with cooking spray before baking at 400°F (200°C) until golden, flipping halfway through.
They won't be quite as deeply golden as the fried version, but they’ll still be smashing!
What oil temperature should I use for frying, and how many sticks can I cook at once?
For that perfect golden exterior without burning the breading, you must maintain the oil temperature right around 350°F (175°C). If you don't have a thermometer, test it with a tiny crumb if it sizzles immediately and floats, you're good to go.
Never overcrowd the pan; stick to 4 or 5 at a time so the temperature stays stable and you avoid soggy bottoms!
I used fresh mozzarella, and they melted into soup! What cheese works best for these?
For a proper stretch and less leakage, you absolutely need low-moisture mozzarella, either the block or pre-cut logs. Fresh mozzarella holds far too much water, which steams inside the coating and forces the cheese out. Stick to the low-moisture kind, give it a good pat down, and you'll get that glorious, stringy melt.
Crispy Homemade Cheese Sticks
Ingredients:
Instructions:
Nutrition Facts:
| Calories | 378 kcal |
|---|---|
| Protein | 8.0 g |
| Fat | 10.6 g |
| Carbs | 21.4 g |
| Fiber | 2.5 g |
| Sodium | 2444 mg |
