Chickpea Milanese: the Ultra-Crispy, Plant-Based Schnitzel
- The Ultimate Vegan Upgrade: Crispy Chickpea Milanese
- Essential Components: Ingredients for the Perfect Chickpea Milanese
- The Science of Crisp: Achieving Perfect Texture in Chickpea Milanese
- Master the Method: Step-by-Step Guide to Pan-Frying the Cutlets
- Troubleshooting and Advanced Techniques
- Make-Ahead Prep and Preservation: Storing Your Chickpea Cutlets
- Presentation and Pairings: How to Serve Chickpea Milanese
- Recipe FAQs
- 📝 Recipe Card
The Ultimate Vegan Upgrade: Crispy Chickpea Milanese
That perfect, loud crackle when you slice into something impossibly crisp, followed by a tender, zesty inside? That’s exactly what this recipe delivers. The aroma of frying lemon zest and fresh herbs immediately transforms your kitchen, making this one of my favorite Healthy Vegan Dinner options.
It truly feels like comfort food, only modernized.
What is Cotoletta alla Milanese (The Traditional Context)
The original Cotoletta alla Milanese is a culinary superstar from Milan, typically made from a thin veal cutlet, breaded, and fried until golden. It’s a dish synonymous with simple elegance. The crucial elements are the delicate thinness and the golden, buttery crust.
We respect that tradition, but give it a serious plant based upgrade today.
The Chickpea Transformation: Why We Love This Plant Based Cutlet
I absolutely love this transformation because it solves the weeknight "What’s for dinner?" panic with zero compromise on texture. We’re using humble chickpeas and some clever binding to create a substantial, sturdy escalope that fries up beautifully.
This approach delivers all the satisfying crunch of a traditional schnitzel or milanese, but is completely vegan and far more budget friendly. Trust me when I say this [Easy Chickpea Recipe] is going to become a staple.
Nutrition Highlights of the Chickpea Escalope
Chickpeas are nutrient powerhouses, making this Plant based Chickpea Milanese a fantastic choice for boosting your fiber and protein intake. Unlike many deep fried options, the chickpea base already provides excellent structure and satiety.
The combination of chickpea flour and nutritional yeast ensures a savory, rich profile without relying solely on oil or heavy ingredients.
Essential Components: Ingredients for the Perfect Chickpea Milanese
You don't need a huge list of fancy ingredients for this, which is half the fun. It’s all about simple things doing big work. We need our base (chickpeas), our binder (flour), and our crunch factor (Panko). Here are the key players and their stand ins, because sometimes the cupboard is bare.
| Ingredient | Role | Viable Substitution |
|---|---|---|
| Canned Chickpeas | The structure and body. | Cannellini beans or white kidney beans, if necessary. |
| Chickpea Flour (Besan) | Essential binder and thickener. | Fine oat flour or a mix of cornstarch/rice flour (will alter flavor slightly). |
| Panko Breadcrumbs | Max crunch factor. | Crushed cornflakes or finely ground stale bread, but Panko is best. |
| Nutritional Yeast | Savory, cheesy depth. | Fine grated vegan Parmesan, or a touch of Dijon mustard in the base mix. |
The Science of Crisp: Achieving Perfect Texture in Chickpea Milanese
Making a solid vegan cutlet that doesn't fall apart requires understanding a bit of kitchen physics. It’s not magic; it’s just paying attention to texture and moisture. This section explains the method behind the crispy madness we are about to create.
Selecting the Best Canned Chickpeas (or Cooking from Scratch)
Canned chickpeas work brilliantly here, and they save you hours of cooking time. The key is to drain them well, but don’t discard the liquid —we actually reserve some of that aquafaba to add back into the dough for binding.
If you cook dried chickpeas, ensure they are cooked until very tender and save some of the cooking liquid, which acts similarly to aquafaba.
Panko vs. Standard Breadcrumbs: A Texture Comparison
If you want a Crispy Chickpea Schnitzel , you must use Panko. Standard breadcrumbs are too fine and dense, leading to a heavy, oily crust. Panko, which is made from crustless bread and processed into flakes, absorbs less oil and fries up into airy, shatteringly crisp shards.
Seriously, this step is non-negotiable.
Flavor Boosters: Lemon Zest and Nutritional Yeast
These two ingredients are the secret weapons in my Lemon Chickpea Cutlets . Nutritional yeast is whisked directly into the chickpea base, giving the interior an unexpected, subtle cheesy richness. But the lemon zest? That gets mixed directly into the Panko!
When the zest hits the hot oil, it perfumes the breadcrumbs and gives you a fragrant, zesty punch that defines this Milanese.
Binding Secrets: Using Chickpea Flour for Structure
The key to preventing crumbly cutlets is the cooking and binding process. We use chickpea flour, not just to dust, but actually cooked into the blended chickpea base. This creates a thick paste, very similar to a panade or choux pastry.
This cooking step gelatinizes the starches, resulting in a dense, pliable dough that holds its shape beautifully after chilling.
The Importance of the Chill: Firming the Cutlets
When I first started trying plant based cutlets, I always rushed the chilling, and everything turned into a sloppy mess during the breading process. You absolutely must chill the prepared loaf for at least 90 minutes.
This downtime allows the dough structure to set firmly, enabling clean, easy slicing and ensuring your slices don't collapse when you dip them into the plant milk.
Master the Method: step-by-step Guide to Pan-Frying the Cutlets

Ready to cook? This process is broken into three phases: making the dough, setting up the assembly line, and the glorious final fry.
Preparing the Base Dough (The Escalope Mixture)
First, sauté your aromatics onions first, until they are totally translucent, then the garlic for about one minute. Next, blend your chickpeas, stock, cooked aromatics, and nutritional yeast until you have a smooth paste. Return this silky mixture to the pan and whisk in the chickpea flour.
Stir constantly over medium heat. Keep cooking until the mixture stiffens dramatically and pulls cleanly away from the sides, forming a dense ball. This is your dough!
Chef's Note: Don't stop stirring once the flour is added. If you don't cook the mixture long enough, it will be too soft and steamy inside, making the final cutlet dense and potentially raw-tasting.
Forming and Dredging the Chickpea Cutlets
Transfer that dense paste into your parchment lined loaf tin, smoothing it out, and then cover it tight. Now, go watch a movie or make yourself a [15Minute Chickpea Avocado Salad Creamy Crunchy Vegan Lunch] the loaf needs a solid chill. Once firm, turn it out and slice it into eight equal escalopes.
Set up your breading station (flour, milk, zesty Panko) and dredge each cutlet, pressing the Panko on firmly. Press the crumbs firmly ; this ensures a perfect crust.
Achieving the Golden Crust: Frying Techniques
We are shallow frying here, so use a neutral oil with a high smoke point. Get the oil hot enough so a small crumb dropped in sizzles immediately, but not so hot that it’s smoking wildly. Fry the cutlets in batches of two or three. Give them space!
Cook for 3- 4 minutes per side until they are deep, glorious golden brown. For an extra rich flavor, throw in a pat of vegan butter right before the cutlets are done frying.
Draining and Immediate Seasoning
Remove the finished cutlets and place them immediately on a wire rack not paper towels! Paper towels steam the bottom of the cutlets, leading to immediate sogginess. If you use paper, at least move them often.
Immediately after they come out of the pan, sprinkle them lightly with fine sea salt while they are still shimmering with oil.
Troubleshooting and Advanced Techniques
We all have kitchen fails. I once had a whole batch disintegrate in the oil because I skipped the chill step rookie mistake. Here’s how you avoid my earlier pain.
Preventing Crumbling: The Dough Ratio Check
If your mixture is falling apart when you try to slice it, your dough ratio was off, or you didn't cook it long enough. The fix? If you have leftover loaf, microwave a small piece and if it feels mushy, mash it back up with a tablespoon of extra chickpea flour and cook it again until it tightens up.
The base must be dense, not wet.
Oil Temperature Management for Even Browning
If your cutlets are turning brown too quickly, turn the heat down slightly. If they are absorbing oil and looking pale, your oil is too cold crank the heat up. The oil should bubble happily around the edges of the cutlet throughout the entire cooking time.
Baking or Air Frying the Milanese (Alternative Methods)
Want less mess? You bet you can bake or air fry this. For the Air Fryer Chickpea Milanese , spray the breaded cutlets liberally with oil spray (seriously, don't skimp). Cook at 375°F (190°C) for 10- 12 minutes, flipping halfway.
This works wonderfully and still delivers great crunch, especially if you have previously checked out my tips for [Crispy Air Fryer Chickpeas The 15Minute Recipe for Maximum Crunch].
make-ahead Prep and Preservation: Storing Your Chickpea Cutlets
This recipe is incredibly forgiving and actually benefits from being made ahead. Perfect for meal prep!
Refrigerating Uncooked Cutlets
You can easily prepare the entire chickpea loaf base up to three days in advance. Once it’s sliced and breaded, you can store the uncooked cutlets layered between parchment paper in an airtight container for up to 24 hours.
Just fry them straight from the fridge; no need to bring them to room temperature.
Freezing the Chickpea Milanese (Cooked vs. Uncooked)
I highly recommend freezing the uncooked, breaded cutlets. Lay them flat on a baking sheet to freeze, then transfer them to a freezer bag. They keep well for about two months. Fry them straight from frozen, adding a couple of minutes to the cooking time per side.
Cooked leftovers can also be frozen, but the crust texture suffers significantly.
Best Methods for Reheating Leftovers
If you have leftover cooked Milanese, please, for the love of crunch, do not use the microwave. Use an air fryer (350°F / 175°C for 5 minutes) or a toaster oven until piping hot and re-crisped. They should sound hollow when tapped.
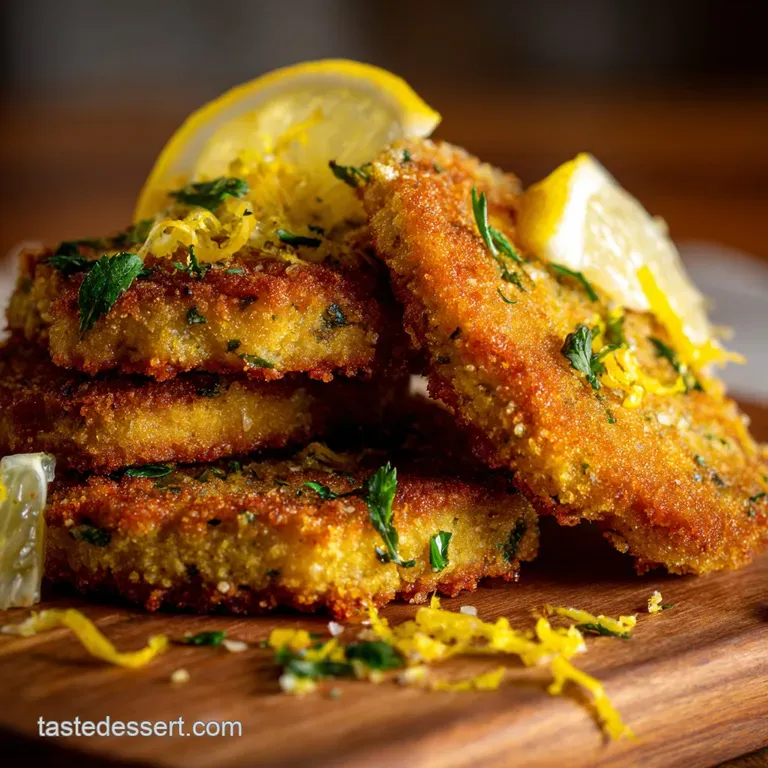
Presentation and Pairings: How to Serve Chickpea Milanese
The traditional way to serve Milanese is simple: with fresh lemon and a pile of peppery greens. That’s truly the best way to enjoy the zesty flavor of these cutlets.
We usually pair ours with a sharp, vibrant salad. Something like rocket (arugula) and thinly sliced fennel, dressed simply with olive oil and extra lemon juice. If you’re feeling ambitious, this goes perfectly with a side of my [The Easiest Greek Chickpea Salad Recipe Best for Lunch Meal Prep] for a truly fulfilling plate.
A final squeeze of fresh lemon over the hot cutlets right before serving makes all the difference!

Recipe FAQs
Why are my Chickpea Milanese cutlets mushy or falling apart during frying?
This usually indicates insufficient chilling time or too much moisture in the initial chickpea mixture. Ensure the dough is dense and sticky before chilling, and allow it to solidify in the refrigerator for at least two hours, or ideally overnight, before slicing.
If the mixture still feels loose after processing, gently knead in a tablespoon more of chickpea flour to improve the binding power.
Can I bake or air-fry these cutlets instead of pan-frying them?
Absolutely. For baking, preheat your oven to 400°F (200°C), lightly spray the coated cutlets with oil, and bake for 15-20 minutes, flipping halfway, until golden brown. The air fryer provides an even crispier result; cook at 375°F (190°C) for 10-12 minutes, making sure not to overcrowd the basket.
How far in advance can I prepare the chickpea dough?
The chickpea dough is excellent for make-ahead meal prep. You can prepare the entire loaf, wrap it tightly in cling film, and store it in the refrigerator for up to three days before slicing and breading.
Extended chilling time is actually beneficial, as it guarantees a firmer, easier-to-handle escalope that holds its shape perfectly during the coating process.
What is the best way to store leftovers and maintain crispiness upon reheating?
Store cooled leftover cutlets in an airtight container in the refrigerator for up to four days. To regain maximum crunchiness, avoid the microwave, as it introduces steam and makes the coating soggy.
Reheat them instead in a dry skillet over medium heat for 2-3 minutes per side, or use a toaster oven until warmed through.
Can I freeze the Chickpea Milanese? If so, at what stage?
Freezing the uncooked, fully breaded cutlets is the ideal method for long term storage. Place the breaded escalopes on a baking sheet and flash freeze them for one hour until solid, then transfer them to a freezer bag, separating layers with parchment paper.
When ready to cook, fry them directly from frozen, adding a few extra minutes to the cooking time.
I don't have chickpea flour (Besan). Can I use all-purpose wheat flour or cornstarch instead?
While all-purpose flour can act as a binding agent, chickpea flour is vital for both structure and the characteristic subtle savory flavor of the Milanese. If you must substitute, use a combination of fine cornmeal and a small amount of arrowroot or tapioca starch.
This mixture will best replicate the binding density needed for a sturdy, non-crumbly cutlet.
My breading isn't sticking well to the cutlet. What am I doing wrong?
A successful breading relies on following the "dry-wet-dry" method precisely, ensuring the middle liquid binder is adequate. After the initial light dusting in dry flour, thoroughly coat the cutlet in the liquid binder (like plant milk or aquafaba), allowing excess to drip off before pressing firmly into the Panko breadcrumbs.
Ensure the cutlets are completely sealed with crumbs before frying.
Crispy Vegan Chickpea Milanese Cutlets

Ingredients:
Instructions:
Nutrition Facts:
| Calories | 1386 kcal |
|---|---|
| Protein | 55.9 g |
| Fat | 56.6 g |
| Carbs | 173.5 g |
