Grandmothers Corn Pudding: Nanas Luxurious Custardy Side Dish
- The Definitive Guide to Truly Custardy Corn Pudding
- Essential Ingredients for Grandmothers Corn Pudding
- Baking Nana's Corn Pudding: Step-by-Step Method
- The Science of the Perfect Pudding Texture: Why It Wiggles
- Troubleshooting and Expert Tips for Your Grandmothers Corn Pudding
- Planning Ahead: Storing, Reheating, and Making Corn Pudding in Advance
- Elevated Pairings: What to Serve Alongside Grandmothers Corn Pudding
- Recipe FAQs
- 📝 Recipe Card
The Definitive Guide to Truly Custardy Corn Pudding
The moment that golden tray hits the table, you know Thanksgiving has officially begun. Honestly, even on a random Tuesday, the smell of butter, sweet corn, and rich vanilla custard baking together is pure magic.
It’s comforting in a way only Nana’s most treasured recipes can be, offering that perfect balance between savory side and lightly sweet dessert.
What I absolutely love about this Grandmothers Corn Pudding recipe is how deceptively easy it is. You spend about fifteen minutes prepping everything, stirring the simple batter until it's smooth and glistening.
Then you just let the oven do the hard work while you go drink some coffee or panic about the rest of the meal, which is usually my strategy. This recipe is an absolute lifesaver when you need a classic, inexpensive side dish that looks incredibly impressive.
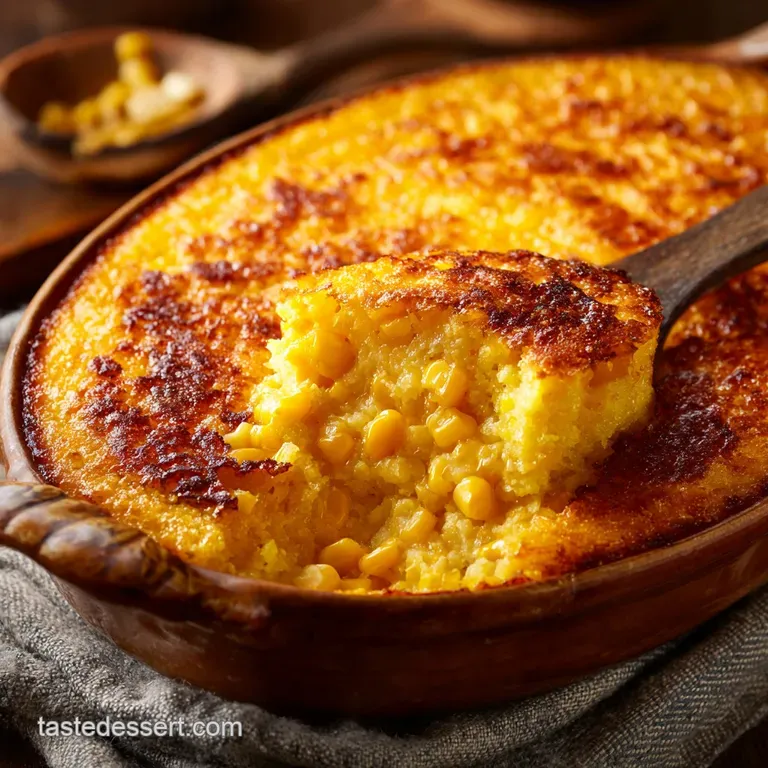
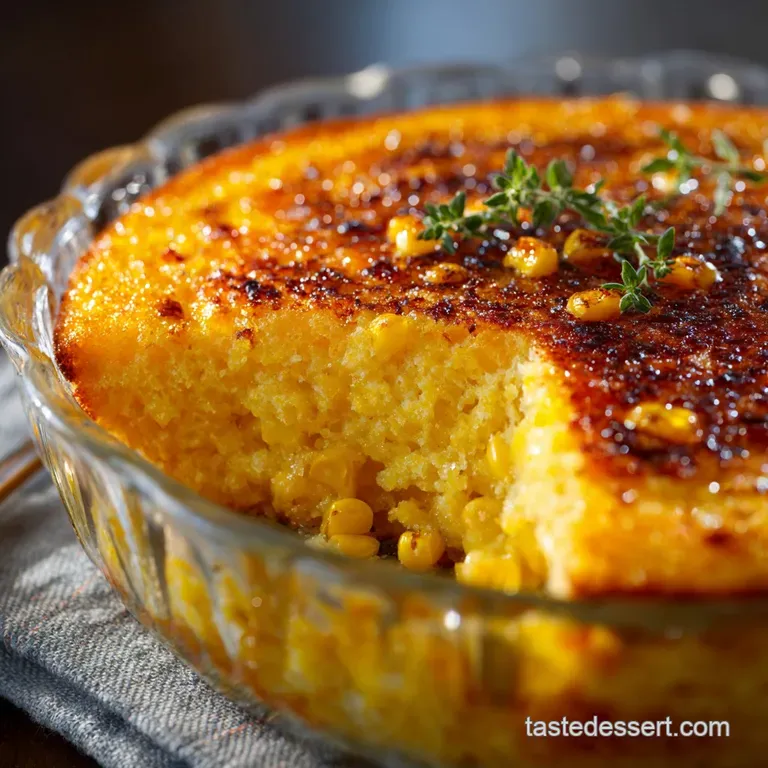
Forget those dry, cakey casseroles you might have tried before. We are going full tilt custard here, aiming for that beautiful, barely set wobble that makes everyone swoon. Trust me, Nana perfected this recipe over decades, and now we’re going to share every little trick that makes it the real deal.
What is the Difference Between Corn Pudding and Corn Casserole?
This is a question I get constantly, and it’s important we get this straight. Corn casserole, like my easy Jiffy Corn Casserole: The Ultimate Creamy, 10 Minute Prep Side , usually relies on a cornbread base and baking powder for lift. It’s dense, bready, and great if you need something sturdy.
Corn pudding, however, is a custard dish. It’s entirely reliant on eggs, milk, and cream for its structure, meaning it’s incredibly creamy, wobbly, and almost silky when baked properly.
We use just enough flour to stabilize the eggs and keep the finished dish from weeping, which is the secret to that perfect, spoonable texture.
Why Nana's Recipe is the Ultimate Comfort Showstopper
Nana knew that fat equals flavor and texture. Unlike recipes that skimp on the dairy, this Grandmas Corn Pudding Recipe uses a heavy dose of melted butter and whole milk combined with eggs.
This heavy fat content ensures the final dish is rich and impossibly creamy, avoiding that unfortunate dry texture that plagues lesser recipes.
The other secret is the combination of whole kernel corn and canned creamed corn. The whole kernels provide that satisfying pop of sweetness, while the creamed corn ensures the entire dish is saturated with sweet corn liquid and a beautiful, thick consistency. It’s genius, really.
Key Equipment Checklist: Setting Up Your Baking Dish
Seriously, don’t skip greasing your dish. This custard is going to want to stick!
- 8x8 inch (or similar) baking dish, thoroughly buttered.
- A balloon whisk (essential for smooth custard).
- One very large bowl for mixing everything.
Essential Ingredients for Grandmothers Corn Pudding
This ingredient list is short and sweet, exactly the way a perfect old fashioned corn pudding recipe should be. Remember: Quality ingredients really shine through in simple dishes like this.
| Ingredient | Why We Use It | Simple Swaps/Substitutions |
|---|---|---|
| Whole Kernel Corn (2 cups) | Texture and sweetness. | Can use fresh corn kernels cut off the cob (about 4 ears worth) or well drained canned corn. |
| Creamed Corn (1 can) | Binder and moisture agent. | No perfect substitute, but if desperate, blend 1 cup of whole kernel corn with 1/4 cup of cream. |
| Whole Milk & Heavy Cream | Richness and custardy base. | Use evaporated milk for similar richness, or half and half if you must, but avoid skim milk entirely. |
| Eggs (3 large) | The structure; it makes it a pudding, not soup. | None. Eggs are non-negotiable for custard. |
| All-Purpose Flour | Binds and prevents weeping. | Use 1 tablespoon of cornstarch or an approved GF blend for a simple swap. |
Fresh vs. Frozen Corn: Maximizing Sweetness and Texture
Look, if you are making this in the summer, absolutely use fresh corn cut right off the cob. Nothing beats that inherent sweetness. But for the rest of the year, frozen corn is your absolute best friend.
Frozen corn is picked at its peak, so it retains a wonderful sweetness, often tasting better than sad, out-of-season fresh corn. Just make sure you thaw it completely and drain off all that excess water before mixing it into your batter. Watery corn dilutes the custard and ruins the set!
Dairy Decisions: Choosing the Right Milk and Cream Base
You need whole milk here. Full fat, absolutely no substitutions for skim or 2%. The fat content of the dairy is what creates that velvety mouthfeel we are chasing in this Southern Corn Pudding Recipe.
Using heavy cream alongside the whole milk bumps the fat level up perfectly, resulting in a dense, rich texture that holds its shape without being bready.
Simple Swaps: Making This Recipe gluten-free or dairy-free
Making this granny's corn pudding gluten-free is ridiculously easy. Just swap out the three tablespoons of AP flour for a gluten-free blend that contains xanthan gum, or use half the amount (1.5 tablespoons) of cornstarch.
If you want to go dairy-free, use full fat coconut milk (the kind in the can, not the carton) instead of the whole milk and a good quality dairy-free heavy cream substitute. Just know the flavor will change slightly due to the coconut notes.
Baking Nana's Corn Pudding: step-by-step Method
This homemade corn pudding dish is really a three phase operation: melting, mixing, and baking. Let’s crack on.
Phase 1: Preparing and Mixing the Wet Custard Base
First, preheat your oven to 350°F (175°C) and grab your buttered dish. Melt your half cup of butter and set it aside immediately so it can cool down while you work. I once added piping hot butter to my eggs and made scrambled corn custard, a mistake I will never, ever repeat.
In a large bowl, whisk together the flour, sugar, salt, and pepper until the dry ingredients are completely uniform. In a separate, smaller bowl, gently beat your eggs until they’re slightly frothy, then whisk in the milk and heavy cream.
Stream the cooled melted butter into the milk and egg mixture while whisking constantly. This creates the richest base ever.
Phase 2: Combining the Corn and Preparing for the Oven
Pour the creamy liquid mixture into your dry ingredients. Whisk this gently until just combined the goal is a smooth, runny batter. Stop mixing the second you see no dry flour streaks! Overmixing develops gluten, which leads to a tough, rubbery pudding.
Now, fold in your drained whole kernel corn and the entire can of creamed corn using a spatula. Mix just enough to distribute the corn evenly throughout the batter. Pour this glorious mix into your prepared casserole dish.
Phase 3: The Low and Slow Bake Cycle
Bake your corn custard recipe for 45 to 55 minutes at 350°F. If you want truly professional, silken results (like my ultimate silky baked custard recipe), you can use a bain marie, or water bath.
Place the 8x8 dish inside a larger pan and fill the outer pan with boiling water halfway up the side of the pudding dish. This gentle, moist heat prevents the edges from overcooking.
Testing for Doneness: The Center Jiggle Test
The pudding is ready when the edges are visibly set and slightly puffed, often pulling away from the sides. The absolute best test is the jiggle test . Gently tap the side of the pan.
Chef's Note: The center should have a slight, barely there wobble, like Jell-O or a perfect crème brûlée. If it sloshes or looks liquid, keep baking! A toothpick inserted near the edge should come out clean, but the very centre should still look moist.
The Science of the Perfect Pudding Texture: Why It Wiggles
That perfect wiggle happens because of the eggs and the flour binder. As the heat gently penetrates the custard, the proteins in the eggs coagulate and form a lattice structure. The starch from the tiny amount of flour locks the water into that structure.
Baking low and slow is key because if the heat is too high, the egg proteins seize up too quickly, forcing out the moisture and leaving you with a dry, rubbery, or spongy texture. We want firm, but soft, essentially.
Troubleshooting and Expert Tips for Your Grandmothers Corn Pudding
I’ve made every mistake possible, so you don’t have to!
Why Is My Pudding Dry? (Avoiding the cakey texture)
Overbaking is the number one culprit. Remember, corn pudding is a custard, not a cake. If you bake it until a toothpick comes out completely dry from the centre, you’ve gone too far. Start checking at the 40 minute mark and pull it out when that centre still has a hint of movement.
Also, using too little cream or too much flour can bind it too tightly, making it cakey.
Temperature Control: Preventing Scrambled Eggs
Keep your dairy and eggs at room temperature before mixing. This helps them combine smoothly. The most important rule? Cool the melted butter before adding it to the eggs.
If the butter is hot, even slightly, it will cook the egg proteins instantly, leaving you with little cooked white specks in your otherwise smooth batter.
Pro Tip: The Importance of a Resting Period After Baking
Seriously, you need to wait 10 minutes after pulling it from the oven. Even when the pudding is "set," it's still cooking internally and needs time to relax and firm up. If you scoop it immediately, it will be looser and potentially runny.
A 10 minute rest allows the custard to achieve its final, perfect consistency.
Planning Ahead: Storing, Reheating, and Making Corn Pudding in Advance
Yes, you can absolutely plan ahead! This is why it’s the ultimate Thanksgiving or holiday side.
Can You Assemble Corn Pudding the Night Before?
You bet! You can mix the entire batter, pour it into the buttered dish, cover it tightly with plastic wrap, and refrigerate it overnight (up to 24 hours). Just be sure to let it sit on the counter for about 30 minutes before baking to take the chill off.
This prevents the shock of cold batter hitting hot oven, which can lead to uneven cooking.
Best Practices for Refrigerating Leftovers
Once fully cooled, cover any leftover corn pudding tightly with foil or transfer it to an airtight container. It keeps beautifully in the fridge for 3 to 4 days. If you’ve made too much, you can freeze individual portions (wrap them airtight) for up to 3 months, though the texture can sometimes become slightly grainy upon thawing.
To reheat, the best method is low and slow in the oven (300°F/150°C) until warmed through, about 15 to 20 minutes, covered with foil. Microwaving works, but it can dry the pudding out quickly.
Elevated Pairings: What to Serve Alongside Grandmothers Corn Pudding
This rich dish demands something substantial next to it. Since the pudding is sweet and savory, it pairs perfectly with classic roasted meats like a holiday ham or a beautifully seasoned pork loin. A crisp salad or some blanched green beans tossed in lemon butter will provide that crucial acidic contrast.
The Magic Ratio: Balancing Sweet Corn and Savory Custard
If you prefer a less sweet dish, you can easily reduce the granulated sugar down to two tablespoons without impacting the texture. However, the contrast between the slightly sweet corn and the saltiness of the butter and pepper is what makes this grandmas corn pudding recipe so addictive. Don’t cut the salt!
Temperature Control: Preventing Scrambled Eggs
(Wait, didn't we cover this? Yes, but the structure requires it here, too, so let's relate it to service.)
If you pre-made this dish and are reheating it alongside your main roast, make sure your oven temperature is stable and low. If you blast this pudding in a 400°F oven to catch up, the edges will burn before the middle heats through. Keep it steady at 300°F (150°C) for gentle warming.
Why Is My Pudding Dry? (Avoiding the cakey texture)
(Again, repeating the troubleshooting, but now framed for the meal planning.)
If you are batch cooking and using smaller dishes, remember that smaller portions bake faster. If you use mini ramekins or an extra large shallow dish, monitor the baking time closely.
A thinner pudding will take closer to 30 minutes, not 50, and you risk a dry texture if you follow the main recipe timing blindly.

Recipe FAQs
Why is my corn pudding runny and not setting properly in the center?
A runny center is the classic sign of underbaking. Ensure the center of the pudding reaches an internal temperature of 180°F (82°C) before removing it from the oven.
If the edges are browning too quickly, cover them loosely with foil and continue baking until the pudding has only a slight, satisfying wobble in the very center.
How do I prevent the corn pudding from becoming dry and cake like instead of custardy?
Dryness is almost always a result of overbaking or using too much thickening agent (like cornmeal or flour). Check for doneness earlier than the recipe suggests if your oven runs hot.
Additionally, using whole milk or cream provides the essential fat needed to maintain that rich, moist texture; avoid using skim milk for this recipe.
Can I use frozen or canned corn instead of fresh corn on the cob?
Yes, absolutely. If using frozen corn, ensure it is completely thawed and drained of any excess moisture before incorporating it into the batter.
If opting for canned corn, drain it thoroughly and pat it dry with a paper towel, as extra liquid will significantly dilute the custard base.
Can I prepare the corn pudding mixture ahead of time?
The batter can be mixed and stored, covered tightly, in the refrigerator for up to 12 hours before baking. This makes it an ideal make-ahead dish for holidays.
However, stir the batter thoroughly just before pouring it into the baking dish, as any cornmeal or starch may have settled at the bottom.
How can I convert this classic recipe to be dairy-free or vegan?
For a dairy-free version, substitute whole milk with high fat alternatives like full fat oat milk or canned coconut milk, and use a quality vegan butter.
Achieving the rich, eggy custard without eggs requires careful use of an effective binder, such as cornstarch mixed into the liquids, though the final texture will be slightly different from the traditional recipe.
What are the best savory additions to boost the flavor profile?
For an excellent savory twist, stir in 1/2 cup of freshly grated sharp cheddar cheese and 1/4 cup of chopped chives into the batter.
Another popular addition is 1/2 cup of crumbled, crispy bacon or diced jalapeño peppers for a little heat; mix these ingredients in just before baking.
What is the best way to store leftover corn pudding and reheat it?
Store leftovers in an airtight container in the refrigerator for up to 4 days, ensuring it cools completely before storage.
To reheat, cover the dish with foil to prevent drying out and warm it in a 300°F (150°C) oven for about 15 20 minutes, or microwave individual portions until just warmed through.
Custardy Grandmothers Corn Pudding

Ingredients:
Instructions:
Nutrition Facts:
| Calories | 843 kcal |
|---|---|
| Protein | 19.1 g |
| Fat | 44.3 g |
| Carbs | 96.9 g |
