Decadent Chocolate Lava Cakes
- Are You Ready to look into into the Ultimate Chocolate Experience?
- A Slice of History
- Master the Art of Decadent Chocolate Lava Cakes
- Why You’ll Love This Version
- Health and Nutrition Highlights
- Recipe at a Glance
- Quality Ingredients Breakdown
- Signature Seasoning Blend
- Smart Substitutions
- Kitchen Equipment Essentials
- Pro Ingredient Tips
- Chocolate Lava Cakes: Master Chef's Method
- Expert Kitchen Wisdom
- Perfect Presentation
- Storage and Make-Ahead
- Creative Variations
- Complete Nutrition Guide
- Expert FAQ Solutions
- 📝 Recipe Card
Are You Ready to look into into the Ultimate Chocolate Experience?
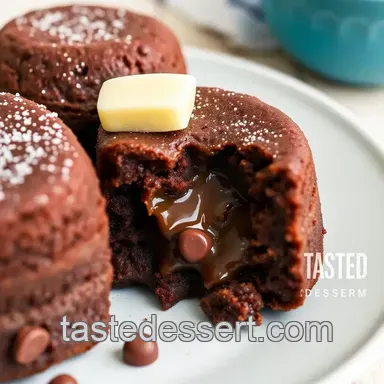
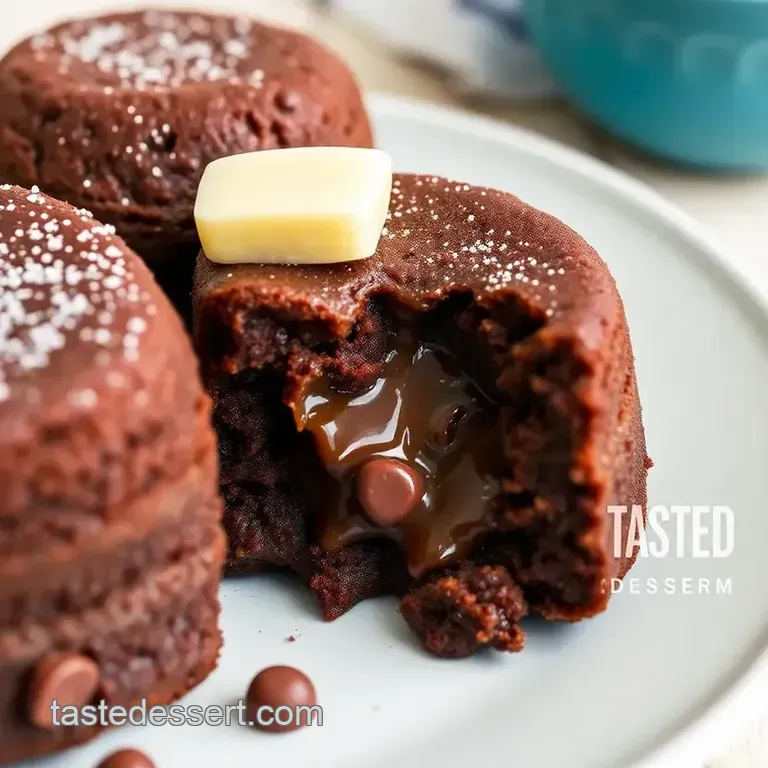
Have you ever had a dessert that felt like a warm hug on a plate? imagine cutting into a luscious chocolate cake only to discover a molten center oozing out like a sweet, gooey dream.
That's right, i’m talking about chocolate lava cakes ! these charming individual desserts are not just another chocolate recipe; they deliver pure decadence.
With about 15 minutes of prep and around 30 minutes of chilling time, they’re a medium difficulty treat that packs a punch, making them perfect for a cozy night in or a fancy dinner party.
The thrill of watching guests cut into their cakes and experience that delightful lava flow? priceless!
A Slice of History
Before we dive into the recipe, let’s take a quick jaunt through history. the concept of the chocolate lava cake, or lava cake as it’s sometimes called, hails from the heart of french patisserie.
This french dessert has its roots deep in culinary history, often attributed to renowned chef jean georges vongerichten, who popularized it in the 1980s.
But as with all good recipes, its origins are murky, floating around like sugar clouds in the air. the experience is what sets this dessert apart.
With its rich cocoa flavor complemented by a hint of vanilla, it's a luxurious treat that feels just right for any occasion.
Unique Selling Points and Benefits
So, why should you whip up these decadent sweets ? first off, they’re pure magic. the warm dessert with a molten center creates an experience that is both fun and sophisticated ideal for impressing guests or treating yourself after a long day.
Plus, they're individual desserts, so no one has to share... unless you want to! and if you’re like me, you’ll want to inhale all of it yourself.
Master the Art of Decadent Chocolate Lava Cakes
Let’s talk a bit about the fascinating culinary heritage of the chocolate lava cake . this dessert embodies the spirit of french indulgence while being surprisingly approachable.
It’s a perfect blend of science and art, requiring precise timing to achieve that perfectly liquid center . no wonder it’s revered in fine dining, yet so beloved at home!
Today, lava cake variations are found in many restaurants and dessert menus worldwide, cherished for both its sophisticated flavor profile and its eye-catching presentation because who doesn’t love an elegant dessert with a bit of theatrics?
Why You’ll Love This Version
Oh, i promise you’ll adore my version of lava cakes! we have a beautiful combination of flavors from the deep, indulgent taste of chocolate to a creamy, dreamy chocolate dessert topped off with fresh berries.
Honestly, the techniques are simple enough that even novice bakers can shine. plus, i’ve tossed in some time saving tips you won’t want to miss, making this homemade dessert feel effortlessly gourmet!
Imagine plating your warm cakes with a dusting of powdered sugar and a side of vanilla ice cream restaurant-quality desserts made right in your own kitchen!
Health and Nutrition Highlights
Now, i know, i know chocolate desserts aren’t usually hailed for their health benefits. but don’t fret! these lava cakes allow us to indulge without completely derailing our wellness goals.
Each serving contains around 330 calories, with a good balance of protein, carbohydrates, and fat, making them a delicious option without feeling overly guilty.
Plus, if you opt for fresh berries on top, you're adding more vitamins and antioxidants in the mix. win-win, right?
Recipe at a Glance
Just how easy is it to whip up these irresistible desserts? Here's the scoop:
- Total Preparation Time: About 1 hour (15 minutes active prep, 30 minutes chilling, plus cooking time)
- Skill Level Required: Medium
- Serving Size: Serves 4
- Cost Efficiency: Pretty reasonable! Think of the money saved on fancy desserts when you can impress friends and family for less.
So, are you ready to bring the magic of warm, oozing chocolate into your kitchen? Next up, let’s gather those ingredients and get our baking on!
Quality Ingredients Breakdown
When it comes to a decadent chocolate dessert like chocolate lava cakes , the quality of your ingredients can make or break the dish.
Let’s dive into the premium core ingredients you’ll need, making sure that your lava cakes come out rich and gooey every time!
Premium Core Ingredients
For our Chocolate Lava Cakes , here’s what you’ll need:
- ½ cup (1 stick) unsalted butter (113g): Look for European style butter for a richer flavor.
- 1 cup semi sweet chocolate chips (170g): Grab a high-quality brand this is where the magic happens!
- 2 large eggs and 2 large egg yolks : Fresh is key! Free range or organic eggs add a lovely depth.
- ⅓ cup granulated sugar (67g): Just enough sweetness to balance out the rich chocolate.
- 1 teaspoon pure vanilla extract : Skip the imitation stuff; real vanilla is where it’s at.
- 2 tablespoons all-purpose flour (15g): For a little structure.
- Pinch of salt : This enhances all the flavors, trust me!
Quality Indicators and Selection Tips
When choosing chocolate, you want to look for a cocoa content of at least 60%. this richness will give you that gourmet dessert vibe right at home.
And pro tip: check the butter packaging for a rich yellow color that’s usually a sign of high quality!
Storage guidance : always keep your chocolate cool and your eggs in the fridge. butter can be stored in the freezer if you’re not using it right away.
And flour? a cool, dry place keeps it fresh until your baking day.
Signature Seasoning Blend
Although lava cakes rely on their simple ingredients, what about those signature flavor enhancers ? Let’s talk about how we can elevate these warm desserts.
Spice Combinations and Herb Selections
While i wouldn’t recommend spices for this specific cake, vanilla extract is practically a secret weapon. for those wild and adventurous bakers, maybe a touch of espresso powder could enhance that rich chocolate flavor.
Aromatic Additions
If you're feeling fancy, consider serving your warm molten cakes with a side of whipped cream infused with cinnamon or even orange zest for a fresh twist.
They say chocolate and berries pair beautifully , so feel free to get creative here!
Smart Substitutions
For those times you find yourself knee deep in flour but missing an ingredient, no worries!
Alternative Options
Running out of semi sweet chocolate? You can substitute with dark chocolate just make sure it’s not too bitter!
- dairy-free Version : Replace butter with coconut oil and use dairy-free chocolate chips.
- gluten-free : Swap the all-purpose flour for almond flour . It gives an interesting flavor and is nutty delicious!
Seasonal Variations
Don’t just stick to the plain jane recipe! During the holidays, why not add a splash of peppermint extract?
Kitchen Equipment Essentials
Alright, now let’s chat about the kitchen gear you’ll need. These tools can honestly make the difference between a good dessert and a “wow!” moment!
Must Have Tools and Recommended Appliances
You’ll definitely want ramekins or small oven safe bowls. these little wonders help keep your cakes individual and adorable perfect for plating! a double boiler or microwave safe bowl is essential for melting that chocolate to silky perfection.
Helpful Gadgets and Home Alternatives
Don’t underestimate the power of a whisk seriously! And if you don’t have a double boiler, just throw a heat resistant bowl over a pot of simmering water. Bam! Improvised double boiler.
Pro Ingredient Tips
When I started baking, I wished someone had shared these selection secrets with me.
- Quality Markers : Always opt for chocolate with a short ingredient list good chocolate doesn’t need much!
- Storage Solutions : Keep chocolate in a cool, dark place. It loves the cool but not too cold. If it gets too chill, it might bloom (that weird white coating).
- Money Saving Tips : Buy in bulk! If you bake often, sourcing your chocolate chips in larger quantities can save you some serious cash.
And there we have it, friends! once you have all your ingredients prepped , you’ll be ready to embrace the next fun part the cooking instructions.
So, let’s get ready to whip up these mouthwatering chocolate lava cakes they’re sure to impress anyone lucky enough to try them!
Chocolate Lava Cakes: Master Chef's Method
Oh my gosh, let’s talk about decadent chocolate lava cakes ! if you’re a chocolate lover (like me!), this recipe is going to be your go-to for impressing dinner guests or just treating yourself after a long week.
Seriously, they’re like a hug in dessert form, with that ooey gooey molten center that just flows out when you slice into it.
Now, let’s dig into how we can whip up these restaurant quality desserts using a bit of strategy and some classic baking tips and tricks .
Essential Preparation Steps
First off, we need to nail the mise en place . this fancy french term just means having everything ready to go.
You want your ingredients measured out before diving into the baking. so, gather your softened butter, chocolate chips, eggs, and a few other essentials .
It’ll save you time later.
Prep Techniques:
- Grease those ramekins well! Butter and a dusting of flour will help the cakes pop out without a hitch.
- Chop your chocolate chips finely if you're not using a double boiler. This helps them melt more evenly, which means no pesky lumps!
Time Management and Organization Tips:
- Set a timer for your chilling and baking; these cakes are all about timing .
- Clean as you go! It makes a world of difference and keeps your kitchen from looking like a bomb went off.
Professional Cooking Method
Ready for the fun part? Let’s get baking. Preheat your oven to 425°F (220°C) . That’s the sweet spot for these babies.
Melt : Get your butter and chocolate all melty in a double boiler or microwave. Gradually stir until it’s smooth and glossy. You'll want that rich chocolate aroma wafting through your kitchen.
Whisk : In a separate bowl, whisk together the whole eggs, egg yolks, sugar, and vanilla . It should get light and airy this is a good sign that you’re on track.
Combine : Gently fold that chocolate mixture into the egg mix. You want to keep that airy texture, so be gentle!
Sift and Mix : Add in your flour and salt, folding just until everything’s combined. No overmixing, or you’ll end up with tough cakes instead of those soft, warm, luscious centers.
Chill : Divide your batter into the ramekins and chill for about 30 minutes . This helps maintain that gooey center.
Timing Precision and Success Indicators:
- Bake them for 12-14 minutes . The edges should be firm, but the center should still jiggle a bit. That’s your cue it’s going to be molten magic!
Expert Techniques
Let’s talk about critical steps to guarantee greatness:
- high-quality chocolate is a non-negotiable! Use the good stuff; it truly elevates your chocolate desserts .
- If you're feeling adventurous, throw in some espresso powder or a splash of Grand Marnier for a twist!
Quality Checks:
- For the best results, test a single cake first! Trust me, if it's underdone, you’ll know to adjust your timing for the rest.
Success Strategies
Now, here comes the real fun! If you encounter any issues, don’t worry. Here are some troubleshooting tips :
- Not molten enough? Next time, reduce the baking time a little. Practice makes perfect!
- If you want to add some flair, use powdered sugar for dusting and fresh berries on top. They brighten up the dessert, plus chocolate and berries are an epic pairing.
Quality Assurance Tip : Serve immediately after baking for the best experience. This cake wants to be enjoyed warm, with that delightful contrast of flavors that only a warm dessert can deliver.
These mini desserts are perfect for special occasions , and they’re a show stopper that can elevate any dinner party.
Feeling inspired? Let’s explore some additional information about transformational desserts that can make any gathering feel festive!
Expert Kitchen Wisdom
Oh my gosh, let’s talk about the molten chocolate cake , shall we? you know, it always seems so fancy, like something you'd order at a swanky restaurant, but trust me, it’s achievable right in your own kitchen.
When i first tried making this delicious french dessert recipe, i was terrified. but here’s the thing once you get the hang of it, you can whip up these decadent sweets with the confidence of a seasoned baker.
One key professional insight is timing: you want that center to be lava like, not a solid cake. the recipe reflects a moderate difficulty level, so you'll want to pay close attention but don’t fret you'll nail it, promise! a bit of culinary wisdom?
Use high-quality chocolate; it really makes a world of difference in those rich chocolate recipes.
Perfect Presentation
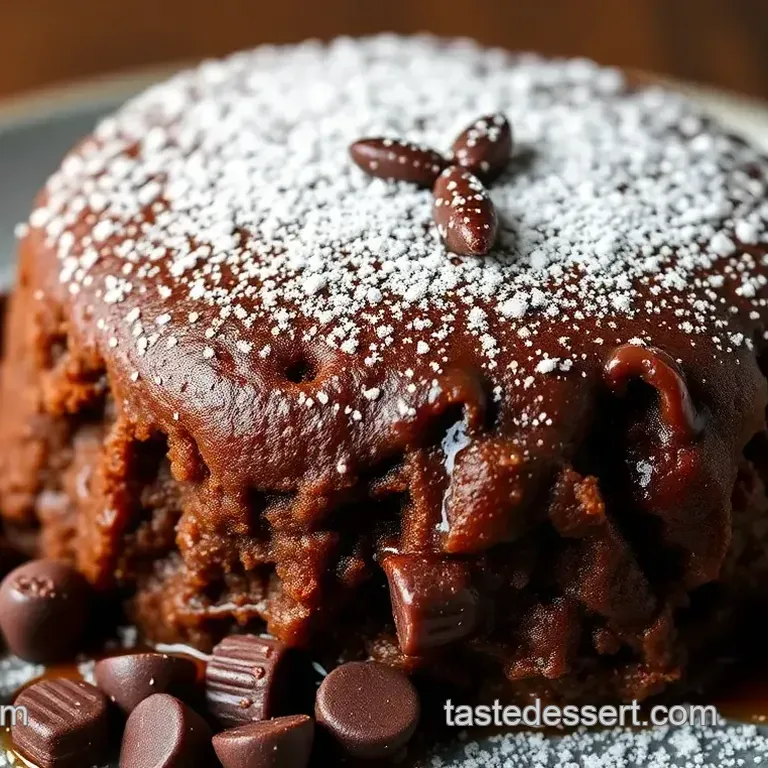
Now, let’s chat about how to present these charming individual desserts. plating techniques are important! i like to dust a bit of powdered sugar over the top before serving; it transforms an ordinary dessert into something extra special.
And those chocolate dessert toppings ? fresh berries like strawberries or raspberries not only add color but also a lovely tartness that cuts through the richness.
Here’s a little secret: serving suggestions can elevate your dessert from good to absolutely restaurant quality desserts . Think about a scoop of vanilla ice cream on the side for temperature contrast nothing beats that experience of warm cake and cold ice cream melting in your mouth!
Storage and make-ahead
If you’ve got leftovers (though i doubt it), here’s how to store those beauties. allow the cakes to cool completely, then cover them lightly with plastic wrap don’t squash them! they can be kept in the fridge for a couple of days, but honestly, they’re best served fresh.
Now, if you want to prep ahead, chill the batter for about 30 minutes before baking. That’s a brilliant way to ensure you have delicious, warm desserts ready for any special occasion just pop them in the oven when guests arrive, and you’re golden!
Creative Variations
Oh, the fun of experimenting with flavors! want to switch things up? try adding espresso powder to amp up the chocolate flavor, or sprinkle in some sea salt for a decadent touch.
And if you’re feeling adventurous, consider lava cake variations using white chocolate; it’s such a unique approach.
For those who might be restricted on certain ingredients, you can totally adapt this recipe. coconut oil in place of butter works wonders for a dairy-free delight, or swap out regular flour for almond flour to make a gluten-free version.
Life’s too short to have boring desserts!
Complete Nutrition Guide
Now, let’s chat numbers. each rich, heavenly cake is about 330 calories. sure, it's indulgent, but remember, you deserve some sweet luxury now and then.
The debatable “dietary information” gets a special mention here too; this chocolate lava cake is packed with flavor but not too heavy on guilt, especially if you savor it mindfully.
Perfect for those cozy nights in!
Portion Guidance
Serves four make sure to share or you might eat all of them yourself. I once made a batch and ended up, well, sampling more than just one, if you catch my drift!
Expert FAQ Solutions
A quick run-through of common concerns: how to make lava cake? simply follow the recipe, and remember, the key is to under bake slightly.
If the center isn’t molten enough on your first try, don’t sweat it practice makes perfect! and if you encounter a cake that sticks to the ramekin? just run a small knife around the edge before inverting.
So there you have it your complete guide to creating decadent chocolate lava cakes ! this dessert is perfect for sharing with someone special, or just enjoying alone after a long day.
There’s a little magic in every bite, whether you make it exact or add your own twist. the key is to enjoy the experience of creating something special in your kitchen.
Happy baking!
Decadent Chocolate Lava Cakes