Dessert Charcuterie Board

Have you ever found yourself wondering why dessert feels extra special when it’s laid out in a colorful, artful spread? it’s true there’s something undeniably charming about a dessert charcuterie board.
Imagine it: a feast for the eyes and the taste buds, brimming with sweetness and colors that whisper “come share me with friends!" this is what makes the dessert charcuterie board a notable choice for any gathering.
Perfect for entertaining, this no-cook masterpiece takes just about 45 minutes to prep and is, honestly, as easy as pie so this recipe is perfect for anyone, regardless of skill level!
When we dig a bit into the backstory of charcuterie boards, we find some intriguing history. originating from france, the word charcuterie traditionally refers to the art of preparing cured meats.
But over the years, our good old charcuterie has evolved into a delightful platter filled with a variety of cheeses, fruits, nuts, and now, our beloved sweets! today, it encompasses all sorts of culinary arrangements meant to tantalize the senses.
Picture this: bustling gatherings where friends swap stories over beautiful displays of food.
This dessert charcuterie board takes that idea and runs with it. it mixes the childhood nostalgia of sweet treats with the sophistication of elegant dessert presentations.
You get the satisfaction of putting together a vibrant assortment for your guests, minus the fuss of intricate baking or cooking.
And here’s the scoop: when everyone contributes to the bites they choose, it fosters a shared experience that’s a real treat! plus, if you’re short on time, fear not there are plenty of dessert charcuterie board delivery options that can save the day!
What i love most about this recipe is its versatility. picture a lavish blend of fresh fruits, dreamy chocolates, an assortment of cheeses, and fun sweets just waiting to be explored and enjoyed.
With flavors dancing together, each bite can be a different adventure. and let’s face it, who doesn’t love a little creativity? arranging a dessert board and sharing it with loved ones can turn a simple gathering into a party.
Now onto the nitty gritty of why this recipe is so appealing: it’s all about the ease. with no cooking involved, it’s practically foolproof, and you can easily customize it to suit any preference from vegan alternatives to gluten-free options.
Trust me, i’ve learned from experience that having a variety is the key to satisfaction. once, i made a half hearted charcuterie board with all the same flavor profiles.
Nothing too exciting happened, and let me tell you, it left guests munching nervously on plain crackers. but with this dessert charcuterie board, everyone will have something delectable to indulge in.
Nutritionally speaking, the board is surprisingly balanced, combining sweet fruits with protein from cheeses and a satisfying crunch from mixed nuts.
The assembly takes just 45 minutes and serves about 6 to 8 people making it a cost efficient option for hosting!
Feeling inspired? i hope so! before we dive into the ingredients for this delightful dessert charcuterie board, keep this in mind: the beauty here lies not only in the flavors but in how you arrange everything.
Think of it like art. who’s ready to mix flavors, colors, and textures together for a truly engaging and delicious experience? let’s gather our goodies and get started on this culinary journey!
Essential Components Guide
Premium Core Ingredients
To build a killer dessert charcuterie board, start with the premium core ingredients . I swear by these picks, and you’ll want to snag the best quality possible. Here’s what you need:
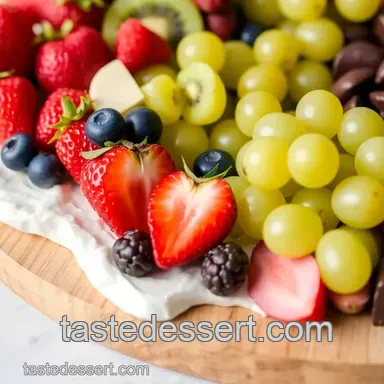
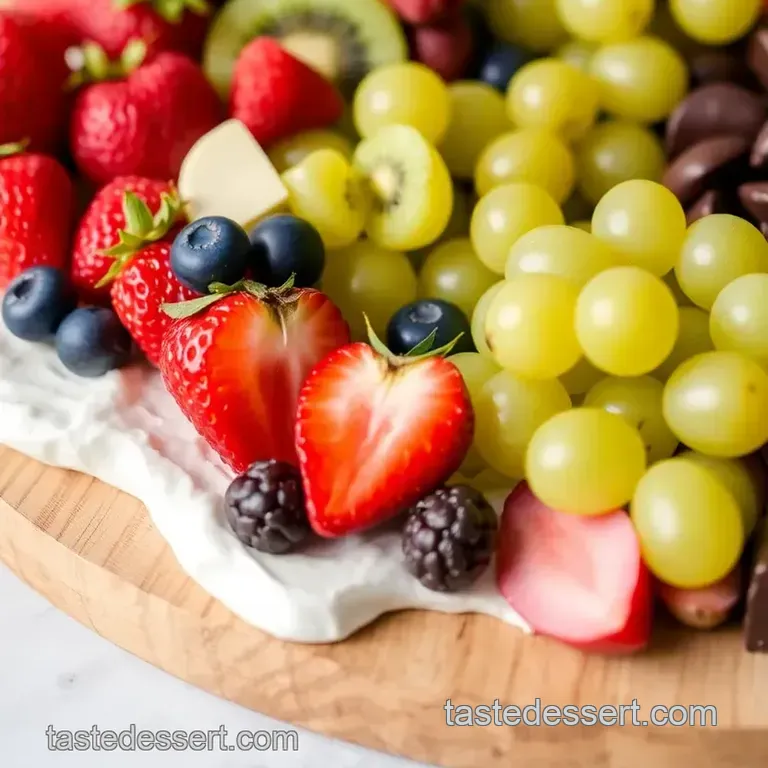
Fruits : aim for about 1 cup each of strawberries, blueberries, raspberries, sliced kiwi, and grapes. look for fruits that are bright in color and firm to the touch.
Skip anything that looks mushy or sad no one wants that!
Sweets : you’ll need a mix of chocolates, cookies, and mini doughnuts. grab one cup of each, but trust your gut! if you’d rather have more chocolatey goodness, go for it.
Look for artisanal chocolates if you can they just hit differently!
Cheese : get 4 oz each of cream cheese, mascarpone, and brie. always opt for the good stuff look for cheeses that smell slightly tangy.
Stick a thumb into the cream cheese to see how soft it is; it should be spreadable, not rock hard!
Spreads : half a cup each of nutella, jam, and honey will sweeten the deal. i find the good jams at a local farmer's market, where they're often bursting with flavors from real fruit rather than just sugar.
Nuts and Seeds : A ½ cup of mixed nuts is perfect. Buy raw or lightly roasted for the best flavor. Keep those in an air-tight container to keep them fresh.
Signature Seasoning Blend
Now let’s sprinkle in those extra magic touches!
Herbs and spices : Add fresh mint leaves or basil to the mix. They don’t just make it look nice; they add a freshness that'll surprise your guests.
Aromatic additions : consider adding some edible flowers for a stunning visual! it really elevates the board and makes it look chef’s kiss .
You can find them in the fresh produce section at the grocery, or sometimes, the herb aisle!
Smart Substitutions
Life happens, right? Here are some smart substitutions for any last minute hiccups:
Cheese : Don’t have mascarpone? Try goat cheese for a tangy kick, or even a nut-based cheese for a vegan option.
Sweets : If you can’t find your favorite cookies, brownies make a fabulous stand-in. Or, toss in some chocolate covered pretzels for an extra salty sweet vibe.
Fruits : If fresh fruit is scarce, you can opt for dried fruits like apricots or figs. They add a lovely chewiness that complements the other textures.
Kitchen Equipment Essentials
As you start to gather your ingredients, don’t forget about the tools you need!
Must have tools : A big wooden board or slate tile will be your canvas for this masterpiece. Make sure it’s clean, and you’re ready to create!
Helpful gadgets : Small bowls for jams and spreads are key. If you have a cheese knife, that’ll make cutting the brie a breeze!
Home alternatives : No wooden board? No problem! A large plate or even a clean cutting board will work wonders. Just get creative!
Pro Ingredient Tips
As someone who’s learned a sprinkle of wisdom from trial and error, here are some pro ingredient tips :
Always taste before you serve . I can’t count how many times I’ve made a spread only to find out it was bland. Adjust as needed!
Look for seasonal fruits to maximize flavor. Strawberries in June are a world away from those anemic, out-of-season ones in winter. Trust me!
For storage, keep leftovers wrapped tightly in plastic or stored in airtight containers. It shouldn’t go to waste; those treats are precious!
So, now we’ve gathered up all the essentials for an amazing dessert charcuterie board. with the ingredients ready, it's time to get into the fun part: assembling everything into a beautiful spread that your friends will absolutely love!
In the next section, i’ll walk you through each step to build your dessert masterpiece, one delicious layer at a time.
Get excited for this!
Foolproof Cooking Steps for a Delicious Dessert Charcuterie Board
Creating a dessert charcuterie board is like hosting a little celebration on a platter! trust me; it’s both easy and delightful.
You'll have a sugary spread that’ll make you the talk of the town. here’s how to do it, step-by-step.
Essential Preparation Steps
Mise en Place Details
First things first, let’s get organized. gather all your ingredients fruits, sweets, cheeses, spreads, and nuts and place them on the counter.
It’s like bringing your friends together before a big event. you want everyone ready to shine!
Prep Techniques
Wash your berries and grapes under cool running water. for the kiwi, slice it with a sharp knife into rounds (or in half if you prefer a decorative look).
Cream cheese? let it soften at room temperature; trust me; it'll spread like a dream.
Time Management
You only need about 45 minutes to prep this heavenly platter. so let’s not dawdle. while you prep one item, keep an eye on time, and think about what can be done next.
Organization Tips
Grab a large wooden board or a beautiful slate tile. this is your canvas! make sure it’s clean and dry presentation is half the fun! i once plopped my goods on a not-so-clean cutting board, and, let’s just say, that didn’t go over well at dinner.
Professional Cooking Method
Step-by-step Process
First, Arrange the Cheeses : Place your cream cheese and mascarpone in dollops, like clouds, on one side of the board. The brie? Cut it into wedges and nestle it nearby.
Next, Add Sweets : Group assorted chocolates, cookies, and mini doughnuts in clusters. Think of it like arranging seating at a party; you want similar vibes close together!
Build the Fruit Section : Use your luscious berries and sliced kiwi to fill any gaps. Make it colorful after all, we eat with our eyes first!
Nuts and Spreads : Sprinkle mixed nuts around for crunch, and place small bowls of Nutella, honey, and jam in corners for easy access.
Temperature Control and Timing Precision
Everything here is non-cooked, so the main thing is to keep the cheeses and fruits chilled but not cold. you want them to be deliciously fresh! i usually pop the cheeses in the fridge while i prep other items.
Success Indicators
You’ll know your board is ready when everything looks inviting and appetizing. It should entice your guests to dig in!
Expert Techniques
Professional Methods
Let your creativity flow; there’s no one way to arrange your board! Use aspects from nature for inspiration.
Critical Steps
Insist on quality over quantity. Choose seasonal fruits for the best flavors nothing beats fresh strawberries in the summer!
Precision Points
When it comes to placement, don’t cram too much together. Leave some space for guests to pick and choose.
Quality Checks
Give it a quick look; everything should be fresh and vibrant. If something's looking sad, like a mushy strawberry, toss it out.
Success Strategies
Troubleshooting Tips
If you have leftover space, consider adding in some alternative dessert options. Think brownies or mini cheesecakes.
Quality Assurance
If assembling seems daunting, take a step back and simplify. Focus on a few key ingredients it’s better to do a few things well than to overcomplicate.
Perfect Results Guide
To ensure perfect results, make sure guests have the right tools: small forks or toothpicks. Everyone loves a DIY experience, plus it keeps things tidy!
Gosh, once you see that dessert charcuterie board delivery arrive at the party, the smiles on your friends’ faces will make all those steps worth it! with a bit of practice and your newfound confidence, you'll be creating gorgeous spreads in no time.
Ready for more? hang tight! in the next section, we'll dive into some clever ideas for customizing your dessert boards and how to make them shine for any occasion.
Whether it's for a special event or just a cozy night in, there's always room for creativity.
Master Chef's Advice
Let me share some insider tips for whipping up a killer dessert charcuterie board. first off, it’s all about combining textures and flavors.
My first board looked a bit, well, like a fruit explosion gone wrong because i didn’t consider pairing flavors. so, expert tip: go bold! think dark chocolate with the tang of fresh strawberries or creamy brie paired with the sweetness of honey.
Professional chefs love to balance sweet with savory, so don’t shy away from cheese and nuts in your setup. trust me, you’ll be amazed by the results!
Kitchen wisdom ? always prep ahead! i’ve had my moments frantically cutting fruit while guests arrive. preparing everything beforehand not only gives you peace of mind but also guarantees a stellar presentation.
And if you're wondering about success, i can assure you the combination of fresh ingredients and thoughtful arrangements will impress everyone.
It’s practically guaranteed, unless you accidentally forget your whole dessert platter in the fridge (oops!).
Perfect Presentation
Now, let’s dive into the fun part plating ! arranging a dessert charcuterie board is an art form in itself.
Start with large items like cheese wedges and then slowly fill in the gaps with fruit and sweets. i like to create visual interest by mixing colors; the vibrant reds of strawberries against the creamy whites of brie make for an eye-catching contrast.
For an added flair, consider little garnishes maybe some mint leaves or even edible flowers . Last summer, I got a bit wild and threw some daisies in my board, and wow, it really elevated the whole vibe!
And don’t forget how you serve it. providing small forks or medley dessert spoons invites guests to mingle while they create their personal dessert journey.
It's a lovely way to break the ice plus it gives you a chance to sneak some cookies for yourself!
Storage and make-ahead
One of the perks of a dessert charcuterie board is you can prep it ahead of time. is there anything better than preparedness ? for storage , keep things clean.
Place berries in a breathable container, and keep cheese wrapped until assembly to preserve its freshness.
If you're making it a day ahead, store certain items in the fridge separately and assemble just before serving. also, i learned the hard way not to let chocolate sit around too long; it can get a bit melty in hot weather.
And, when it comes to reheating well, guess what? there’s no cooking here! just pop it out and let the sweet magic happen once more.
Creative Variations
Feeling adventurous? the beauty of a dessert charcuterie board is that it’s super flexible. swap out your standard fruits for seasonal delights or unique alternatives.
I love using figs in the fall they lend a lovely flavor and a touch of elegance.
You can even think about dietary modifications if you have gluten-free or vegan friends. try using almond or coconut based cheeses, and swap out cookies for no-cook dessert recipes , such as raw energy bites made with oats and natural sweeteners.
The world of flavor is your oyster or in this case, your dessert platter!
Complete Nutrition Guide
Alright, let’s get real about the nutrition . each serving of our dessert charcuterie board comes in at about 350 calories .
It’s a fun treat, but be mindful of portions. i sometimes face the dilemma of wanting to devour the entire thing during family gatherings, but sticking to a reasonable size will help you enjoy it without the guilt.
Mixing in fruits and nuts not only adds flavor but brings health benefits as well. fresh fruits like blueberries are known for their antioxidants, while nuts provide a dose of healthy fats.
A little indulgence can go a long way when you mix in healthy options!
Expert FAQ Solutions
And since i’ve had my fair share of questions while experimenting, let’s touch on some common concerns. what if the chocolate melts? well, it’s often a little humid here in the uk, so i learned to opt for high-quality chocolate with a lower melting point.
Also, if you’re creating a dessert charcuterie board for delivery or events, think about transportation ; keep the board chilled until serving.
What if i mess up the presentation? honestly, don’t sweat it! sometimes the best boards look a bit like a arranged circus of delights.
Trust me, no one will complain when there’s something sweet to munch on together. quick success tip: keep it fun and interactive.
Encourage your friends to dive in and create their own dessert masterpieces!
In conclusion, a dessert charcuterie board isn’t just a dish; it’s a delightful experience. whether you’re indulging solo or sharing it with others, embracing creativity, simplicity, and love for food will always win the day.
So why not take that plunge, gather some friends, and get the chocolate charcuterie board delivery sorted? your next gathering is bound to be a sweet success!
Dessert Charcuterie Board