Easter Cake Recipehtml
- Time: Active 45 minutes, Passive 35 minutes, Total 1 hour 20 mins
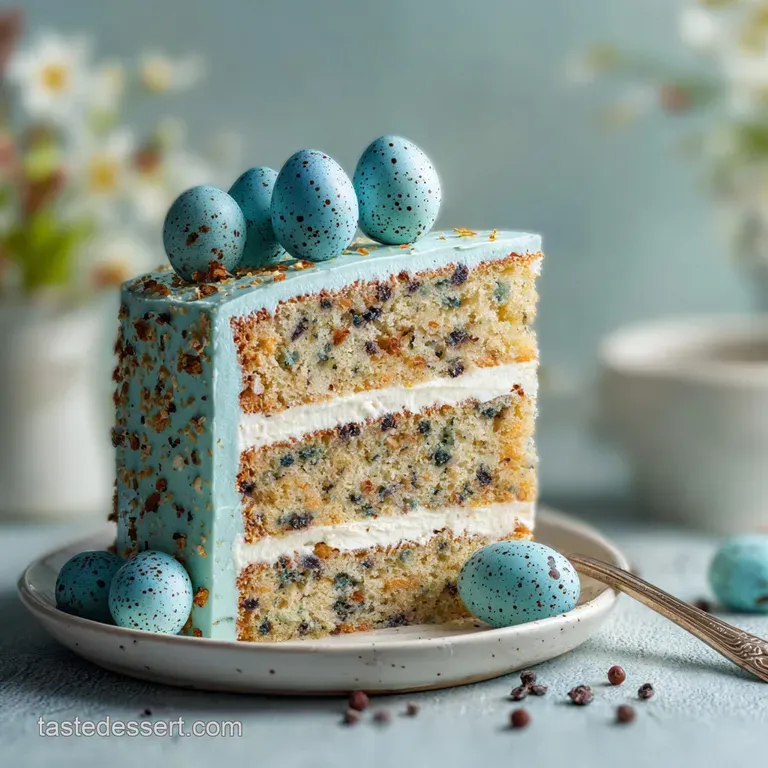
- Flavor/Texture Hook: A shatter crisp malted egg topping over silky blue buttercream and a buttery, tender crumb.
- Perfect for: Easter brunch, spring garden parties, or a show stopping family Sunday dinner.
- Master the Ultimate Easter Cake Recipehtml
- The Molecular Architecture of Spring Bakes
- Component Analysis for Baking Success
- The Essentials for Your Bake
- Necessary Tools for the Job
- From Batter to Finished Masterpiece
- Solving Common Baking Hurdles
- Flavor Adaptations and Simple Swaps
- Debunking Common Baking Beliefs
- Keeping Your Cake Fresh Longer
- Presentation and Perfect Slicing Tips
- Easter Cake Recipe FAQs
- 📝 Recipe Card
Master the Ultimate Easter Cake Recipehtml
The air in my kitchen currently smells like a mix of toasted coconut and pure vanilla bean, and honestly, it’s the best kind of aromatherapy. I remember the first time I tried to make a "speckled" cake; I ended up with more cocoa vanilla splatter on my white curtains than on the actual frosting.
It was a mess, but the way my nieces' eyes lit up when they saw that blue, robin’s egg finish made every scrubbed spot worth it.
This particular easter cake recipehtml is the result of years of tinkering with buttermilk ratios and finding the exact shade of "sky blue" that doesn't look like a science experiment. We’ve all been there the dry cake, the frosting that’s too sweet, or the decorations that just won't stay put.
This guide is about moving past those "Pinterest fails" and into the territory of a dessert that actually tastes as good as it looks.
We aren't just making a cake here; we’re building a memory. Whether you’re a seasoned pro or this is your first time wielding a palette knife, I’ve got you covered. We're going to lean into the science of a moist crumb and the art of a perfectly messy coconut nest.
Trust me, once you see those chocolate "speckles" hit the blue buttercream, you'll feel like a regular Van Gogh.
The Molecular Architecture of Spring Bakes
Acidic Activation: The buttermilk reacts instantly with the baking soda to create carbon dioxide bubbles, ensuring a light, airy rise.
Fat Suspension: Using room temperature butter allows it to emulsify with the eggs, creating a stable fat in-water emulsion that prevents a greasy texture.
The Maillard Response: Toasted coconut undergoes a chemical reaction between amino acids and reducing sugars, transforming it from bland to nutty and golden.
Gluten Regulation: The high sugar content in this recipe actually interferes with gluten development, keeping the "shatter" of the crumb tender rather than bread like.
| Aspect | Classic Method | Fast Version |
|---|---|---|
| Texture | Velvety, fine grained crumb | Slightly denser, muffin like |
| Preparation | Three layer assembly for height | Single 9x13 pan for speed |
| Decoration | Hand speckled artistic finish | Simple swirl with candy toppers |
Choosing the right approach depends on your afternoon. If you have the time to let the sponges cool properly, the three layer classic version offers that "wow" factor that guests will talk about for weeks.
If you’re in a rush, a single layer still carries those delightful almond and vanilla notes without the structural stress.
Component Analysis for Baking Success
| Ingredient | Science Role | Pro Secret |
|---|---|---|
| Buttermilk | Tenderizes gluten through acidity | Shake the carton vigorously before measuring for even fat distribution. |
| Unsalted Butter | Provides structure and "mouthfeel" | Use high-quality European style butter for a higher fat percentage. |
| Almond Extract | Enhances the aroma profile | A tiny amount "tricks" the palate into thinking the cake is richer than it is. |
The Essentials for Your Bake
- 3 cups (375g) all purpose flour: Why this? Provides the perfect protein balance for a sturdy but soft layer.
- Substitute: 1:1 gluten-free baking flour (with xanthan gum).
- 1.5 tsp baking powder & 0.5 tsp baking soda: Essential leavening duo.
- 1 tsp salt: Sharpens the sweetness.
- 1.5 cups (300g) granulated sugar: Sweetness and moisture retention.
- 1 cup (226g) unsalted butter, room temperature, cubed: The flavor base.
- 4 large eggs, room temperature: Why this? Room temp eggs incorporate without curdling the batter.
- 1 cup (240ml) full fat buttermilk: For that classic tang.
- Substitute: 1 cup milk + 1 tbsp lemon juice (let sit 10 mins).
- 2 tsp pure vanilla extract: Always use the real stuff.
- 0.5 tsp almond extract: The secret "bakery" flavor.
For the frosting and decor:2 cups (450g) unsalted butter, softened5 cups (625g) powdered sugar, sifted: Why this? Sifting prevents tiny "sugar rocks" in your smooth finish.0.25 cup (60ml) heavy cream1 drop sky blue gel food coloring: Gel is better than liquid as it won't thin the frosting.
1 tbsp unsweetened cocoa powder + 2 tsp vanilla extract: Our "speckle" paint. 1 cup shredded coconut, toasted1 bag (approx. 280g) malted milk easter eggs
Necessary Tools for the Job
You’ll want three 8 inch round cake pans for this. If you only have two, you can bake in batches, but the height of a three layer cake is what really sells the "Easter nest" look.
A stand mixer like a KitchenAid is your best friend here, especially for the buttercream, which needs a lot of aeration to become truly fluffy.
A rotating cake turntable and an offset spatula will make the frosting process much less of a headache. For the speckling, grab a clean, food only stiff paintbrush or even a clean toothbrush. I also highly recommend using a kitchen scale for the flour; it’s so easy to accidentally pack a measuring cup and end up with a dry, heavy cake. If you're looking for something a bit different for the kids, you might want to try an Easter Egg Cake Pops recipe alongside this main attraction.
From Batter to Finished Masterpiece

Phase 1: Preparing the Base
Preheat your oven to 350°F (175°C). Grease and flour your three 8 inch pans. Whisk the 3 cups of flour, baking powder, baking soda, and salt in a medium bowl until combined. Note: This ensures no one gets a clump of baking soda in their slice.
Phase 2: The Creaming Process
In your stand mixer, beat the 1 cup of butter and 1.5 cups of sugar on medium high until pale and fluffy (about 3-4 minutes). Add the eggs one at a time, beating well after each. Note: Scraping the bowl after each egg ensures a uniform texture.
Stir in the 2 tsp vanilla and 0.5 tsp almond extract.
Phase 3: The Alternating Addition
Turn the mixer to low. Add one third of the flour mixture, then half of the 1 cup buttermilk. Repeat, ending with the flour. Mix only until a few streaks remain. Note: Overmixing at this stage creates a tough, rubbery cake. Divide the batter evenly between the pans.
Phase 4: The Oven Transformation
Bake for 30-35 minutes until a toothpick comes out with just a few moist crumbs. The tops should be golden and spring back when lightly touched. Let them cool in the pans for 10 minutes before transferring to wire racks. They must be completely cold before frosting.
Phase 5: Whipping the Blue Skies
Beat the 2 cups of softened butter for 5 minutes until it looks almost white. Gradually add the 5 cups of powdered sugar, the heavy cream, and a pinch of salt. Add the sky blue gel coloring one drop at a time until you reach a soft pastel. If you love this base, it’s very similar to my favorite Yellow Cake Recipe.
Phase 6: The Speckle and Nest
Mix the 1 tbsp cocoa and 2 tsp vanilla in a small bowl to form a "paint." Once the cake is frosted, dip your brush into the mixture. Use your finger to flick the bristles toward the cake, creating "speckles." Top with toasted coconut and the malted eggs.
Note: Do the speckling inside the sink or a large box to contain the mess!
Solving Common Baking Hurdles
Why Your Cake Sinks in the Center
It's heartbreaking to see a beautiful rise collapse. This usually happens if the oven door is opened too early, causing a sudden temperature drop before the structure has set. Alternatively, using expired baking powder means there wasn't enough "lift" to support the weight of the flour and sugar as it baked.
The Mystery of the Grainy Frosting
If your buttercream feels like sandpaper, the powdered sugar wasn't sifted or the butter was too cold. Butter needs to be soft enough that your finger leaves an indent, but not so soft that it's oily.
If it's already grainy, try adding a tablespoon of warm heavy cream and beating it for another 5 minutes on high speed.
| Problem | Root Cause | Solution |
|---|---|---|
| Dry, crumbly cake | Overbaked or too much flour | Brush layers with simple syrup before frosting |
| Frosting sliding off | Cake still warm | Chill cake layers in fridge for 30 mins before assembly |
| Dull blue color | Using liquid coloring | Use gel paste for vibrant, saturated pastels |
Common Mistakes Checklist
- ✓ Ensure eggs and buttermilk are truly room temperature (it takes about 1 hour on the counter).
- ✓ Don't skip the salt in the frosting; it cuts through the "sugar shock."
- ✓ Toast the coconut carefully it goes from white to burnt in about 30 seconds.
- ✓ If the cake domes too much, use a serrated knife to level the tops for a stable stack.
- ✓ Clean your "speckle" brush thoroughly so you don't get stray bristles in the icing.
Flavor Adaptations and Simple Swaps
To scale this recipe down for a smaller gathering, you can halve the ingredients and bake in two 6 inch pans. The cook time will stay roughly the same, but keep an eye on it after 25 minutes.
To scale up for a large party, double the recipe and use four 9 inch pans, but be careful not to double the salt and spices use about 1.5x the amount instead to keep the flavors balanced.
If you're looking for a variation, this base is incredibly versatile. You could swap the almond extract for lemon zest to create a brighter spring flavor. For those who want something even more elegant, look at the technique used in my Raspberry Chocolate Cake Roll recipe to see how fruit can change the entire profile of a holiday dessert.
| If you want... | Do this... |
|---|---|
| A deeper chocolate hit | Replace 0.5 cup flour with dark cocoa powder |
| A tropical twist | Use coconut milk instead of buttermilk |
| A lighter texture | Use cake flour instead of all purpose |
Debunking Common Baking Beliefs
One massive myth is that you need to "seal the pores" of the cake with a crumb coat. While a crumb coat is helpful for a clean look, it doesn't actually change the moisture level of the cake. It’s purely aesthetic!
Another one is that "more leavening equals more rise." In reality, too much baking powder will cause the cake to rise too fast and then implode, leaving you with a dense, sunken mess.
Finally,, many people believe you can't over cream butter and sugar. You actually can! If you beat them for 10 minutes, you'll incorporate too much air, which will expand in the oven and then collapse, creating large, uneven holes in your cake's crumb. 3 to 5 minutes is the sweet spot.
Keeping Your Cake Fresh Longer
This cake keeps beautifully in the fridge for up to 5 days. Just make sure to cover the cut sides with plastic wrap or extra frosting to prevent the air from drying out the sponge. For longer storage, you can freeze individual slices.
Wrap them twice in plastic wrap and once in foil; they’ll stay delicious for up to 3 months. To reheat, just let them sit at room temperature for an hour.
Don't throw away those cake scraps if you leveled the tops! I like to crumble them up, mix with a spoonful of leftover frosting, and roll them into "cake truffles." You can even use the leftover toasted coconut as a coating.
If you have extra egg whites from another project, they can be frozen for up to 6 months in a sealed container perfect for a future meringue or pavlova.
Presentation and Perfect Slicing Tips
To get those clean, professional looking slices, use a thin, sharp knife and a tall glass of hot water. Dip the knife into the water, wipe it dry with a clean towel, and make your first cut. Repeat the dipping and wiping for every single slice.
It sounds tedious, but it prevents the blue frosting from smearing into the white cake layers.
Pair this cake with a light, sparkling rosé or a crisp Earl Grey tea. The floral notes in the tea play beautifully with the almond extract in the sponge. If you're serving this to kids, a cold glass of milk is the classic choice that never fails.
Most importantly, don't worry if the "nest" on top looks a bit wild nature isn't perfect, and your Easter cake shouldn't be either! It's all about that homemade charm that makes everyone feel at home.

Easter Cake Recipe FAQs
Can I use melted butter instead of softened butter for the cake batter?
No, stick with softened butter. Melted butter can lead to a denser cake by overdeveloping gluten and can cause the cake to spread too much while baking.
How do I prevent my Easter cake from sinking in the middle?
Ensure accurate baking time and oven temperature. Sinking often occurs if the cake is underbaked, the oven temperature is too high, or the oven door is opened too soon during baking.
What's the best way to get a smooth, even layer of blue frosting?
Chill your cake layers before frosting. A cold cake is firmer and less likely to crumble or have the frosting slide off, making it easier to achieve a smooth finish.
Can I substitute the buttermilk in the recipe?
Yes, a common substitute works well. Mix 1 cup of milk with 1 tablespoon of lemon juice or white vinegar and let it sit for 5-10 minutes before using it as a buttermilk replacement, similar to how we might adapt a base for other recipes.
How do I achieve the "speckled" effect for the Easter cake decoration?
Create a thin "paint" and flick it onto the frosting. Mix cocoa powder with a touch of vanilla extract to make a paste, then use a stiff brush or toothbrush to flick small dots of the mixture onto the blue buttercream.
Is it true that I must use a specific type of food coloring for pastel shades?
No, but gel food coloring is highly recommended. Gel colors are more concentrated than liquid versions, allowing you to achieve vibrant pastel shades without adding excess liquid that could alter the frosting's consistency.
How can I make this Easter cake recipe ahead of time?
Bake and store the cake layers. The sponge layers can be baked up to 2 days in advance, cooled completely, wrapped tightly in plastic wrap, and kept at room temperature.
Easter Cake Recipehtml
Ingredients:
Instructions:
Nutrition Facts:
| Calories | 896 kcal |
|---|---|
| Protein | 6.2 g |
| Fat | 51 g |
| Carbs | 105 g |
| Fiber | 1.2 g |
| Sugar | 84 g |
| Sodium | 478 mg |
