Halloween Snack Board: the Ghouls Gathering Platter
- Unveiling The Ghoul's Gathering: The Ultimate Halloween Snack Board
- Mastering the Balance: The Flavor and Texture Science of a Great Halloween Spread
- Components for Your Haunted Host: Essential Ingredients and Clever Substitutions
- Step-by-Step Guide to Assembling Your Magnificent Halloween Snack Board
- Chef's Troubleshooting: Maximizing Presentation and Avoiding Common Board Mistakes
- Post-Party Practicalities: Storing Leftovers and Ingredient Longevity
- Pairing Perfection: Ideal Drinks and Dips to Serve Alongside Your Platter
- Recipe FAQs
- 📝 Recipe Card
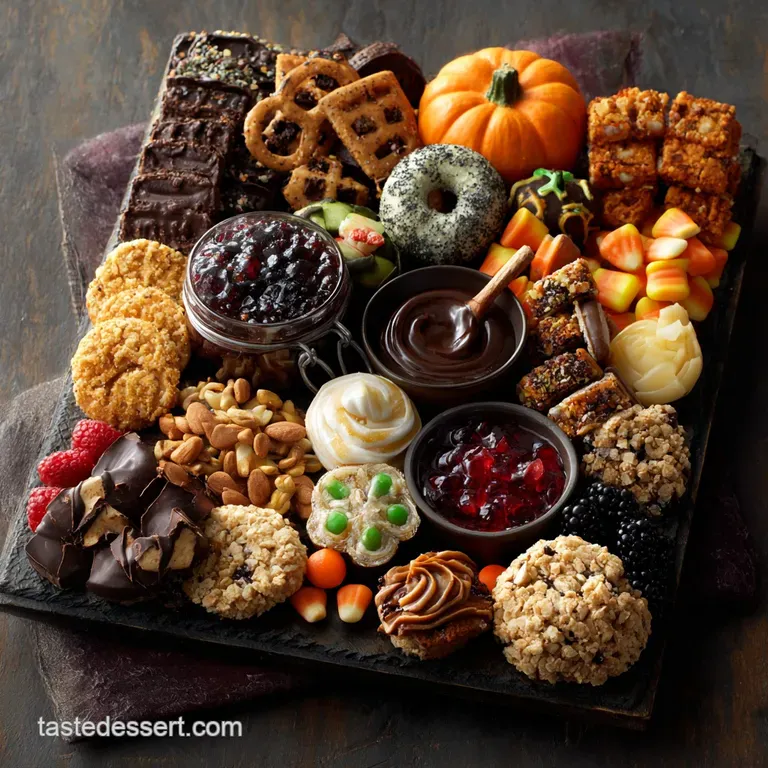
Unveiling The Ghoul's Gathering: The Ultimate Halloween Snack Board
The sight of a fully loaded Halloween Snack Board just hits different, doesn't it? We’re talking about that dramatic, glossy contrast between pitch black grapes, vibrant orange cheddar, and the truly spectacular sight of warm, buttery puff pastry wrapped around oozing brie.
It smells slightly sweet from the candy and savory from the sliced charcuterie, creating an irresistible, bountiful effect.
Forget spending hours messing around with complicated finger foods; this masterpiece is a party superhero. This spooky snacks spread looks utterly magnificent, costs way less than trying to whip up 12 different appetizers, and requires zero complicated cooking techniques it’s pure assembly genius.
It’s the ultimate centerpiece for any grown-up or kid-friendly Halloween party.
Ready to stop messing with sad little bowls of chips and start arranging a showstopper? We’re going to cover all my personal cheats for maximum impact, including a ridiculously simple Mummy Baked Brie and a sinister Spider Web Hummus. Trust me, you are going to look like a culinary genius with this one.
Mastering the Balance: The Flavor and Texture Science of a Great Halloween Spread
Beyond Charcuterie: What Makes a Snack Board Spooky?
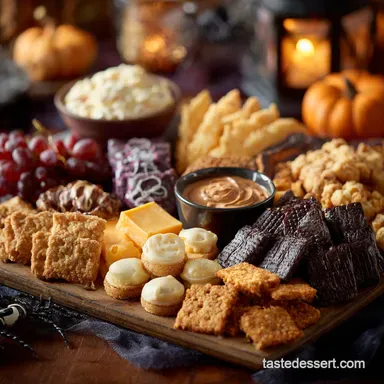
The key to a successful Halloween snack board ideas isn't just throwing orange food on a platter. It’s about leveraging stark contrast. We want strong visuals, like using black charcoal crackers next to bright white goat cheese, and utilizing unexpected savory sweet pairings.
Think glossy black olives next to sticky candy corn that’s the fun, slightly unhinged Halloween vibe we’re going for.
The Art of Assembly: Impressive Results with Zero Cooking Required
My philosophy for the perfect Halloween party foods is all about clever purchasing and intentional placement. We anchor the board with a few high impact, easy components our Mummy Brie and Spider Hummus which do all the heavy lifting visually.
The rest is simply arranging store-bought items around them, filling every gap until the board looks utterly abundant and overflowing.
Target Audience: Who Will Love This Creepy Spread?
Seriously, everyone. Because this board mixes creamy dips, crunchy crackers, fresh fruit, salty meats, and silly candy, it genuinely offers something for every guest. It works just as well for an elevated adult cocktail party as it does for a group of hyped-up trick-or-treaters (just add more candy eyeballs for the kids!).
This is universal snacking joy.
Contrasting Textures: The Crunch of Crackers vs. Creamy Dips
Texture is a non-negotiable factor. You need the satisfying, structural crunch of sturdy breadsticks or the charcoal crackers (essential for that black color!) to balance the smooth, molten lava of the baked Brie. Without that crunch, the whole thing just turns into a creamy pile, and nobody wants that.
Always use small bowls for creamy dips; this prevents soggy cracker disaster.
The Sweet and Salty Dynamic: Enhancing the Palette
We are leaning hard into the sweet and salty dynamic. The saltiness of the prosciutto and the savory depth of the olives are absolutely fantastic next to the light sweetness of fresh grapes and the inevitable handful of candy corn.
This variation keeps guests coming back for "just one more bite" because their palette is constantly being refreshed.
Components for Your Haunted Host: Essential Ingredients and Clever Substitutions
When building the ultimate board, think in layers: Anchors, Savory Contrast, Crunch, and Filler. Here are the must haves and my favorite swaps in case you can't find that perfect item.
The Foundation: Selecting Your Spooky Cheeses and Dips
| Component | Quantity Suggestion | Substitute If Needed |
|---|---|---|
| Mummy Brie | 1 Wheel (13.2 oz) | Camembert, or firm goat cheese log rolled in black pepper. |
| Spider Hummus | 10 oz Container | Black Bean Dip (for darker color) or even guacamole for a bright green swamp look. |
| Orange Cheddar | 6 oz, cubed | Orange Mimolette or even cubes of sharp Colby Jack. |
| Goat Cheese | 6 oz, rolled | Cream cheese mixed with black olives, or Boursin for texture. |
Designing the Edible Decorations: Fruit, Candy, and Olive Accents
Black and orange are your best friends here. You need those deep, moody colors to really sell the spooky vibe. I love the look of grapes still on the vine it just feels more rustic and autumnal.
- Black Grapes: Cluster them loosely, keeping them on the vine. This makes them look like spider eggs, which is wonderfully gross.
- Green Apples: Slice them thin, but always toss them in a little lemon juice right away so they don't turn brown before the party starts.
- Olives: Use black and green olives, draining them well. If you can find the spooky "worm like" green olives stuffed with pimento, grab those!
- Candy Corn/M&Ms: These are purely gap fillers. Use them to sprinkle texture and color into the empty spaces between the larger ingredients.
Crunchy Elements: Cracker Shapes and Breadstick Selection
You need variety in shape and color here. I always look for black or dark gray crackers (like charcoal crackers) because they provide that crucial contrast to the white and orange cheeses. Sturdy water biscuits are also great because they won't snap under the weight of dip.
We include sliced baguette because some guests prefer a soft bread base.
DIY Garnish Hacks: Simple Assembly Shortcuts for Maximal Impact
I once spent 45 minutes trying to carve a miniature pumpkin out of an orange pepper. It looked terrible. Don't be me. Here’s the easy way: Use sliced green olives and small chunks of pimento to make little eyeballs you can scatter across the board. Need a quick sweet element? Check out my recipe for Halloween Mummy Brownies UltraFudgy Recipe for Spooky Treats and cut them into tiny, bite sized squares to sprinkle around. Instant spooky dessert component!
step-by-step Guide to Assembling Your Magnificent Halloween Snack Board

This entire process should take less than an hour, even accounting for the warm Mummy Brie. Let’s crack on.
Preparation Phase: Selecting and Arranging the Anchor Items (The Board Foundation)
- Bake the Mummy Brie: Preheat your oven to 375°F (190°C). Roll out your puff pastry slightly and cut thin strips (about 1/4 inch). Place the Brie wheel on the center of the remaining pastry sheet. Criss cross those pastry strips loosely over the cheese, leaving a small exposed oval area for the "face."
- Egg Wash and Bake: Brush the entire pastry surface generously with the whisked egg wash. Bake for 10– 15 minutes until it is beautifully puffed and golden brown. Immediately press your halved black olives into the face opening for eyes. Set aside to cool slightly before placement.
- Place the Anchors: Place the warm Mummy Brie (or the dedicated spot for it), the ramekin of olives, and the hummus dish (we will decorate the hummus in the next step!) onto the board first. These are your immovable foundation items.
The Cheese Transformation: Shaping Soft Cheeses for Visual Appeal
The key here is presentation. Don’t just pile the cheese. Cube the orange cheddar and arrange it fanned out, creating a bright visual block. Roll the goat cheese log in black sesame seeds or chopped chives to give it a moody, mossy texture and contrast.
Then, fold your salami or prosciutto into loose, elegant "roses" and place them near the cheddar.
Filling the Voids: Strategically Adding Secondary Elements and Fruit Clusters
Now we introduce the fresh elements. Arrange the sliced fruits (apples, grapes) and vegetables (bell peppers). Remember the rule of color blocking! Keep the orange pepper slices near the orange cheese but away from the candy corn, if possible, to maximize visual interest.
Use the grapes on the vine to drape over the edges of the cheese blocks, adding height and dimension.
The Grand Finale: Incorporating Spooky Garnish and Final Candy Accents
- Decorate the Hummus: Spoon your plain hummus into the shallow ramekin and smooth the top. Thin the Greek yogurt just enough to pipe easily, then create 3 4 concentric circles starting from the center. Using a clean toothpick, drag lines from the center outward to create the web. The hummus must be chilled for best results!
- Tuck in the Carbs: Stand up some of the charcoal crackers and breadsticks this adds vertical interest. Place small mounds of candy corn and pretzels into any gaps. They act as filler, ensuring the board looks luxurious and full.
- Final Spooky Touches: Scatter the candy eyeballs onto the apple slices or perched next to the Mummy Brie. I like to use a tiny pinch of paprika to dust the board lightly, giving it an earthy, haunted glow.
Chef's Note: If your board looks sparse, you haven't added enough filler. A great snack board should feel almost aggressively abundant; the best ones hide the wood completely under food.
Chef's Troubleshooting: Maximizing Presentation and Avoiding Common Board Mistakes
People often mess up snack boards by making them too symmetrical or by adding warm elements too early. Here are the pitfalls to avoid for a truly stunning result.
1. The "Pre-Baked Brie Problem": Never bake the Mummy Brie more than 30 minutes before serving. If you bake it too early, the cheese will set, and you lose that crucial, glorious ooze factor when guests cut into the pastry.
If the pastry looks dull, give it a final brush with egg wash right before baking.
2. The Crowded Center Mistake: Trying to place every ingredient equidistant from the center leads to visual chaos. Instead, use clusters and blocks of color. Group the red meats together, the orange elements together, and the black elements together. This gives the eye defined zones to appreciate the variety. Want a complete masterclass in layout? Check out my tips in the Charcuterie and Cheese Board: The Easiest Guide to Effortless Entertaining .
3. Ignoring Height: Everything looks flat if you just lay it down. Stand crackers upright in small clusters. Use small ramekins (like the one for the hummus) to lift dips higher than the surrounding fruit. Cluster the grapes to create little hills. Height gives the board visual drama!
Post Party Practicalities: Storing Leftovers and Ingredient Longevity
Deconstructing the Board: Safely Storing Cheeses and Spreads
The rule of thumb for cheeses and spreads is three hours at room temperature, tops. Separate all the hard cheese (like cheddar) and wrap it tightly in parchment paper, then plastic wrap, storing it in the fridge for up to 5 days.
Any soft cheese, like the Brie or goat cheese, should be transferred to an airtight container immediately.
Reviving Soft Elements: Refreshing Stale Crackers and Bread
Did your crackers get a little soft overnight? Don't toss them! You can usually revive stale crackers or sliced bread by placing them on a baking sheet and toasting them in a 300°F (150°C) oven for about 5– 7 minutes. Watch them carefully to prevent burning.
They will crisp right back up.
Temperature Control: Keeping Ingredients Fresh During the Party
If your party is long, consider replacing the cold items midway through. If you have the space, keep backup bowls of sliced fruit and hummus chilled in the fridge. When the first batch of hummus runs low, swap it immediately. This ensures every guest gets the best quality, cold dip.
Pairing Perfection: Ideal Drinks and Dips to Serve Alongside Your Platter
Maximizing Visual Impact: Using Height and Color Contrast
To really make the board pop, set it on a tiered serving stand or prop it up on a few cookbooks covered with a dark tablecloth. This elevates the board and makes it the uncontested star of the table.
Use small skeleton figurines or plastic spiders nestled in the grapes or on the corners of the board for those final, spooky details.
The Flow Factor: Optimal Placement for Guest Interaction
Place the crackers and bread at the outer edges of the board. This allows guests to approach the center to get their dips and then move outward to load up their plate without everyone crowding directly around the Brie. If you are serving a heavier savory meal later, like my French Bread Mummy Pizzas: The Easiest Spooky Halloween Snack , keep the portions on the board a little smaller.
Complementary Beverages: Non-Alcoholic and Adult Pairing Ideas
For the grown ups, nothing beats a dry, slightly chilled sparkling wine (like Cava or Prosecco); the bubbles cut through the richness of the cheese and pastry beautifully. For a festive non-alcoholic option, serve a batch of Spiced Mulled Cider garnished with orange slices and star anise.
The warming spices contrast wonderfully with the salty charcuterie and sweet candy elements on the board.

Recipe FAQs
How far in advance can I assemble The Ghoul's Gathering Platter?
For optimal freshness, you should only fully assemble the board about 30 to 60 minutes before serving, especially if it includes perishable items like soft cheeses and creamy dips.
However, you can prep all your decorative elements, slice non-perishable cured meats, and prepare dips up to a day in advance to save time on the day of the party. Keep all prepped items refrigerated in airtight containers until the final assembly.
How can I prevent sliced apples or pears from browning if I prepare them ahead of time?
Browning is caused by oxidation when the flesh is exposed to air. To keep fruit fresh and crisp for hours, soak the slices briefly (about 5 minutes) in a solution of one cup of cold water mixed with a tablespoon of lemon juice or a small pinch of salt.
Drain the fruit thoroughly and pat it completely dry before placing the slices on your board for presentation.
Can this entire snack board be made vegan or adapted for major allergies?
Absolutely; snack boards are inherently versatile and adaptable for various diets. Substitute all dairy cheeses with gourmet vegan nut cheeses, plant based spreads, or increased portions of themed dips like black bean or pumpkin hummus.
Ensure any crackers, cookies, or decorative candies used are certified gluten-free or nut-free as required by your guests’ needs.
My presentation looks sparse; what is the culinary secret to making a charcuterie board look abundant?
The secret is maximal density and strategic layering, leaving no empty space visible. Start by placing your large anchor items (bowls, cheeses) first, then arrange the larger meats and crackers, and finally, use small elements like nuts, seeds, dried cranberries, or small candies to fill in all the gaps between the larger components.
Overlap items slightly to enhance the look of luxurious abundance.
What is the easiest, quickest spooky shortcut addition I can create using minimal effort?
One of the fastest spooky additions involves using cookie cutters on soft cheese or tortillas. Use a ghost, bat, or spider cookie cutter on provolone cheese slices or thin whole wheat tortillas to create immediate, eerie shapes.
Alternatively, use black olive halves to form spider bodies on top of cracker and cream cheese combinations.
What is the maximum safe time this board can sit out at room temperature during a party?
Following general food safety guidelines (the 'two-hour rule'), the entire platter should not remain unrefrigerated for longer than two hours, especially since it contains soft cheeses and deli meats.
If your party extends past that limit, it is crucial to refresh the board by swapping out the perishable components or serving them in small, rotating batches. Always prioritize guest safety over convenience.
I can't find specialty black cheese; what's a good alternative to maintain the necessary spooky dark color?
Achieving a dark, eerie look is easy through substitution. Use dark colored foods like slices of pumpernickel or marbled rye bread, or prioritize arranging deeply colored fruits such as black grapes, blackberries, and figs prominently on the board.
You can also mix a single drop of tasteless black gel food coloring into plain goat cheese or cream cheese for a dramatic, homemade dark spread.
Easy Halloween Snack Board Assembly
Ingredients:
Instructions:
Nutrition Facts:
| Calories | 2094 kcal |
|---|---|
| Protein | 69.1 g |
| Fat | 133.8 g |
| Carbs | 159.9 g |
