Clotted Cream: Essential Homemade Recipe for Cream Tea

- Embracing the West Country Tradition: What Defines True Clotted Cream?
- The Science of the Golden Crust: Achieving Perfect Clotting
- Ingredient Deep Dive: Selecting the Essential Dairy Component
- The Gentle Oven Method: Step-by-Step Clotting Process
- Troubleshooting Your Batch: Expert Tips for a Richer Finish
- Maximizing Freshness: Storage and Preservation Techniques
- The Perfect Complement: Pairing Your Spread with Scones and Tea
- Alternative Techniques: Can You Use a Slow Cooker or Instant Pot?
- Recipe FAQs
- 📝 Recipe Card
Embracing the West Country Tradition: What Defines True Clotted Cream?
The moment that golden, nutty crust appears on the surface of slowly baked cream, you know you’ve done it right. This isn’t just heavy cream; this is proper, rich, magnificent Clotted Cream .
It has a texture unlike anything else smooth beneath the crust, intensely buttery, and velvety thick. If you’ve ever had it fresh from the UK, you know that jarred imports just can’t compare.
Forget the stress of elaborate pastry making. This recipe requires exactly one ingredient and a reliable oven, making it an absolute lifesaver for impressive entertaining. It's incredibly easy, surprisingly affordable (especially compared to ordering it online), and mostly passive time.
You start it before bed, and wake up to a luxury that costs pennies on the dollar.
Trust me, once you make your own homemade Clotted Cream , you will never look back. I’m going to walk you through the tiny little details the secrets I learned the hard way that ensure you get that perfect, thick, scoopable clot every single time. Let’s get cooking!
The Science of the Golden Crust: Achieving Perfect Clotting
Why does simply heating cream turn it into something so radically different? The magic of Clotted Cream lies entirely in the gentle application of prolonged low heat. We aren't boiling it; we are incubating the fats.
As the temperature stays consistently low (below boiling), the fat globules rise to the surface, concentrate, and coagulate into a thick, solid layer. The whey remains liquid underneath.
The Magic of the Maillard Reaction in Dairy
That glorious yellow gold colour on the surface of your Clotted Cream isn't just colour it's flavour. We are witnessing the Maillard Reaction at work, though very slowly. The low heat causes the trace sugars and proteins in the dairy to begin caramelizing and browning slightly.
This low and slow process is what gives authentic Clotted Cream its distinctly nutty, subtly cooked, and intensely creamy flavour profile that is miles ahead of plain whipped cream.
Devon vs. Cornwall: A Quick History of the Great Cream Debate
You can’t talk about authentic British Clotted Cream without mentioning its regional origins. Both Devon and Cornwall fiercely claim ownership, dating back centuries.
While the exact preparation is almost identical now, historically, the Devon method involved heating the cream in a pan over a stove, while Cornwall typically baked it. Regardless of lineage, the key is the quality of the local dairy that makes this delicious Clotted Cream .
We’re siding with the oven method today, which is generally easier for modern home cooks.
Why Homemade Always Beats store-bought
Shelf stable, imported Clotted Cream is heavily pasteurized and usually stabilized, which slightly dulls the fresh flavour and changes the texture. When you make it yourself, you control the quality of the cream and the duration of the bake.
The result is fresher, richer, and the texture is incomparably smoother it simply melts in your mouth.
The Role of Low Heat and Long Slow Setting
This cannot be rushed. If the temperature gets too high (even 200°F is risky), the cream will boil, the proteins will denature improperly, and you'll end up with rubbery, scorched skin, not soft clots. The goal is to keep the oven at a consistently mild temperature for 10 to 12 hours.
This gentle heat is the backbone of producing rich, spoonable Clotted Cream .
Optimizing Butterfat Content for Maximum Thickness
If you use a cream with a lower fat percentage, you will get a smaller, thinner clot and a lot more whey waste. We need that glorious thickness, which means we must start with heavy whipping cream that is at least 36% butterfat.
True British Double Cream is even higher (around 48%), which yields the richest, thickest, most luxurious Clotted Cream imaginable. Use the highest quality, highest fat percentage cream you can source.
The Importance of the Cooling and Chill Phase
The baking is only half the battle. Once the golden crust forms, the cream is still liquid underneath. The long, gradual cooling period first at room temp, and then for hours in the fridge, allows the concentrated fats to fully harden and bond. Do not skip the overnight chill!
This critical phase is what transforms the baked dairy into proper, scoopable, solidified Clotted Cream .
Ingredient Deep Dive: Selecting the Essential Dairy Component
You only need one ingredient, so make it count. Quality here is everything.
Whole Cream vs. Double Cream: Understanding the Fat Minimum
In the US, we look for "Heavy Whipping Cream," usually around 36% fat. If you are lucky enough to find true European "Double Cream" (around 48% fat), snap it up immediately for the ultimate homemade Clotted Cream .
Avoid "light" cream or half and half entirely; they simply don't have enough butterfat to clot properly.
Pasteurization Levels and Their Impact on the Final Clot
This is the single biggest trap for making homemade Clotted Cream. Avoid Ultra Pasteurized (UHT) cream at all costs. UHT processes heat the cream to extreme temperatures (above 280°F) to give it a super long shelf life.
This high heat permanently alters the protein structure, preventing the fat molecules from separating and clumping when you bake it low and slow. Always look for cream labeled simply "Pasteurized" or "Low-Temperature Pasteurized."
Can I Use Raw Milk Cream?
Yes, absolutely, provided you have access to high-quality, safe, raw cream. Raw cream often clots beautifully due to its intact protein structure. However, it must be handled according to food safety guidelines, and you should be comfortable with using unpasteurized dairy.
The sheer volume of fat means the yield of gorgeous Clotted Cream is usually fantastic.
The Gentle Oven Method: step-by-step Clotting Process
Let's crack on with turning that carton of cream into liquid gold.
- Prep the Environment: Preheat your oven to a steady 180°F (82° C) . Use an oven thermometer to verify this temperature. If your oven doesn't go this low, use the "Keep Warm" setting if it runs around 160 180°F, or opt for the slow cooker method instead.
- Pour and Place: Choose a wide, shallow glass or ceramic baking dish (like a 9x13 Pyrex). Pour the cream into the dish. The layer should be shallow no more than 1.5 inches deep. The shallower the layer, the faster and more evenly the Clotted Cream will set.
- Bake, Don't Touch: Place the uncovered dish into the middle of the preheated oven. Bake for a minimum of 10 hours, up to 12 hours. Seriously, leave it alone. The Clotted Cream needs an unbroken skin to form.
- Check for Crust: After 10 hours, the surface should be entirely covered by a firm, yellowish golden crust, and the liquid underneath (the whey) should look clear and pale yellow.
- Cool Gradually: Turn the oven off but leave the dish inside for 1– 2 hours. This gradual drop in temperature is crucial for setting the initial body of the Clotted Cream .
- The Overnight Set: Remove the dish from the oven, let it cool completely on the counter, then cover it tightly and chill in the refrigerator for at least 8 hours, or preferably overnight.
- Harvest: Use a slotted spoon or spatula to scrape the thick, solid layer of Clotted Cream off the top, leaving the liquid whey behind. Transfer the resulting product to an airtight container. Use the leftover whey in baking; it makes incredible scones!
Chef's Note: The biggest mistake I ever made was trying to make my Clotted Cream set faster by turning the oven up to 225°F. It created a thick, rubbery skin that tasted scorched. Patience is truly the secret ingredient here.
Troubleshooting Your Batch: Expert Tips for a Richer Finish
Prepping the Cream and Baking Vessel
A common issue is uneven clotting. Make sure your baking dish is truly shallow and wide. If you use a deep pot, the edges will overcook before the center is even warm. The larger surface area allows for better evaporation and promotes the formation of that golden crust necessary for perfect Clotted Cream .
Monitoring the Golden Halo (The Visual Cue)
The color is your indicator. If the surface is still white or only faintly yellow after 10 hours, your oven temperature might be too low. If the edges are dark brown or bubbly, your temperature is too high.
You want a uniform, gentle golden hue across the entire surface of the finished Clotted Cream .
The Critical Waiting Period: Cooling at Room Temperature
Do not transfer the hot cream directly from the oven to the fridge. The rapid temperature change can make the resulting Clotted Cream grainy or cause condensation to drip onto the surface, making it watery. Let it relax and cool down slowly on the counter first.
Scraping and Whipping: Transforming the Crust into the Spread
When you harvest the clot, use a wide, flat slotted spoon. Be gentle. The traditional texture of real Clotted Cream is thick and firm, almost like softened butter or very stiff low-fat Cream Cheese Frosting: Featherlight, Guilt Free Easy but richer.
If your scraped clot seems too firm or chunky, you can gently stir it a couple of times, but do not aggressively whip it.
Preventing a Scorched or Rubbery Surface
Scorching happens when the temperature exceeds 200°F (93°C). If you are worried, place a sheet of foil lightly over the top of the dish for the last couple of hours. This slows down the rate of evaporation and prevents the exposed surface of the developing Clotted Cream from hardening too quickly.
How to Achieve a Smooth, Silky Texture
A grainy texture usually signals one of two things: either your cream was UHT, or your oven temperature fluctuated too wildly during the long bake. If the graininess is minor, you can try passing the finished Clotted Cream through a fine mesh sieve after chilling, pressing it through gently with a spoon.
This smooths out any minor lumps and makes for a more elegant spread.
Maximizing Freshness: Storage and Preservation Techniques
You’ve dedicated 20 hours to this glorious batch of Clotted Cream —let’s make sure it lasts!
The Shelf Life of Refrigerated Homemade Clot
Stored properly in a sealed container, homemade Clotted Cream is safe to eat for up to 5 days, though I find the flavour peaks around day two. Always store it on the middle or lower shelf of your refrigerator where the temperature is most stable and coldest.
Freezing Clotted Cream: Best Practices for Thawing
Yes, you can absolutely freeze Clotted Cream ! It works wonderfully. Transfer the harvested clot into freezer safe containers, leaving a little headspace. Freeze for up to three months. To thaw, move it to the refrigerator and allow it to defrost slowly overnight.
Do not microwave or rush the thaw. Once thawed, the texture might be slightly less firm, but it will still be thick and delicious. If it separates slightly, a gentle stir will bring it back together.
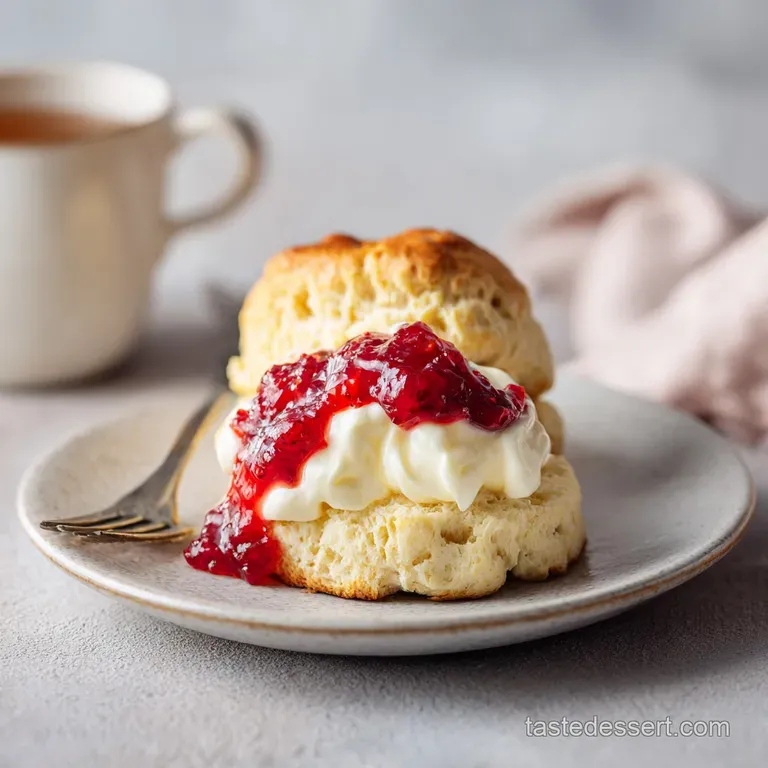
The Correct Assembly: Jam or Cream First?
The age-old question! Devonians traditionally put the cream first, then the jam. Cornish folk insist on jam first, topped with a generous dollop of Clotted Cream .
Honestly, as long as you have warm scones, good jam, and this incredible homemade Clotted Cream , you cannot lose. I personally lean toward the Cornish style jam first gives the scone a better structural base for the heavy cream.
The Perfect Complement: Pairing Your Spread with Scones and Tea
While the classic cream tea is non-negotiable, there are so many creative ways to use your magnificent Clotted Cream .
Beyond Cream Tea: Savory and Sweet Applications
Think of it as the richest cultured butter you’ve ever tasted. I love swapping out my usual spread with a thin layer of Clotted Cream on a piece of thick toast. You could even use it instead of ricotta when making my recipe for Whipped Ricotta Toast with Roasted Tomatoes: Easy Cloud Like Creaminess for an intensely savory and rich breakfast. For dessert, it’s amazing dolloped over warm seasonal fruits or used as a luxurious replacement for ice cream on pie.
Alternative Techniques: Can You Use a Slow Cooker or Instant Pot?
If your oven is moody or unreliable at low temperatures, the slow cooker is your best friend for making this easy Clotted Cream recipe .
The Slow Cooker Method: Pros and Cons of Wet Heat
The slow cooker provides perfect, consistent, low heat. This method is incredibly reliable for great results. Simply pour the cream directly into the slow cooker basin (or use a small Pyrex dish placed inside, if you prefer).
Cook on the lowest "Keep Warm" setting (which should be around 160°F) for 10– 12 hours. Crucially, prop the lid slightly ajar with a wooden spoon. This allows condensation to escape.
If you leave the lid sealed, the steam will drop back into the cream, preventing the golden crust from forming properly. This slow cooker approach often yields the softest, silkiest Clotted Cream .
Adapting the Recipe for Smaller Batches
If you are only making a quart and want to try a smaller batch of this famous Clotted Cream , you must reduce the size of the baking dish accordingly. The cream needs a wide surface area relative to its volume, so keep the depth around 1 to 1.5 inches deep.
If you pour a small amount into a giant tray, it will evaporate too quickly. Conversely, pouring a quart into a small, deep bowl will result in poor clotting and scorched edges. Measuring the depth is key to making flawless Clotted Cream .

Recipe FAQs
Can I use half and-half or light cream instead of heavy cream?
No, clotted cream requires a very high fat content (ideally 40% or more) to form the characteristic “clots.” Lighter creams will evaporate too quickly and lack the necessary density, resulting in a thin, disappointing product.
Always opt for the highest quality heavy cream available, avoiding ultra pasteurized versions if possible.
My cream is perfectly set but lacks that rich, yellow color and thick crust. Why?
The distinctive deep yellow color and thick crust are achieved through extremely slow cooking, often taking 8 to 12 hours. Ensure your oven temperature is truly low (around 180°F or 82°C) and avoid disturbing the cream during the process.
This gentle heating allows the surface fat to oxidize and thicken beautifully, creating the desired depth of color.
I chilled my cream overnight, but it is still too runny. What went wrong?
The cream may not have cooked long enough, meaning insufficient water evaporated, or the initial cream lacked the requisite high fat content. If it seems almost ready but just slightly loose, try returning the liquid portion to a very low oven for another hour or two to achieve further evaporation.
Ensure your chilling time is a minimum of 8 hours for complete solidification.
How long can homemade clotted cream be stored, and can it be frozen?
Properly refrigerated clotted cream, stored in an airtight container, will remain fresh for about 5 to 7 days. While it can be frozen for up to 2 months, thawing often results in a slightly grainy texture due to the separation of the high fat content, though it remains perfectly safe to consume.
Thaw it slowly in the refrigerator for best results.
Is there any way to speed up the clotting process?
Unfortunately, the slow, gentle heating process is essential for separating the fats and proteins necessary to form the true clots. Attempting to cook the cream faster or at a higher temperature will result in scorched cream or just baked butterfat, not authentic clotted cream.
Patience is truly the most crucial ingredient in this recipe, allowing the fat molecules time to organize.
What is the thin liquid remaining after I skim off the clotted cream?
That thin liquid is whey, or skimmed milk, rich in dairy proteins and flavor compounds left over after the fat has solidified and been skimmed. Do not discard it; this liquid whey is excellent for using in baking recipes like scones or quick breads, or it can be used as a liquid base for creamy soups.
Store it refrigerated like regular milk.
Can I make a non-dairy or vegan version of clotted cream?
Authentic clotted cream relies on the specific structure of dairy fat, making an exact vegan replicate difficult. However, some success has been found using extremely thick, full fat canned coconut cream that has been refrigerated overnight and then slow baked in the oven.
The texture will be slightly different, but it achieves a similar rich, thick consistency.
Easy Homemade Clotted Cream Recipe

Ingredients:
Instructions:
Nutrition Facts:
| Calories | 190 calories |
|---|---|
| Fat | 20 g |
| Fiber | 0 g |
