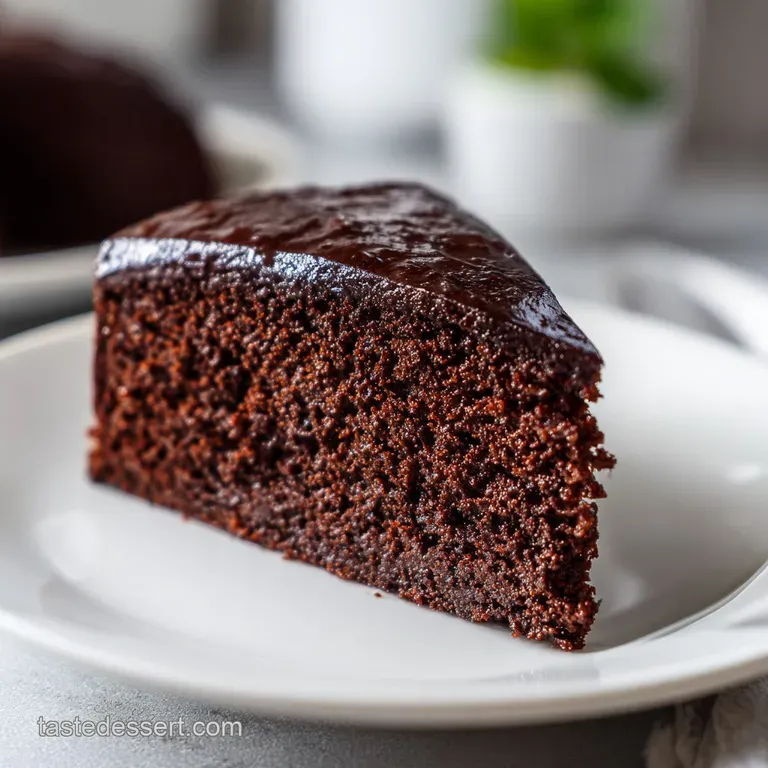
Moms Famous Gluten Free Chocolate Cake
- Time: Active 20 minutes, Passive 35 minutes, Total 55 minutes
- Flavor/Texture Hook: Intensely chocolatey with a silky, melt on-the tongue crumb
- Perfect for: Milestone birthdays, family gatherings, or a weekend comfort project
- Master Moms Famous Gluten Free Chocolate Cake
- Why You’ll Love This Recipe
- Selecting High Quality Core Ingredients
- Tools for a Velvety Cake Base
- Step by Step to Chocolate Perfection
- Avoiding Gummy Textures and Crumbles
- Customizing Your Chocolate Sponge Experience
- Keeping Your Chocolate Layers Fresh
- Finishing Your Masterpiece with Style
- Myths About gluten-free Baking
- Recipe FAQs
- 📝 Recipe Card
Master Moms Famous gluten-free Chocolate Cake
The scent of dark cocoa hitting boiling water is something that stays with you, a warm, earthy aroma that fills every corner of the kitchen. I remember the first time my mom pulled this specific cake out of the oven; the surface had this delicate, sugary crackle, and the house smelled like a professional chocolatier’s shop.
We weren't even a gluten-free household back then, but she had found this recipe in an old community cookbook and tweaked it until it was foolproof. When we eventually had to cut out gluten for family health reasons, this was the one recipe that didn't need a single apology or a "it's good for being gluten-free" disclaimer.
Watching that thin, dark batter pour into the pans always feels a bit like a leap of faith because it looks far too liquid to ever become a cake. But as it bakes, something magical happens in the heat of the oven.
The kitchen transforms into a sanctuary of chocolate, and when you finally peel back the parchment paper, you're met with a sponge so tender it practically sighs. It is the kind of cake that makes people go quiet after the first bite, mostly because they’re busy wondering how on earth something this good doesn't contain a speck of wheat.
Why You’ll Love This Recipe
When we talk about this specific chocolate cake, we are talking about a texture that is light yet substantial, much like the delicate balance found in my Aunt Millies Butter recipe. It avoids the density issues that plague many gluten-free bakes by leaning into high moisture and smart chemistry. You'll find that the chocolate flavor isn't just a background note; it’s the star of the show, deepened by a specific technique we use right at the end of the mixing process.
- The Steam Bloom: Adding boiling water at the final stage forces the cocoa powder to release its deepest flavor compounds while simultaneously hydrating the rice starches in the flour blend.
- Xanthan Synergy: Using a blend that already contains xanthan gum ensures the cake has the "stretch" and structural integrity needed to hold up layers of heavy buttercream.
- Oil Based Moisture: Vegetable oil stays liquid at room temperature, which means this cake remains incredibly soft even if you have to store it in the fridge.
- Leavening Balance: The combination of baking powder and baking soda reacts with the acidic cocoa to create tiny air pockets that produce a velvety, airy crumb.
The Physics of the Steam Bloom
The boiling water effectively "cooks" the starches in the gluten-free flour, creating a gelatinized network that traps air more efficiently than cold mixing. This process also dissolves the cocoa solids completely, ensuring every single crumb is saturated with intense chocolate flavor.
| Method | Time | Texture | Best For |
|---|---|---|---|
| Standard Oven | 35 minutes | Classic, light crumb | Layer cakes and birthdays |
| Convection Bake | 30 minutes | Slightly crisper edges | Sturdier sheet cakes |
| Individual Cupcakes | 22 minutes | Fluffy and airy | Portion controlled parties |
Choosing the right method depends on your final goal, but for the authentic experience, the standard oven method provides that iconic, soft top finish we all crave. It creates a stable base that holds frosting beautifully, much like the structure required for The Homemade Funfetti recipe.
Selecting high-quality Core Ingredients
To get the best results from moms famous gluten-free chocolate cake, the quality of your cocoa and the specific blend of your flour are non negotiable. I've tried this with "budget" cocoa, and while it works, you lose that mahogany depth that makes this cake famous.
| Ingredient | Science Role | Pro Secret |
|---|---|---|
| GF AP Flour (260g) | Provides the framework | Use a blend with rice, potato, and tapioca for the best "snap" and lift. |
| Granulated Sugar (400g) | Hygroscopic moisture | Sugar doesn't just sweeten; it keeps the cake moist by holding onto water molecules. |
| Cocoa Powder (75g) | Structural acid | Natural cocoa reacts with baking soda to create the rise. Don't use Dutch processed here. |
| Boiling Water (240ml) | Starch gelatinization | This is the "secret sauce" that prevents the cake from feeling gritty or dry. |
One mistake I once made was trying to use a flour blend without xanthan gum. Honestly, don't even bother if your blend is missing it; the cake will simply shatter when you try to slice it.
- gluten-free Flour Blend (260g): Ensure it's a 1 to-1 substitute variety. Why this? The pre mixed ratios of starches provide the necessary lift without being overly gummy or dense.
- Granulated Sugar (400g): Provides sweetness and tenderizes the crumb. Why this? It helps the cake brown and creates a delicate, thin crust on the exterior.
- Unsweetened Cocoa Powder (75g): The heart of the chocolate flavor. Why this? Natural cocoa is acidic, which is vital for the chemical reaction with the baking soda.
- Extra Large Eggs (2): Provide structure and fat. Why this? They must be room temperature to emulsify properly with the oil and milk.
- Vegetable Oil (120ml): The primary fat source for moisture. Why this? Unlike butter, oil remains liquid, ensuring the cake doesn't turn into a brick when cold.
- Boiling Water (240ml): The final hydration step. Why this? It blooms the cocoa and softens the gluten-free grains for a velvety finish.
Tools for a Velvety Cake Base
You don't need a kitchen full of gadgets, but a few specific tools will make your life much easier. I always reach for my stand mixer, though a hand mixer works just fine if you have the arm strength for the initial sugar egg whip.
- 9 inch Cake Pans: You need two of these. I prefer light colored aluminum to prevent the edges from over browning before the center is set.
- Parchment Paper: This is the most important "tool" for gluten-free baking. Since the sponge is so tender, it can stick easily. Lining the bottoms is essential.
- Fine Mesh Sieve: gluten-free flour and cocoa powder love to form stubborn little lumps. Sifting them ensures a smooth, silky batter.
- Whisk and Spatula: You'll use the whisk for the dry ingredients and the spatula to scrape every last drop of that liquid gold batter into the pans.
Chef Tip: Freeze your butter for just 10 minutes before starting the frosting. When you beat it, it stays slightly cooler, allowing you to whip in more air for a cloud like texture that doesn't melt off the cake.
step-by-step to Chocolate Perfection

This process moves quickly once you start, so having everything measured out (mise en place) is the best way to avoid stress. The timeline follows a simple flow: Prep, Mix, Bloom, and Bake.
- Preheat and Prep: Set your oven to 350°F (180°C) and grease two 9 inch pans. Note: Always line the bottom with parchment paper to ensure a clean release.
- Whisk Dry Bases: Combine the 260g flour, 400g sugar, 75g cocoa, 1.5 tsp baking powder, 1.5 tsp baking soda, and 1 tsp salt in a large bowl. Note: Whisking thoroughly aerates the mixture for a lighter cake.
- Add Wet Ingredients: Mix in the 2 eggs, 240ml whole milk, 120ml oil, and 2 tsp vanilla. Note: Beat on medium speed for about 2 minutes until the mixture is glossy and uniform.
- The Hot Water Bloom: Carefully stir in the 240ml boiling water by hand. Note: The batter will be very thin; this is exactly what you want for a moist sponge.
- Divide the Batter: Pour the liquid batter evenly into the prepared pans. Note: Use a kitchen scale if you want perfectly even layers for a professional look.
- Precision Baking: Bake for 30 to 35 minutes until a toothpick inserted in the center comes out clean.
- Initial Cooling: Let the cakes sit in their pans for 10 minutes. Note: This allows the structure to firm up before you move them.
- Complete Cooling: Transfer to a wire rack to cool completely. Note: Frosting a warm gluten-free cake is a recipe for a melted mess.
- Whip the Frosting: Beat 225g softened butter with 420g powdered sugar, 60g cocoa, 45ml cream, and 1 tsp vanilla. Note: Beat for at least 3 minutes until it looks like whipped chocolate silk.
- Assembly: Stack the layers with a generous amount of frosting in the middle, then coat the outside. Note: A "crumb coat" (thin layer of frosting) helps keep the exterior looking sharp.
Achieving a Velvety Crumb
To get that professional finish, don't overmix once the flour is added. While there is no gluten to develop, over aerating the eggs can lead to a cake that rises beautifully but then collapses in the center as it cools.
Ensuring Strong Structure
Always check that your gluten-free flour blend has xanthan gum. If it doesn't, you must add 1 teaspoon to the dry ingredients. Without it, the cake will lack the "glue" that binds the crumb together, leading to a frustratingly crumbly mess.
| Comparison | Fresh Homemade | store-bought Mix |
|---|---|---|
| Texture | Velvety and moist | Often grainy or dry |
| Flavor | Deep, dark chocolate | Overly sweet, artificial |
| Control | You choose the ingredients | Contains preservatives |
Avoiding Gummy Textures and Crumbles
gluten-free baking has a few common pitfalls that can ruin an otherwise perfect afternoon. The most frequent issue I see is the "gummy" center, which usually happens because the cake was pulled out too early or the flour wasn't measured correctly.
| Problem | Root Cause | Solution |
|---|---|---|
| Gummy Texture | Underbaked center | Bake until internal temp reaches 205°F. |
| Cake Crumbles | Missing xanthan gum | Ensure your flour blend includes a binder. |
| Dry Sponge | Overbaked | Check 5 minutes before the timer ends. |
Why Your Chocolate Cake Sinks
If your cake looks like a crater, it’s usually due to one of two things: either your leavening agents (baking powder/soda) are expired, or you opened the oven door too early. The rush of cold air can cause the delicate structure to fail before it's set.
Trust the process and keep that door closed until the 30 minute mark!
Common Mistakes Checklist:
- ✓ Check expiration dates on your baking soda and powder every 6 months.
- ✓ Use a kitchen scale for the flour (260g) to avoid "packing" the cup.
- ✓ Ensure your boiling water is truly at a rolling boil for the bloom.
- ✓ Don't skip the room temperature eggs; cold eggs can seize the oil.
- ✓ Let the cake cool entirely before frosting, or it will tear.
Customizing Your Chocolate Sponge Experience
One of the best things about this recipe is how adaptable it is. Whether you need it to be dairy-free or you want to add a sophisticated twist, the base is sturdy enough to handle changes.
- dairy-free Alternative: Swap the whole milk for full fat oat milk or almond milk. Note: Use a dairy-free butter stick for the frosting to maintain that creamy mouthfeel.
- Espresso Infused Depth: Add 1 tablespoon of instant espresso powder to the boiling water before stirring it in. Note: This doesn't make it taste like coffee; it just makes the chocolate taste "more" like chocolate.
- Mexican Chocolate Twist: Add 1 teaspoon of ground cinnamon and a tiny pinch of cayenne pepper to the dry ingredients for a subtle heat.
If You Want X, Do Y:
- If you want a fudgier texture, use 3 eggs instead of 2.
- If you want a darker color, replace 20g of the cocoa powder with "black cocoa."
- If you want a lighter crumb, sift the flour blend three times before mixing.
| Original Ingredient | Substitute | Why It Works |
|---|---|---|
| Whole Milk (240ml) | Full fat Oat Milk (240ml) | Similar protein and fat levels keep the crumb tender. |
| Vegetable Oil (120ml) | Melted Coconut Oil (120ml) | Provides a similar fat content but adds a very subtle tropical note. |
| Granulated Sugar (400g) | Brown Sugar (400g) | Adds a molasses depth and slightly more moisture. |
Keeping Your Chocolate Layers Fresh
Because this cake is so high in moisture, it stores exceptionally well compared to other gluten-free bakes. You can actually make the layers a day in advance, which often makes them easier to frost as they settle and firm up.
Storage: Keep the frosted cake under a cake dome or in an airtight container at room temperature for up to 3 days. If your kitchen is very warm, move it to the fridge, but let it sit out for 20 minutes before serving so the buttercream softens.
Freezing: You can freeze the unfrosted layers by wrapping them tightly in plastic wrap and then foil. They stay fresh for up to 3 months. To thaw, leave them in the fridge overnight while still wrapped to prevent condensation from making the sponge soggy.
Zero Waste Tip: If you have cake scraps from leveling the tops, don't throw them away! Crumble them into a bowl, mix with a spoonful of leftover frosting, and roll them into "cake truffles." Dip them in melted chocolate for a bonus treat that looks like it came from a bakery.
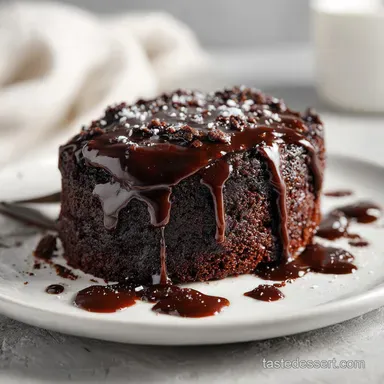
Finishing Your Masterpiece with Style
A cake this rich deserves a presentation that matches its flavor. I love to finish mine with a sprinkle of flaky sea salt right on top of the frosting; the contrast between the sharp salt and the deep chocolate is incredible.
If you’re serving this for a dinner party, consider a side of fresh raspberries or a dollop of lightly sweetened whipped cream. The acidity of the berries cuts through the richness of the cocoa perfectly. For a truly decadent experience, serve a slice slightly warmed with a scoop of vanilla bean ice cream.
The way the frosting melts into a thick sauce against the cold ice cream is something you won't soon forget.
Precision Checkpoints for Success:
- Water Temperature: 212°F (100°C). The water must be at a rolling boil to properly bloom the cocoa.
- Internal Temperature: 205-210°F (96-99°C). This ensures the starches are fully set and the cake won't be gummy.
- Rest Time: 10 minutes in the pan. Any less and the cake might break; any more and the steam might make the bottom soggy.
Myths About gluten-free Baking
One of the biggest misconceptions is that you have to sift gluten-free flour differently. The truth is, while sifting helps with lumps, the real key is the weight. Measuring by grams (260g) is far more important than how many times you've passed it through a sieve.
Another myth is that gluten-free cakes "must" be eaten the same day. Thanks to the oil and boiling water method in moms famous gluten-free chocolate cake, this sponge actually stays moist longer than many wheat based recipes.
Finally, people often think you can't use "natural" cocoa in gluten-free recipes because it’s too heavy. In reality, the acidity in natural cocoa is your best friend. It reacts with the baking soda to provide the lift that gluten-free flours often struggle to achieve on their own.
Stick to the natural stuff for the best rise and the most authentic "mom's kitchen" flavor.

Recipe FAQs
Is Kourtney Kardashian's flourless chocolate cake gluten-free?
Yes, flourless chocolate cakes are inherently gluten-free. Since they rely on eggs, chocolate, and sugar for structure instead of flour, they naturally exclude wheat.
What is the best gluten-free chocolate cake mix?
King Arthur Measure for Measure or Bob's Red Mill 1-to-1 are top recommendations. These blends are specifically formulated to mimic the structure of wheat flour in moist recipes like this one, often already including the necessary xanthan gum.
What is the 1-2-3-4 cake rule?
The 1-2-3-4 cake rule is a ratio for traditional cakes: 1 cup butter, 2 cups sugar, 3 cups flour, 4 eggs. This mom's famous recipe deviates significantly as it uses oil and specific starches to achieve a gluten-free texture, which requires a different ratio.
Does Trader Joe's have gluten-free cake mixes?
Yes, Trader Joe's typically carries a dedicated gluten-free baking mix, often chocolate or vanilla. While convenient, they may not yield the same deep, moist result as this scratch recipe, which utilizes the boiling water bloom technique.
How do I prevent my gluten-free cake from being dry or gritty?
Use high moisture ingredients and the boiling water technique. The boiling water gelatinizes the starches, ensuring a velvety crumb, and oil keeps the cake soft longer than butter. If you enjoyed mastering the moisture control here, see how the same principle applies to achieving a perfect texture in our Carrot Cake Recipe.
How do I get that rich, dark color in my gluten-free chocolate cake?
Use natural, non-Dutched cocoa powder combined with baking soda. Natural cocoa is acidic, which provides the necessary lift and deepens the color when activated by the base. If you nail the flavor balancing act here, you'll appreciate the complexity used in our How to Bake recipe for lava cakes.
Can I substitute the oil for applesauce to make this healthier?
No, this substitution will severely impact the final texture. Oil ensures the cake remains liquid soft at room temperature, whereas applesauce adds too much moisture, often resulting in a dense, gummy crumb in gluten-free recipes.
Famous gluten-free Chocolate Cake
Ingredients:
Instructions:
Nutrition Facts:
| Calories | 631 kcal |
|---|---|
| Protein | 5.2 g |
| Fat | 29.6 g |
| Carbs | 94.4 g |
| Fiber | 3.8 g |
| Sugar | 68.5 g |
| Sodium | 335 mg |
