Halloween Mummy Brownies the Best Easy Fudgy Recipe
- Unveiling the Fudgy Phantom: Why This Is Your Best Halloween Treat
- Gathering Your Hauntingly Rich Ingredients and Essential Tools
- Step and by-Step Guide to Creating Halloween Mummy Brownies
- The Transformation: Piping and Decorating
- Maximizing Your Fright Factor: Tips and Troubleshooting
- Storage, Nutrition, and Making Ahead
- Recipe FAQs
- 📝 Recipe Card
Unveiling the Fudgy Phantom: Why This Is Your Best Halloween Treat
Look, I love Halloween, but I don't love spending four hours piping elaborate royal icing ghosts when I could be watching a scary movie and eating candy corn. Right? That's why these Halloween Mummy Brownies are brilliant.
They look totally impressive frighteningly good, even but they require zero actual artistic talent. If you can melt chocolate and use a zip and top bag, you can make these.
We are not messing around with boxed mixes, and we are absolutely refusing to tolerate a cakey texture. We're chasing deep, dark, intense chocolate flavour and a chewiness that makes you work for it. This recipe guarantees fudgy, dense results every single time.
It’s the kind of brownie base that makes people say, "Wait, is this homemade? Seriously?" The mummy wrapping? That's just a fun bonus.
The Secret to Achieving a Perfect Crinkly Top
This is the one place where you actually have to put in some elbow grease, but it’s worth it. That signature crackle on top of a brownie isn't accidental; it’s science. Once you've melted your butter and dark chocolate together, let it cool slightly. Then, you whisk in the sugars (both white and brown).
Keep whisking until the mixture transforms from merely liquid and shiny into something thick, almost glossy, and noticeably lighter in colour.
You’re essentially pre and dissolving some of the sugar and creating a thin, stable meringue and like layer. I forgot to do this once because I was distracted by a phone call, and my brownies came out sad, matte, and lacked personality. Never again. Whisk until your arm hurts a little.
It’s worth the strain.
Why We Prioritize Fudgy Density Over Cakey Lightness
A cakey brownie is a failed brownie. I said what I said. If I want cake, I’ll bake cake. When I want a brownie, I want density. I want something that feels like an indulgence, almost like biting into a firm chocolate truffle.
We achieve this fudgy status by keeping the flour content shockingly low (less than a cup) and maxing out the fat and sugar content. We also use melted chocolate and cocoa powder, giving us both structural richness and deep flavour.
The eggs do the heavy lifting in terms of structure here, not gluten development. Don't even think about adding baking powder or soda. We want gravity, people.
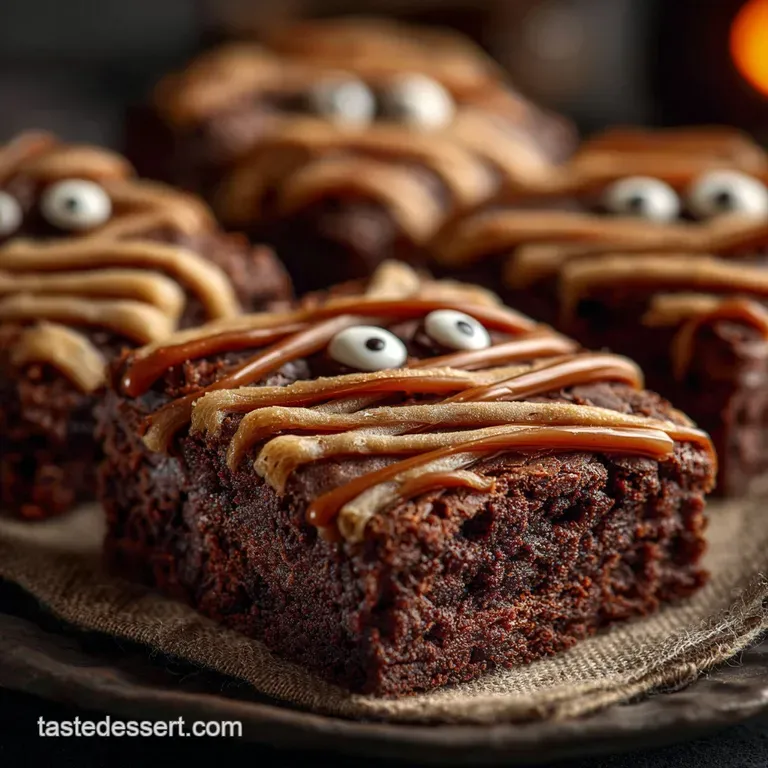
A Quick Look at the Simple Magic Behind Mummy Transformation
The most intimidating part is usually the decoration, but here it’s the easiest part. We cut our perfectly chilled fudgy slabs into rectangles. Then, we take melted white chocolate (or, honestly, just use white candy melts if you want zero fuss) and put it into a piping bag with a tiny snip at the end.
The key to a good mummy is irregularity. Drizzle haphazardly. Crisscross the lines. Overlap them. Leave gaps. You are meant to look like a tattered, ancient piece of cloth. If you try to make perfect parallel lines, it stops looking like a mummy and starts looking like a weirdly striped Kit Kat.
We pop the edible eyes on while the chocolate is still sticky, and BAM. Instant Halloween star.
Gathering Your Hauntingly Rich Ingredients and Essential Tools
You don't need obscure ingredients for this, but quality matters, especially in a recipe this simple. When the chocolate is the headline, make sure it’s a good one.
Essentials for the Deep Chocolate Foundation
Please, please use dark chocolate that you would actually eat on its own. If you use cheap baking chips, the resulting brownie will taste cheap. I aim for 60% cacao or higher. The combination of the melted dark chocolate and the Dutch and process cocoa powder (that’s the one with the darker colour and smoother flavour) gives us that deep, complex chocolate profile.
Also, don't skip the brown sugar. That little bit of molasses doesn't just sweeten; it traps moisture, which is the secret ingredient for chewiness.
Choosing the Right White Chocolate for Mummy Wraps
This is where people sometimes get tripped up. Real white chocolate can be fussy. If it overheats or gets a drop of water in it, it seizes up into a grainy mess, which is absolutely useless for drizzling.
If you’re new to melting chocolate, do yourself a huge favour and use white chocolate candy melts . They are designed to melt smoothly and stay liquid longer, making the piping process stress and free. If you insist on real white chocolate, melt it low and slow over a double boiler.
Trust me on this.
Crucial Equipment Checklist for Brownie Success
You only need a few things, but they are mandatory:
- Parchment paper: Cut it so it hangs over the sides of your 9x9 inch pan. We call these "slings." You use these to lift the entire slab of brownies out once cooled. Trying to cut them while they are still in the pan is a sticky nightmare.
- A whisk: See the crinkly top section above. You need this.
- A rubber spatula: For folding in the dry ingredients gently. No overmixing allowed!
- A serrated knife: The secret weapon for clean cuts. We are aiming for sharp, defined mummy edges, not crumbled heaps.
Step and by-Step Guide to Creating Halloween Mummy Brownies
Let's crack on with the making. Remember: precision in mixing, patience in cooling.
Related Recipes Worth Trying
- Boonana Pops Spooky Frozen Banana Ghosts Perfect for Halloween Treats — Make irresistible Boonana Pops the ultimate easy Halloween dessert These frozen banana ghosts are dipped in snappy dark chocolate and decorated with white...
- Brownies Recipe Seriously Fudgy CrinklyTop Squares from Scratch — These classic Brownies deliver an intensely rich fudgy interior and that desirable crinkly top Our seriously fudgy brownies recipe is easy to make from...
- The Ultimate Fudge Brownies with Peanut Butter Chips Recipe — These arent cakey Bake the Ultimate Fudge Brownies with Peanut Butter Chips for a dense dark and intensely chocolatey treat Follow our foolproof fudge blueprint
The Transformation: Piping and Decorating
Melting and Mixing the Ultra and Fudgy Batter
First, preheat that oven to 350°F (175°C) and line your pan. Then, get your chocolate and butter melted together. I usually do this in 30 second bursts in the microwave, stirring well each time. Let it hang out for five minutes to cool slightly.
This is the important stage: Whisk those sugars into the cooled chocolate mixture until it’s thick and glossy. Now, add the eggs one at a time, whisking well after each one. It should look like a thick, glossy pudding batter. This step is building structure and shine!
Finally, the dry ingredients (flour, cocoa, salt). Fold these in gently. I stop the moment I see almost no streaks of flour left. You might see a tiny lump of flour here or there; that’s fine. Overmixing activates gluten and gives you chewy, but not fudgy, results.
Achieving the Ideal Bake Time for Chewy Edges
Pour the batter into the lined pan and level it slightly. Bake for 25 to 30 minutes. How do you know they are done? The edges should look set, maybe even pulling away from the pan just a tiny bit.
If you stick a toothpick in the centre, it should come out covered in moist, sticky crumbs not raw batter, but definitely not dry and clean.
CRUCIAL WARNING: If your toothpick comes out clean, you waited too long. Pull them out fast. They set up as they cool and will be rock hard if you overbake them.
Ensuring Complete Cooling Before Decoration
I know you want to eat them now. We all do. But if you try to cut or decorate warm brownies, you get crumbs, melted chocolate everywhere, and tears. Don't cause yourself unnecessary pain.
Lift the whole slab out using the parchment slings and let it cool completely on a wire rack. Seriously, wait 45 minutes to an hour. For the cleanest possible cuts, chill the block in the fridge for 15 minutes before grabbing that serrated knife.
Cut them into 12 perfect rectangles.
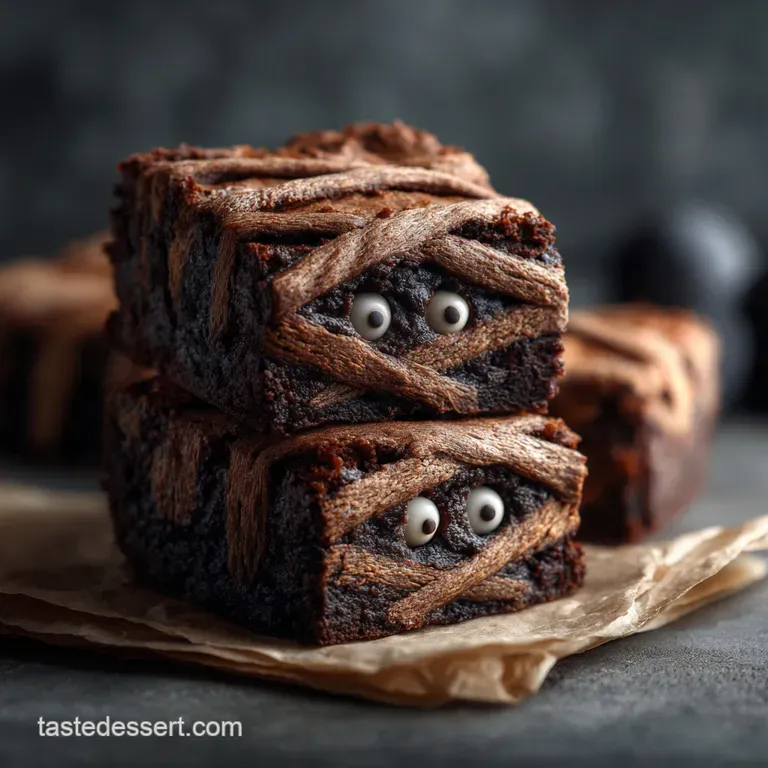
Mastering the White Chocolate Bandage Drizzle
Melt your white chocolate or candy melts. Transfer it into a small piping bag or a ziptop bag. Snip a very small hole in the corner smaller than you think you need.
Hold your hand high above the brownie and move fast. Pipe lines across the brownie, moving diagonally and then switching back to straight across. You want a chaotic web of white chocolate, not neat lines. This is the moment to channel your inner messy artist.
Placing the Edible Eyes for Maximum Horror Effect
While the white chocolate is still wet and sticky, press two edible candy eyes onto the upper half of the brownie. Tilt them slightly. Make one look a little cross and eyed. Give them some character!
If the white chocolate starts to set too fast, just put a tiny dot of fresh melted chocolate down first, then place the eye on top.
Maximizing Your Fright Factor: Tips and Troubleshooting
Here are a few pointers I’ve picked up over years of chasing the perfect brownie:
- Hot Knife, Clean Cut: If you are struggling with messy edges, run your serrated knife under hot water, dry it completely, and make one clean slice. Wipe the blade off completely and repeat for the next slice. This is the only way to get bakery and sharp edges.
- The Freeze Option: If you are baking these ahead of time, bake the full slab, cool it, wrap it tightly, and freeze it before cutting and decorating. Thaw overnight, then cut and decorate. They taste amazing thawed.
- Keep it Simple: This recipe is about the fudgy texture. Don't overwhelm it with too many mix and ins. If you must add chips or nuts, fold in no more than 1/2 cup right at the end.
Storage, Nutrition, and Making Ahead
Ingredient Swaps: Making Gluten and Free Halloween Mummy Brownies
You can absolutely make these gluten and free. Just swap out the all and purpose flour for a good quality 1:1 gluten and free blend. Crucially, make sure that blend already contains xanthan gum (most good ones do). The rest of the process remains exactly the same.
Because gluten development isn't key here, the texture barely changes. It's a fantastic swap.
Troubleshooting: Why Your Brownies Might Be Too Cakey
Nine times out of ten, if your brownies are cakey, it’s because of one of two things:
| Problem | Cause | Solution |
|---|---|---|
| Too much rise | Overmixing the flour or using old cocoa powder. | Fold gently until just combined; measure flour precisely (spooned and leveled). |
| Dry texture | Overbaking. | Pull them out when the centre still looks slightly wobbly. |
Best Practices for Storing Leftover Phantom Treats
Assuming you have leftovers (which is highly doubtful), store them in an airtight container at cool room temperature for up to four days. If you need to stack them, make sure the white chocolate bandages are completely set first, or you'll peel them off when you try to separate them.
I sometimes slip a piece of parchment between layers just to be safe.
Serving Suggestions and Recipe Variations
These spooky treats are delicious enough to stand alone, but if you want to push the boat out:
- Serve them slightly warmed (about 10 seconds in the microwave) with a dollop of high and quality vanilla ice cream.
- Pair them with a rich hot chocolate or a pumpkin spice latte for peak autumn indulgence.
- Want a variation? Try adding a pinch of chili powder (seriously!) to the dry ingredients for a subtle, warming kick. It’s unexpected and really highlights the dark chocolate.

Recipe FAQs
I'm prepping for a massive party; can I bake these Halloween Mummy Brownies ahead of time?
Absolutely, they actually improve overnight as the flavour deepens! Store the undecorated brownie slab in an airtight container at room temperature for up to 3 days, then complete the mummy decoration with the white chocolate and eyes just before serving for the freshest appearance.
My brownies came out a bit too cakey. Where did I go wrong?
That's usually a symptom of overbaking; remember to pull them when the centre is still slightly wobbly, as they continue to set while cooling. Also, ensure you do not overmix the flour, as that develops the gluten, resulting in a drier, cakey texture rather than a dense fudge.
I can't find edible eyes in the shops. Is there a good cheat or substitution?
Not to worry, that happens more often than you’d think! You can easily use tiny chocolate chips, pressing the pointy side into the frosting, or simply use a tiny dot of black gel icing from a tube to mimic a spooky, intense stare.
How do I get those really neat, spot-on slices? Mine always look a bit of a mess.
The secret is patience and temperature control: ensure the brownie block is completely cooled or even slightly chilled, and use a serrated knife dipped in hot water and wiped clean and dry between every single cut.
Are there any good swaps to make these gluten-free without losing the chewiness?
For a successful GF brownie, substitute the wheat flour with a 1:1 gluten-free baking blend that contains xanthan gum, which is crucial for maintaining the required structure and fudgy chewiness when gluten is absent.
Fudgy Halloween Mummy Brownies

Ingredients:
Instructions:
Nutrition Facts:
| Calories | 170 kcal |
|---|---|
| Protein | 1.0 g |
| Fat | 1.0 g |
| Carbs | 26.0 g |
