Smores Fudgsicles the Ultimate Campfire Cooler Gourmet Dessert

- Why These Smores Fudgsicles Will Replace Your Freezer Staples
- From Open Flame to Freezer Mold: The Recipe Concept
- Mastering the Chocolate Base: Essential Components for Creaminess
- Required Gear: Setting Up Your Fudgesicle Operation
- Batching and Layering: A Step and by-Step Guide to Perfect Smores Fudgsicles
- Troubleshooting Common Issues During the Freezing Process
- Elevating Your Batch: Pro Tips and Flavor Variations
- Frequently Asked Questions About Smores Fudgsicle Storage and Diets
- Recipe FAQs
- 📝 Recipe Card
Why These Smores Fudgsicles Will Replace Your Freezer Staples
Look, I love the ease of store and bought frozen desserts as much as the next person, but let’s be honest. Most commercially made fudgesicles taste like chocolate and flavored ice shards. They’re fine if you need a two and second sugar hit, but they are not an experience.
When I decided to make my own Smores Fudgsicles , I wasn't just aiming for "better," I was aiming for "mind and blowingly creamy."
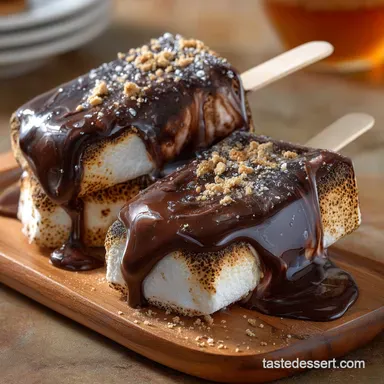
These aren't just popsicles. They are a genuinely Unique Frozen Dessert . We’re talking a velvety, dark chocolate base so rich it tastes like melted ganache with ribbons of gooey marshmallow fluff and pockets of toasted, buttery graham cracker crunch woven throughout.
It’s heaven on a stick. It also looks incredibly fancy, making this an ideal candidate if you’re looking for standout Summer Bridal Shower Dessert Ideas or just need a decadent Homemade Fudgesicle Recipe to impress yourself.
Seriously, once you taste this level of richness, the freezer aisle will feel utterly disappointing.
From Open Flame to Freezer Mold: The Recipe Concept
How do you take the inherent messiness of a campfire treat all that smoke and ooze and translate it into something cool, clean, and structured? It takes finesse, especially when dealing with ice crystals. My first attempt resulted in a pale, crunchy disaster. We are not repeating that.
We need to focus on concentrated ingredients that freeze dense and smooth, rather than freezing watery and brittle.
Defining the 'Gourmet' Difference: Richness vs. Watery Ice Pop
The secret to moving from watery ice pop to gourmet fudgsicle is fat and dissolved solids. If you just mix cocoa powder, sugar, and regular milk, you get ice crystals. Gross. To get that thick, creamy texture we crave, you must rely on a higher concentration of fat and milk solids.
I swear by using evaporated milk for this base. It’s canned gold, honestly. It eliminates a ton of the water content right out of the gate, resulting in a fudgesicle that bites back with chewiness instead of shattering into shards. This is how we achieve that intensely satisfying, deep chocolate flavor.
The Nostalgia Factor: Capturing Campfire Magic Without the Smoke
S’mores are pure memory. They smell like wood smoke and feel like sticky fingers. My job here was to deliver the flavor profile without the actual fire. We accomplish this by focusing on three distinct textures.
The chocolate base handles the darkness, the marshmallow fluff provides the extreme sweetness and slight chew, and the toasted graham cracker crumble provides the buttery, slightly savory crunch. It has to hit all those notes simultaneously, or it just tastes like a chocolate pop with random bits in it.
It's a precise equation.
Decoding the Perfect S'mores Texture Trifecta
Right then, the challenge: graham crackers turn soggy when soaked in liquid and frozen. But what about the crunch ? We solve this by toasting the graham cracker crumble with butter and brown sugar first. This essentially fortifies the crumbs, protecting them from instant moisture absorption.
More importantly, we layer them sparingly, sandwiching them between already and chilled layers of the chocolate base and marshmallow fluff. The chill helps minimize the moisture exchange.
Mastering the Chocolate Base: Essential Components for Creaminess
This isn’t the time to skimp. The base needs to be thick, smooth, and deeply flavorful. We achieve this depth by using two sources of chocolate. You need high and quality cocoa powder (I’m a Dutch and process kind of girl for the color) and melted dark chocolate chips.
The cocoa powder dissolves perfectly and provides color and sharpness, while the solid, melted chocolate provides that incredibly creamy mouthfeel and richness when it freezes. Skip the solid chocolate chips, and the final product feels thin and sad. Trust me on this.
Required Gear: Setting Up Your Fudgesicle Operation

You don't need a fancy ice cream maker for this, thankfully. Just a saucepan and some decent molds.
Choosing the Right Cocoa Powder for Deep Intensity
I highly recommend using Dutch and process cocoa powder (also labeled 'alkalized'). It has a milder flavor and, crucially, a much darker, richer color. This gives your fudgesicles that intense, near and black appearance that screams, "This is serious chocolate." Natural cocoa powder works, sure, but it will be slightly lighter in both color and intensity.
For a genuine Foodie Dessert , go dark.
The Secret Ingredient for Ultra and Smooth Fudgesicles
I’ve already hammered this home, but let me reiterate: evaporated milk is the backbone of this Homemade Fudgesicle Recipe . It’s simply milk with 60% of the water removed. This means when we freeze it, we have far fewer water molecules ready to form big, nasty ice crystals.
If you try to swap it out for standard whole milk, you will end up with brittle, icy pops. It’s worth the trip to the canned goods aisle, promise.
Selecting the Optimal Molds and Stick Types (Reusable vs. Disposable)
I have both silicone molds and hard plastic molds. While the silicone ones release beautifully, they can be wobbly when layering. For this recipe, where precision layering is key, I actually prefer the sturdy, upright plastic molds. Just make sure you follow the warming trick later to release them cleanly.
For the sticks, use standard wooden popsicle sticks. If you’re making these for a grown and up event like a bridal shower, consider using bamboo or specialty flat sticks for a refined look.
Related Recipes Worth Trying
- Ultimate Smores Brownie Pie Fudgy Toasted — Ditch the campfire This Smores Brownie Pie recipe features a rich fudgy layer over a buttery graham cracker crust A truly gourmet smores dessert
- The Ultimate Fudgy Smores Brownie Pie Recipe — Ditch the campfire and bake this magnificent Smores Brownie Pie Featuring a fudgy brownie base and perfectly toasted marshmallows Easy comfort food perfection
- Smores Brownie Bars Campfire Comfort Made Easy — Craving smores brownie bars This recipe brings campfire vibes to your kitchen Fudgy brownies gooey marshmallows graham cracker crunch Get the easy recipe
Batching and Layering: A Step and by-Step Guide to Perfect Smores Fudgsicles
The steps for the base are straightforward, but the layering demands patience. Once your base is cooked, smooth, and glossy, you have to stop and walk away for a minimum of 30 minutes while it chills.
Warning: This is the absolute most critical step. If you introduce warm (or even room temperature) chocolate base to the marshmallow fluff, the fluff will instantly dissolve and disappear into the chocolate, turning your perfect swirl into a uniform, slightly sticky mess. Chill that base completely!
I like to use a small spoon or even a piping bag (if I’m feeling particularly meticulous) for the marshmallow fluff. This prevents large, sloppy clumps and ensures you get those beautiful ribbons of white throughout the dark chocolate.
We layer slowly: one and third chocolate, a drizzle of fluff, a tiny sprinkle of crumbs. Repeat. The crumbs should sit on top of the marshmallow, not sink into the liquid chocolate.
Troubleshooting Common Issues During the Freezing Process
Things can go sideways, they always can. Here's how we fix them.
Phase 1: Combining and Cooking the Decadent Chocolate Mixture
If your chocolate base is grainy, you likely didn't cook the mixture long enough for the sugar and cocoa powder to fully dissolve, or you used too high a heat and scorched the milk solids on the bottom of the pan.
Keep the heat medium and low, whisk constantly, and make sure every grain of sugar is gone before you remove it from the heat.
Phase 2: Assembling the Marshmallow Swirl and Cracker Crunch
The biggest mistake here is over and swirling. Dip a thin skewer into the mould, give it one or two gentle 'S' motions, and pull it out. If you mix too much, you lose the contrast, and the whole point of a Smores Fudgsicles is the visible contrast between the components. Be gentle.
Phase 3: Setting and Curing Your Frozen Treats
Don't peek! You need a solid overnight freeze (at least 6 hours). If you try to pull them out at 4 hours, the center will still be soft and mushy, and they might break upon release.
Preventing Separation and Ice Crystal Formation
The evaporated milk solves the ice crystal problem, but if you notice the mix separating (fat rising to the top) before freezing, that means you didn't whisk the base ingredients enough, or you shocked the mixture by adding the cold milk too fast.
Just give the chilled mixture one final, strong whisk before pouring into the molds to re and emulsify everything.
Elevating Your Batch: Pro Tips and Flavor Variations
Want to take this already gorgeous Homemade Fudgesicle Recipe to the next level?
- Toast the Marshmallow Fluff: Before swirling, gently torch the top of the marshmallow fluff in a separate bowl using a kitchen torch. This gives it that genuine campfire char flavor, adding amazing depth. (It’s a great trick for true Foodie Desserts .)
- The Double and Dip Finish: After the fudgesicles are frozen solid, quickly dip them into melted dark chocolate mixed with a tablespoon of coconut oil. This creates a hard shell. Sprinkle on extra graham crumbs immediately.
- Spice It Up: Add 1/2 teaspoon of espresso powder to the milk mixture while cooking to give the chocolate base a mocha kick. It’s brilliant.
- Salty Kick: Instead of standard salt, use a few flakes of smoked sea salt in the graham cracker crumble for an earthy, savory contrast.
Frequently Asked Questions About Smores Fudgsicle Storage and Diets
The Adult Twist: Adding a Dash of Liqueur for Depth
Oh, I love doing this. Try stirring in one tablespoon of high and quality Bourbon or Dark Rum to the cooled fudge mixture. Alcohol doesn't freeze, so it keeps the resulting fudgesicle slightly softer and much smoother (and hey, it’s a fun, unique spin for Bridal Shower Desserts ).
Just remember that adding too much will prevent the treat from freezing solid. One tablespoon is your limit here.
Cracker Alternatives: Gluten and Free and Low and Carb Swaps
If you need a gluten and free option, you absolutely can swap traditional graham crackers for GF digestive biscuits or even crushed vanilla wafers. If you’re going low and carb, I’ve had decent success using crushed pork rinds mixed with sweetener and cinnamon, surprisingly.
It provides the necessary crunch and fat without the sugar (I know, I know, but don't knock it 'til you try it).
Shelf Life and Optimal Freezer Conditions for Maximum Freshness
If properly stored, these will last in the freezer for about 2 months, though the graham cracker crunch will definitely start to soften after the third week. Once they are fully solid, pull the fudgesicles from the molds and wrap each one individually in parchment paper, then transfer them to an airtight freezer bag or container.
This prevents freezer burn and keeps other freezer odors away.
Making These Fudgsicles Dairy and Free and Vegan Compliant
Yes, you can absolutely make these dairy and free. Instead of evaporated milk and whole milk, use one can of full and fat coconut cream (the thick, solid part from a chilled can of coconut milk) and supplement with high and quality almond milk or oat milk to reach the necessary liquid volume.
Ensure your chocolate chips are dairy and free, and use vegan marshmallow fluff (which is widely available now) or a homemade aqua faba meringue fluff. The resulting Unique Frozen Dessert is still intensely creamy.

Recipe FAQs
Why did my Smores Fudgsicles turn out a bit icy, not beautifully creamy like they should be?
Icy texture usually signals too much water content; the secret to that delightfully creamy texture lies in using evaporated milk, which has a higher concentration of milk solids and fats than regular milk.
Ensure the fudgesicle base is cooked until just simmering, reducing the moisture slightly, and is fully chilled before freezing.
My graham cracker crumbs went all mushy. What’s the secret to keeping that satisfying crunch?
Right then, the trick here is twofold: first, bake the crumbs until they are properly toasted and completely cool them before use; second, layer the crumbs between the cool fudge and marshmallow layers, avoiding mixing them into the primary liquid base.
Help! My marshmallow swirl just disappeared into the chocolate base. What went wrong?
If the marshmallow disappears, it means your chocolate base wasn't cold enough during assembly. The base must be properly chilled (at least 30 minutes in the fridge) before layering, otherwise the fluff will instantly melt upon contact and turn into a muddy mix.
These are cracking good! How long can I store them in the freezer before they lose their charm?
When properly sealed, these treats keep brilliantly for up to two months, though we find the flavour and texture are absolutely spot on within the first three weeks. For best results, individually wrap the fully frozen S'mores Fudgsicles in cling film to prevent flavour absorption and freezer burn.
Can I make these treats dairy-free or add a little extra spice for a sophisticated adult variation?
Absolutely! For a dairy-free version, substitute both milks with full fat canned coconut cream; and yes, adding 1/2 teaspoon of cinnamon and a pinch of cayenne pepper to the chocolate base gives it a marvellous, warming Mexican Mocha kick.
Gourmet Smores Fudgsicles Recipe
Ingredients:
Instructions:
Nutrition Facts:
| Calories | 210 kcal |
|---|---|
| Fat | 9 g |
| Fiber | 1 g |
