Hershey Kiss Thumbprint Cookies: the Buttery Sugar Cookie Blossom
- Introducing the Ultimate Holiday Classic: Buttery Hershey Kiss Thumbprint Cookies
- The Science of Perfect Texture: Why This Thumbprint Cookie Recipe Delivers
- Essential Components for Buttery Hershey Kiss Thumbprint Cookies
- Ingredient Notes and Simple Swaps
- Step-by-Step Guide to Baking Perfect Classic Crinkles
- Troubleshooting and Expert Baking Secrets
- Preparing Ahead: Storage and Freezing Practicalities
- Presentation and Perfect Pairings for Your Thumbprint Cookies
- Recipe FAQs
- 📝 Recipe Card
Introducing the Ultimate Holiday Classic: Buttery Hershey Kiss Thumbprint Cookies
When that classic Hershey Kiss Thumbprint Cookies smell fills your kitchen, you know it’s officially cookie season, even if it’s August. That aroma of browned butter and vanilla, mixing with slowly melting milk chocolate, is pure nostalgia distilled into a soft, crisp edged bite.
The texture is everything here: a light, buttery shortbread base giving way to a creamy, dreamy chocolate center.
These cookies are a total holiday cheat code. They look impressive on any platter, yet the batter comes together fast, uses standard pantry staples, and requires no fussy rolling or icing like those Christmas Cookies: Vanilla Bean Cut-Outs That Hold Their Shape Perfectly . If you need a gorgeous dessert that makes 40 people happy without spending all day decorating, this is your lifesaver.
Forget every dry, tough version you’ve ever encountered at a potluck. We are locking down the science of the perfect tender crumb today, ensuring your Hershey Kiss Thumbprint Cookies stay soft for days.
Let’s crack on with the recipe that truly works, featuring the secret step to keeping that chocolate kiss perfectly shiny and unmelted.
The Science of Perfect Texture: Why This Thumbprint Cookie Recipe Delivers
The secret weapon in these Thumbprint Kiss Cookies is the precise ratio of butter to flour and the use of two kinds of sugar. We are leaning heavily on the shortbread structure high fat content means a ridiculously tender, melt away mouthfeel.
If the dough spreads too much, the cookie loses its signature dome, but chilling the dough counteracts that perfectly.
Addressing the Confusion: Why These Are Superior to Peanut Butter Blossoms
I get this question constantly: Aren’t these just peanut butter blossoms? Absolutely not! Peanut butter blossoms rely on the sticky fat of peanut butter for their chewy texture and shape.
These use a classic Hershey Kiss Sugar Cookies recipe base, which means a cleaner, buttery flavour that genuinely highlights the vanilla and the chocolate. Plus, they are a fantastic option if you need a nut-free cookie for a school bake sale.
The Appeal of Nostalgia: A Cookie for Every Celebration
These cookies aren't just for Christmas, though they certainly dominate the holiday table. Because the base is so neutral and delicious, they work for birthdays, picnics, or just a Tuesday afternoon when you desperately need chocolate. The simple technique makes them ideal for baking with kids, too.
Maximizing Creaming: Achieving the Ideal Fluffy Dough Base
We need to beat the butter and sugar a lot —like, four full minutes. This process, called creaming, whips air into the mixture, which is what gives the baked cookie its lift and tender structure. Don't rush the creaming step; it is vital for texture.
When you look at the mixture, it should be significantly lighter in color than when you started.
The Chill Factor: Ensuring Cookies Hold Their Signature Shape
Do not, under any circumstances, skip the chilling step. The moment butter warms up, it starts to get eager to spread out in the oven. Chilling the dough solidifies the fat, ensuring the Hershey Kiss Thumbprint Cookies maintain their beautiful domed shape instead of collapsing into flat, buttery discs.
30 minutes minimum, but an hour is even better.
Essential Components for Buttery Hershey Kiss Thumbprint Cookies
You likely have most of these ingredients in your pantry right now. Remember, when baking simple recipes like this, the quality of your core ingredients really shines through. Use real vanilla extract, not imitation!
Ingredient Notes and Simple Swaps
| Ingredient | Role in Recipe | Substitution/Alternative |
|---|---|---|
| Unsalted Butter | Flavour and Shortening | Good quality plant based butter sticks (avoid tubs). |
| All-Purpose Flour | Structure | Measure for-measure gluten-free blend with xanthan gum. |
| Brown Sugar | Moisture and Chew | Replace with granulated sugar, but cookies will be slightly drier. |
| Hershey's Kisses | The Star Topping | Mini Reese's cups or a small chocolate truffle rolled into a ball. |
Choosing the Right Chocolate: Which Hershey Kiss Variety Works Best?
I stick with the classic milk chocolate Kisses because that’s the nostalgic flavour we’re aiming for. However, you can certainly mix it up! Caramel filled Kisses are divine, or try using the striped Hugs for an extra festive look. Just make sure you unwrap them before you start baking.
Trust me, frantically unwrapping 40 chocolates while hot cookies cool is peak chaos.
The Role of Butter Quality in Shortbread Dough
Since this recipe relies so heavily on butter, use the best unsalted butter you can afford. It dramatically impacts the final flavor. Ensure it is perfectly softened, meaning if you press it, your finger leaves a clean, deep indentation not melted, but definitely pliable.
Mastering the Flour Measurement for Tender Crumble
If you scoop your flour directly out of the bag, you will pack it down, using way too much. This results in tough, dry cookies that crack when you try to indent them. Always spoon the flour lightly into your measuring cup and then level it off with a straight edge.
This is the number one trick to a tender crumb.
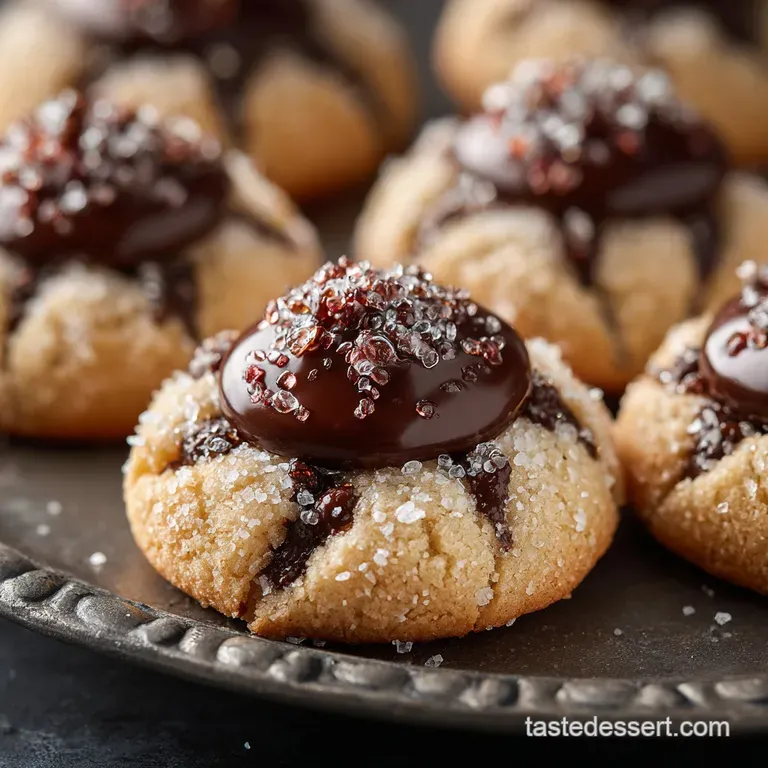
Rolling Options: Granulated Sugar vs. Sparkling Crystals
I call for basic granulated sugar for rolling because it gives a lovely fine texture and a gentle crunch around the edge. If you want a truly spectacular, festive look (especially for Hershey Christmas Cookies ), swap that out for coarse turbinado or sanding sugar.
It reflects light beautifully and adds extra texture.
step-by-step Guide to Baking Perfect Classic Crinkles
Preparing the Dough: The Importance of Immediate Chilling
- Start Hot, Finish Cold: Preheat your oven to 375°F (190°C) and line your sheets. Most importantly, unwrap all 36 40 Kisses now and put them in the freezer to keep them extra firm.
- Cream and Combine: Cream the softened butter and sugars until very light and fluffy, about 3– 4 minutes. Beat in the egg and vanilla until just incorporated.
- Mix Dry: Whisk the flour, salt, and baking soda together, then mix them into the wet ingredients on low speed until just combined. Stop immediately when the last streak of flour disappears.
- Chill Time: Cover the dough and chill it for at least 30 minutes. If you’re rushing it, the dough will be sticky and the cookies will spread.
Uniform Rolling: Achieving Consistent Cookie Size
Use a small cookie scoop (1.5 tablespoons) to portion out the dough. Roll each piece into a perfectly smooth ball. Roll them thoroughly in the rolling sugar, coating them completely. Place them 2 inches apart on your prepared baking sheets. Uniformity is key here for consistent baking results.
The Oven Temperature Sweet Spot for Golden Edges
Bake for 10– 12 minutes. The cookies should look set, slightly puffy, and you will see a faint golden halo starting around the edges. They might look slightly underdone in the center, and that's okay. They will continue to bake slightly once they are out of the oven.
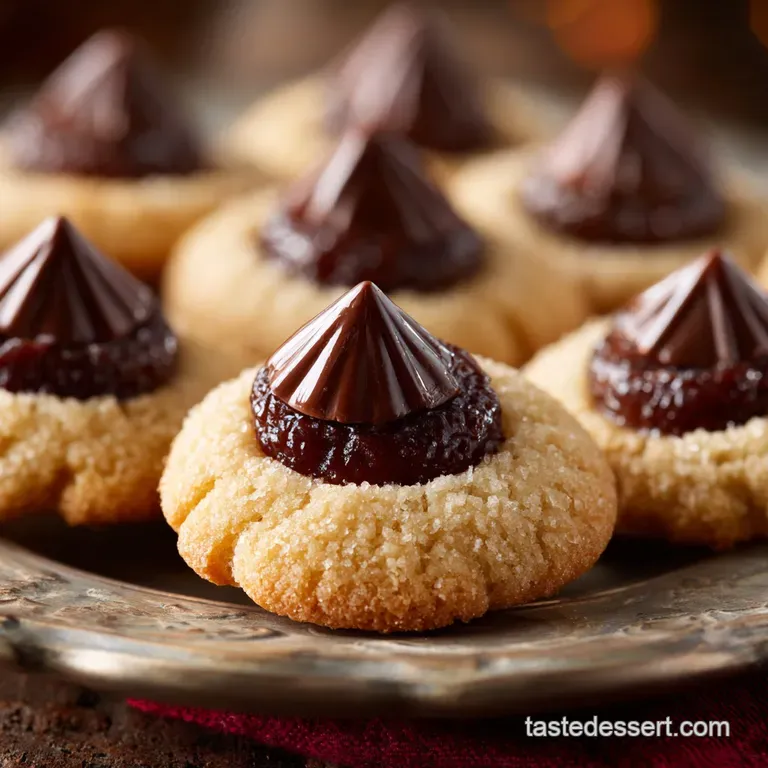
The 60 Second Rule: When to Add the Hershey Kiss
This is the most critical step for perfect chocolate kiss thumbprint cookies ! As soon as the cookies exit the oven, you have about one minute before they start firming up.
Chef's Note: Immediately press the bottom of a metal measuring teaspoon firmly into the center of each cookie to create a deep, smooth indentation. Don't worry if the edges crack a little; gently nudge them back together. Then, swiftly press one chilled Hershey's Kiss into the indentation. The intense residual heat will soften the chocolate just enough to adhere without turning it into a runny mess.
Troubleshooting and Expert Baking Secrets
Fixing Sticky Dough: Too Warm vs. Too Dry Dough Issues
If your dough is too sticky to roll after the initial chill, your kitchen might be too warm, or your butter was slightly melted. Throw the whole bowl back in the fridge for another 15 minutes.
If, conversely, the dough is super dry and crumbling excessively when you roll it, you likely over measured the flour. Try adding half a teaspoon of milk or cream and mixing lightly to rehydrate it slightly.
Preventing the Chocolate Kiss from Melting or Sliding Off
The secret is twofold: chilled Kisses and speedy action. If you add the chocolate before baking, it will melt completely and potentially burn. If you wait too long after the cookie comes out, the cookie is too cool, and the chocolate won’t adhere, meaning it will fall off later.
Get that Kiss in within 60 seconds of leaving the oven! I learned this the hard way using warm cookie sheets once the Kisses slid right off like tiny chocolate icebergs!
Achieving Deep Indentations Without Cracking the Edges
Use the back of a rounded measuring spoon, not your thumb. Press down firmly but gently twist it as you pull it out. If your dough cracks excessively, it usually means it was over mixed, developing too much gluten, or it was chilled too long.
Let the baked cookie sit for 30 seconds before indenting if cracking is severe.
Preparing Ahead: Storage and Freezing Practicalities
Freezing Unbaked Dough Balls for Later Use
This is my favorite holiday hack! Roll the dough into balls, coat them in sugar, and place them on a parchment lined tray. Flash freeze them until solid (about an hour), then transfer the frozen dough balls into a freezer bag or container. They last beautifully for up to 3 months. When ready to bake, just place them on the baking sheet and add 2– 3 minutes to the total bake time. If you need another speedy dessert, try my Cool Whip Cookies: The Cloud Soft, Easy Cake Mix Crinkle Recipe too!
How to Properly Store Baked Thumbprint Cookies for Maximum Freshness
Once the cookies are completely cool and the chocolate has fully set, store them in an airtight container at room temperature. Layer them with a sheet of parchment paper to prevent the Kisses from sticking to the cookie above. They stay wonderfully soft for 5 7 days.
They don't typically require refrigeration unless your kitchen is extremely hot.
Presentation and Perfect Pairings for Your Thumbprint Cookies
Creative Serving Platters and Festive Drink Pairings
These buttery cookies are wonderful served alongside something intensely chocolatey, offering a nice textural contrast. Consider whipping up a batch of my Hersheys Perfectly Chocolate Cake: The Ultimate Moist Rich Recipe for a true chocolate extravaganza pairing. For drinks, they go beautifully with a simple glass of cold milk or a robust espresso, cutting through the richness of the butter and chocolate.
Dusting the cooled Blossom Sugar Cookies lightly with a sieve of confectioners’ sugar just before serving gives them that magical, snow dusted, festive finish. Arrange them on a tiered stand for maximum impact; they always disappear first!

Recipe FAQs
Why are my cookies dry or crumbly after baking?
Dryness usually results from over mixing the dough or adding too much flour during preparation. Measure your flour accurately using the spoon and-level method, and only mix the dough until the ingredients are just combined to keep the resulting cookie tender.
Overbaking can also cause dryness, so remove them when the edges are set but the center is still pale.
My Hershey Kisses melted or slid off the cookie. What went wrong?
Kisses melt if they are applied while the cookies are still radiating maximum heat, or if the chocolate itself was stored in a very warm area. Wait 1 2 minutes after removing the tray from the oven before pressing the kisses firmly into the indentation.
If melting occurs rapidly, you can briefly chill the finished cookies in the refrigerator to help the chocolate set quickly.
Is chilling the dough required for this recipe?
Chilling the dough is highly recommended for this shortbread based thumbprint cookie. Chilling for at least 30 minutes prevents the cookies from spreading excessively during baking, maintaining their thick, chewy shape. This step also helps the exterior rolling sugar adhere better to the dough ball.
How should I store these cookies, and can I freeze them?
Store these cookies in an airtight container at room temperature for up to 5 days, ensuring they are fully cooled before sealing the container. To freeze, place cooled, baked cookies in a single layer until solid, then transfer them to a freezer safe container, where they will last up to 3 months.
Thaw them overnight on the countertop before serving.
Can I use different flavor extracts or toppings instead of the standard vanilla and sugar crust?
Absolutely! You can substitute the vanilla extract with almond, peppermint, or lemon extract for a delicious flavor twist. For the exterior coating, try using coarse sanding sugar for extra crunch, or roll the dough balls in finely chopped pecans or walnuts before baking.
What should I do if the indentations flatten out during baking?
If the indentations flatten, it means the butter melted quickly, likely due to insufficient dough chilling or a hot baking sheet. If they flatten after 5 minutes in the oven, briefly remove the tray and gently re-press the center of the cookie dough using the back of a measuring teaspoon before continuing to bake.
Make sure you are using cold dough.
Can I make these cookies ahead of time?
Yes, you can easily prepare the dough in advance. Roll the dough into balls, coat them in sugar, and place them on a baking sheet to freeze until solid. Transfer the frozen dough balls to a zip-top bag and store for up to one month; bake directly from frozen, adding 2 4 minutes to the total baking time.
Hershey Kiss Sugar Thumbprint Cookies

Ingredients:
Instructions:
Nutrition Facts:
| Calories | 198 kcal |
|---|---|
| Protein | 2.1 g |
| Fat | 10.7 g |
| Carbs | 23.6 g |
