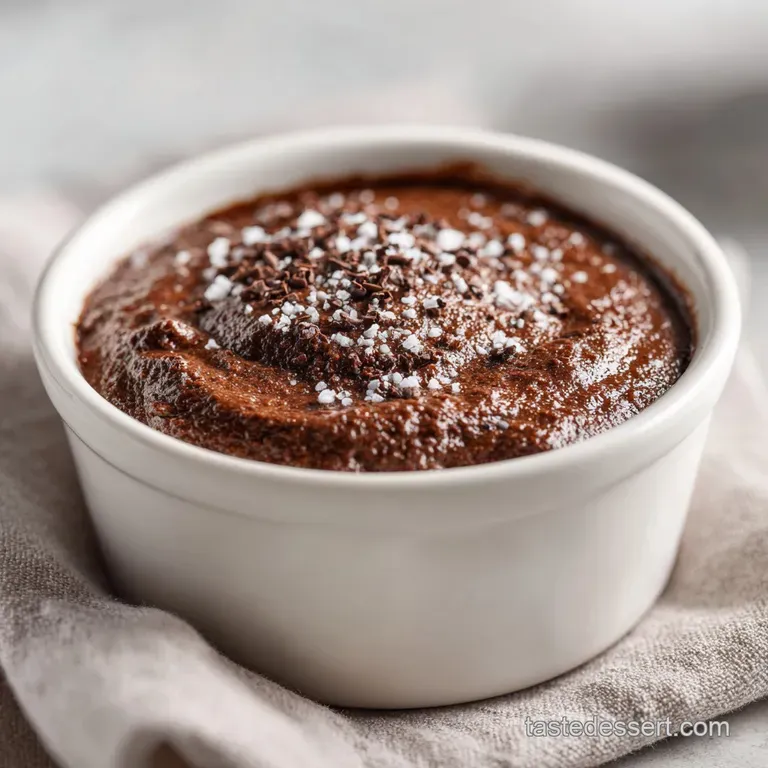
Brownie Batter Dip: Velvety and Rich
- Time: Active 10 minutes, Passive 2 minutes, Total 12 minutes
- Flavor/Texture Hook: Silky smooth fudge essence with a satisfying chocolate chip snap
- Perfect for: Party appetizers, late night cravings, or a quick dessert board
- Master the Ultimate Brownie Batter Dip
- Why This Creamy Recipe Works
- Essential Specs and Quick Metrics
- Selecting the Best Rich Components
- Tools Needed for Velvety Texture
- Mixing Your Decadent Chocolate Treat
- Fixing Common Texture Mistakes Now
- Adjusting Batch Sizes for Any Crowd
- Smart Swaps and Flavor Twists
- Busting Brownie Batter Misconceptions
- Storage Tips and Reheating Guide
- Perfect Pairings and Plating Styles
- Recipe FAQs
- 📝 Recipe Card
Master the Ultimate Brownie Batter Dip
Imagine walking into a kitchen where a fresh batch of brownies just hit the oven, but instead of waiting for the bake, you get to dive straight into the glossy, dark ribbons of batter.
That deep, earthy aroma of cocoa hits you first, followed by the sugary promise of a treat that usually comes with a "don't eat the raw flour" warning. This Brownie Batter Dip is my way of making that forbidden kitchen moment completely safe and even more indulgent than the original.
The secret lies in the contrast between the velvety cream cheese base and the intense, fudgy profile of the mix. I remember the first time I served this at a birthday party; people were hesitant until they saw someone swipe a salty pretzel through the dark, swirling clouds of chocolate.
Within ten minutes, the bowl was scraped clean, and I was being grilled for the recipe. It is the kind of treat that feels like a cheat code for entertaining because it looks polished but takes almost no effort.
What I love most about this specific version is how the sea salt and espresso powder cut through the sweetness. It isn't just a sugar bomb; it is a sophisticated chocolate experience that happens to be served in a bowl.
We are going to treat the brownie mix as our hero ingredient, utilizing its pre balanced ratios of cocoa and sugar to create something that feels like it came from a high end confectionery.
Why This Creamy Recipe Works
Getting that specific "batter" feel without the grit or the safety concerns of raw flour requires a bit of home kitchen physics. Most people just stir things together, but we are going to use a few specific mechanisms to ensure every bite is airy rather than heavy.
- Aeration Volume: Beating the cream cheese and butter for exactly 3 minutes builds a structural foam. This creates tiny air pockets that suspend the heavy cocoa particles, preventing the mixture from becoming a dense, oily brick.
- Starch Modification: Heat treating the mix to 160°F–165°F does more than just kill bacteria; it begins to slightly swell the starches. This takes away the "raw" graininess and allows the powder to meld seamlessly with the fats.
- Solubility Boost: Adding the espresso powder directly to the softened fats before the dry mix ensures the coffee notes dissolve completely. This amplifies the chocolate's floral and earthy notes without leaving behind any bitter, sandy granules.
- Osmotic Balance: The inclusion of sea salt works to suppress our tongue's perception of bitterness while heightening the perception of sweetness. This creates a more rounded flavor profile that doesn't feel cloying after two bites.
Serving Size and Party Planning
| Servings | Ingredient Adjustments | Preferred Serving Vessel | Prep Effort |
|---|---|---|---|
| 4-6 people | Use 1/2 the quantities listed | Small glass trifle bowl | Minimal (5 mins) |
| 12 people | Follow standard recipe exactly | Large shallow ceramic bowl | Standard (10 mins) |
| 24 people | Double all quantities; 2 boxes mix | Wide wooden grazing board | Moderate (20 mins) |
When you are planning your spread, consider how you want guests to interact with the dish. A shallow bowl is often better than a deep one because it allows for more "toppings real estate," meaning every person gets a fair share of those mini chocolate chips and a drizzle of extra chocolate if you’re feeling fancy.
Essential Specs and Quick Metrics
This recipe is built on precision to ensure the texture remains consistent every time you make it. While it feels casual, the ratios of fat to dry matter are what keep it spreadable even after it has been sitting in the fridge.
Component Analysis
| Ingredient | Science Role | Pro Secret |
|---|---|---|
| Block Cream Cheese | Provides the lactic acid tang and structural stability | Always use full fat blocks to prevent the mixture from weeping or becoming runny |
| Fudge Brownie Mix | Supplies the concentrated cocoa solids and fine milled sugar | Sift the mix after heat treating to remove any clumps formed by moisture |
| Unsalted Butter | Acts as the primary flavor carrier and adds a silky mouthfeel | Use high-quality European style butter for a higher fat content and richer taste |
| Mini Chocolate Chips | Introduces textural contrast (the "snap" factor) | Freeze the chips for 10 minutes before folding in to keep them distinct |
The interaction between the cream cheese and the sifted mix is the most critical part of the process. If the cream cheese is too cold, you'll end up with lumps that no amount of whipping can fix.
If the brownie mix isn't cooled after its microwave session, it will melt the butter on contact, leading to a greasy finish rather than a fluffy one.
Selecting the Best Rich Components
Choosing your elements wisely is the difference between a grocery store quality spread and a gourmet dessert. I always opt for a "Fudge" style brownie mix because it typically contains a higher cocoa to flour ratio than the "Cake" style versions.
This gives us that dark, brooding color and intense flavor that defines a good Brownie Batter Dip.
- 1 box (18.3 oz) Standard Fudge Brownie Mix: This is our foundation. Why this? It provides pre balanced sweetness and chocolate intensity without needing extra cocoa powder.
- 8 oz Block cream cheese, softened: Stick to the silver bricks. Why this? Tub style cream cheese has added air and water, which ruins the structural integrity.
- 1/2 cup Unsalted butter, softened: This adds the "velvety" finish we crave. Why this? Using unsalted allows us to control the seasoning with our specific sea salt.
- 1/4 cup Powdered sugar, sifted: This stabilizes the whip. Why this? It provides a fine crumb sweetness that dissolves faster than granulated sugar.
- 1/2 cup Mini semi sweet chocolate chips: Texture is king. Why this? Minis ensure you get chocolate in every single bite without overwhelming the dip.
- 3.5 tbsp Whole milk: Our hydration agent. Why this? Adjusting the milk allows you to customize the thickness for dipping or spreading.
- 1 tsp Pure vanilla extract: The background melody. Why this? It rounds out the sharp edges of the cocoa for a professional flavor.
- 1/2 tsp Sea salt: The flavor corrector. Why this? Salt is mandatory to keep the chocolate from tasting one dimensional and flat.
- 1/2 tsp Instant espresso powder: The chocolate "booster." Why this? Coffee enhances the depth of cocoa without making the whole thing taste like latte.
Tools Needed for Velvety Texture
You don't need a professional pastry kitchen to pull this off, but a few specific tools will make your life much easier. I’ve made this with just a wooden spoon before, and while it tasted fine, it lacked that "mousse like" lightness that makes people go back for seconds.
Chef's Tip: If you don't have a fine mesh strainer for sifting, use a whisk to vigorously break up the dry mix after heat treating. Clumps are the enemy of a velvety mouthfeel.
A stand mixer (like a KitchenAid) is the gold standard here because it allows you to walk away while the butter and cream cheese are aerating. However, a sturdy hand mixer works perfectly well as long as you have the patience for the full three minutes of beating.
You’ll also want a silicone spatula to fold in the chips don’t use the mixer for that part, or you’ll risk breaking the chips and turning the whole mixture a muddy grey.
Mixing Your Decadent Chocolate Treat
Let's get into the step-by-step process. Remember, the goal is to keep the air we're beating in, so follow the speeds exactly as written.
- Heat treat the mix. Place the dry brownie mix in a microwave safe bowl and heat in 30 second intervals, stirring between each, until the temperature reaches 160°F–165°F. Note: This ensures the flour in the mix is safe for raw consumption.
- Sift and cool. Pass the warmed mix through a fine mesh strainer into a clean bowl and let it cool completely. Note: This prevents the hot mix from melting the butter in the next steps.
- Cream the base. In a large bowl, beat the softened cream cheese and butter on medium high speed for 3 minutes until the mixture is pale and voluminous.
- Add flavorings. Incorporate the vanilla, sea salt, and espresso powder, mixing until the brown specks of coffee disappear.
- Incorporate dry mix. Turn the mixer to low and gradually add the cooled brownie mix one scoop at a time.
- Adjust the texture. As the batter thickens, add the whole milk one tablespoon at a time until the mixture looks glossy and smooth.
- Final fold. Use a silicone spatula to fold in the mini chocolate chips by hand.
- Rest the batter. Let the mixture sit at room temperature for 10 minutes before serving. until the flavors have fully melded.
While the microwave is the fastest way to heat treat, you can also use the oven if you're making a larger batch or prefer a more even toast on the cocoa.
Heat Treating Method Comparison
| Method | Time | Texture Result | Best For |
|---|---|---|---|
| Microwave | 2 minutes | Standard/Fast | Quick weeknight cravings |
| Oven (350°F) | 5-7 minutes | Slightly Toasty | Enhancing deep cocoa notes |
| Stovetop | 4 minutes | High risk of scorching | Only if you have no microwave/oven |
The microwave method is what we use in our official steps because it's efficient, but the oven method (spreading the mix on a sheet tray) actually helps dry out the flour even more, which can lead to a fluffier final result. Just be sure to watch it like a hawk!
Fixing Common Texture Mistakes Now
Even the simplest recipes can go sideways if the temperatures aren't quite right. If you find your Brownie Batter Dip looking a bit "off," don't panic. Most issues are easily fixed with a little bit of temperature management or extra whipping.
Why Your Mixture Is Grainy
If the texture feels sandy on your tongue, it usually means the brownie mix wasn't sifted or the powdered sugar wasn't fine enough. Another culprit is using cold cream cheese that didn't fully integrate with the fats.
To fix this, let the bowl sit in a warm spot for 10 minutes, then beat it again on high speed for 60 seconds.
Why Your Mixture Is Greasy
A greasy finish happens when the butter or cream cheese gets too warm and the emulsion breaks. This often happens if you add the brownie mix while it's still hot from the microwave. Stick the bowl in the fridge for 15 minutes, then re whip it. It should come back together into a velvety state.
Quick Fix Table
| Problem | Root Cause | Solution |
|---|---|---|
| Mixture is too stiff | Not enough liquid | Add milk 1 tsp at a time until spreadable |
| Visible white lumps | Cold cream cheese | Beat on high speed; use a warm spatula to smooth |
| Dull, flat color | Under mixed base | Increase whipping time to incorporate more air |
Common Mistakes Checklist
- ✓ Never skip the heat treating step; it's essential for safety and better texture.
- ✓ Ensure the brownie mix is 100% cool before adding it to the cream cheese base.
- ✓ Use room temperature butter, not melted butter, to maintain the structure.
- ✓ Sift the dry ingredients to prevent "pockets" of unmixed cocoa powder.
- ✓ Use mini chips instead of regular ones for a better distribution of crunch.
Adjusting Batch Sizes for Any Crowd
If you're hosting a massive party or just want a tiny treat for two, scaling this recipe is straightforward. However, because it relies on a specific fat to dry ratio, you have to be careful with the liquids when you move away from the standard 18.3 oz box of mix.
Scaling Down: If you only want a small portion, you can use half of the brownie mix box (about 9 oz). Reduce the cream cheese to 4 oz and the butter to 1/4 cup. When scaling down, the milk becomes very sensitive start with just 1 tablespoon and see how the consistency looks before adding more.
Scaling Up: Doubling this recipe is a breeze. Just use two boxes of mix and double all other ingredients. When working with such a large volume of "batter," I recommend using a stand mixer rather than a hand mixer to ensure the aeration is consistent throughout the entire bowl.
If you're doubling, you may find you need slightly less milk proportionally (maybe 6 tablespoons instead of 7) because the sheer weight of the mixture helps it stay moist.
Smart Swaps and Flavor Twists
While the classic fudge version is a crowd pleaser, you can easily pivot this recipe to suit different dietary needs or flavor preferences. For example, if you're looking for a slightly more sophisticated profile, you could swap the milk for a splash of Irish cream liqueur.
| Original Ingredient | Substitute | Why It Works |
|---|---|---|
| Whole Milk | Heavy Cream | Creates a richer, more truffle like consistency |
| Mini Chocolate Chips | Crushed Pretzels | Adds a salty crunch. Note: Add just before serving to prevent sogginess |
| Brownie Mix | gluten-free Brownie Mix | Works perfectly; GF mixes are often very fine and smooth |
If you love a more complex chocolate experience, check out my Fudgy chocolate chip brownies for a baked version that uses similar flavor profiles. For those who want to lean into the "batter" theme but with a cookie twist, my Cosmic brownie cookies are a fantastic companion to this dip.
Quick Flavor and Texture Decisions If you want a Mousse like texture, use heavy cream instead of milk and whip for an extra 2 minutes. If you want a Nutty kick, swap the vanilla for almond extract and fold in toasted slivered almonds.
If you want a Darker profile, add 2 tablespoons of Dutch processed cocoa powder to the dry mix.
Busting Brownie Batter Misconceptions
There are a few "rules" floating around the internet about dessert spreads that just aren't true. Let's clear those up so you can cook with confidence.
First, many people think you can't over beat cream cheese. In reality, if you beat it too long at a very high speed, the friction can actually cause the fat to melt slightly, leading to a runny mess. Stick to the 3 minute rule on medium high for the best results.
Second, the idea that "all brownie mixes are the same" is a total myth. High end mixes often have real chocolate chunks or higher quality fats already in the powder. If you're making this for a special occasion, it is worth spending an extra dollar on the "Supreme" or "Ultimate Fudge" box.
The difference in the final gloss and flavor is undeniable.
Storage Tips and Reheating Guide
Because this recipe contains dairy and heat treated flour, it needs to be handled properly to stay fresh and safe.
Storage: Store your Brownie Batter Dip in an airtight container in the refrigerator for up to 5 days. I actually think it tastes better on day two because the espresso and salt have had more time to penetrate the fats.
If it firms up too much in the fridge, let it sit on the counter for 15-20 minutes before serving to regain its spreadability.
Freezing: You can freeze this! It will last for up to 2 months in a freezer safe bag or container. To thaw, move it to the fridge overnight. Do not thaw it on the counter, as the temperature shock can cause the cream cheese to become grainy.
Zero Waste: If you have leftovers that are starting to get a little dry, don't throw them out. You can roll the mixture into small balls, dip them in melted chocolate, and freeze them to make "brownie batter truffles." They are incredible as a quick snack or as a topping for vanilla ice cream.
Perfect Pairings and Plating Styles
The way you present this Brownie Batter Dip can change the entire vibe of the dessert course. Since we are focusing on a presentation style archetype, let's look at three ways to level up your plating.
Level 1: The Simple Social
Serve the mixture in a colorful ceramic bowl placed in the center of a large circular plate. Surround it with a single type of dipper, like honey graham crackers or vanilla wafers. This is casual, unpretentious, and perfect for a movie night.
Level 2: The Polished Board
Use a wide wooden board. Place the dip in a small ramekin and garnish with a few extra chocolate chips and a tiny pinch of flaky sea salt. Arrange "zones" of dippers: fresh strawberries, salty pretzel rods, and slices of green apple for a tart contrast.
Level 3: The Restaurant Finish
Create individual portions by piping the mixture into small glass jars. Top with a dollop of whipped cream and a single raspberry. Serve on a slate plate with a "shatter" of toasted waffle cone sticking out of the top.
Plating Level Tweaks
| Level | Garnish | Best Dipper | Presentation Tool |
|---|---|---|---|
| Simple | Extra Chips | Graham Crackers | Cereal Bowl |
| Polished | Flaky Sea Salt | Strawberries | Wooden Board |
| Restaurant | Mint Leaf | Waffle Cone Shards | Individual Glass Jars |
No matter how you serve it, the key is the contrast. The rich, velvety chocolate needs something with a bit of "snap" or "tang" to balance the palate. Whether it's the acidity of a fresh berry or the crunch of a pretzel, that second element is what makes the Brownie Batter Dip truly sing.

Recipe FAQs
Is it true I must heat the raw brownie mix before eating?
Yes, this is essential for food safety. You must heat the dry mix in 30-second intervals until it reaches 160°F 165°F throughout to eliminate potential raw flour bacteria.
How to achieve the perfect creamy texture?
Beat the softened cream cheese and butter for exactly 3 minutes on medium high speed. This aeration process creates the pale, voluminous base required before you fold in the dry ingredients.
Is it possible to use frozen cream cheese for this dip?
No, this is a common misconception. Frozen and thawed cream cheese loses its smooth structure and becomes grainy, which will ruin the consistency of your dip.
How to fix the dip if it becomes too thick after refrigeration?
Let the container sit on the counter for 15 20 minutes before serving. This brings the butter and cream cheese back to a spreadable temperature without affecting the flavor profile.
Is it necessary to sift the brownie mix after heating?
Yes, sifting is crucial to remove any clumps formed during the heating process. If you enjoyed learning how to refine textures here, you can see how similar Recipe in 5 Minutes apply to other dessert dips.
How to store leftovers for the best flavor?
Keep the dip in an airtight container in the refrigerator for up to 5 days. The flavor actually improves by the second day as the espresso powder and sea salt fully meld with the fats.
Can I freeze the dip if I have leftovers?
Yes, you can freeze it for up to 2 months in a freezer safe bag. Ensure you squeeze out as much air as possible to prevent ice crystals from forming on the surface.
Homemade Brownie Batter Dip

Ingredients:
Instructions:
Nutrition Facts:
| Calories | 386 kcal |
|---|---|
| Protein | 3.4 g |
| Fat | 21.8 g |
| Carbs | 42.6 g |
| Fiber | 1.4 g |
| Sugar | 31.8 g |
| Sodium | 245 mg |
