Homemade Cheesecakes Cookbook: Velvety Custard
- Time: Active 30 minutes, Passive 1 hours 15 mins, Total 1 hours 45 mins
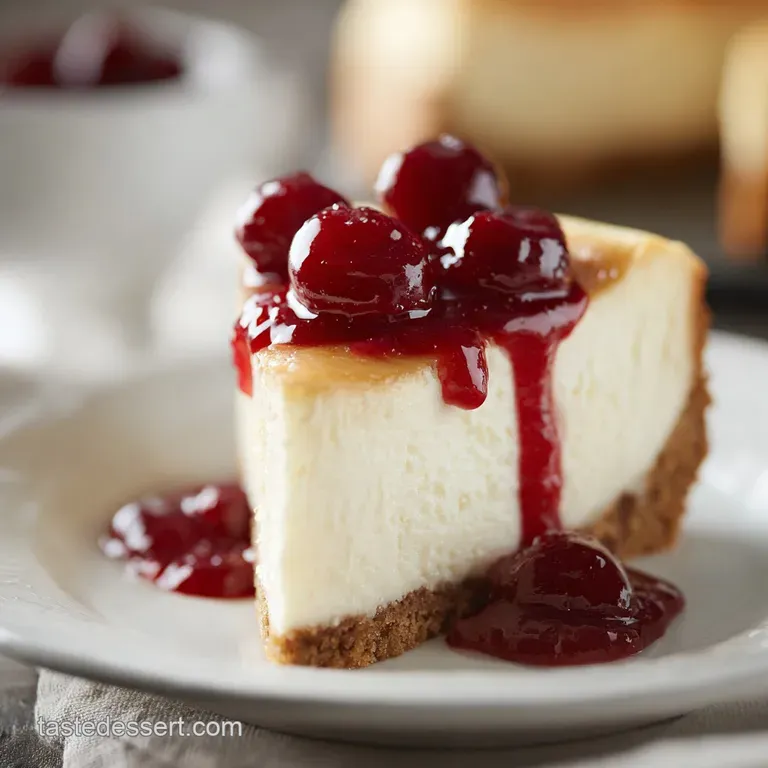
- Flavor/Texture Hook: Tangy, velvety custard set atop a nutty, shatter crisp browned butter crust.
- Perfect for: Milestone celebrations or showing off at a weekend dinner party.
- The Logic Behind a Velvety Crumb
- Essential Metrics for Baking Success
- Elements of a Dreamy Filling
- Gear Required for Silky Results
- Transforming Items into Edible Velvet
- Navigating Hurdles for Flawless Tops
- Creative Twists to Personalize Your Bake
- Debunking Baked Custard Beliefs
- Keeping Every Slice Fresh
- Presentation Styles for Maximum Impact
- Homemade Cheesecakes Cookbook FAQs
- 📝 Recipe Card
You know that specific, nutty aroma that hits when butter begins to foam and brown in a pan? It's the scent of a kitchen transformation. I remember the first time I pulled a cheesecake from the oven that didn't look like the Grand Canyon had opened up in the center.
I danced around my tiny kitchen, clutching a spatula like a trophy. That moment changed everything for me, turning a stressful baking project into a joyful ritual.
We've all been there staring through the oven glass, praying the top stays smooth, only to find a massive crack 10 minutes later. Honestly, I used to think you needed a professional degree or a hundred dollar springform pan to get it right.
But after making every mistake in the book (hello, soggy crust and lumpy batter), I realized it's all about the chemistry of the ingredients and the patience of the cool down. This guide is basically the homemade cheesecakes cookbook I wish someone had handed me years ago.
It's brilliant because we're swapping the usual heavy sour cream for Greek yogurt, which gives a bright tang that cuts right through the richness. We're also browning the butter for the crust, which adds a depth of flavor that standard melted butter just can't touch.
Right then, let's crack on and get you that silky, restaurant quality slice you deserve.
The Logic Behind a Velvety Crumb
Protein Coagulation Control: By using room temperature eggs and a low baking temperature, we prevent the egg proteins from tightening too quickly, which is what usually causes those unsightly cracks.
Starch Stabilization: The inclusion of cornstarch acts as a safety net, binding to the proteins and preventing them from curdling or over thickening, ensuring the texture remains buttery and smooth.
| Feature | Fresh From Scratch | Shortcut Method |
|---|---|---|
| Crust Flavor | Deep, toasted hazelnut notes from browned butter | Standard sweet cracker taste |
| Filling Texture | Silky, dense, and slow melting | Airy, often mousse like or oily |
| Structural Integrity | Stays firm for hours at room temp | Often sags or weeps liquid quickly |
Standard shortcuts often rely on whipped toppings or gelatin, but those lack the satisfying weight of a real baked custard. When you follow the techniques in this homemade cheesecakes cookbook, you’re aiming for that specific density that yields to a fork with zero resistance.
Essential Metrics for Baking Success
Before we touch a single bowl, let's look at the numbers that actually matter. Accuracy is the difference between a centerpiece and a mess.
- Precision Temperature: Ensure your cream cheese is exactly 21°C (70°F) before mixing; cold cheese is the primary cause of lumpy batter.
- Doneness Cue: The cheesecake is finished when the internal temperature hits 65°C (150°F), or when the outer 5cm are set but the center still wobbles like Jell O.
- The Weight Factor: 900g of cream cheese provides the necessary mass to hold heat evenly during the long, slow bake.
Elements of a Dreamy Filling
Choosing the right components is half the battle. We’re going for high-quality fats and natural sweeteners to keep things balanced.
- 150g Graham cracker crumbs: These provide the structural base. Why this? They absorb the browned butter while staying crisp.
- 25g Granulated monk fruit sweetener (Crust): Adds sweetness without the sugar spike.
- 85g Unsalted butter: We will be browning this for a savory sweet profile.
- 0.25 tsp Sea salt: Essential for cutting through the fat.
- 900g Full fat cream cheese: Must be room temperature for a smooth emulsion. Why this? Fat content is key for that signature mouthfeel.
- 150g Granulated monk fruit sweetener (Filling): Provides the bulk of the sweetness.
- 240g Plain 2% Greek yogurt: A lighter, tangier alternative to sour cream.
- 1 tbsp Pure vanilla bean paste: For those beautiful little black flecks.
- 1 tsp Freshly squeezed lemon juice: Brightens the entire profile.
- 4 Large eggs: The glue that holds the custard together.
- 16g Cornstarch: Our insurance policy against cracks.
| Ingredient | Science Role | Pro Secret |
|---|---|---|
| Cream Cheese | Structural base & fat source | Always use block style, never the tub spread. |
| Eggs | Emulsifier & thickener | Add them one at a time to avoid breaking the batter. |
| Greek Yogurt | Acidic tenderizer | Strains out excess moisture for a denser finish. |
If you find yourself missing an ingredient, don't panic. This homemade cheesecakes cookbook approach is flexible. Similar to how you might adjust the base in a New York Style recipe, you can swap the yogurt for sour cream if that's what's in the fridge. Just keep the fat percentages similar to maintain that velvety feel.
| Original Ingredient | Substitute | Why It Works |
|---|---|---|
| Monk Fruit | White sugar (1:1 ratio) | Same sweetness level. Note: Adds calories but maintains texture. |
| Graham Crackers | Digestive biscuits | Similar crumbly texture with a slightly more wheaty flavor. |
| Vanilla Bean Paste | Vanilla extract (1:1) | Provides flavor but lacks the visual bean specks. |
Gear Required for Silky Results
You don't need a professional kitchen, but a few specific tools make the process much smoother.
- 23cm Springform Pan: This is non negotiable for getting the cake out in one piece.
- Stand Mixer or Hand Mixer: Essential for aerating the cheese without overworking the eggs later.
- Heavy Duty Foil: You'll need this to waterproof the pan for the water bath.
- Large Roasting Pan: This needs to be big enough to hold the springform pan with space for water.
- Small Saucepan: For browning that butter to golden perfection.
Chef's Tip: Wrap your springform pan in three layers of extra wide, heavy duty foil. Nothing ruins a homemade cheesecakes cookbook entry faster than a soggy, water logged crust.
If you’re worried, you can even place the foiled pan inside a slightly larger cake pan, then put that into the water bath.
Transforming Items into Edible Velvet
Phase 1: Constructing the Foundation
Preheat your oven to 175°C. In a small saucepan, melt the 85g unsalted butter over medium heat. Keep cooking it, swirling occasionally, until it smells like toasted nuts and brown bits form at the bottom.
Mix the 150g crumbs, 25g monk fruit, salt, and that liquid gold butter in a bowl. Press the mixture firmly into the bottom of your springform pan and bake for 10 mins until the edges are lightly golden and the kitchen smells like a bakery.
Let this cool completely before adding the filling.
Phase 2: The Velvet Emulsion
Reduce the oven heat to 150°C. In your mixer, beat the 900g cream cheese and 150g monk fruit on medium speed. Stop every minute to scrape the bottom. Do this until the mixture looks like smooth silk with zero lumps. This is the most important step for the texture.
Phase 3: The Gentle Integration
Add the 240g Greek yogurt, vanilla paste, and lemon juice. Mix on low just until combined. Note: High speeds at this point introduce air bubbles that cause cracks. Add the 16g cornstarch and mix slowly.
Phase 4: The Low Stress Bake
Add the 4 eggs one-by-one. Mix on the lowest setting until the yellow streaks just barely disappear. Pour the batter over your cooled crust. Tap the pan hard on the counter five times to force air bubbles to the surface.
Place the pan in the roasting tin and fill the tin with boiling water halfway up the sides of the cheesecake pan. Bake for 1 hour 15 mins until the edges are set but the center still has a slight jiggle.
Phase 5: The Patient Descent
Turn off the oven and crack the door slightly. Leave the cheesecake inside for 1 hour. Note: This prevents the thermal shock that leads to sinking. Remove, let it reach room temperature on the counter, then refrigerate for at least 6 hours, preferably overnight.
Trust me, the wait is what develops the flavor.
Navigating Hurdles for Flawless Tops
Even with the best instructions, things can go sideways. But usually, it's an easy fix.
Why Your Cheesecake Cracked
This usually happens because of a sudden temperature change or over beating the eggs. When eggs are beaten too much, they hold air, which expands in the oven and then collapses, tearing the surface.
Dealing with Lumpy Batter
If you see lumps after adding the sugar, your cheese was too cold. You can sometimes save this by passing the batter through a fine mesh sieve before adding the eggs. It's tedious, but it saves the cake.
| Problem | Root Cause | Solution |
|---|---|---|
| Soggy Crust | Water bath leaked into the pan. | Use oven bags or extra foil layers next time. |
| Lumpy Filling | Cold ingredients didn't emulsify. | Ensure all dairy is at room temp for 2 hours. |
| Top is Browning | Oven temp is too high. | Tent with foil and check oven calibration. |
Common Mistakes Checklist
- ✓ Never skip the water bath; the steam keeps the surface moist and stretchy.
- ✓ Don't open the oven door during the first hour of baking.
- ✓ Use full fat ingredients; low-fat versions contain more water and will weep.
- ✓ Ensure the cornstarch is whisked into the sugar first to prevent clumps.
- ✓ Let the cake cool in the oven to avoid "shocking" the proteins.
Creative Twists to Personalize Your Bake
Once you’ve mastered the base from this homemade cheesecakes cookbook, you can start playing with flavors.
- For a Zesty Summer Twist: Fold in 2 tablespoons of fresh lemon zest and a tablespoon of poppy seeds to the batter.
- For a Decadent Chocolate Soul: Drizzle the finished, chilled cake with a 70% dark chocolate ganache and a sprinkle of flaky sea salt.
- To Prevent a Soggy Crust: If you’re terrified of the water bath, place a pan of water on the rack below the cheesecake instead of putting the cheesecake in the water. It’s less effective but much safer for beginners.
If you are looking for more inspiration, I love the technique in this How to Bake recipe for creating different flavor layers in one go.
Scaling Guidelines
- To Scale Down (15cm Pan): Halve all ingredients. Use 2 large eggs. Reduce bake time to 45-50 minutes.
- To Scale Up (Two 23cm Pans): Double all ingredients. Bake both on the same middle rack if possible, or swap positions halfway through. Keep the water bath full!
| Premium Choice | Budget Alternative | Flavor Impact | Savings |
|---|---|---|---|
| Vanilla Bean Paste | Pure Vanilla Extract | Less intense aroma | Save $15 |
| Monk Fruit Sweetener | Granulated White Sugar | Higher glycemic index | Save $8 |
| Greek Yogurt | Sour Cream | Slightly less "bright" tang | Save $2 |
Debunking Baked Custard Beliefs
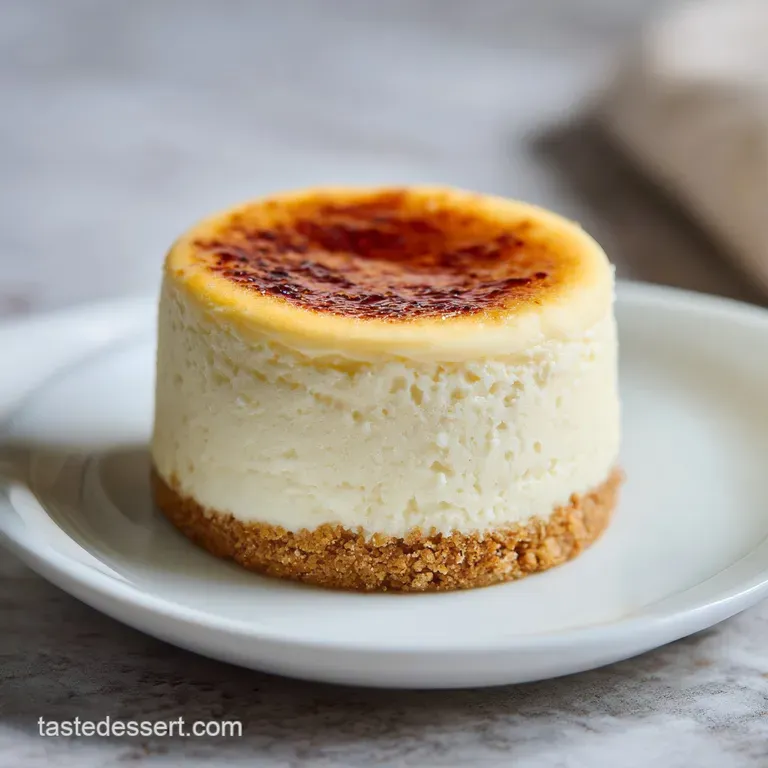
Many people think you must beat the batter until it's "fluffy." This is a myth! For a dense, NY style result, you want to incorporate as little air as possible. Air is the enemy of a smooth cheesecake; it creates a texture more like a sponge cake than a custard.
Another common misconception is that you need to grease the sides of the pan. Actually, if you don't grease the sides, the cheesecake "clings" as it rises, which can actually help prevent it from collapsing into a bowl shape later. Just run a thin knife around the edge as soon as it comes out of the oven to release it.
Keeping Every Slice Fresh
Storage: Store your cheesecake in the fridge, covered loosely with foil or plastic wrap, for up to 5 days. The flavor actually improves after the second day as the lemon and vanilla meld.
Freezing: This is a great freezer friendly dessert. Wrap individual slices tightly in plastic wrap, then a layer of foil. They’ll stay fresh for up to 3 months. Thaw in the fridge overnight never on the counter, or the texture will turn grainy.
Zero Waste Tip: If you have leftover crust crumbs, don't toss them! Sprinkle them over yogurt or ice cream for a quick treat. Any leftover egg whites from other recipes can be used to make a quick meringue topping for the cake.
Presentation Styles for Maximum Impact
For that "shatter" effect when someone takes their first bite of the crust, make sure the cake has had at least 12 hours to set. When you're ready to serve, use a long, thin knife dipped in hot water and wiped dry between every single cut. This ensures those sharp, professional looking edges.
Pairing Suggestions: A tart raspberry coulis to balance the monk fruit sweetness. A glass of cold brew coffee or a nutty espresso. Fresh mint leaves and macerated strawberries.
There is something so deeply satisfying about mastering the homemade cheesecakes cookbook techniques at home. It’s not just about the food; it’s about the patience and the process. Once you see that perfectly smooth, pale ivory surface, you'll realize it was worth every minute of waiting.
Now, go grab your springform pan and let's get baking!

Homemade Cheesecakes Cookbook FAQs
What is the secret to making good cheesecake?
Room temperature ingredients and slow cooling. Cold cream cheese causes lumps, and rapid temperature change causes cracking. Ensure your dairy is warm and let the cake cool inside the turned off oven for at least an hour.
What makes New York cheesecake different than regular cheesecake?
It is denser and uses heavy cream or sour cream. New York style is baked for a richer, heavier custard texture, whereas 'regular' recipes often use lighter dairy or gelatin, resulting in a fluffier mouthfeel.
What is the best cheese to use for cheesecake?
Full fat block cream cheese is mandatory. Avoid whipped or low-fat versions as they contain excess water that prevents proper setting and leads to weeping or a grainy texture.
What not to do when making cheesecake?
Do not overmix the eggs once they are added to the batter. Overbeating incorporates too much air, which expands during baking and inevitably causes surface cracking upon cooling.
How to prevent my cheesecake crust from getting soggy?
Blind bake the crust completely before adding the filling. You must also tightly wrap the outside of the springform pan in multiple layers of heavy duty foil to ensure the water bath stays out.
Is it true I must use a water bath to bake cheesecake?
No, this is a common misconception, but highly recommended for perfection. A water bath (bain marie) insulates the sides, creating steam that bakes the custard gently and evenly, guaranteeing a silky texture.
How to tell when the cheesecake is finished baking?
Check for a small wobble in the exact center. The outer 2-3 inches should look set and matte, but the very middle should still visibly jiggle like soft gelatin when the pan is nudged gently.
Homemade Cheesecakes Cookbook
Ingredients:
Instructions:
Nutrition Facts:
| Calories | 409 kcal |
|---|---|
| Protein | 9.3 g |
| Fat | 35.2 g |
| Carbs | 15.0 g |
| Fiber | 0.4 g |
| Sugar | 3.3 g |
| Sodium | 284 mg |
