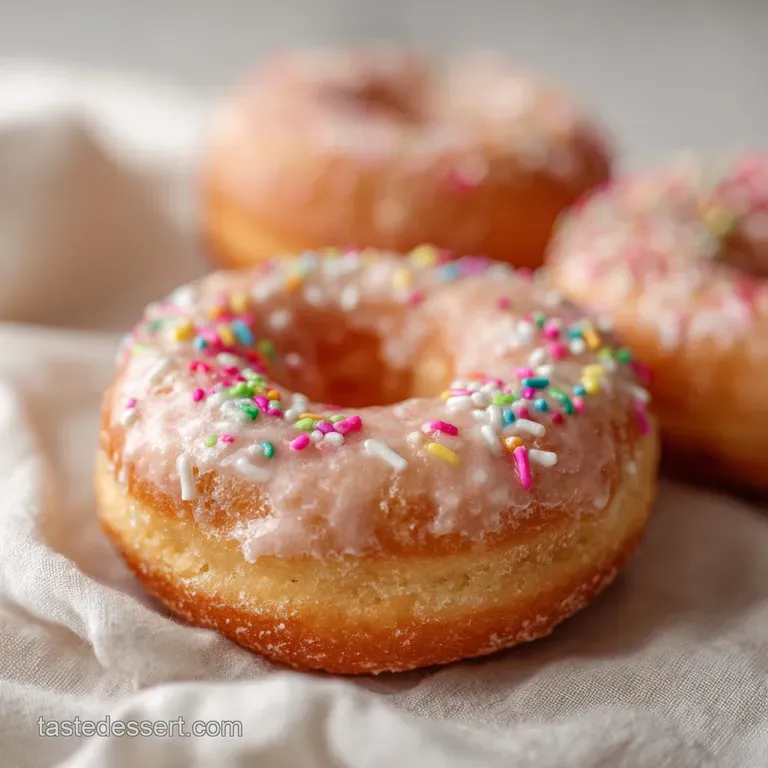
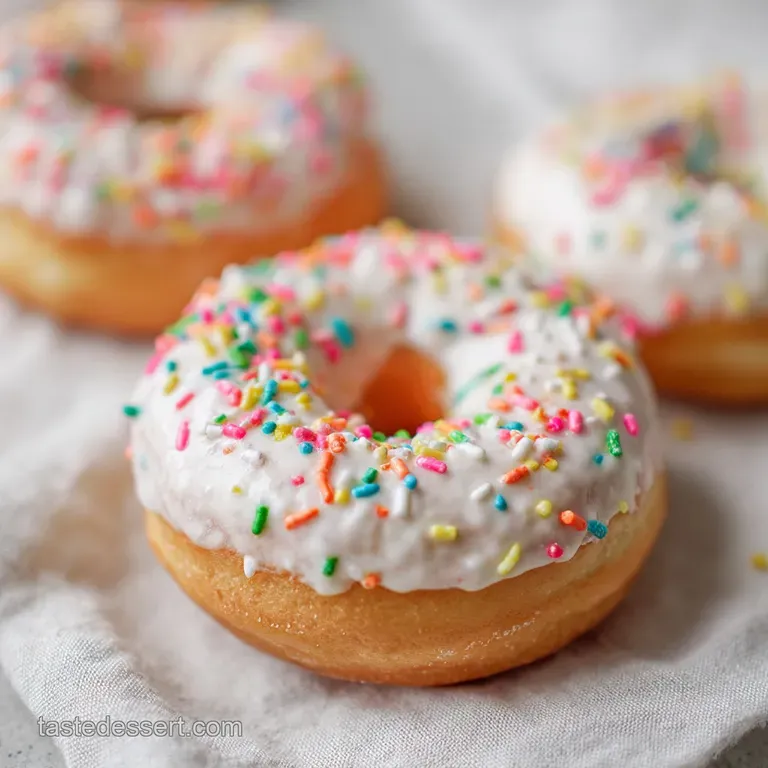
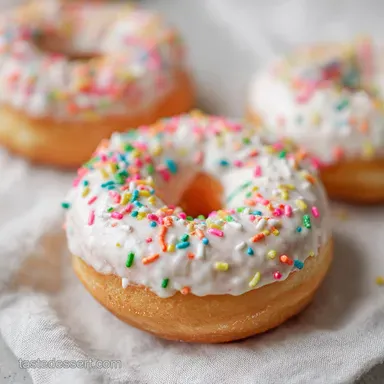
Homemade Donuts: Light and Cloud-Like
- Time:20 minutes active + 2 hours 10 mins resting = 150 minutes total
- Flavor/Texture Hook: A velvety, cloud like crumb with a glaze that provides a satisfying shatter.
- Perfect for: Slow Saturday mornings, birthday breakfasts, or a delightful project for beginner bakers.
- Mastering This Fluffy Classic Homemade Donuts Recipe
- Why the Butter Goes in Late
- Component Analysis and Selection
- The Tools You Really Need
- Perfecting the Dough and Fry
- Solving the Most Common Mistakes
- Adapting This Recipe for Everyone
- Keeping the Sweetness Fresh
- Styling Your Warm Homemade Treats
- Recipe FAQs
- 📝 Recipe Card
Mastering This Fluffy Classic Homemade Donuts Recipe
Imagine the scent of sweet yeast and warm nutmeg filling your home while the sun just starts to peek through the curtains. There is something deeply nostalgic about the sizzle of dough hitting hot oil, a sound that has echoed through kitchens for centuries.
Long before they were a brightly lit drive thru staple, these treats were "olykoeks" or oily cakes, brought to the American colonies by Dutch settlers. They were simple, rustic balls of dough fried in fat, often with a nut or fruit in the center to ensure the middle actually cooked through.
We have come a long way from those dense little cakes, but the heart of the tradition remains the same. It is about the joy of watching a shaggy mess of flour and milk transform into a smooth, elastic ball of potential.
When you bite into one of these, you aren't just eating a snack; you are tasting a piece of history that has been lightened and refined by generations of home cooks who wanted something more wonderful for their families.
I promise you that once you see that beautiful white ring appear around the center of your frying donut, you will feel like a professional pastry chef. This method is designed to be approachable and forgiving, focusing on the sensory cues that tell you exactly when the dough is ready.
We are going to make 14 of these delightful rings, and honestly, the hardest part is waiting for them to cool down just enough so you don't burn your tongue on the glaze!
Why the Butter Goes in Late
Fat Interference: Adding the softened butter one cube at a time after the flour is mixed prevents the fat from coating the flour particles too early, which allows for better gluten development.
Thermal Stability: Using milk warmed to exactly 105°F ensures the yeast activates immediately without being scalded, leading to a more reliable and vigorous rise.
Texture Regulation: The small amount of nutmeg acts as a flavor bridge, but its oils also slightly interfere with starch bonding, contributing to a "shorter" and more tender crumb.
| Servings | Ingredient Adjustments | Pot Size | Total Cook Time |
|---|---|---|---|
| 7 Donuts | 1/2 quantities, use 1 egg yolk | 2 quart | 5 minutes |
| 14 Donuts | Use quantities exactly as listed | 4 quart | 10 minutes |
| 28 Donuts | Double ingredients, use 2 eggs | 6 quart | 20 minutes |
When you are planning your morning, remember that the yeast needs time to breathe and grow. If you rush the rise, you end up with a heavy, bready texture instead of the airy pillow we are after.
The beauty of this process is that most of the time is hands off, leaving you plenty of time to brew a fresh pot of coffee or perhaps read a few chapters of that book you've been meaning to finish while the dough doubles in size.
Component Analysis and Selection
| Component | Role in Dough | Pro Secret |
|---|---|---|
| Whole Milk | Provides moisture and fat | Warm it to exactly 105°F for a perfect bloom |
| Active Dry Yeast | The primary leavening agent | If it doesn't foam in 10 minutes, start over |
| Unsalted Butter | Creates a velvety, rich crumb | Use "European style" butter for higher fat content |
| Ground Nutmeg | The "secret" bakery aroma | Always grate it fresh for the most vibrant scent |
The Tools You Really Need
To get the best results from this homemade donuts recipe, a few specific tools will make your life much easier. While you can certainly mix this by hand, a stand mixer fitted with a dough hook is a wonderful companion for incorporating the butter into the dough.
It does the heavy lifting, ensuring the gluten is developed enough to hold those precious air bubbles.
You will also want a heavy bottomed pot, like a cast iron Dutch oven. These pots hold heat much better than thin stainless steel, which is vital because when you drop cold dough into the oil, the temperature will naturally dip.
A clip on candy thermometer is non negotiable here; if the oil is too cool, the donuts will absorb grease like a sponge, and if it's too hot, they will burn on the outside while remaining raw inside.
Finally, a wire rack set over a baking sheet is essential for the glazing stage, allowing the excess to drip away so you get that perfect, even coating.
Perfecting the Dough and Fry
- Bloom the yeast. Combine 1 cup whole milk (warmed to 105°F), 2.25 tsp active dry yeast, and 0.25 cup granulated sugar. Note: Wait 5-10 minutes until it is foamy.
- Form the mass. Whisk in 1 large egg, then add about 1.75 cups of all purpose flour. Use a dough hook to mix until it looks shaggy and messy.
- Strengthen the dough. Add 1 tsp fine sea salt and the remaining 1.75 cups of flour. Mix on low until the flour is fully hydrated.
- Incorporate the butter. Add 0.25 cup unsalted butter, one cube at a time, while the mixer runs. Cook until the dough is smooth, shiny, and clears the sides of the bowl.
- First rise. Place the dough in a greased bowl, cover, and let sit in a warm spot for 2 hours. Wait until it has visibly doubled in size.
- Shape the rings. Punch the air out and roll to 1/2 inch thickness on a floured surface. Cut 14 rings using a sharp donut cutter.
- Heat the oil. Fill your pot with 1 quart vegetable oil and heat to 350°F. Note: Use a thermometer for precision.
- Fry until golden. Carefully drop 2-3 donuts in at a time. Fry for 60-90 seconds per side until they are a rich golden brown.
- Prepare the glaze. Whisk 2 cups powdered sugar, 4 tbsp milk, and 1 tsp vanilla extract until it flows like thick honey.
- Glaze the treats. Dip the warm donuts into the bowl. Set them on a wire rack until the glaze sets and shatters when touched.
Solving the Most Common Mistakes
One of the most frequent hurdles I see is the oil temperature falling too low during the fry. If you notice your donuts aren't sizzling vigorously the moment they hit the oil, they will likely come out heavy. I always recommend doing a "test donut" with one of the donut holes first.
This allows you to check the internal texture and the color without risking a whole batch. If the outside turns brown in 30 seconds, your oil is way too hot!
Why are my donuts greasy?
If your treats feel oily to the touch, the culprit is almost always the oil temperature or the proofing time. When the oil is below 350°F, the dough takes longer to cook, allowing the fat to penetrate the crumb rather than searing the outside.
Alternatively, if you over proof the dough, the air bubbles become too large and weak, causing the structure to collapse and soak up oil like a sponge.
| Problem | Root Cause | Solution |
|---|---|---|
| Dough is sticky | Too much humidity or warm milk | Add flour 1 tbsp at a time until it clears the bowl |
| No white ring | Dough was too heavy or under proofed | Ensure the second rise is at least 30 minutes |
| Glaze is translucent | Not enough powdered sugar | Whisk in more sugar until it coats a spoon thickly |
Don't be discouraged if your first few aren't picture perfect. Even the "mistakes" usually taste wonderful when they are warm and covered in sugar! If you find yourself wanting to try different textures, you might enjoy comparing this yeast raised version to a Sour Cream Donut which has a more dense, cake like consistency.
- ✓ Always use a thermometer to track oil temp between batches.
- ✓ Pat the dough lightly with a paper towel if it looks "sweaty" before frying.
- ✓ Don't crowd the pot; only fry 2 or 3 at a time to keep heat stable.
- ✓ Use a wooden skewer or chopstick to flip the donuts easily.
- ✓ Sift your powdered sugar to avoid lumps in your glaze.
Adapting This Recipe for Everyone
If you are looking to change things up, this dough is incredibly versatile. You can easily swap the vanilla in the glaze for a bit of maple extract or even a splash of citrus juice for a bright twist.
For those who want to avoid frying, you can actually bake these at 375°F for about 8-10 minutes, though keep in mind the texture will be closer to a brioche roll than a classic fried donut.
| Original Ingredient | Substitute | Why It Works |
|---|---|---|
| Whole Milk | Canned Coconut Milk | High fat content maintains richness with a nutty hint |
| All Purpose Flour | Bread Flour | Higher protein creates a chewier, more substantial donut |
| Vegetable Oil | Lard | Traditional method that yields an exceptionally crisp exterior |
If you're in the mood for something even lighter and a bit more fancy, you should definitely try my French Cruller Doughnut Recipe which uses a choux pastry base instead of yeast. It's a fun way to see how different doughs react to the heat of the oil!
Keeping the Sweetness Fresh
Fried treats are undoubtedly best when they are still warm from the pot, but you can keep them fresh for a day if you store them in a cardboard box or a paper bag. Avoid airtight plastic containers while they are fresh, as the trapped moisture will make the glaze weep and turn the dough soggy.
If you have leftovers, a quick 5-10 second zap in the microwave will revive that soft, pillowy texture beautifully.
For long term storage, you can freeze unglazed donuts for up to 2 months. Wrap them individually in plastic wrap and then place them in a freezer bag. When the craving hits, let them thaw at room temperature and then warm them in a low oven (about 300°F) for 5 minutes before dipping them in fresh glaze.
Don't let the scraps go to waste, either! Any leftover dough bits can be fried as "donut holes," or if you have stale donuts, they make the most incredible bread pudding you have ever tasted. Simply cube them up, soak them in a custard of eggs and milk, and bake until golden.
Styling Your Warm Homemade Treats
Presentation is half the fun! While a simple vanilla glaze is classic, you can make these look like they came from a high end boutique by adding a few simple toppings. Sprinkle toasted coconut, crushed freeze dried raspberries, or even a pinch of flaky sea salt over the wet glaze.
The contrast of the salt against the sweet sugar is absolutely sophisticated and helps balance the richness of the fried dough.
If you are serving these for a special occasion, try setting them out on a tiered stand. I love to put a small bowl of extra glaze or some homemade butterscotch fudge on the side for people who want an extra decadent experience. Arrange them with a few sprigs of fresh mint or some edible flowers to make the platter really pop. Remember, these are a labor of love, so take a moment to admire that beautiful golden crust and the perfectly set glaze before everyone dives in!

Recipe FAQs
What ingredients do I need to make doughnuts?
You will need a mix of pantry staples. Gather 1 cup whole milk, 2.25 tsp active dry yeast, 0.25 cup granulated sugar, 1 large egg, 0.25 cup unsalted butter, 1 tsp fine sea salt, 3.5 cups all-purpose flour, 0.25 tsp ground nutmeg, 2 cups powdered sugar, 4 tbsp whole milk, 1 tsp vanilla extract, and 1
quart vegetable oil.
What is the secret to perfect donuts?
Maintain precise oil temperature and patience. Heat your oil to exactly 350°F (175°C) to ensure the exterior browns without the center remaining doughy, and always allow the full 2-hour proofing time for a light, airy crumb. If you enjoyed mastering yeast leavened dough here, the same proofing principles apply to our other bread recipes.
Can pancake mix be used for donuts?
No, this is a common misconception. Pancake mix lacks the yeast based structure required to achieve the traditional light, elastic texture of these classic donuts.
Can I bake my doughnut instead of frying it?
No, it is not recommended for this recipe. This specific dough formula relies on the intense, quick heat of deep frying to set the crust and create that signature soft interior.
How to achieve the signature white ring on the donut?
Fry the dough once it has doubled in size and maintain a steady 350°F oil temperature. The ring forms naturally when the donut floats in the oil, leaving the middle section slightly protected from the direct heat.
How to store leftovers?
Keep them in an airtight container at room temperature. They are best enjoyed within one day, as the glaze tends to soften over time.
How to tell if the dough is properly proofed?
Check that the dough has visibly doubled in size. The surface should look smooth and feel soft when gently pressed.
Homemade Donuts Recipe
Ingredients:
Instructions:
Nutrition Facts:
| Calories | 288 kcal |
|---|---|
| Protein | 4.5 g |
| Fat | 10.4 g |
| Carbs | 44.1 g |
| Fiber | 0.9 g |
| Sugar | 20.8 g |
| Sodium | 182 mg |
