Homemade Kaiser Rolls: Golden Crust, Soft Inside
- The Comfort of Homemade Kaiser Rolls: A Bakery Secret Unlocked
- The Essential Ingredients Guide to Dazzling Dishes
- Mastering the Art of Baking: Professional Cooking Method for Kaiser Rolls
- Pro Tips & Secrets for Perfect Kaiser Rolls
- Perfect Presentation of Your Kaiser Rolls
- Storage & Make-Ahead: Keep Your Kaiser Rolls Fresh!
- Creative Variations: Switch It Up!
- Complete Nutrition Guide: It’s All About Balance
- Frequently Asked Questions
- 📝 Recipe Card
The Comfort of Homemade Kaiser Rolls: A Bakery Secret Unlocked
Oh my gosh, let me tell you something! there’s nothing quite like the smell of fresh bread baking in the oven.
You know that moment when you open the oven, and that warm, crusty goodness hits your nose? it’s pure magic! when i first tried making kaiser rolls at home, i wasn’t entirely sure how it would go.
But as soon as i tasted that soft, fluffy interior with a crunchy crust, i was hooked! honestly, it felt like i had a little pop-up bakery right in my kitchen.
Kaiser rolls have their roots in austria, with a history that dates back a few centuries. they were a staple back in the day, often served alongside hearty meals.
Today, they’ve made their way into the hearts (and bellies) of folks all around the world, especially here in the good ol’ usa.
Whether you’re making sandwiches, pairing them with soups, or just slathering them in butter, you can’t go wrong! they’re quite the crowd pleaser for any meal.
Now, here’s the scoop: making these rolls is a bit of a time commitment, but don't let that scare you off! you’ll need about 2 hours and 40 minutes to pull it all together, including rest time for the dough.
And let’s talk difficulty i'd rate this as medium . sure, kneading can be a workout, but you’ll feel like a baking pro when your rolls come out golden brown.
Plus, they yield 12 rolls , perfect for sharing if you’re feeling generous!
Let’s get real for a second. have you ever felt the disappointment of store-bought rolls that are merely "meh"? yeah, me too! but with homemade kaiser rolls , you're in for a treat.
They pack a protein punch, around 5g per roll , and all that fluffy goodness comes in at about 150 calories (not too shabby, right?).
The best part? they’re customizable. you can sprinkle sesame seeds for that classic look or add your favorite herbs for a twist.
When it comes to serving, these rolls are a superstar. they’re perfect for a chilly day paired with a hot bowl of tomato soup.
Or how about hosting a game night? these kaiser rolls can be the base for some wicked awesome sliders! imagine juicy burgers piled high with toppings yeah, i can taste it already.
So, the benefits of these rolls? well, they’re not just tasty; they’re also a delightful way to bring people together.
Feel like pretending you’re in a quaint café in vienna while sipping coffee and indulging in fresh bread? you’ve got this, my friend! plus, the satisfaction you’ll feel from making something from scratch is unbeatable.
Now that you know why kaiser rolls deserve a spot in your kitchen, are you ready to dive into the ingredients? Let's get your hands a little flour smeared and whisk away to bread heaven!
The Essential Ingredients Guide to Dazzling Dishes
Alright, food lovers! let's dive into the world of essential ingredients , where we chat about the foundation of delicious meals.
You know when you cook and something just clicks? it’s often because you have the right stuff on hand. whether you're crafting the perfect kaiser roll or whipping up your grandma's classic chili, having the right ingredients is key!
Premium Core Components
Let’s break it down: detailed measurements are a must. whether you roll with the us system or the metric system , it doesn’t matter if you nail those amounts.
For instance, when making those scrumptious kaiser rolls, you’ll need 4 cups of all-purpose flour and 1 ½ cups of warm water .
Pro tip : keep an eye on the quality of your ingredients too. fresh flour? yes, please! if it smells a bit off, it's time to toss it.
Now onto storage guidelines you don’t want to keep that flour around forever. flour typically keeps for about 6-12 months in your pantry, so make sure you check those dates! and when it comes to freshness, always give your ingredients a little sniff.
If your yeast doesn’t bubbly foam up when you mix it with water and sugar, consider getting a new package.
Spice Things Up: Signature Seasoning Blend
Now, let’s chat about that signature seasoning blend . i swear, seasoning is where magic happens! you don’t need the whole spice cabinet to shine.
A few essential spices like salt, black pepper, and paprika can take your dish from bland to grand. for herbs, don’t forget about the classics: basil, parsley, and oregano.
You can mix and match to create flavor profiles that sing!
And here’s a little bonus regional variations. want a twist? try adding cajun seasoning for a southern kick or italian herbs for a stroll through the tuscan countryside.
When in doubt, trust your tastebuds!
Smart Substitutions
Ever run out of an ingredient mid-recipe? we’ve all been there, and thankfully, smart substitutions save the day! running low on flour? grab that cornmeal for a unique texture! need a vegan touch? swap out butter for applesauce in your baked goods trust me, it works wonders.
Dietary needs? Easy peasy! gluten-free friends can reach for almond flour or coconut flour instead. And seasonal options? Oh gosh, when summer squash is in season, those bad boys can stand in for zucchini in so many recipes!
Kitchen Equipment Essentials
Now, let’s get a little practical with some must have kitchen tools . seriously, these essentials can make your life easier. you don’t need a fancy mixer (though they are nice!) but a good mixing bowl, a whisk , and a wooden spoon can help you whip up just about anything.
If you’re in a pinch, stick handles with alternative equipment like a fork for mixing or a cutting board for rolling dough.
Preparation tips? keep your workspace tidy, it’ll help you stay sane. and for storage, label everything! you don’t want to mix up that vanilla extract with the vinegar, if you know what i mean.
Keeping It Real
Cooking doesn’t have to be a chore, y’all! it’s all about experimenting and enjoying the process. i remember the first time i tried making kaiser rolls; flour was everywhere, and my dough was a bit too sticky.
But hey, they turned out fine, and boy did they impress my friends at a dinner party! seriously, there’s nothing like homemade bread to make you feel like a kitchen rockstar!
So, as we gear up for the instructions , remember: the fun is in the journey! keep your ingredients fresh, your spices handy, and your mind open to subbing in those seasonal options.
Get ready to roll out those kaiser rolls and let’s whip up some happiness together!
Mastering the Art of Baking: Professional Cooking Method for Kaiser Rolls
Homemade kaiser rolls are like little pillows of goodness that always hit the spot! whether you're planning a family dinner, hosting game day, or just craving that perfect sandwich roll, i'm here to share my tried and-true method to get this delicious recipe right every time.
Trust me, it’s easier than it looks, and the reward is oh-so-sweet!
Essential Preparation Steps
Before diving into the actual baking, let’s chat about mise en place . this fancy french term just means having everything in its place.
Grab your flour, water, and other ingredients and set them out. saves time, and you don’t end up looking for the yeast while you’re elbow deep in flour.
(i've been there, and it's not pretty!)
Time management tips ? definitely! prepare yourself for about 20 minutes of active prep and then set aside 2 hours for the dough to rise .
The wait is just part of the magic!
Organizing is key. keep your workspace tidy. you know, clear the clutter, so that lovely dough has room to shine.
And don’t forget safety! always keep a clean area, and wash your hands after handling raw ingredients. it’s a no-brainer, but worth a reminder.
Step-by-step Process
Alright, let’s get baking in a few simple steps.
Activate yeast : mix 1 ½ cups of warm water (at 110° f/ 43° c ) with 2 tablespoons of sugar and 2 teaspoons of active dry yeast .
Wait for about 5- 10 minutes until it froths up like a science experiment exciting, right?
Mix Dry Ingredients : In another bowl, whisk together 4 cups of all-purpose flour with 1 tablespoon of salt.
Combine : Make a well in the flour, stir in the yeast mix, and 2 tablespoons of vegetable oil .
Knead It : Mix until combined and then knead that dough for about 8- 10 minutes until it’s smooth and elastic. Who knew getting a workout could taste so good?
First rise : pop your dough in a greased bowl, cover it with a towel, and let it rise in a warm spot for 1 to 1.
5 hours until it doubles. it's like waiting for a balloon to inflate full of potential!
Shape Rolls : Once risen, divide the dough into 12 pieces , shape each into a ball, and flatten slightly. Use a wooden spoon to create the classic star shape.
Second Rise : Let those bad boys rise again on a cornmeal dusted baking sheet for 30 minutes . Yes, it’s a lot of waiting, but totally worth it!
Preheat Your Oven : While they’re rising, get that oven cranking at 425° F ( 220° C) .
Prepare for Baking : Brush the tops with water, sprinkle on sesame seeds (if using) , and pop them in the oven.
Bake : Let them bake for about 20 minutes . They should look golden brown and sound hollow when you tap 'em.
Cool : Pull them out and let them cool on a wire rack. The aroma will drive you wild!
Expert Techniques
Now that we know the basics, let's get into some advanced moves to up your Kaiser roll game.
For a fantastic crust, consider placing a pan with water in the oven during baking. That steam creates a nice crust just like at a professional bakery!
One critical checkpoint? Trust your senses! Tap the bottom of the roll. If it sounds hollow, you’ve nailed it! If not, give it a couple of minutes more.
And don’t fret if things go sideways. If they’re too dense, maybe the yeast was old or the dough didn’t rise long enough. It happens. Learn from it and move on!
Success Strategies
Avoid common pitfalls. Rushing the kneading? A bad idea. Dough that isn’t elastic won’t rise well. Patience is key, friends!
For assurance, always stick to your measurements. A little too much flour or water could lead to failure.
Looking for make-ahead options ? these rolls freeze beautifully! bake them, let them cool, then pop them in a freezer bag.
Just throw them in the oven for a quick reheat when you’re ready.
And there you have it! a professional cooking method for making those delicious kaiser rolls . it's totally achievable, and the payoff is way more than a quick bakery stop.
Trust me: your family and friends will be begging for more!
In the next section, we’ll dive into some Additional Information to keep your baking adventures rolling. Don't miss out!
Pro Tips & Secrets for Perfect Kaiser Rolls

Alright, friends! Let’s dive into making those delightful Kaiser rolls! Trust me, once you get the hang of it, you’ll feel like a baking superstar!
Chef's personal insights: i've learned that patience is key with this recipe. don’t rush the rising times. if the dough isn’t doubling in size, give it some more time.
It’s like letting a great movie build up good things take time!
Time saving techniques: now, if you're running short on time, i get it! you can make the dough the night before.
Just let it rise in the fridge! the next day, take it out and shape your rolls. it adds a whole new depth of flavor, too!
Flavor enhancement tips: want to jazz it up a notch? try adding some garlic powder or herbs like oregano into the flour.
It’s like taking a plain old roll to italy! and don’t skimp on the sesame seeds. they give that extra crunch and flavor that’s just unmatched.
Presentation Advice: When plating, don’t just dump them on a plate. Arrange your Kaiser rolls in a basket lined with a pretty linen napkin. Just like they do at fancy restaurants!
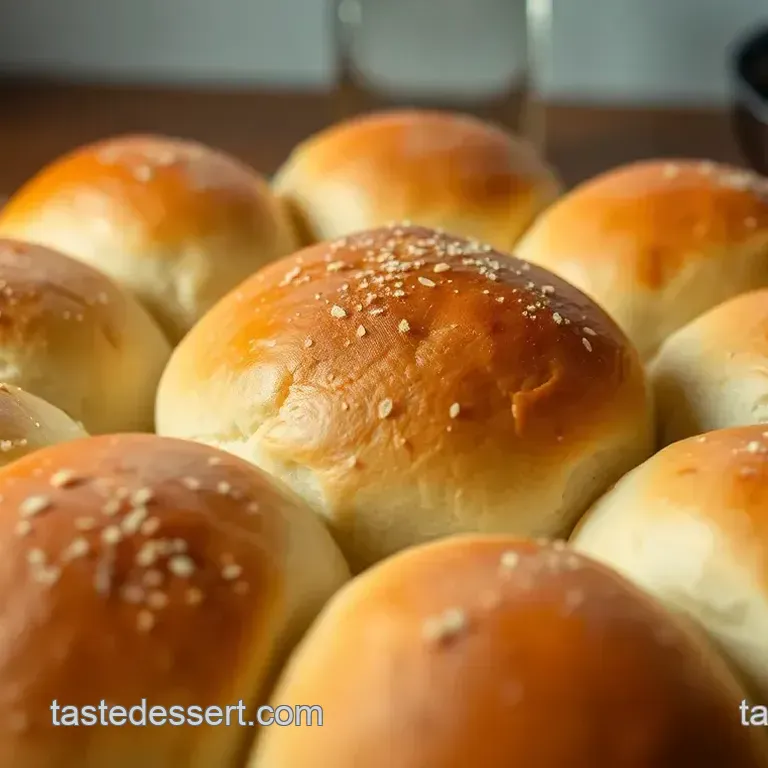
Perfect Presentation of Your Kaiser Rolls
Here comes the fun part making your Kaiser rolls look as good as they taste!
Plating Techniques: Use a wide basket or a wooden board for a rustic feel. It's all about that farm-to-table vibe, you know?
Garnish Ideas: A sprinkle of chopped herbs on top of your rolls can make a world of difference. Or how about a drizzle of infused oil right before serving?
Color Combinations: Aim for a mix of colors. Pair those golden brown rolls with colorful sides like roasted veggies or a bright salad. It’s all about the eye candy!
Visual Appeal Tips: A little shine goes a long way! Brush those beauties with olive oil right before serving to give them that irresistible glistening look.
Storage & make-ahead: Keep Your Kaiser Rolls Fresh!
Okay, listen up. You’ve got a batch of lovely Kaiser rolls and don’t want them to go stale!
Storage guidelines: if you have leftovers, store them in a brown paper bag at room temperature for a day or two.
Just like grandma would! no fridge, please the rolls will just get sad and dry.
Preservation methods: for longer storage, wrap each roll individually and toss them in the freezer. just pop them in the oven frozen for a quick reheating.
They’ll be like you just baked them!
Reheating Instructions: When it’s time to heat, bake them in a preheated oven at 350° F ( 175° C) for about 10 minutes. They’ll be fluffy again, promise!
Freshness Duration: Generally, these beauties are best eaten within 2-3 days if stored properly. But we all know they probably won’t last that long!
Creative Variations: Switch It Up!
Now let’s get creative because the Kaiser roll isn’t just a one-trick pony!
Flavor Adaptations: Want something spicy? Mix in jalapeños or add chipotle powder to the dough. Feel free to get wild!
Dietary Modifications: If gluten isn't your friend, opt for gluten-free flour designed for baking. Your stomach will thank you!
Seasonal Twists: How about some pumpkin puree in the fall? Or fresh herbs in spring? Seasonal ingredients can elevate your rolls like nothing else!
Regional Variations: And hey, let’s not forget the power of culture! Try adding a bit of Mexican flair with cumin and cilantro for a unique twist.
Complete Nutrition Guide: It’s All About Balance
So, how do those Kaiser rolls stack up nutrition wise? Let’s break it down!
Detailed Breakdown: One roll has roughly 150 calories . Not bad, right?
Health Benefits: Here’s the kicker these rolls are made from scratch, so you know exactly what’s going in them. No preservatives or weird stuff.
Dietary Considerations: Keep in mind the sodium from the salt, especially if you’re watching your intake.
Portion Guidance: I’d say one or two rolls with a hearty soup is a solid meal. But if you’re like me? Go ahead and devour a few extras!
So folks, there you have it! don’t be afraid of making these glorious rolls yourself. the satisfaction of pulling a batch of kaiser rolls out of the oven is second to none.
Share them with your friends, family, or even enjoy them solo! happy baking!
Frequently Asked Questions
What is a kaiser roll and how is it different from other rolls?
A kaiser roll is a type of bread roll with a distinctive crust and soft interior, often featuring a star shaped design on top. Unlike standard rolls, the kaiser roll has a thicker crust and is usually shaped using a special technique or tool to create those iconic lines.
This makes it perfect for sandwiches, especially when you want something that can hold up to hearty fillings!
Can I make kaiser rolls ahead of time?
Yes, you can definitely make kaiser rolls ahead of time! Once shaped, you can freeze the rolls after the second rise. Just place them on a baking sheet, freeze until solid, then transfer to a freezer bag. When ready to bake, let them thaw and rise again before baking. They’ll taste freshly made!
What are some variations I can try with kaiser rolls?
There are plenty of fun variations you can explore! For a herby twist, mix dried herbs like rosemary or thyme into the dough. If you're a cheese lover, try adding shredded cheese, such as cheddar, directly to the dough for savory kaiser rolls.
You could even sprinkle toppings like poppy seeds or onion flakes for a unique flavour!
How do I store homemade kaiser rolls?
To keep your kaiser rolls fresh, store them in an airtight container or a resealable bag at room temperature for up to 3 days. If you want to extend their shelf life, consider freezing them in a freezer safe bag. Just remember to wrap them tightly to prevent freezer burn!
What are some great serving suggestions for kaiser rolls?
Kaiser rolls are a fantastic canvas for a variety of toppings! Serve them with a hearty soup like Tomato Soup or French Onion Soup for a cozy meal. They also pair wonderfully with spreads like pesto mayo or garlic aioli.
And if you’re feeling cheeky, enjoy them alongside a pint of lager nothing like a good British ale to complement your freshly baked rolls!
Are kaiser rolls healthy? What are the nutritional considerations?
While kaiser rolls can be part of a balanced diet, they are still a carbohydrate rich food. One roll has about 150 calories and minimal fat, but keep an eye on portion sizes if you're watching your carbohydrate intake.
You can always add healthier fillings such as grilled veggies or lean proteins to boost the nutritional value!
Homemade Kaiser Rolls Golden Crust Soft Inside