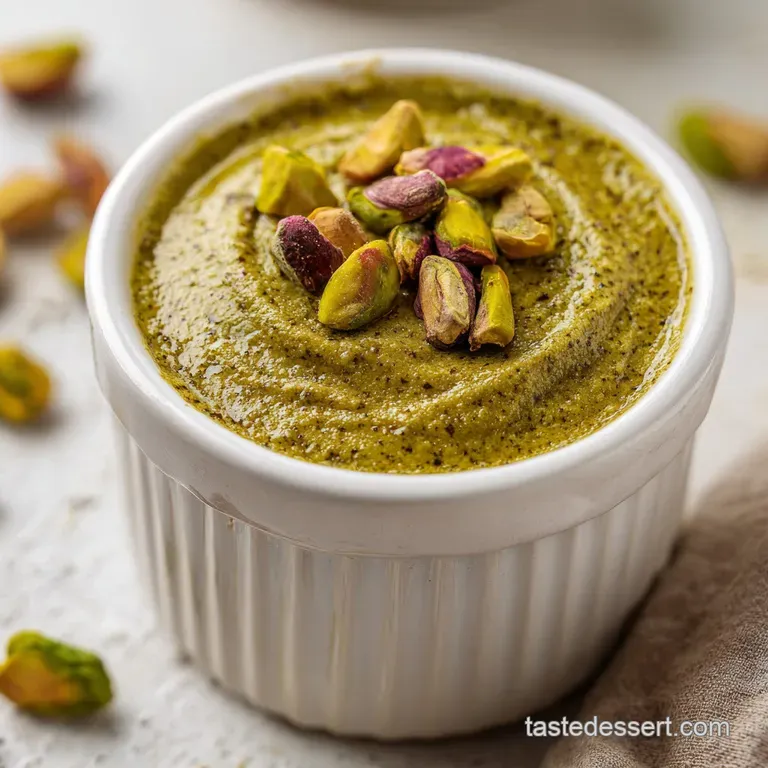
Pistachio Butter: Creamy and Silky

- Time: Active 15 minutes, Passive 10 minutes, Total 25 minutes
- Flavor/Texture Hook: Vibrant neon green with a velvety, melt in-the mouth consistency.
- Perfect for: Filling Dubai style chocolate bars or swirling into decadent desserts.
- Achieving Vibrant Green Color and Silky Pistachio Butter
- Key Recipe Specifications for Your Homemade Nut Butter
- Selecting Quality Ingredients for a Delightful Spread
- Essential Kitchen Tools for Smashing Those Green Nuts
- Mastering the Transformation Through Detailed Instructional Steps
- Solving Texture Issues and Improving Your Final Result
- Creative Adaptations to Suit Your Unique Flavor Preferences
- Optimal Storage Solutions to Keep Everything Fresh
- Artistic Garnish Strategies for a Beautiful Presentation
- Recipe FAQs
- 📝 Recipe Card
Achieving Vibrant Green Color and Silky Pistachio Butter
I remember the first time I tried to make a homemade version of that famous Dubai chocolate bar. I was so excited, but honestly, it was a complete disaster. I just threw some raw pistachios into my food processor and hit "start," thinking it would magically turn into that bright, beautiful green paste I saw online.
Instead, I ended up with a dull, muddy brown sludge that felt like eating wet sand. It was heartbreaking to waste such expensive nuts on something that looked more like damp mulch than a luxury treat.
But that failure was the best thing that could have happened for my kitchen skills. I realized that if I wanted that delightful, neon glow and a texture that feels like silk on the tongue, I had to stop being lazy with the prep work.
The secret isn't in a fancy machine or some hidden additive; it's all about how we treat the pistachio before it ever touches a blade. Once you learn the trick of the "blanch and peel," your homemade treats will start looking like they came straight from a high end boutique in the Middle East.
Today, we are going to walk through the process of creating the most transforming Pistachio Butter you have ever tasted. We'll focus on getting that color balance just right and ensuring the texture is smooth enough to flow into every corner of your chocolate molds.
It is a process that requires a little bit of patience, but trust me, when you see that vibrant green color emerge from the blender, it feels like a total kitchen victory. Let's get into the details of why this method actually works.
Chlorophyll Protection: Blanching the nuts for exactly 60 seconds shocks the outer layers, allowing us to remove the dull brown skins and reveal the bright green chlorophyll underneath.
Moisture Management: Toasting the blanched nuts at a low 300°F removes any residual water from the ice bath, which prevents the butter from seizing and becoming grainy.
Cellular Breakdown: High speed blending creates friction that warms the nuts, causing the natural oils to escape the cell walls and transform dry crumbs into a liquid like spread.
Emulsion Stability: Adding avocado oil and maple syrup while the blender is running helps create a stable bond between the fats and sugars, resulting in a glossy, professional finish.
The choice of ingredients can significantly impact your wallet, especially when you need enough for a large batch of chocolate bars. If you are looking to save a bit of money without sacrificing too much of that signature taste, consider these swaps.
| Premium Ingredient | Budget Alternative | Flavor Impact | Savings |
|---|---|---|---|
| Iranian Pistachios | California Pistachios | Slightly less intense green | Save $5-10 per lb |
| Pure Maple Syrup | Honey or Agave | Adds floral notes rather than woody | Save $2-4 per bottle |
| Avocado Oil | Grapeseed Oil | Very neutral; maintains the green hue | Save $3-5 per bottle |
Regardless of which path you choose, the technique remains the same. You want to prioritize the freshness of the nuts above all else. Old nuts will be dry and won't emulsify nearly as well, even if you add extra oil.
Key Recipe Specifications for Your Homemade Nut Butter
When we talk about making a spread like this, we have to be precise with our measurements. This recipe is designed to yield 24 servings, which is the perfect amount for several large chocolate bars or one massive batch of cookies. Because we are using 2 cups of raw pistachios, the weight comes out to about 300 grams.
It is a dense, calorie rich treat, but because the flavor is so intense, a little bit goes a long way.
The timing is the most important part of these specs. You only need 15 minutes of hands on prep time, which includes the peeling and the blending. The 10 minutes of cook time refers to the gentle toasting in the oven. When you follow this timeline, you ensure that the oils are perfectly primed for blending without the nuts getting so hot that they lose their delicate floral aroma. If you've ever made a Honey Butter recipe, you know how important temperature and timing are for a smooth spread.
One thing to keep in mind is the cooling time. While the recipe is "done" in 25 minutes, I always tell my friends to let the butter sit for about an hour after blending. This allows the flavors of the tahini and maple to really marry with the nut oils.
It also helps the toasted kataifi stay crunchier for longer once you mix it in by hand.
| Component | Science Role | Pro Secret |
|---|---|---|
| Raw Pistachios | Base Protein/Fat | Use "unsalted" to control the final seasoning level perfectly. |
| Avocado Oil | Emulsifying Agent | Its high smoke point and neutral flavor keep the green color vibrant. |
| Tahini | Flavor Depth | Adds a savory, nutty complexity that cuts through the maple sweetness. |
Understanding how these parts work together is what separates a "nut paste" from a "nut butter." The oil isn't just there for calories; it's the bridge that turns a pile of crumbs into a flowing sauce.
The maple syrup, while a sweetener, also adds a touch of moisture that helps the blades catch the ingredients during the final blending phase.
Selecting Quality Ingredients for a Delightful Spread
For this delightful transformation to happen, you need to start with the right shopping list. I always look for raw, unsalted pistachios. If you buy the roasted, salted ones in the shell, you'll spend an hour peeling them and the salt level will be impossible to fix.
Look for the bags in the baking aisle or the bulk section.
- 2 cups (approx. 300g) Raw, Unsalted Pistachios: Why this? Essential for color and the pure, unadulterated nutty flavor we need. (Substitute: Raw cashews, but you will lose the green color entirely.)
- 1/4 tsp Sea Salt: Why this? Enhances the natural sweetness of the nut without making it taste salty. (Substitute: Table salt, use slightly less.)
- 2 tbsp Avocado Oil: Why this? A neutral fat that helps the butter reach a silky, pourable consistency. (Substitute: Melted coconut oil, though it will firm up in the fridge.)
- 2 tbsp Maple Syrup: Why this? Adds a hint of caramel like sweetness that complements the pistachios. (Substitute: Honey or agave nectar.)
- 1/2 cup Toasted Kataifi: Why this? Provides the iconic "shatter" crunch for the Dubai chocolate filling. (Substitute: Crushed toasted phyllo or even puffed rice.)
- 2 tbsp Tahini: Why this? Gives the butter a sophisticated, creamy finish and keeps it from being too sweet. (Substitute: Cashew butter or sunflower seed butter.)
When you are at the store, check the color of the pistachios through the clear bag if possible. You want them to look as green as possible even before peeling. Avoid any that look yellow or overly shriveled, as these are often old and will taste slightly dusty. A fresh pistachio should smell sweet and a bit like grass.
Essential Kitchen Tools for Smashing Those Green Nuts
You don't need a professional kitchen to make world class Pistachio Butter, but there are a few things that will make your life much easier. The most important tool is a high speed blender. A regular food processor can work, but it often struggles to get the butter truly velvety.
It might leave small grains, which is fine for some, but if you want that professional "drip," a blender is the way to go.
You will also need a clean kitchen towel and I mean a dedicated one that you don't mind getting a little stained. The process of rubbing the skins off the blanched nuts can leave little green and purple marks on the fabric. I have a specific "nut towel" in my drawer just for this purpose.
It works much better than paper towels, which tend to fall apart when they get wet.
Finally,, a small baking sheet is vital for the toasting step. We aren't looking to brown the nuts; we just want to dry them out. A light colored aluminum sheet is better than a dark one because it reflects heat more evenly, preventing the bottom of the nuts from scorching while the tops stay raw. If you're planning to use this butter as a topping for a Classic New York Cheesecake, you'll appreciate having the right tools to get that perfectly smooth finish.
Mastering the Transformation Through Detailed Instructional Steps
- Bring a pot of water to a rolling boil. Drop the raw pistachios in for exactly 60 seconds. Note: This loosens the skins without cooking the nut through.
- Drain immediately and plunge into an ice bath. Use a clean kitchen towel to rub the skins off, leaving only the bright green kernels. until they look like little emeralds.
- Spread the peeled nuts on a baking sheet and toast gently at 300°F (150°C) for 5-8 minutes to remove moisture and enhance aroma. until they smell faintly sweet and nutty.
- Place toasted pistachios and sea salt into a high speed blender. Process on low speed, gradually increasing to high until the nuts release their oils and form a thick paste.
- Stream in the avocado oil and maple syrup while blending until the mixture becomes a glossy, silky spread. Note: The friction will make the blender jar feel warm.
- Stop the blender and scrape down the sides with a spatula to ensure every bit is processed.
- Pulse one last time on high for 30 seconds to ensure total emulsification.
- Pour the mixture into a glass bowl and let it cool for 10 minutes.
- Stir in the toasted kataifi and tahini by hand to maintain the iconic crunch for Dubai chocolate filling. until the shards are evenly distributed.
- Transfer to a jar or use immediately to fill your chocolate molds.
While many people think they can just use the oven for everything, there's a specific reason we use a combination of stovetop blanching and oven toasting.
| Method | Time | Texture Outcome | Best For |
|---|---|---|---|
| Stovetop (Blanching) | 60 seconds | Softens skin, preserves green | Achieving that neon look |
| Oven (Toasting) | 5-8 minutes | Dry, crisp, aromatic | Deepening flavor and removing water |
If you skip the blanching and only toast, the skins will fuse to the nut, and you'll end up with a brown, bitter butter. If you only blanch and don't toast, the excess water will cause the blender blades to "gum up," and you'll never get that velvety flow.
Solving Texture Issues and Improving Your Final Result
The most common heartache I hear from fellow home cooks is that their Pistachio Butter turned out "chunky" or "grainy." Usually, this is because of one of two things: either the blender wasn't powerful enough, or the nuts weren't toasted long enough to remove the blanching water.
Water is the enemy of smooth nut butter. If there's even a teaspoon of water left in those nuts, the oils won't emulsify, and it will seize up like a bad chocolate ganache.
Why Your Butter Is Gritty Instead of Silky
If you notice small flecks in your spread, it usually means the nuts weren't warm enough when you started blending. The friction of the blades works best when the nuts have a little bit of their own heat. If they’ve cooled down too much after the oven, pop them back in for 2 minutes.
Also, make sure you aren't rushing the oil addition. You want to add it in a slow, steady stream while the blades are spinning fast.
What If My Blender Is Overheating?
This happens to the best of us! Pistachios are tough. If your machine starts to smell like burning plastic or feels very hot, stop immediately. Let it rest for 5 minutes. Nut butter is a marathon, not a sprint.
You can also add a tiny bit more avocado oil to help the blades move, but don't go overboard, or it will be too runny.
| Problem | Root Cause | Solution |
|---|---|---|
| Bitter Aftertaste | Skins were left on | Ensure 100% of the purple/brown skins are rubbed off after blanching. |
| Separation in Jar | Natural oil migration | Give it a good stir before using; this is normal for homemade versions. |
| Butter is too thick | Not enough liquid fat | Add avocado oil one teaspoon at a time while blending on high. |
Common Mistakes Checklist
- ✓ Never skip the ice bath after boiling; it stops the cooking and makes the skins "pop" off easily.
- ✓ Pat the nuts completely dry with a paper towel before putting them in the oven to toast.
- ✓ Use a high speed blender (like a Vitamix or Blendtec) if you want that commercial grade silkiness.
- ✓ Don't add the kataifi while the butter is hot; the residual heat will make the pastry soggy.
- ✓ Store the tahini at room temperature before adding so it incorporates without clumping.
Creative Adaptations to Suit Your Unique Flavor Preferences
Once you have the base recipe down, you can start playing with the profile. I love adding a tiny pinch of cardamom for a more traditional Persian flavor, or even a drop of rose water. Just be careful with liquids!
Any water based flavoring (like vanilla extract or rose water) should be added at the very end and stirred in by hand to prevent the oils from separating.
If you are making this for a crowd, you can easily double the recipe. However, keep in mind that doubling the ingredients means the blender has to work twice as hard. I usually recommend making two separate batches rather than trying to cram 4 cups of nuts into one blender jar.
It keeps the motor cool and ensures the texture stays consistent throughout.
- If you want a "Cream" version: Add 2 extra tablespoons of tahini and reduce the kataifi. It becomes more like a spreadable dip.
- If you want a "Crunch" version: Pulse half the pistachios into large chunks first, set them aside, then fold them into the smooth butter at the end.
- If you want a "Salty Sweet" version: Increase the sea salt to 1/2 tsp and use a dark Grade B maple syrup for a more intense flavor.
Optimal Storage Solutions to Keep Everything Fresh
Because we are using fresh nuts and no preservatives, this Pistachio Butter won't last forever on the counter. In a clean, airtight glass jar, it will stay fresh in the pantry for about 1 week. However, if you live in a warm climate, I highly recommend keeping it in the refrigerator.
In the fridge, it will last for up to 3 weeks. Just remember that it will firm up quite a bit when cold, so you'll need to let it sit at room temperature for 20 minutes before you try to spread it.
For long term storage, you can actually freeze this! I like to spoon the butter into silicone ice cube trays. Once they are frozen solid, I pop the cubes into a freezer bag. They will stay good for up to 3 months. When you're ready for a treat, just thaw a cube or two in a small bowl.
The texture might change slightly, but a quick vigorous stir with a spoon will bring that silkiness right back.
Don't let any leftovers go to waste! If you have a little bit stuck to the bottom of the jar, pour in some warm milk and shake it up for a "pistachio latte" base. Or, you can use the last tablespoon to whisk into a vinaigrette with some lemon juice and olive oil for a delightful salad dressing.
Artistic Garnish Strategies for a Beautiful Presentation
The presentation is where you can really show off your hard work. Since this recipe is focused on color balance, we want to choose garnishes that make that neon green really sing. I always use a "three point" color strategy to make the dish look professional.
- The Pink Accent: Dried edible rose petals are my favorite. The soft pink against the vibrant green is a classic Middle Eastern color pairing that looks absolutely stunning. Add these just before serving so they don't get damp.
- The White Accent: A sprinkle of flaky sea salt (like Maldon) provides a beautiful crystalline white contrast. It catches the light and tells your guests that this is a sophisticated, balanced treat.
- The Red Accent: If you are serving this as a dip or on a plate, a few fresh pomegranate arils add a burst of ruby red and a juicy texture that cuts through the richness of the butter.
When you are filling your Dubai chocolate bars, try to leave a tiny bit of the green filling visible at the edges of the chocolate. This "peek a-boo" effect creates a lot of visual interest and makes the final product look much more artisanal.
Use a small offset spatula to smooth the top of the butter before you pour the final layer of chocolate over it. This ensures a clean, level look when you snap the bar in half to show off that gorgeous, crunchy interior.

Recipe FAQs
What is the best pistachio butter brand for Dubai chocolate?
Homemade is best. store-bought options often contain palm oils or excessive sugar that ruins the flavor profile of the chocolate filling. Making it yourself ensures a pure, vibrant green color and superior nut intensity.
Is pistachio butter used for Dubai chocolate?
Yes, it is the primary component. The butter acts as the binding base for the toasted kataifi and tahini, which defines the signature texture and taste of the dessert.
Which is the real Dubai pistachio chocolate?
Authenticity relies on the filling texture. The real version combines a smooth, high-quality nut paste with crispy, toasted shredded phyllo to achieve that specific contrast between creamy fat and sharp crunch.
Where to get pistachio cream for Dubai chocolate?
Make it at home using a high speed blender. By processing raw, toasted pistachios with avocado oil and maple syrup, you achieve a silky finish that mimics commercial creams without artificial additives.
How to remove pistachio skins easily?
Boil the nuts for exactly 60 seconds before plunging them into an ice bath. This thermal shock makes the skins loose, allowing you to rub them off effortlessly with a clean kitchen towel.
Is it true that I should toast the nuts after peeling?
Yes, this is essential. Toasting at 300°F (150°C) for 5-8 minutes removes internal moisture and deepens the aroma, which is vital for building a robust flavor base.
How to keep the kataifi crunchy in the chocolate?
Wait until the nut butter is completely cool before folding in the toasted kataifi. Adding it while the butter is warm will result in soggy pastry rather than the iconic crunch required for the filling.
Homemade Pistachio Butter
Ingredients:
Instructions:
Nutrition Facts:
| Calories | 96 kcal |
|---|---|
| Protein | 2.8 g |
| Fat | 7.5 g |
| Carbs | 5.5 g |
| Fiber | 1.3 g |
| Sugar | 2.1 g |
| Sodium | 25 mg |
