Honey Butter Recipe: Whipped Spread
- Time: Active 3 minutes, Passive 0 minutes, Total 3 minutes
- Flavor/Texture Hook: Light, floral, and whipped
- Perfect for: Holiday brunches, weekend cornbread, or gifting in jars
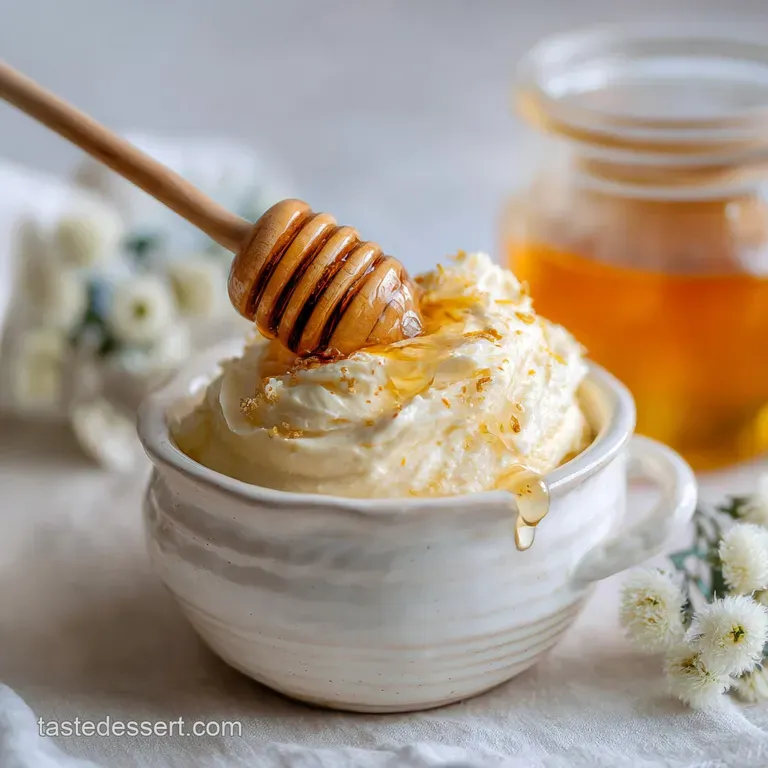
- Whip Up This Fluffy Honey Butter Recipe
- Science Behind the Fluff
- Key Metrics for Success
- The Core Ingredient Analysis
- Tools for Aerated Texture
- How to Whip Everything
- Solving Common Mixing Issues
- Swapping Flavors and Textures
- Scaling Your Batch
- Keeping Your Spread Fresh
- Myths About Butter Temperature
- Styling for the Table
- Recipe FAQs
- 📝 Recipe Card
Whip Up This Fluffy Honey Butter Recipe
Imagine pulling a tray of golden, steam filled rolls out of the oven, the yeasty aroma filling every corner of your kitchen. Now, imagine topping those rolls with a dollop of something so light it practically floats, swirling into the crumb without tearing it. That is the magic of this specific technique.
It isn’t just "mixed" butter; it is an aerated confection that bridges the gap between a condiment and a dessert.
I remember the first time I tried to make this by just stirring honey into cold butter with a fork. It was a disaster streaky, lumpy, and the honey just pooled at the bottom of the bowl. I felt so defeated until I realized the secret was all in the temperature and the whip.
You want that butter to be just soft enough to yield to a finger press, but not so warm that it’s greasy.
We've all been there, staring at a torn biscuit because the butter was too hard. This recipe solves that once and for all. It’s the kind of kitchen win that makes you feel like a professional pastry chef with only three minutes of effort. Right then, let’s get into why this works so well.
Science Behind the Fluff
Understanding the physics of fat makes all the difference when you're aiming for that glossy, stable finish.
- Mechanical Aeration: High speed whipping forces air into the butter solids, creating a stable foam like structure that increases volume.
- Emulsification Stability: The honey’s sugars are suspended within the fat matrix, preventing the liquids from separating or weeping over time.
- Crystal Inhibition: Adding a tiny amount of powdered sugar provides cornstarch, which helps stabilize the emulsion and prevents the honey from recrystallizing.
| Preparation Method | Total Time | Resulting Texture | Best Usage |
|---|---|---|---|
| Hand Stirred | 2 minutes | Dense and streaky | Rustic toast |
| Melted/Stovetop | 5 minutes | Syrup like and heavy | Glazing hams |
| High Speed Whip | 3 minutes | Velvety and airy | Biscuits and rolls |
Choosing the whipped method ensures your spread feels like a premium restaurant experience. If you’ve ever tried the English Toffee Sauce recipe, you know how important temperature control is for sugar fat emulsions.
Key Metrics for Success
Precision in the kitchen isn’t just for baking cakes; it applies to your spreads too. To get that iconic Texas Roadhouse style, you need to hit three specific checkpoints. First, your butter should be precisely 65°F to 68°F cool to the touch but pliable.
If it’s 72°F or higher, it will collapse.
Second, the whipping time must hit the two minute mark. This is when the color shifts from a deep yellow to a pale, ivory cream. Finally, the ratio of honey to fat must stay at 1:3 by volume to ensure the structure can hold the weight of the sweetener without breaking.
The Core Ingredient Analysis
Using the right components is the difference between a "good" spread and something truly memorable.
| Ingredient | Science Role | Pro Secret |
|---|---|---|
| Unsalted Butter | Lipid Base | Use European style for higher fat content and less water |
| Raw Honey | Humectant | Darker honey yields a more floral, complex undertone |
| Powdered Sugar | Stabilizer | The cornstarch prevents the honey from "weeping" out |
| Vanilla Bean Paste | Aromatic | Provides visual "freckles" that signal high-quality |
I always reach for vanilla bean paste here. Much like in a Homemade Vanilla Bean recipe, those tiny black seeds make the butter look incredibly artisanal and expensive.
Tools for Aerated Texture
You don't need a professional kitchen, but a stand mixer or a high-quality hand mixer is non negotiable here. A simple whisk won't have the speed required to break the fat molecules and trap enough air.
I prefer using a paddle attachment rather than a whisk attachment; the paddle smears the butter against the sides of the bowl, which actually incorporates the honey more effectively.
A flexible silicone spatula is also essential. You’ll need to scrape the bottom of the bowl at least twice to ensure no "honey pockets" are left behind. If the honey isn't fully integrated, you'll end up with sticky spots that ruin the velvety mouthfeel.
How to Whip Everything
- Temper the lipid. Place 1 cup (226g) Unsalted Butter on the counter for about 30 minutes until slightly softened. Note: It should be pliable but not shiny.
- Aerate the base. Beat the butter on medium high speed for 1 minute until pale and fluffy.
- Incorporate the sweetener. Stream in 1/3 cup (113g) high-quality Raw Honey slowly while the mixer is running.
- Add the stabilizer. Sift in 2 tbsp (15g) Powdered Sugar to ensure no lumps.
- Season the mix. Add 1/2 tsp Fine Sea Salt. Note: Salt cuts the sweetness and brightens the floral honey notes.
- Infuse the aromatics. Mix in 1/2 tsp Pure Vanilla Bean Paste.
- Final whip. Increase speed to high and whip for 1 full minute until the mixture looks like clouds.
- Scrape and fold. Use a spatula to ensure the bottom is fully incorporated.
- Transfer and set. Spoon into a glass jar or ceramic crock.
- Serve. Let it sit at room temperature for 15 minutes before serving for the best spreadability.
Solving Common Mixing Issues
The most frequent heartbreak is a broken emulsion where the honey separates. This usually happens because the butter was too warm or you added the honey too quickly. If you see liquid pooling at the bottom, don't panic.
Put the whole bowl in the fridge for 5 minutes to firm up the fat, then try whipping it again on high speed. It should come back together perfectly.
Fixing a Greasy Texture
If your butter looks shiny and oily rather than matte and fluffy, it has surpassed the melting point of its fat crystals. This often happens in warm kitchens. The air bubbles are escaping because the "walls" of the fat are too weak to hold them.
| Problem | Root Cause | Solution |
|---|---|---|
| Grainy feel | Honey crystallized | Microwave honey for 5 seconds before adding to dissolve crystals |
| Liquid at bottom | Poor emulsion | Chill the bowl and re whip on high speed for 2 minutes |
| Flat texture | Under whipping | Ensure you whip for at least 3 minutes total |
Common Mistakes Checklist
- ✓ Never use melted butter; the air bubbles will have nothing to cling to.
- ✓ Use room temperature honey; cold honey will seize the butter into lumps.
- ✓ Don't skip the salt - it's the bridge between the fat and the sugar.
- ✓ Scrape the bowl twice; honey is heavy and naturally sinks to the bottom.
- ✓ Use a deep bowl to prevent the honey from splattering during the initial mix.
Swapping Flavors and Textures
While the classic version is iconic, you can easily pivot based on what's in your pantry. If you are serving this with a seafood feast, perhaps alongside a Surimi Snow Crab recipe, you might even omit the vanilla and add a pinch of lemon zest.
| Original Ingredient | Substitute | Why It Works |
|---|---|---|
| Raw Honey | Maple Syrup | Thinner consistency; use 1/4 cup only to prevent soupy texture |
| Unsalted Butter | Salted Butter | Omit the added sea salt. Note: Harder to control salt levels |
| Vanilla Bean Paste | Ground Cinnamon | Adds warmth; perfect for fall themed rolls or sweet potatoes |
Scaling Your Batch
If you're hosting a massive brunch, you can easily double this. When scaling up (2x-4x), keep the salt to about 1.5x the original amount first, then taste. Liquids like honey should be added even more slowly to ensure the larger mass of butter can absorb it without breaking.
For smaller batches (1/2 recipe), use a smaller bowl. If the bowl is too large, the beaters won't be able to effectively grip the butter, and you'll just be smearing it around without actually incorporating any air. For a tiny portion, a hand mixer in a measuring cup works surprisingly well.
Keeping Your Spread Fresh
Store your whipped creation in an airtight glass jar in the fridge for up to 2 weeks. Because we've introduced air and honey (which is a humectant), it won't last quite as long as plain butter, but it's still very stable. If you want to keep it longer, you can freeze it for up to 3 months.
Just thaw it in the fridge overnight.
To reduce waste, if you have leftover "scraps" in the bowl, don't wash them away! Toss some warm popcorn into the mixing bowl and use a spatula to coat the kernels in the residual honey butter. It’s a low effort snack that uses every last bit of that liquid gold.
Myths About Butter Temperature
There is a common misconception that "room temperature" means the butter should be soft enough to smash with a spoon easily. In reality, butter begins to lose its structural integrity at 70°F. If your kitchen is warm, your butter might be too soft in just 15 minutes.
Always aim for "cool room temp."
Another myth is that you can't over whip butter. While it's hard to do by hand, a high powered stand mixer can eventually warm the butter through friction. If the mixture starts to look yellow and oily again, stop immediately and chill it. You want to stop right when it looks like stiff peak whipped cream.
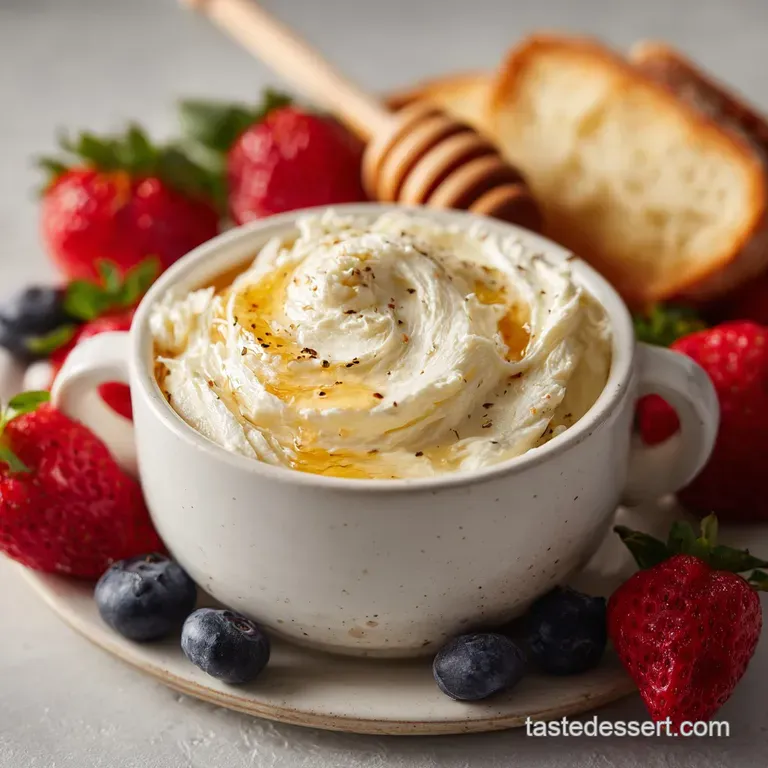
Styling for the Table
For a modern look, ditch the traditional butter crock and try a "butter board" style. Smear the whipped honey butter across a wooden board in swoops using the back of a spoon. Sprinkle with flaky Maldon salt and perhaps some edible flower petals or additional vanilla bean flecks.
It looks stunning and encourages guests to dive in.
If you prefer individual servings, use a small cookie scoop to create uniform spheres. Place them on a parchment lined tray and chill for 10 minutes to set the shape. This makes for a very clean presentation at a formal dinner party where you want everyone to have their own perfect portion.
Trust me on this the visual of those tiny vanilla specks against the ivory butter is a total showstopper.

Recipe FAQs
How is honey butter made?
Cream softened butter and honey together. For the best texture, beat softened butter with a mixer until fluffy, then gradually stream in honey and a stabilizer like powdered sugar until fully incorporated and airy.
What is Texas Roadhouse butter made of?
It's primarily butter, honey, and powdered sugar. The key is whipping the butter to incorporate air for a light texture, similar to how we create a stable emulsion in our Pioneer Womans Pecan Pie: The Best Sticky Buttery Classic Recipe.
How much honey per stick of butter?
A 1:3 ratio of honey to butter by volume is ideal. For one stick (1/2 cup or 113g) of butter, use about 1/3 cup (113g) of honey to maintain the correct structure.
What kind of bread is best for honey butter?
Warm, soft, and slightly sweet breads are best. Think biscuits, cornbread, dinner rolls, or even lightly toasted brioche. The warmth allows the honey butter to melt beautifully into the crumb.
Can I make honey butter with salted butter?
Yes, but omit added salt. If using salted butter, simply leave out the sea salt in the recipe to avoid an overly salty spread.
How long does homemade honey butter last?
Refrigerated, it lasts up to 2 weeks. Store in an airtight container; it's best served at room temperature for optimal spreadability, so let it sit out for about 15 minutes before serving.
What's the secret to extra fluffy honey butter?
The secret is mechanical aeration and proper butter temperature. Ensure your butter is cool but pliable (around 65°F), and whip it at high speed to incorporate air, creating a stable foam much like the principles used in making stable sauces like our Sweet and Sour Agrodolce Sauce: My Simple Family Recipe.
Honey Butter Recipe
Ingredients:
Instructions:
Nutrition Facts:
| Calories | 126 kcal |
|---|---|
| Protein | 0.1 g |
| Fat | 11.4 g |
| Carbs | 6.7 g |
| Fiber | 0 g |
| Sugar | 6.7 g |
| Sodium | 73 mg |
