Hot Chocolate Cheesecake Brownie Cake Recipe
- Time: Active 25 minutes, Passive 50 minutes, Total 1 hours 15 mins
- Flavor/Texture Hook: Velvety cocoa cream meets chewy, decadent chocolate.
- Perfect for: Cozy winter gatherings or impressive budget-friendly celebrations.
- Why You'll Love This hot chocolate cheesecake brownie cake
- The Chemistry of the Cocoa Swirl
- Quick Budget Comparison: Fresh vs Shortcut
- Ingredient Component Deep Dive
- Essential Stats for This Recipe
- Best Tools for Baking Success
- Step-By-Step Baking Instructions
- Solving Common Baking Hurdles
- Scaling This Recipe Up or Down
- Ingredient Substitution Guide
- Flavor Tweaks and Smart Swaps
- Debunking Baking Myths
- Freezing and Reheating Best Practices
- Elegant Ways to Serve This
- Recipe FAQs
- 📝 Recipe Card
Why You'll Love This hot chocolate cheesecake brownie cake
The first time I pulled this hot chocolate cheesecake brownie cake out of the oven, the aroma alone stopped me in my tracks. It wasn't just "chocolatey"; it smelled like a rainy Tuesday afternoon spent by a fireplace, clutching a mug of the richest cocoa you’ve ever tasted.
As I torched the mini marshmallows on top, the scent of caramelized sugar drifted through the kitchen, and I knew I’d stumbled onto something special.
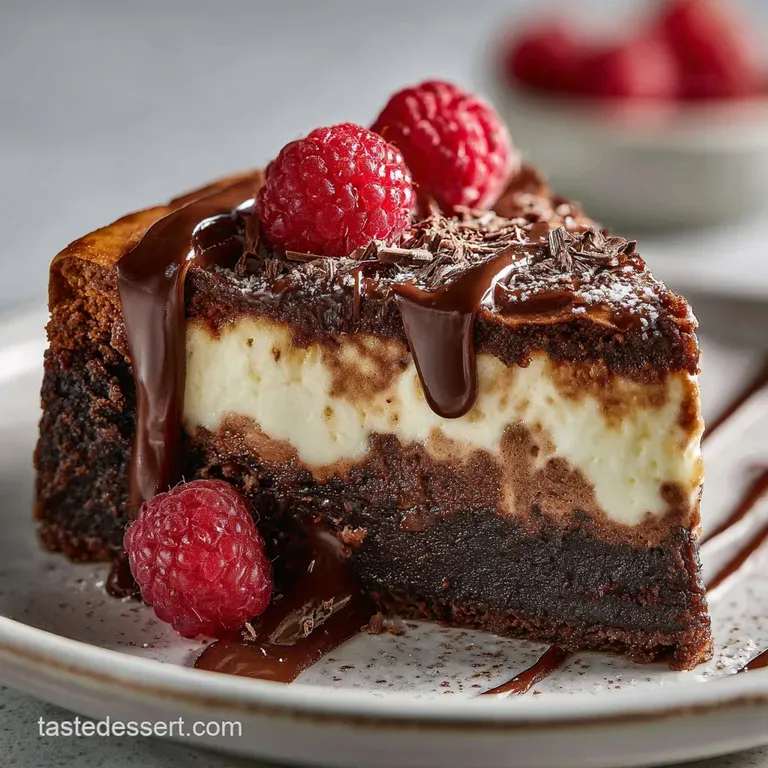
You’re going to love how the textures play together here. We’re talking about a brownie base that is so fudgy it almost clings to the fork, topped with a cheesecake layer that feels like a silk ribbon on your tongue.
It’s a transformation of simple ingredients butter, sugar, and flour into a multi dimensional masterpiece that looks far more expensive than it actually is. Honestly, it’s the kind of bake that makes people think you’ve spent all day in the kitchen, when we both know you were probably scrolling through your feed while it worked its magic in the oven.
The brilliance of this dish lies in its approachability. We’re not using gold leaf or rare imported beans; we’re using smart techniques to make standard Dutch processed cocoa sing.
This isn't just another brownie; it’s a full sensory experience that hits every note from the crunch of a toasted marshmallow to the cool, tangy richness of the cream cheese. Right then, let's get into what makes this work so well.
The Chemistry of the Cocoa Swirl
Fat Induced Fudginess: Melted butter coats the flour particles, inhibiting gluten formation and ensuring the brownie base remains dense and chewy rather than cake like.
Acidic Balance: Sour cream introduces lactic acid which tenderizes the cream cheese proteins, resulting in a velvety, crack free cheesecake surface.
Quick Budget Comparison: Fresh vs Shortcut
| Feature | Made From Scratch | Using Boxed Mix |
|---|---|---|
| Cost | Roughly $12 total | Roughly $18 total |
| Texture | Dense and buttery | Often airy or oily |
| Flavor | Deep, customized cocoa | Generic sweetness |
Choosing to go the homemade route isn't just about the flavor; it's about control. When we build this hot chocolate cheesecake brownie cake from scratch, we manage the moisture levels and the "snap" of the chocolate.
While a box mix might save you five minutes, it lacks the structural integrity needed to support the heavy cheesecake layer without turning into a soggy mess.
Building the flavors from the ground up allows us to use 170g of melted unsalted butter to create that classic crackle top on the brownie portion. If you're looking for another decadent project, you might also enjoy the technique used in my How to Bake recipe for chocolate lava cakes.
Ingredient Component Deep Dive
| Ingredient | Science Role | Pro Secret |
|---|---|---|
| Dutch Processed Cocoa | Reduced acidity | Sift before adding to prevent bitter clumps. |
| Full Fat Cream Cheese | Structural fat | Use blocks, not tubs, for a firmer set. |
| Sour Cream | Moisture & Tang | Full fat yields the creamiest mouthfeel. |
Choosing the right components is half the battle won. The 75g of Dutch processed cocoa powder provides a dark, mellow base that contrasts beautifully with the 30g of hot cocoa mix in the upper layer.
The cocoa mix isn't just for flavor; the milk solids in the mix help the cheesecake layer mimic the exact profile of a steaming cup of cocoa.
Essential Stats for This Recipe
To pull off this hot chocolate cheesecake brownie cake recipe, you'll need to gather these specific amounts. Don't skip the room temperature eggs; they are vital for emulsifying the fats properly.
For the Brownie Base:
- 170g unsalted butter, melted Why this? Provides the richness and chew.
- 300g granulated sugar Why this? Sweetness and structural stability.
- 3 large eggs, room temperature Why this? Binds the fats and liquids.
- 1 tbsp vanilla extract Why this? Enhances the chocolate notes.
- 75g Dutch processed cocoa powder Why this? For a deep, dark color.
- 125g all purpose flour Why this? Provides just enough structure.
- 0.5 tsp salt Why this? Balances the sugar.
- 60ml hot fudge sauce, slightly warmed Why this? Adds an extra layer of moisture.
For the Hot Cocoa Cheesecake Layer:
- 450g full fat cream cheese, softened Why this? The creamy heart of the dish.
- 100g granulated sugar Why this? Sweetens the tang.
- 30g premium hot cocoa mix Why this? Delivers the specific hot chocolate flavor.
- 2 large eggs, room temperature Why this? Sets the cheesecake custard.
- 60g sour cream Why this? Smooths the texture.
For the Finishing Toppings:
- 1.5 cups mini marshmallows Why this? Provides the iconic "hot cocoa" look.
- 2 tbsp hot fudge, for drizzling Why this? For visual and flavor punch.
Chef's Tip: To take the chocolate flavor even deeper, add 1 teaspoon of espresso powder to the brownie batter. You won't taste the coffee, but it makes the chocolate taste "more like chocolate."
Best Tools for Baking Success
You don't need a professional kitchen, but a few specific items will make your life much easier. I always recommend a 9x9 inch square baking pan (23cm) for this. If you use a glass pan, remember that it holds heat differently than metal, so you might need to add 5 minutes to the bake time.
A stand mixer or a reliable hand mixer (like a KitchenAid) is essential for the cheesecake layer to ensure there are no lumps in the cream cheese. Also, grab some parchment paper. Leaving an "overhang" or "sling" on two sides of the pan allows you to lift the entire cake out easily once it's chilled.
Trust me, trying to cut this inside a deep pan is a recipe for heartbreak and messy edges.
step-by-step Baking Instructions
Phase 1: Preparing the Foundation
Preheat your oven to 175°C (350°F). Line your square pan with parchment paper, ensuring the sides are covered. In a large bowl, whisk the 170g of melted butter and 300g of sugar together until the mixture looks shiny and smooth.
Phase 2: Building the Brownie
Add the 3 large eggs one at a time, whisking vigorously after each. Stir in the vanilla and the warmed 60ml of hot fudge sauce. Sift in the 75g of cocoa powder, 125g of flour, and salt. Fold gently with a spatula until no streaks of white flour remain.
Pour all but half a cup of this batter into the pan.
Phase 3: The Creamy Heart
In a separate bowl, beat the 450g of softened cream cheese and 100g of sugar until the texture is velvety and lump free. Add the 30g of hot cocoa mix and 60g of sour cream, mixing on low speed.
Phase 4: Incorporating the Eggs
Add the 2 large eggs to the cheesecake mixture one at a time. Mix just until combined to avoid incorporating too much air, which causes cracking later.
Phase 5: The Marbling
Spread the cheesecake mixture over the brownie base. Take the reserved half cup of brownie batter and drop small dollops on top of the cheesecake. Use a butter knife to swirl the two together until a beautiful marbled pattern emerges.
Phase 6: The First Bake
Bake for 40 to 45 minutes. The edges should be set, but the center should still have a slight jiggle when you gently shake the pan. This is crucial for that fudge like texture.
Phase 7: The Topping
Remove the pan from the oven and immediately sprinkle the 1.5 cups of mini marshmallows over the top. Return to the oven for 3 to 5 minutes until the marshmallows are puffy and slightly melted.
Phase 8: The Finishing Touch
If you have a kitchen torch, use it now to brown the marshmallows. If not, you can pop it under the broiler for 30 seconds but watch it like a hawk! Drizzle the final 2 tbsp of hot fudge over the top in a zig zag pattern.
Phase 9: The Cool Down
Allow the cake to cool at room temperature for 1 hour, then refrigerate for at least 4 hours. This wait is agonizing, I know, but it’s what allows the cheesecake to set into a silky dream.
Phase 10: Slicing
Lift the cake out using the parchment sling. Use a hot, sharp knife to slice into 14 portions, wiping the knife clean between every single cut. This ensures those beautiful, clean layers stay visible.
Solving Common Baking Hurdles
Even the best of us hit a snag sometimes. The most common issue with this cheesecake brownie cake is the dreaded "sinking center" or a cracked top. Usually, this comes down to temperature or over mixing. If your brownie base is too hard, you likely over baked it. Remember, it continues to cook as it cools in the pan!
The Secret to Fudgy Brownies
The brownie base stays fudgy because we use a high fat to flour ratio and melted butter rather than creamed butter. Creaming butter incorporates air, which creates a cakey texture. Melted butter keeps things heavy and rich. If you want to explore more about that fudgy texture, check out The Fudge Brownie recipe which uses a similar technique.
Avoiding the Cheesecake Crack
Cracks happen when the cheesecake dries out or rises too fast and then collapses. By using sour cream and room temperature eggs, we keep the mixture stable. Also, don't open the oven door during the first 30 minutes of baking!
| Problem | Root Cause | Solution |
|---|---|---|
| Cracked Surface | Over beating the eggs | Mix on low speed; don't whip. |
| Grainy Texture | Cold cream cheese | Ensure cheese is fully softened first. |
| Soggy Bottom | Under baked base | Bake until edges pull away slightly. |
Common Mistakes Checklist
- ✓ Ensure the cream cheese is truly at room temperature (about 2 hours on the counter).
- ✓ Sift the cocoa powder to avoid "cocoa bombs" of dry, bitter powder in the brownie.
- ✓ Use full fat sour cream; low-fat versions contain more water and can lead to a runny set.
- ✓ Resist the urge to cut the cake while it's still warm; the cheesecake needs cold to solidify.
- ✓ Line the pan with parchment; the marshmallows will stick to the sides otherwise.
- ✓ Don't over torch the marshmallows; they go from golden to charcoal in about three seconds.
Scaling This Recipe Up or Down
If you're baking for a crowd, you can double this recipe and use a 9x13 inch pan. You'll need to increase the bake time by about 10-15 minutes. Watch the center jiggle carefully. For spices like salt or vanilla, I usually only increase them by 1.5x to keep the flavors balanced.
To scale down for a smaller treat, you can halve the ingredients and use an 8x4 inch loaf pan. Reduce the bake time by about 20%. Since it's hard to use "half an egg," I recommend beating an egg in a small cup and then measuring out 2 tablespoons of it to use as your "half."
Ingredient Substitution Guide
| Original Ingredient | Substitute | Why It Works |
|---|---|---|
| Sour Cream | Greek Yogurt | Similar acidity; slightly tangier finish. |
| Dutch Cocoa | Natural Cocoa | More acidic; result will be lighter. |
| Granulated Sugar | Light Brown Sugar | Adds a subtle molasses, chewy note. |
If you are looking for a dairy-free option, you can use a high-quality vegan butter and a coconut based cream cheese. Note that the texture will be slightly softer, so an extra hour of chilling in the fridge is mandatory.
Flavor Tweaks and Smart Swaps
If you want to turn this into a hot chocolate peppermint cheesecake brownie, simply add 1/2 teaspoon of peppermint extract to the cheesecake layer and sprinkle crushed candy canes over the marshmallows after they come out of the oven. It’s a holiday classic that never fails.
For those who want to transform this into hot cocoa cheesecake bars, you can bake the brownie base for 15 minutes first before adding the cheesecake layer. This creates a more distinct separation between the layers and makes them easier to eat with your hands at a party.
Debunking Baking Myths
Myth: You must use a water bath for all cheesecakes. Truth: Since this cheesecake layer is relatively thin and sits on a sturdy brownie base, a water bath isn't necessary. The brownie protects the cheese from the direct heat of the pan bottom.
Myth: "Room temperature" isn't that important. Truth: It's vital. Cold cream cheese will never get smooth, no matter how long you beat it. You'll end up with little white lumps in your beautiful chocolate batter.
Freezing and Reheating Best Practices
This hot chocolate cheesecake brownie cake freezes remarkably well. Wrap individual slices tightly in plastic wrap, then place them in a freezer safe bag. They will stay fresh for up to 3 months. When you're ready for a treat, just thaw a slice in the fridge overnight.
For reheating, I actually recommend eating the cheesecake layer cold or at room temperature. However, if you want that "just baked" marshmallow pull, you can put a slice in the microwave for exactly 10 seconds. Any longer and the cheesecake will lose its structure and start to melt.
Elegant Ways to Serve This
If you’re serving this at a dinner party, skip the square cut and use a round cutter to create elegant circular towers. Top each with a single, perfectly toasted large marshmallow and a sprig of mint. The contrast between the dark chocolate and the bright green mint is visually stunning.
You can also serve this alongside a scoop of vanilla bean ice cream. The cold creaminess of the ice cream cuts through the intensity of the hot fudge and the brownie base. It's the kind of dessert that begs for a strong cup of coffee on the side to balance the sweetness.
Whatever you do, make sure to show off those marbled swirls they are the star of the show!

Recipe FAQs
Is it necessary to use room temperature cream cheese for the cheesecake layer?
Yes, absolutely. Cold cream cheese will never incorporate smoothly, resulting in a grainy texture, even after extended mixing.
How to achieve the perfect swirl between the brownie and cheesecake layers?
Dollop the reserved brownie batter onto the cheesecake layer using a spoon and use a thin knife to gently drag through the batter just once or twice.
Can I substitute natural cocoa powder for Dutch processed cocoa in the brownie base?
No, I recommend sticking to Dutch processed. Dutch cocoa is lower in acidity, which is necessary when pairing it with baking soda/powder for the intended dark color and fudgy texture.
How to prevent the marshmallows on top from burning during the final bake?
Remove the cake from the oven after the main bake, immediately sprinkle marshmallows, and return it to the oven only for the final 3 to 5 minutes, watching closely.
What is the best technique for slicing this layered dessert cleanly?
Heat a long, sharp knife under hot water, wipe it dry, and then slice; repeat this process between every single cut to prevent sticking.
Is it safe to make the brownie base ahead of time like in some other bar recipes?
No, this is not recommended for the brownie base. The structure relies on that immediate pour over the cheesecake; pre-baking the brownie base changes the moisture balance needed for the final set.
How does the inclusion of sour cream affect the cheesecake texture compared to recipes using heavy cream?
Sour cream adds essential lactic acid, which tenderizes the proteins, creating a silkier, less dense mouthfeel than heavy cream alone would provide; this technique is similar to stabilizing emulsions in recipes like the Amish Peanut Butter recipe.
Hot Chocolate Brownie Cake

Ingredients:
Instructions:
Nutrition Facts:
| Calories | 438 calories |
|---|---|
| Protein | 6.6g |
| Fat | 25g |
| Carbs | 51g |
| Fiber | 2g |
| Sugar | 41g |
| Sodium | 204mg |
