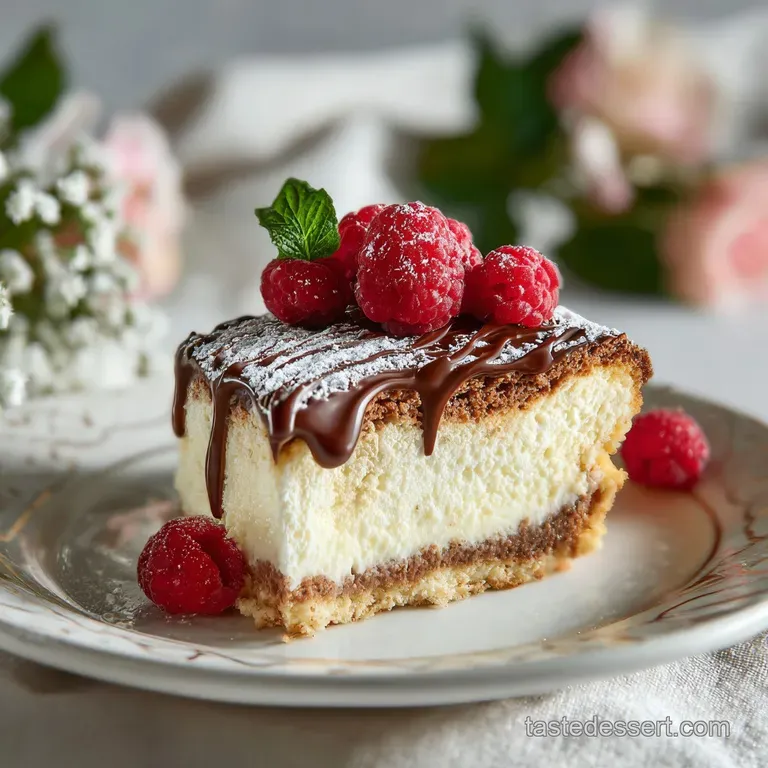
The Best Italian Love Cake
- Time: Active 20 minutes, Passive 1 hours, Total 1 hours 20 mins
- Flavor/Texture Hook: Velvety chocolate crumb paired with a silky ricotta custard and airy mousse.
- Perfect for: Sunday family dinners, holiday potlucks, or when you want a "wow" factor with minimal effort.
- The Magic of The Best Italian Love Cake
- The Science of Why it Works
- Performance Data and Decision Shortcuts
- Ingredient Deep Dive and Science
- Necessary Ingredients and Smart Swaps
- Recommended Tools for This Recipe
- Step-by-Step Layering and Baking
- Solving Common Baking Mishaps
- Flavor Variations and Modern Twists
- Scaling and Preparation Guidance
- The Truth About This Cake
- Storage and Zero Waste Strategies
- Perfect Pairings for Sweet Success
- Recipe FAQs
- 📝 Recipe Card
The Magic of The Best Italian Love Cake
I still remember the first time I pulled this cake out of the oven. I was convinced I'd ruined it because I poured the heavy cheese mixture right on top of the batter, thinking it would just sit there like a cheesecake. But that is where the secret lies.
As it bakes, the layers perform a beautiful dance, swapping places to create a dessert that is as much a science experiment as it is a treat.
You'll love how the dark, fudgy chocolate provides a sharp contrast to the snowy white, sweetened ricotta. It's not just a cake, it's a conversation starter. People always ask how I got the filling "inside" so perfectly. Honestly, I just let the oven do the heavy lifting while I prep the fluffy pudding topping.
This recipe is my go to when I want something that feels incredibly fancy but doesn't require me to be a professional pastry chef. If you’ve ever felt intimidated by layered cakes, this is your sign to start here.
We’re using a few clever shortcuts, like a high-quality cake mix and instant pudding, but with some specific additions that make it taste like it came from a high end Sicilian bakery.
The Science of Why it Works
Density Inversion: The ricotta mixture is significantly denser than the aerated chocolate batter, causing it to sink through the cake layer as the heat expands the air bubbles in the batter.
Protein Coagulation: The eggs in the ricotta layer set firmly into a custard like texture, preventing the two layers from fully merging into a muddy mess.
Performance Data and Decision Shortcuts
Before you grab your whisk, it's helpful to know exactly what you're aiming for. This table helps you visualize the transformation that happens inside your pan so you can pull it out at the precise moment.
| Layer | Finished Thickness | Visual Cue | Expected Texture |
|---|---|---|---|
| Chocolate Base | 1.5 inches | Deep brown, springy | Moist, tight crumb |
| Ricotta Center | 1 inch | Opaque white, set edges | Silky, dense custard |
| Mousse Topping | 0.5 inches | Matte finish, no peaks | Light, airy, velvety |
To get the most out of your baking session, consider these quick decision shortcuts. They help you tailor the results to your specific craving without overthinking the process.
- If you want a fudgy bite, use full fat sour cream and don't overbake by even a minute.
- If you want a cleaner "flip", ensure your ricotta is drained of all excess liquid for at least two hours.
- If you want a deeper chocolate flavor, add a teaspoon of espresso powder to the cake mix.
Ingredient Deep Dive and Science
Choosing the right components is what separates a soggy cake from a legendary one. We aren't just throwing things in a bowl, we're building a structural masterpiece. If you’re a fan of traditional textures, you might also enjoy a Classic Italian Biscotti Recipe with your coffee while this bakes.
| Ingredient | Science Role | Pro Secret |
|---|---|---|
| Full fat Sour cream | Acidic tenderizer | Breaks down gluten for a melt in-mouth crumb. |
| Whole milk ricotta | Structural fat | Provides the creamy "heft" that allows the layer flip. |
| Instant Pudding | Stabilizing agent | Thickens the whipped topping so it doesn't deflate or weep. |
Chef's Tip: Freeze your mixing bowl and beaters for 10 minutes before making the pudding topping. This ensures the fat molecules in the cream stay cold, resulting in a much more stable, voluminous mousse.
Necessary Ingredients and Smart Swaps
Having everything measured out before you start is the key to a stress free kitchen. This recipe relies on specific ratios to ensure that famous layer swap happens.
- Premium Chocolate Cake Mix (15.25 oz): Use a "moist" or "triple chocolate" version. Why this? Provides the structural foundation and consistent leavening.
- Water (1 cup): Standard hydration for the mix.
- Vegetable oil (1/2 cup): Keeps the cake moist even after refrigeration.
- Full fat sour cream (1/2 cup): Adds fat and acidity. Substitute: Greek yogurt for a similar tang.
- Large eggs (3 for cake, 4 for filling): Total of 7 eggs at room temperature. Why this? Room temp eggs emulsify better for a smoother batter.
- Whole milk ricotta cheese (32 oz): Must be drained. Substitute: Mascarpone for a richer, more buttery flavor.
- Granulated sugar (3/4 cup): Sweetens the cheese layer.
- Pure vanilla extract (1 tsp): Essential for that bakery aroma.
- Instant chocolate pudding mix (3.9 oz): The "magic" thickener for the frosting.
- Cold whole milk (1 cup): Activates the pudding.
- Whipped topping (8 oz): Creates the airy finish. Substitute: Stabilized whipped cream for a less sweet option.
Recommended Tools for This Recipe
You don't need a professional kitchen, but a few specific items make this much easier. A 9x13 inch glass or ceramic baking dish is non negotiable here. I prefer glass because it allows me to peak at the bottom to see if the chocolate layer has fully migrated.
A sturdy stand mixer or a high powered hand mixer is also vital. You really need to aerate the ricotta and sugar mixture so it doesn't become a leaden brick. Finally, grab a fine mesh strainer. Draining your ricotta is the single most important step for preventing a soggy middle.
step-by-step Layering and Baking
1. The Aerated Base Prep
Preheat your oven to 350°F and grease your 9x13 pan. In your large bowl, combine the cake mix, water, vegetable oil, sour cream, and 3 eggs. Beat on medium speed for 2 minutes until the batter is glossy and free of lumps. Pour this into the pan and smooth it out.
This layer needs to be level to support the coming weight.
2. The Ricotta Gravity Mix
In a separate clean bowl, beat the 32 oz of drained ricotta, 3/4 cup sugar, 4 eggs, and vanilla. Beat this for about 3 to 4 minutes. Note: You want to incorporate air to lighten the cheese slightly, even though it remains denser than the cake.
3. The Low and Slow Bake
Gently pour the ricotta mixture over the chocolate batter. Don't worry about swirling it, just spread it to the edges. Bake for 1 hour until the center barely jiggles and a toothpick comes out clean. The cake will rise up around the sides and the ricotta will have "disappeared" underneath.
4. The Chilled Transformation
Let the cake cool completely on a wire rack. This is crucial. If you top it while warm, the mousse will melt into a puddle. Once cool, whisk the pudding mix with 1 cup of cold milk for 2 minutes.
Fold in the whipped topping until the color is uniform and the texture is velvety and cloud like. Spread this over the cake and chill for at least 6 hours, or ideally overnight.
Solving Common Baking Mishaps
Even the best of us hit a snag sometimes. If your cake doesn't look like the pictures, don't panic. Most "failures" with this recipe still taste incredible, even if the physics didn't quite behave.
Why Your Cake Didn't Flip
If the layers stayed exactly where you poured them, it's usually a density issue. Either the cake batter was too thick (perhaps you skipped the sour cream?) or the ricotta was too light. This often happens if the ricotta isn't drained properly, making it "watery" rather than dense.
Why Your Cake Sunk in the Middle
A massive crater in the center usually means the oven door was opened too early. The cold air hits the rising cake and collapses the delicate air bubbles before the proteins have set. It can also happen if the ricotta mixture was over beated, creating too much air that eventually escapes and leaves a void.
| Problem | Root Cause | Solution |
|---|---|---|
| Leaking Water | Undrained ricotta | Drain cheese in cheesecloth for 2 hours before mixing. |
| Runny Topping | Warm cake base | Ensure the cake is stone cold before adding the mousse. |
| Grainy Ricotta | Low quality cheese | Use a "fine grained" brand or pulse ricotta in a processor first. |
Common Mistakes Checklist
- ✓ Never skip draining the ricotta - excess whey ruins the custard texture.
- ✓ Use room temperature eggs to ensure the fats don't seize up.
- ✓ Avoid the temptation to "swirl" the layers manually, let gravity do it.
- ✓ Wait for a full 6 hour chill; the flavors need time to marry and the layers to set.
- ✓ Don't use "Cook and Serve" pudding; it must be Instant to set the topping.
Flavor Variations and Modern Twists
Once you've mastered the classic chocolate version, you can start playing with the profile. A popular choice is the "Sicilian Lemon" version, where you swap the chocolate cake for a lemon mix and use vanilla pudding with fresh lemon zest in the topping.
1. The Cannoli Inspired Crunch
Add 1/2 cup of mini chocolate chips and a pinch of cinnamon to the ricotta layer. After topping with the mousse, sprinkle crushed cannoli shells or toasted pistachios over the top. This adds a "shatter" of texture that contrasts beautifully with the soft cake.
2. The Zesty Orange Twist
Add the zest of one large orange to the chocolate batter. The combination of dark chocolate and bright citrus is a classic Italian pairing. You can also use a splash of Grand Marnier in the ricotta filling for an adult only version.
3. gluten-free Adaptation
This recipe works surprisingly well with a 1 to-1 gluten-free cake mix. Because the ricotta layer provides so much moisture and structure, you won't even notice the typical grittiness associated with some gluten-free bakes. Just ensure your pudding mix is also certified gluten-free.
Scaling and Preparation Guidance
If you're cooking for a smaller crowd, you can halve this recipe and bake it in an 8x8 inch square pan. Reduce the baking time to about 40 to 45 minutes. When halving the eggs, beat one egg in a small cup and use half of it to get the "3.5 eggs" needed for the filling.
Scaling up for a huge party is also easy. You can double the recipe into two 9x13 pans. Do not try to bake this in one giant deep dish, as the center will never set before the edges burn. If baking two pans at once, rotate them halfway through to ensure even heat distribution.
| Method | Cook Time | Texture | Best For |
|---|---|---|---|
| Standard Oven | 1 hours | Even, traditional crumb | Every day baking |
| Convection Oven | 50 mins | Slightly crisper edges | Faster results |
| Steamed (Stovetop) | 1 hours 15 | Ultra moist, dense | High altitude baking |
The Truth About This Cake
One common myth is that you need to use expensive, hand dipped ricotta from a specialty deli. While that's lovely, it actually doesn't work as well here because it can be too dry and crumbly. The standard, whole milk ricotta from the grocery store has the right moisture balance once drained.
Another misconception is that the cake will be overly "cheesy." In reality, the ricotta transforms into something resembling a dense custard or a cheesecake. It loses that grainy texture and becomes purely velvety.
Storage and Zero Waste Strategies
This cake actually tastes better on the second day once the ricotta has fully set and the moisture has distributed evenly. Keep it covered in the fridge for up to 5 days. I don't recommend freezing it with the pudding topping, as the texture can become spongy upon thawing.
However, you can freeze the baked and cooled cake (before frosting) for up to 3 months.
To reduce waste, don't toss the leftover whey from draining your ricotta. It’s packed with protein! You can use it in place of water in bread recipes or add it to your morning smoothie. If you have extra pudding mousse, it makes a fantastic dip for strawberries or graham crackers.
Perfect Pairings for Sweet Success
Since this cake is quite rich, it pairs best with something that offers a bit of acidity or a bitter edge. A strong cup of espresso or a glass of dry Vin Santo is the traditional way to go. This cake is the ultimate finale after a heavy meal like My Family's Manicotti Recipe.
If you're serving it at a summer party, a side of fresh raspberries or macerated strawberries helps cut through the density of the cheese. The brightness of the fruit highlights the deep notes of the chocolate without overwhelming the palate.
Trust me, one slice is never enough, but it's satisfying enough that you won't feel the need to overindulge. Right then, let's get that oven preheated!

Recipe FAQs
What is the "flip" in Italian Love Cake?
It's when the ricotta layer sinks and the chocolate batter rises. This happens due to density differences during baking, creating a marbled, layered effect.
Why didn't my Italian Love Cake layers swap places?
Likely a density issue or improper draining. If your ricotta was too light or the cake batter too thick, they won't invert; ensure ricotta is well drained for proper density.
Can I use low-fat ricotta for this cake?
No, stick with whole milk ricotta. low-fat versions contain more water and less fat, which hinders the density needed for the "flip" and can result in a watery cake.
How do I prevent the cake from sinking in the middle?
Avoid opening the oven door too early. The rapid temperature change can cause the delicate structure to collapse before the proteins have fully set.
How long does Italian Love Cake need to chill before serving?
A minimum of 6 hours, but overnight is best. This allows the flavors to meld and the ricotta custard layer to fully set, creating a cohesive texture.
Can I make this Italian Love Cake gluten-free?
Yes, it adapts well to gluten-free cake mixes. The substantial moisture and structure from the ricotta layer help to mask any potential dryness common in gluten-free baking.
What's the best way to store leftovers?
Refrigerate covered for up to 5 days. The cake actually improves in flavor and texture after the initial chilling period, making it great for make-ahead preparation.
Italian Love Cake

Ingredients:
Instructions:
Nutrition Facts:
| Calories | 448 kcal |
|---|---|
| Protein | 11.9 g |
| Fat | 25.2 g |
| Carbs | 42.1 g |
| Fiber | 1.2 g |
| Sugar | 31.8 g |
| Sodium | 535 mg |
