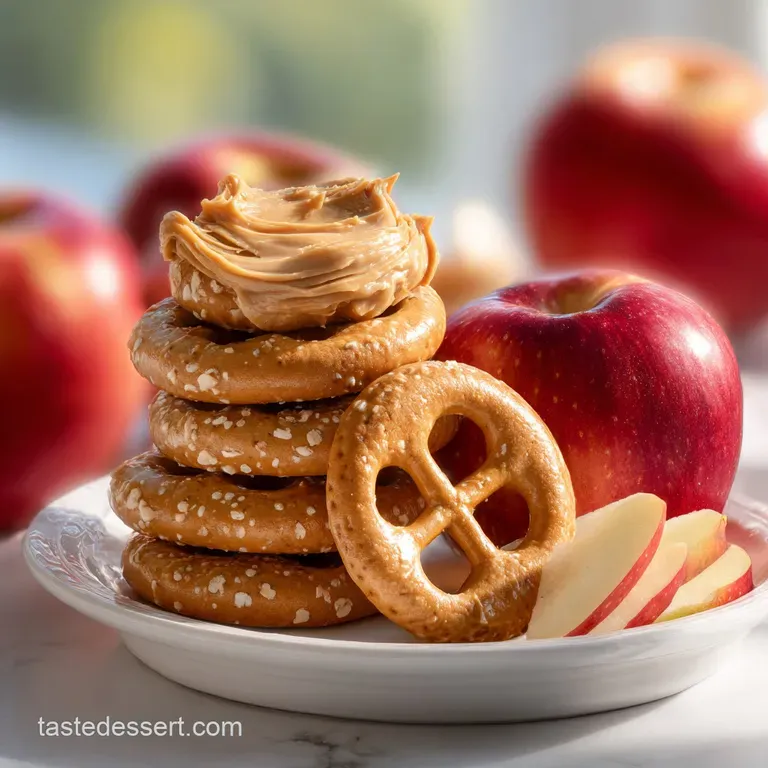
Kid Favorite After School Snack with Peanut Butter and Apples
- Time: Active 10 minutes, Passive 0 minutes, Total 10 minutes
- Flavor/Texture Hook: Shatter crisp cold apples paired with creamy, nutty velvet dip.
- Perfect for: Busy school days, toddler lunches, or a quick pre gym fuel up.
- Perfect Kid Favorite After School Snack with Peanut Butter and Apples
- Why This Creamy Nut Butter Snack Actually Works
- Essential Ingredient Component Analysis
- Sourcing Your Crunchy Elements and Substitutes
- Kitchen Tools for Easy Prep
- Step-By-Step Preparation Guide
- Solving Common Snacking Problems
- Smart Swaps and Flavor Twists
- Keeping Leftovers Fresh Longer
- Perfect Drinks for Snacking
- Debunking Browning and Nutrition Myths
- Recipe FAQs
- 📝 Recipe Card
Perfect Kid Favorite After School Snack with Peanut Butter and Apples
The sharp, clean snap of a cold Honeycrisp apple hitting the cutting board is the universal signal in my house that the 3 PM chaos has officially shifted into snack mode. We've all been there the kids are home, bags are dropped, and the "I'm starving" chorus begins before they've even kicked off their shoes.
For years, I just tossed a jar of nut butter and a whole fruit on the table, but the results were always messy, brown, and half eaten.
This article shares a simple, delicious Kid Favorite After School Snack with Peanut Butter and Apples. It's the result of my obsession with finding that "goldilocks" balance between something they actually want to eat and something that won't result in a sugar crash ten minutes later.
By folding Greek yogurt into the base, we get a dip that’s light and airy rather than heavy and cloying, making it much easier for little ones to scoop without breaking their apple "chips."
Trust me on this one: the lemon water soak is the step you shouldn't skip. I once made the mistake of prepping these for a playdate without the soak, and by the time the kids finished their first round of tag, the apples looked like they’d been sitting out since last Tuesday.
Now, I use this specific method to keep everything bright, fresh, and visually appealing so the snack actually gets finished.
Why This Creamy Nut Butter Snack Actually Works
Oxidation Inhibition: Lemon juice contains ascorbic acid which creates a low pH barrier on the apple flesh, preventing the enzyme polyphenol oxidase from reacting with oxygen and turning the fruit brown.
Emulsion Stability: Mixing Greek yogurt with natural peanut butter creates a stable emulsion where the water in the yogurt binds with the fats in the nut butter for a velvety, spreadable texture.
Glycemic Control: Combining the fiber from apple skins with the healthy fats and protein in the dip slows down the absorption of fruit sugars into the bloodstream.
| Servings | Apple Count | Nut Butter Amount | Prep Time |
|---|---|---|---|
| 1 Child | 1 Small Apple | 2 Tablespoons | 5 minutes |
| 3 Children | 2 Large Apples | 1/4 Cup | 10 minutes |
| 6 (Party Size) | 4 Large Apples | 1/2 Cup | 15 minutes |
When you're scaling this for a larger group, remember that the dip stays stable in the fridge for about 48 hours, but the apples are always best sliced fresh. If you're hosting a whole team after practice, you can whip the dip in a stand mixer to get it extra airy.
Essential Ingredient Component Analysis
| Ingredient | Science Role | Pro Secret |
|---|---|---|
| Honeycrisp Apples | Structural Base | Keep them in the crisper drawer until the absolute second you are ready to slice to maximize the "shatter" crunch. |
| Greek Yogurt | Textural Softener | Use full fat yogurt to provide a richer mouthfeel that mimics a decadent fruit dip without the excess sugar. |
| Natural Peanut Butter | Protein Binder | Stir the jar thoroughly before measuring to ensure the oil to solid ratio provides a consistent, non runny dip. |
Sourcing Your Crunchy Elements and Substitutes
To get the best results, start with the freshest produce. I prefer Honeycrisp or Fuji because they have a dense cell structure that holds up to heavy dipping without snapping. If you're looking for a bit more tartness, a Granny Smith provides a brilliant contrast to the sweet honey in the dip.
- 2 large Honeycrisp or Fuji apples: Why this? These varieties offer the loudest "snap" and hold their shape best when sliced thin. (Substitute: Gala or Pink Lady)
- 1 cup cold water: Used for the anti browning soak. (Substitute: Sparkling water for a slight fizz)
- 1 tbsp lemon juice: Why this? The acidity is crucial for keeping the fruit white and appetizing for picky eaters. (Substitute: Pineapple juice or 1/2 tsp salt)
- 1/4 cup creamy natural peanut butter: This provides the savory foundation. (Substitute: Almond butter or Sunflower butter for nut free)
- 2 tbsp plain Greek yogurt: Why this? It lightens the density of the nut butter, making it more kid friendly and scoopable. (Substitute: Coconut yogurt for dairy-free)
- 1 tsp honey: Adds a touch of floral sweetness. (Substitute: Maple syrup or agave)
- 1/4 cup low sugar granola: Adds the necessary "rubble" texture on top. (Substitute: Crushed pretzels)
- 1 tbsp mini dark chocolate chips: For a tiny bit of indulgence. (Substitute: Cacao nibs)
- 1 tsp chia seeds: Why this? Adds a massive nutritional punch with almost zero flavor impact. (Substitute: Hemp hearts)
If you're out of peanut butter, you can easily pivot. Our Proper Job Chewy recipe uses similar pantry staples if you decide you'd rather bake something warm and comforting instead of a fresh fruit snack.
Kitchen Tools for Easy Prep
You don't need a professional kitchen for this, but a few specific tools make the job much faster. A sharp chef's knife is non negotiable for getting those thin, even slices. If you have a mandoline, use it on the thickest setting for perfect "apple chips," but please use the safety guard!
A small whisk or even a sturdy fork works best for combining the yogurt and peanut butter. You want to see the two textures fully merge into a single, uniform tan color. I also recommend a wide, shallow bowl for the dip it makes it much easier for multiple kids to dip at once without bumping elbows.
step-by-step Preparation Guide
Phase 1: The Anti Browning Prep
- Prepare the soak. Mix 1 cup cold water and 1 tbsp lemon juice in a large bowl. Note: This prevents the fruit from turning brown through oxidation.
- Slice the apples. Core the 2 large apples and cut them into 1/2 inch thick wedges.
- Submerge the fruit. Place the wedges into the lemon water for exactly 3 minutes until they look shimmering and bright.
- Drain and dry. Pat the slices thoroughly dry with a clean kitchen towel. Note: If they are wet, the dip will slide right off the surface.
Phase 2: Whipping the Velvet Base
- Combine the proteins. In a small mixing bowl, add 1/4 cup natural peanut butter and 2 tbsp plain Greek yogurt.
- Sweeten the mix. Drizzle in 1 tsp honey.
- Whip the dip. Use a fork to vigorously beat the mixture for 1 minute until it becomes velvety and pale.
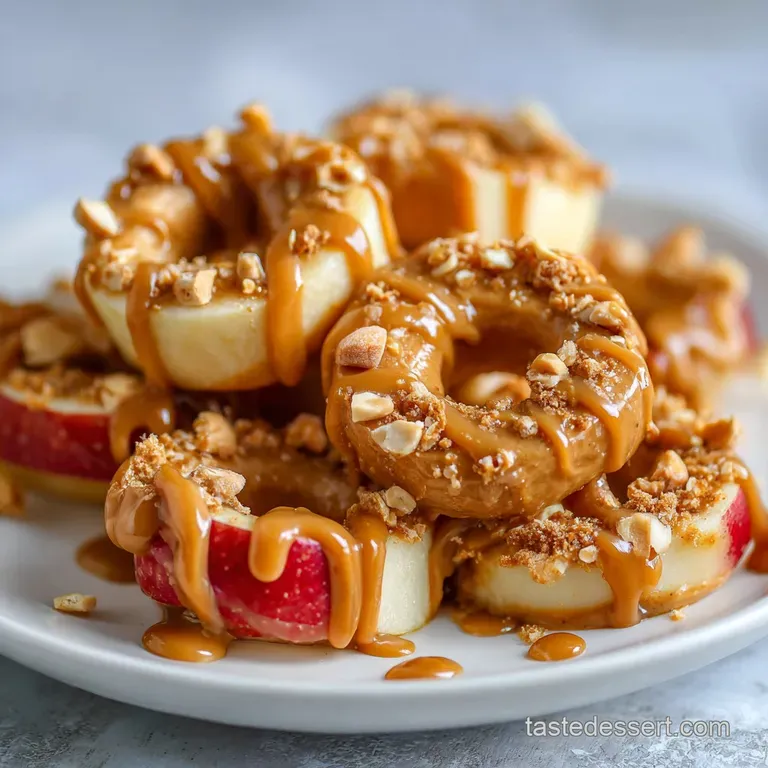
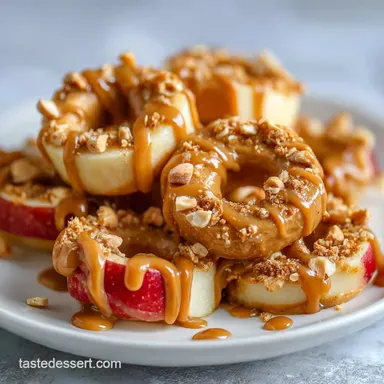
Phase 3: The Loaded Assembly
- Plate the fruit. Arrange the dried apple slices in a circular "sunburst" pattern on a large plate.
- Garnish the center. Place the dip in a small bowl in the middle and sprinkle with 1/4 cup granola, 1 tbsp mini dark chocolate chips, and 1 tsp chia seeds.
- Serve immediately. Present the dish while the fruit is still cold from the fridge for the best sensory experience.
Chef Tip: For an extra decadent touch, toast the granola in a dry pan for 2 minutes before topping. The warmth releases the oils in the oats and makes the whole kitchen smell like a bakery.
Solving Common Snacking Problems
Sometimes things don't go perfectly, especially if your peanut butter is from the bottom of the jar where it's a bit drier. If your dip feels more like a paste than a dip, don't panic.
The Apple Sogginess Factor
If you find your apples are getting soft too quickly, it's usually a temperature issue. Always start with apples that have been in the fridge for at least 4 hours. The cold temperature keeps the cell walls rigid, providing that satisfying shatter when you bite in.
The Separating Dip
Natural nut butters can sometimes be temperamental when mixed with cold yogurt. If the mixture looks "broken" or grainy, it's likely because the yogurt was added too quickly while the peanut butter was too cold.
| Problem | Root Cause | Solution |
|---|---|---|
| Watery Dip | Too much yogurt or watery yogurt whey | Strain the yogurt through a coffee filter for 5 minutes before mixing. |
| Browning Apples | Insufficient acid soak | Increase lemon juice to 2 tbsp or ensure fruit is fully submerged. |
| Toppings Falling Off | Slices are too dry | Lightly brush the apple slice with a tiny bit of honey before dipping. |
Common Mistakes Checklist:
- ✓ Using "no stir" peanut butter with added palm oil (it won't emulsify as smoothly with the yogurt).
- ✓ Skipping the pat dry step after the lemon soak (the dip won't stick).
- ✓ Cutting the apples too thin (they will go limp under the weight of the toppings).
- ✓ Adding the toppings too early (the granola will lose its crunch).
- ✓ Leaving the pit/seeds in the slices (it ruins the smooth texture of the bite).
Smart Swaps and Flavor Twists
This recipe is incredibly flexible. If you have a child who prefers a smoother experience, you can swap the granola for toasted coconut flakes or even crushed graham crackers. For a fall inspired twist, add a pinch of cinnamon and nutmeg to the dip it makes the whole thing taste like a deconstructed apple pie.
If you are looking for a more substantial snack that you can prep ahead of time in bulk, you might enjoy my NoBake Peanut Butter recipe. Those bites use many of the same ingredients but are much more portable for soccer practice or long car rides.
For Nut Free Classrooms
Many schools have strict no nut policies. You can replace the peanut butter 1:1 with sunflower seed butter (like SunButter). Just be aware that sunflower butter can sometimes have a slightly bitter finish, so you may want to increase the honey by an extra half teaspoon to balance the flavors.
For Apples and Peanut Butter for Toddlers
If you're serving this to very young children, safety is the priority. Instead of wedges, slice the apples into very thin "planks" or circles with the core removed. This eliminates the choking hazard of a thick wedge and makes it easier for tiny hands to manage.
You should also skip the chia seeds and mini chocolate chips, as these can be tricky for toddlers to navigate.
Keeping Leftovers Fresh Longer
While this snack is best eaten immediately, you can store the components separately. Put the dip in an airtight container in the fridge for up to 3 days. The apples are more difficult; even with the lemon soak, they will lose their crispness after about 4 hours.
- Fridge
- Dip lasts 3 days; sliced apples last 4 hours.
- Freezer
- I do not recommend freezing the apples, as the cell walls will collapse, resulting in a mushy mess upon thawing. However, you can freeze the dip for up to 1 month!
- Zero Waste Tip
- If you have leftover apple slices that have started to soften, don't throw them away. Toss them into a blender for a smoothie or dice them up to stir into your morning oatmeal. The lemon juice won't affect the flavor of a cooked dish.
| Feature | Fresh Method | Shortcut Method (store-bought) |
|---|---|---|
| Texture | Shatter crisp and airy | Often gummy or overly dense |
| Sugar Content | Controlled (approx 17g) | Usually 25g+ with corn syrup |
| Cost per Serve | Approx $0.85 | Approx $2.50 |
Perfect Drinks for Snacking
Since this snack is quite rich and creamy, it pairs beautifully with something refreshing. A cold glass of milk is the classic choice, but a sparkling hibiscus tea or even just ice water with a sprig of mint can cut through the fattiness of the nut butter perfectly.
If you’re in the mood for something a bit more festive, this snack also goes surprisingly well with a small cup of warm apple cider. The temperature contrast between the hot drink and the cold, crisp fruit is a delight for the senses.
Precision Checkpoints for Success
- Temperature: The apples must be below 40°F (4°C) for maximum crunch.
- Soak Time: Exactly 180 seconds in the lemon water too long and they pick up too much citrus flavor.
- Whip Time: 60 seconds of vigorous mixing is required to incorporate air into the yogurt PB base.
Three Quick Decision Shortcuts
- If you want it sweeter, add a dash of cinnamon to the dip and use a red Fuji apple.
- If you want it more filling, double the chia seeds and use extra crunchy peanut butter.
- If you want it for a party, serve the dip in a hollowed out apple "bowl" for a fun presentation.
Debunking Browning and Nutrition Myths
One of the biggest misconceptions is that you must use lemon juice to stop browning. While lemon is effective, any acidic liquid works. I've used orange juice and even a very light salt water brine (1/2 tsp salt per cup of water) with great success.
The salt water actually helps enhance the sweetness of the apple, similar to how salt works in caramel.
Another myth is that "natural" peanut butter isn't as good for dipping because it’s too oily. The truth is, once you mix it with the Greek yogurt, the yogurt acts as a stabilizer.
This gives you all the flavor of pure roasted peanuts without the additives found in processed brands, and the texture becomes even superior to the "no stir" varieties.
Finally,, don't believe the idea that you have to peel the apples to make them "kid friendly." The skin is where most of the fiber and polyphenols live. If the skin is a texture issue, try using a vegetable peeler to remove just "stripes" of the skin, creating a fun pinstripe look that keeps half the nutrition while making the bite easier to manage.
Chef Note: If your natural peanut butter has become rock hard at the bottom of the jar, microwave the portion you need for just 10 seconds. It will soften enough to whisk into the yogurt without melting it.
For those days when you need something a bit more indulgent after the kids go to bed, you might want to try this Irresistible Classic English recipe. It's the complete opposite of this healthy snack, but sometimes a home cook needs a little reward for survived another after school rush!

Recipe FAQs
What are the best snacks for kids after school?
Snacks combining protein, fiber, and healthy fat are best. Apple slices with this modified peanut butter dip offer steady energy release until dinner, avoiding the quick sugar crash.
What goes well with apples and peanut butter?
Yogurt, honey, cinnamon, and crunchy textures are excellent additions. Adding Greek yogurt creates a lighter dip, and granola provides a contrasting crunch against the crisp apple.
Are peanut butter and apples a good snack?
Yes, they form a highly nutritious pairing. The fiber from the apples slows the absorption of the fats and protein from the peanut butter, leading to sustained satiety.
Are peanut butter and apples a good snack before bed?
Generally, yes, but aim for a smaller portion. The protein and fat content digests slowly, which is fine, but heavy fat intake right before sleep isn't ideal for everyone.
How do I prevent my sliced apples from turning brown?
Submerge the slices in acidulated water for three minutes. Mix 1 tablespoon of lemon juice into 1 cup of cold water and soak immediately after slicing to halt oxidation.
How do I make the peanut butter dip fluffier instead of dense?
Vigorously whisk plain Greek yogurt into the peanut butter base. The water content in the yogurt creates a stable emulsion that feels lighter than pure nut butter, similar to the technique used for stabilizing the sauce in our Heavenly Butter Sauce recipe.
Can I substitute almond butter for peanut butter in this dip?
Yes, almond butter is a direct swap for taste and texture. If you enjoyed mastering the emulsion stability here, apply that same careful whisking when combining almond butter and yogurt for a smooth result.
Kid Favorite After School Snack With Peanut Butt
Ingredients:
Instructions:
Nutrition Facts:
| Calories | 268 kcal |
|---|---|
| Protein | 8.1 g |
| Fat | 14.6 g |
| Carbs | 31.2 g |
| Fiber | 5.6 g |
| Sugar | 17.4 g |
| Sodium | 72 mg |
