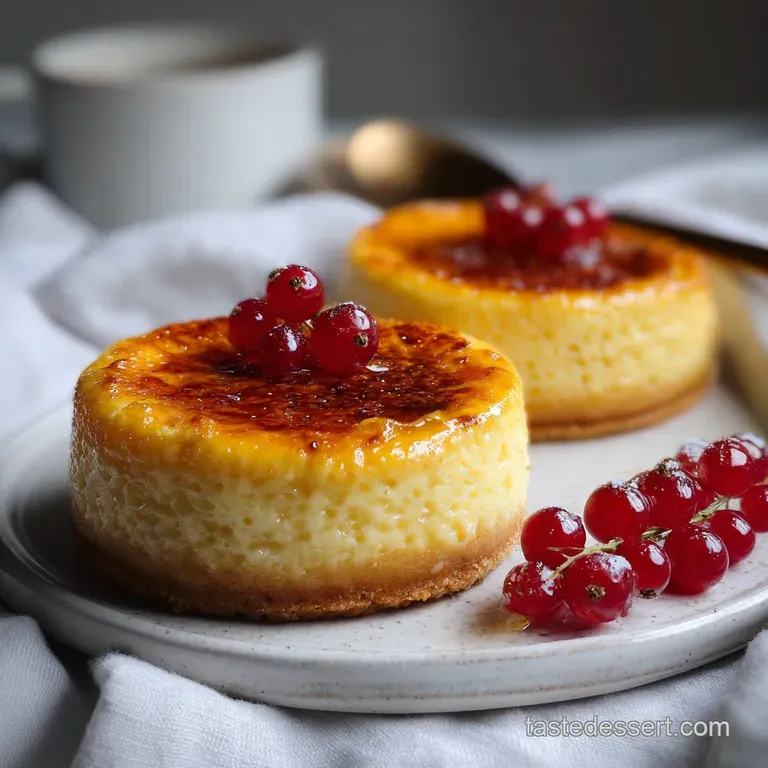
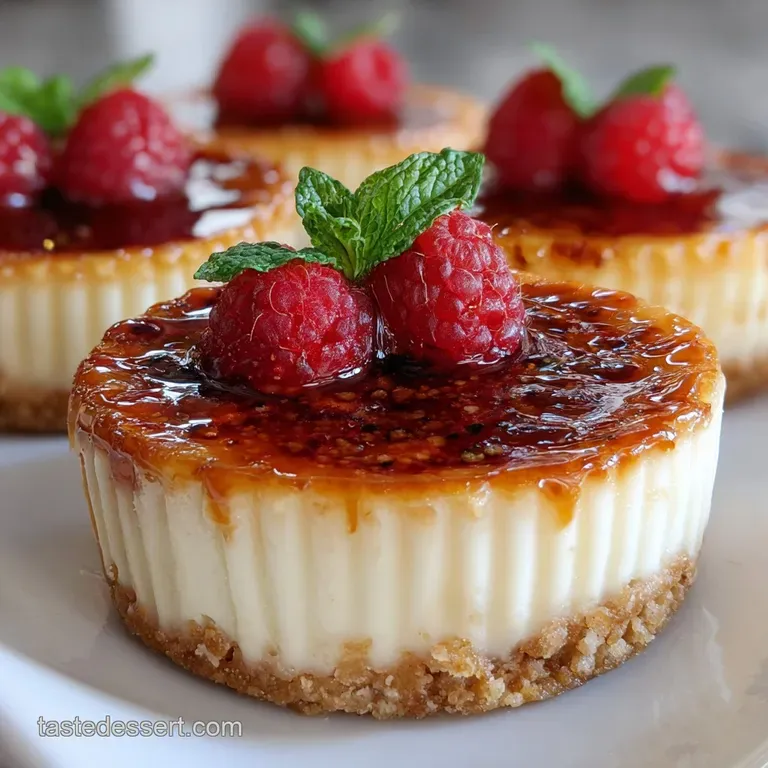
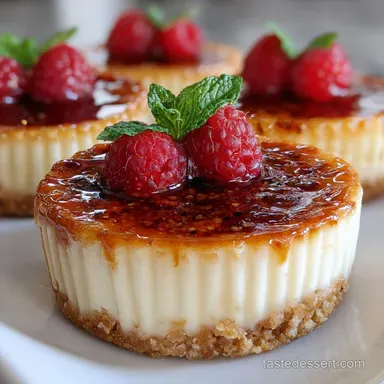
Mini Creme Brulee Cheesecakes: Silky & Shattering
- Time: Active 22 minutes, Passive 4 hours 20 mins, Total 4 hours 42 mins
- Flavor/Texture Hook: A velvety vanilla bean core topped with a shattering mahogany sugar crust.
- Perfect for: Dinner parties, holiday dessert platters, or date night indulgence.
- Making the Ultimate Mini Creme Brulee Cheesecakes Decadent Dessert
- Achieving a Velvet Texture and the Perfect Shatter
- Essential Precision Points for Baking Success
- Component Analysis for a Truly Luxurious Bite
- Minimalist Tools for Professional Dessert Results
- Steps to Transforming Simple Components into Elegance
- Fixing Common Custard Flaws and Texture Issues
- Variations for Personalizing Your Miniature Treats
- Scaling Your Decadent Batch
- Preserving the Crunch and Silkiness Over Time
- Enhancing the Visual Appeal of Your Dessert
- Recipe FAQs
- 📝 Recipe Card
Making the Ultimate Mini Creme Brulee Cheesecakes Decadent Dessert
Imagine the sound of a silver spoon tapping against a crystal thin layer of burnt sugar. It doesn't just break; it shatters into amber shards that melt into a cool, ivory custard below. I first tried making these for a New Year's Eve bash after my full sized brûlée ended up as a soup in the center.
Scaling them down into a mini creme brulee cheesecakes decadent dessert was the ultimate solution for portion control and foolproof baking.
The first time I torched these, I actually set a paper cupcake liner on fire because I got a bit too enthusiastic with the flame. We've all been there! But once you see those tiny vanilla bean specks suspended in the creamy filling, you'll realize this is the only way to eat cheesecake.
This recipe delivers that high end restaurant experience without the stressful water bath or specialized ramekins.
We are aiming for a specific contrast here: the base must be cold and dense, while the sugar topping should be warm and brittle. It is a sensory collision that makes this decadent dessert stand out from a standard cupcake style cheesecake.
Honestly, don't even bother with low-fat cream cheese here; the fat is what carries the vanilla flavor and creates that luxurious mouthfeel we're after.
Achieving a Velvet Texture and the Perfect Shatter
The secret to this mini creme brulee cheesecakes decadent dessert lies in the structural integrity of the custard. We aren't just making a "mini cheesecake" and calling it a day; we are using specific ratios to mimic the lightness of a custard while maintaining the stability of a cheesecake.
- Surface Tension: Superfine sugar has a smaller crystal size, allowing it to melt into a liquid caramel before the cheesecake beneath begins to curdle or melt.
- Acid Protein Bond: The Greek yogurt introduces lactic acid which weakens the egg protein network just enough to ensure the filling stays creamy rather than rubbery.
- Thermal Buffering: Using a high fat base (450g cream cheese) prevents the middle from drying out during the short bake time.
The Physics of the Brûlée
The caramelization of the topping relies on the Maillard reaction and pyrolysis. When you apply the 2500°F flame of a kitchen torch to the superfine sugar, it dehydrates the sucrose instantly, turning it into a complex, bitter sweet mahogany shield that protects the cold cheese layer below.
| Method | Time | Texture | Best For |
|---|---|---|---|
| Standard Torch | 45 seconds | Glass like / Shatter | Authentic experience |
| Oven Broiler | 2 minutes | Chewy / Bubble | No tool shortcut |
| Sugar Disk | 5 minutes | Thick / Hard | make-ahead events |
The sugar disk method involves melting sugar in a pan and pouring circles onto parchment, but for this specific recipe, the torch is king. If you want a more traditional New York style base, you can adapt the technique used in our New York Style recipe.
Essential Precision Points for Baking Success
Success in the kitchen often comes down to knowing exactly when to stop. For these mini creme brulee cheesecakes decadent dessert bites, timing and temperature are your best friends. I once pulled these out too early, and they collapsed into a sad puddle the moment I touched them with the torch.
Chef's Tip: Freeze your butter for 10 minutes before melting it. It sounds counterintuitive, but it slightly changes the way the fat coats the wafer crumbs, leading to a crust that stays crisp rather than greasy.
- Precision Point 1: Ensure your oven is truly at 325°F using an external thermometer; even a 10 degree variance can cause the tops to crack.
- Precision Point 2: The center of the cheesecake should hit 150°F if you’re using a digital probe.
- Precision Point 3: Chill the baked cheesecakes for at least 4 hours. If they aren't cold, the torch will turn the whole thing into a liquid mess.
Component Analysis for a Truly Luxurious Bite
Every ingredient in this decadent dessert serves a functional purpose beyond just flavor. We are building layers of texture, starting from the crunchy vanilla wafer base up to the brittle sugar lid.
| Ingredient | Science Role | Pro Secret |
|---|---|---|
| Vanilla Bean Paste | Flavor Depth | Provides the visual "specks" that look professional. |
| Greek Yogurt | Moisture / Tang | Softens the crumb and prevents the "rubbery" egg texture. |
| Superfine Sugar | Meltability | Creates a more even caramel layer than regular granulated sugar. |
Using vanilla bean paste is a massive step up from standard extract. It adds an earthy, floral note that stands up to the burnt sugar topping. While extract works in a pinch, the paste makes this feel like a true mini creme brulee.
Minimalist Tools for Professional Dessert Results
You don't need a kitchen full of gadgets to pull this off. I've made these in a cramped apartment kitchen with nothing but a hand mixer and a basic muffin tin. The only "specialty" item is the torch, but even that can be swapped if you're brave with your broiler.
- Standard 12 cup muffin tin: This provides the perfect depth for the custard to crust ratio.
- Paper liners: Essential for easy removal, but peel them off before torching.
- Kitchen torch: A small butane torch allows for precision that an oven broiler simply can't match.
If you don't have a torch, you can use the broiler setting on your oven, but watch it like a hawk. It takes about 2 minutes, and the window between "golden" and "incinerated" is roughly three seconds.
Steps to Transforming Simple Components into Elegance
Let’s get into the nitty gritty of the process. Follow these steps closely, especially the cooling times, because patience is the most important ingredient in any cheesecake.
Preparing the Golden Base
- Pulse the 150g vanilla wafer crumbs with 30g granulated sugar until fine.
- Mix in the 45g melted unsalted butter until the mixture looks like wet sand.
- Press one tablespoon of the mixture into the bottom of each lined muffin cup. Note: Use the bottom of a spice jar to pack it tightly.
- Bake at 325°F for 5 minutes until fragrant and slightly darkened.
Whipping the Velvety Filling
- Beat 450g softened cream cheese and 100g superfine sugar until silky and lump free.
- Fold in 100g Greek yogurt, 1 tbsp vanilla bean paste, and 1/4 tsp sea salt.
- Add 2 large eggs one at a time, mixing on the lowest speed. Note: Overbeating at this stage incorporates air that causes cracks.
- Divide the batter evenly over the baked crusts, filling them almost to the top.
Baking and Finishing
- Bake for 15 to 17 minutes until the edges are set but the centers still jiggle slightly.
- Chill in the tin for 30 minutes, then refrigerate for at least 4 hours.
- Peel off the liners and sprinkle 5g (about 1 tsp) of superfine sugar over each chilled cheesecake.
- Torch the sugar with a circular motion until it bubbles and turns a deep amber.
Fixing Common Custard Flaws and Texture Issues
Even the best of us hit a snag sometimes. The most common heartbreak with a mini creme brulee cheesecakes decadent dessert is a soggy sugar top. If you torch them and then put them back in the fridge, the sugar will absorb moisture and turn into syrup within an hour.
Why Your Cheesecake Cracked
Cracks usually happen because of two things: too much air in the batter or overbaking. When you beat eggs at high speed, you trap air bubbles that expand in the oven and then pop, leaving a canyon in your dessert. Always use low speed once the eggs are in.
| Problem | Root Cause | Solution |
|---|---|---|
| Grainy Filling | Cold cream cheese | Ensure cheese is room temp before mixing. |
| Soft Sugar Top | Humidity/Refrigeration | Torch immediately before serving; never refrigerate after torching. |
| Burnt Paper | Liners left on | Always remove paper liners before using the torch. |
Common Mistakes Checklist
- ✓ Using "cold" eggs (they won't emulsify properly with the fat).
- ✓ Skipping the salt (the sea salt balances the intense sweetness of the burnt sugar).
- ✓ Over mixing the batter (stop as soon as the yellow streaks of egg disappear).
- ✓ Forgetting to tap the tin on the counter to release trapped air bubbles.
- ✓ Torching the same spot for too long (keep the flame moving to avoid scorching the cheese).
Variations for Personalizing Your Miniature Treats
While the vanilla bean version is classic, this base is incredibly versatile. You can swap the vanilla wafer crumbs for graham crackers or even crushed ginger snaps for a spicy kick.
If you are looking for a way to serve these at a party, consider how they fit into a larger spread. They are a highlight when you How to Create recipe for a dessert table, providing a sophisticated alternative to cookies or brownies.
| Original Ingredient | Substitute | Why It Works |
|---|---|---|
| Greek Yogurt (100g) | Sour Cream (100g) | Similar acidity but slightly higher fat content for a richer finish. |
| Vanilla Wafers | Graham Crackers | Provides a more honey forward, rustic crust. |
| Superfine Sugar | Demerara Sugar | Larger crystals give a thicker, more "toffee" like crunch. Note: Takes longer to melt. |
Scaling Your Decadent Batch
If you need to feed a crowd, this recipe scales beautifully. For a double batch (24 servings), you don't actually need to double the salt or vanilla bean paste use 1.5x the amount to avoid overpowering the cheese.
When scaling down for a "party of two," beat one egg in a small bowl and use exactly half of it by weight (about 25-28g). Use a 6 cup muffin tin and keep the baking time the same, as the individual volume per cup doesn't change. For larger gatherings, the German Chocolate Cake recipe is another great high yield option to pair with these minis.
If you want...
- A citrus twist: Add 1 tsp of lemon zest to the sugar before torching.
- Extra crunch: Double the crust ingredients and press them halfway up the sides.
- A hidden surprise: Place one fresh raspberry on the crust before pouring in the batter.
Preserving the Crunch and Silkiness Over Time
Storage is the only "tricky" part of this recipe because of the hygroscopic nature of sugar. Once sugar is caramelized, it begins to pull moisture from the air and the cheesecake itself.
Storage: Keep the untorched, baked cheesecakes in an airtight container in the fridge for up to 4 days. Do not add the sugar topping until you are ready to serve. If you have leftovers that are already torched, the topping will soften, but the cheesecake remains safe to eat for 2 days.
Freezing: These freeze exceptionally well! Wrap the untorched cheesecakes individually in plastic wrap and freeze for up to 2 months. Thaw in the fridge overnight before adding the sugar and torching.
Zero Waste Tip: If you have leftover vanilla wafer crumbs, stir them into your morning yogurt or use them as a topping for vanilla ice cream. Never throw away the egg whites if you only use yolks in other recipes save them for a pavlova or an egg white omelet.
Enhancing the Visual Appeal of Your Dessert
Presentation is half the battle with a mini creme brulee cheesecakes decadent dessert. Since these are small, the details matter. I love to serve these on a dark slate board to make the golden sugar tops pop.
Designing the Plate
Place the cheesecake in the center and add a tiny dollop of whipped cream to the side not on top, as you don't want to hide that beautiful burnt sugar. A single mint leaf or a dusting of dehydrated raspberry powder adds a touch of color that signals "luxury."
Debunking Custard Myths
- Myth 1: You must use a water bath for mini cheesecakes. Truth: Because the volume is so small, the heat penetrates the center quickly enough that a water bath is unnecessary and often leads to soggy crusts.
- Myth 2: The sugar won't caramelize without a torch. Truth: The broiler works, but it heats the entire cheesecake, whereas a torch only heats the surface, keeping the center cold.
- Myth 3: You can't use regular sugar for the top. Truth: You can, but it's harder to get an even "glass" layer. Granulated sugar often leaves unmelted white grains behind.
Right then, you're ready to create some magic. Grab that torch, don't be afraid of a little sizzle, and enjoy the most satisfying "crack" in the dessert world. Trust me, once you go mini, you'll never go back to the giant springform pan again!

Recipe FAQs
Can I skip chilling the cheesecakes before torching the sugar?
No, absolutely not. The cheesecake must be very cold (ideally 4+ hours chilled) or the intense heat from the torch will melt the custard underneath, resulting in liquid instead of a glass like top.
How to prepare the crust for maximum crispness?
Pulse crumbs with sugar, then mix with melted butter until it resembles wet sand. Press this mixture tightly into the liners and pre-bake for 5 minutes until fragrant to set the structure.
Is it true that I must use a water bath for these mini cheesecakes?
No, this is a common misconception for mini versions. Due to their small volume, these bake quickly enough that a water bath is usually unnecessary and can actually lead to a soggier crust base.
How to prevent the cheesecake centers from cracking during baking?
Incorporate eggs one at a time on the lowest mixer speed until just combined. Overbeating after the eggs are added traps air, which expands and causes surface fissures upon cooling.
What is the best sugar substitute for the brûlée topping?
Superfine (caster) sugar is highly recommended for the topping. Its smaller crystal size allows it to melt into an even, brittle caramel shield much faster than standard granulated sugar.
How to properly store these if I need to make them ahead of time?
Store the baked, un-torched cheesecakes in an airtight container in the refrigerator for up to four days. Only apply the sugar topping right before you plan to serve them to maintain the crunch; if you enjoyed mastering the stability of the custard texture here, apply that same control when you learn
How to Make recipe for delicate layered desserts.
What is the best way to achieve a tangy flavor in the custard?
Incorporate Greek yogurt into the cream cheese mixture. The natural lactic acid in the yogurt tenderizes the egg proteins, ensuring the final texture is creamy rather than rubbery.
Mini Creme Brulee Cheesecakes
Ingredients:
Instructions:
Nutrition Facts:
| Calories | 298 kcal |
|---|---|
| Protein | 4.6 g |
| Fat | 19.3 g |
| Carbs | 27.1 g |
| Fiber | 0.2 g |
| Sugar | 21.8 g |
| Sodium | 128 mg |
