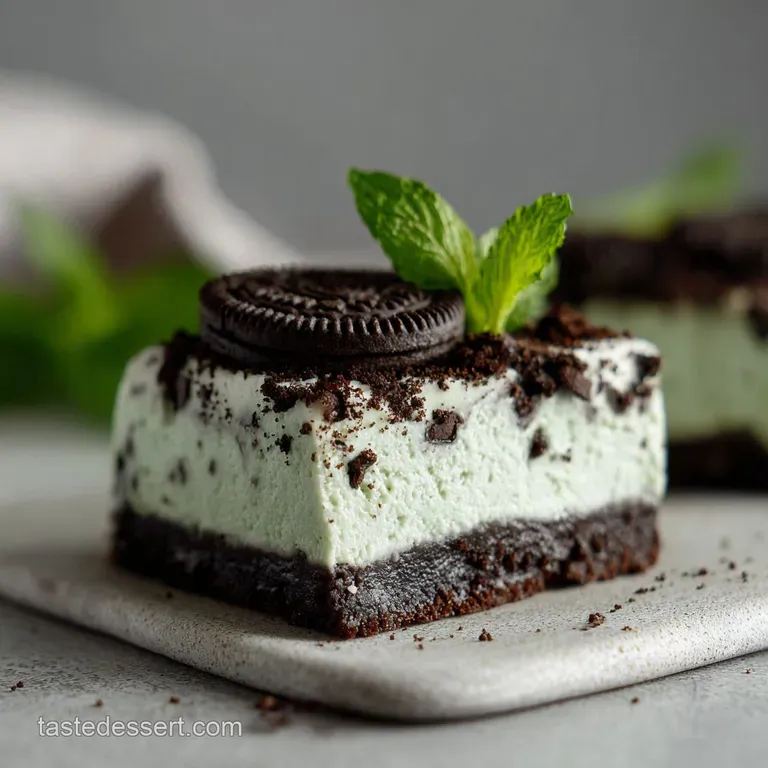
Mint Oreo Cheesecake Bars Recipe
- Time: Active 20 minutes, Passive 35 mins, Total 55 mins (plus chilling)
- Flavor/Texture Hook: Cool, refreshing peppermint paired with a dark, shattering cocoa crust and silky cheesecake filling.
- Perfect for: St. Patrick’s Day celebrations, holiday dessert tables, or a weekend baking project for Oreo lovers.
- The Science Behind Achieving a Silky Smooth Texture
- Understanding the Essential Components of Your Dessert
- Tools and Gear for Professional Style Baking Results
- Step by Step Guide to Crafting These Refreshing Treats
- Solving Common Problems for a Flawless Dessert Finish
- Creative Ways to Adapt Your Minty Cheesecake Squares
- Debunking Kitchen Myths
- Best Practices for Keeping Your Leftovers Fresh Longer
- Presentation Ideas for Serving Your Decadent Green Treats
- Recipe FAQs
- 📝 Recipe Card
The second you twist the cap off a bottle of pure peppermint extract, the whole kitchen transforms. It’s that sharp, icy aroma that cuts through the heavy scent of cream cheese and sugar, promising something much more exciting than a standard vanilla bar.
I remember the first time I pulled these out of the oven; the vibrant green hue was so striking against the dark, midnight black crust that I almost didn't want to cut into them. But then I did, and that first bite the way the cold, creamy filling hit the crunch of the cookie was a total revelation.
Honestly, I used to be intimidated by cheesecake. I thought you needed fancy water baths and a degree in structural engineering to keep the tops from cracking like a dry riverbed. It turns out, the secret isn't in the equipment, but in how you treat the ingredients before they even see the heat.
We’ve all been there: rushing the process, using cold eggs, and ending up with a lumpy mess. This recipe is my "no fail" version that I’ve tweaked over dozens of batches to ensure every single square is as smooth as silk.
But we aren't just making a basic peppermint bar here. We’re building layers. We’re talking about a crust that actually stays crisp instead of turning into a soggy sponge, and a filling that balances that iconic "cool" mint sensation without tasting like a tube of toothpaste.
Trust me, once you master the timing of the "jiggle test," you’ll never go back to store-bought desserts again. Right then, let's get into the details of why this specific method works every single time.
The Science Behind Achieving a Silky Smooth Texture
The Physics of the Peppermint Emulsion: The high fat content in full fat sour cream and cream cheese traps the volatile peppermint oils, preventing them from evaporating during the bake and ensuring a consistent flavor throughout the bar.
Starch Gelatinization: While we aren't adding flour, the cocoa solids in the chopped Oreos act as a mild stabilizer, absorbing excess moisture from the eggs to prevent the bars from becoming weeping or watery as they cool.
| Method | Total Time | Texture | Best For |
|---|---|---|---|
| Classic (Baked) | 55 mins | Velvety and dense | Dinner parties and clean slicing |
| Fast (No Bake) | 20 mins | Light and mousse like | Hot summer days and quick prep |
| Shortcut (Store crust) | 40 mins | Thinner, sweeter base | Beginners or last minute needs |
If you want a deeper chocolate hit, use dark cocoa Oreos for the base. If you're looking for the cleanest slices, freeze the bars for 20 minutes before cutting. If you want a more "natural" look, skip the green food coloring entirely the mint flavor will still be there!
Similar to the technique I use in my How to Make recipe, the key here is managing the temperature of your dairy. Cold cream cheese is the enemy of a smooth batter. When it's cold, the fat molecules are tightly packed and won't emulsify with the sugar, leading to those annoying little white dots in your finished green bars.
Chef's Tip: To get cream cheese to room temperature in 10 minutes, submerge the sealed foil bricks in a bowl of warm (not hot) water. It’s a total life saver when you forget to pull them out of the fridge.
Understanding the Essential Components of Your Dessert
Building the perfect Mint Oreo Cheesecake Bars requires a balance between the bitter cocoa of the crust and the sweet, herbaceous notes of the peppermint. We aren't just throwing things in a bowl; we're selecting specific fats and proteins to create a structure that holds up when sliced but melts the moment it hits your tongue.
| Component | Science Role | Pro Secret |
|---|---|---|
| Full fat Cream Cheese | Provides the structural protein matrix. | Always use bricks, never the spreadable tub version which contains extra air. |
| Large Eggs | Act as the primary binder and leavening agent. | Whisk them gently before adding to prevent over incorporating air. |
| Peppermint Extract | Provides the signature aromatic profile. | A tiny pinch of salt actually makes the peppermint taste "colder" and brighter. |
| Unsalted Butter | Coats the cookie crumbs to create a moisture barrier. | Brown the butter slightly for a nutty undertone that complements the cocoa. |
The Essential Ingredient List
- 24 whole Mint Oreo cookies (approx. 270g): Why this? The mint filling in the cookie reinforces the flavor of the cheesecake layer.
- Substitute: Regular Oreos + 1/4 tsp extra peppermint extract.
- 5 tbsp unsalted butter, melted: Why this? Acts as the "glue" for the crust while adding a rich mouthfeel.
- Substitute: Salted butter (just omit the extra kosher salt).
- 1/4 tsp kosher salt: Why this? Balances the sugar and prevents the mint from feeling cloying.
- Substitute: Sea salt (use half the amount).
- 16 oz full fat cream cheese, room temperature: Why this? The high fat content is non negotiable for that velvety, professional texture.
- Substitute: Neufchâtel cheese (will be slightly softer and less rich).
- 2/3 cup granulated sugar: Why this? Dissolves perfectly into the cream cheese without adding grit.
- Substitute: Caster sugar for an even finer texture.
- 1/2 cup full fat sour cream: Why this? Adds a necessary tang that cuts through the heavy fat of the cheese.
- Substitute: Full fat Greek yogurt (adds more protein but less "slip").
- 2 large eggs, room temperature: Why this? Provides the "lift" and sets the custard like consistency.
- Substitute: Flax eggs (note: texture will be much denser and less silky).
- 1 tsp peppermint extract: Why this? Pure extract offers a clean, sharp mint flavor compared to "mint" flavorings.
- Substitute: 1.5 tsp peppermint oil (check potency first).
- 1 tsp vanilla extract: Why this? Rounds out the sharp edges of the peppermint with a floral sweetness.
- Substitute: Vanilla bean paste for those beautiful little black flecks.
- 2 drops green gel food coloring: Why this? Gel is concentrated and won't thin out your batter like liquid drops.
- Substitute: Spinach powder for a natural (but slightly earthy) alternative.
- 10 Mint Oreo cookies, roughly chopped: Why this? Provides a textural contrast inside the smooth cheesecake filling.
- Substitute: Mini chocolate chips for a different kind of crunch.
Tools and Gear for Professional Style Baking Results
You don't need a kitchen full of gadgets, but a few specific tools will make your life significantly easier and your bars much more attractive. A standard 8x8-inch square baking pan is the gold standard here. I highly recommend using a light colored metal pan rather than glass or ceramic.
Glass holds onto heat for too long, which can lead to overbaked edges while the center stays raw a classic cheesecake disaster.
A stand mixer (like a KitchenAid) or a sturdy hand mixer is essential. Trying to beat cream cheese by hand is a workout nobody asked for, and you'll never get it smooth enough to avoid lumps. Also, grab some parchment paper. This is the "secret weapon" for removing the bars from the pan.
Leave a little overhang on the sides to create "handles," allowing you to lift the entire block of cheesecake out once it's chilled. It makes slicing a dream.
Finally, a sharp, thin bladed knife and a tall glass of hot water are your best friends for serving. Dipping the knife in hot water and wiping it clean between every single cut is how you get those perfectly sharp, geometric edges you see in food photography.
It prevents the soft filling from dragging across the dark crust, keeping the layers distinct and beautiful.
step-by-step Guide to Crafting These Refreshing Treats
1. Construct the Foundation
Preheat your oven to 350°F (180°C) and line your 8x8 pan with parchment paper. Pulse the 24 Mint Oreos in a food processor until they resemble fine, dark sand. Note: Don't remove the cream filling from the cookies; it helps bind the crust.
Stir in the 5 tbsp melted butter and salt, then press the mixture firmly into the bottom of the pan. Bake for 10 minutes to set the structure.
2. Emulsify the Filling
In a large bowl, beat the 16 oz cream cheese and 2/3 cup sugar on medium speed until the mixture is completely smooth and glossy. Note: This usually takes about 3 minutes. Scrape the sides of the bowl frequently to ensure no rogue lumps are hiding at the bottom.
3. Add the Aromatics
Lower the mixer speed and blend in the 1/2 cup sour cream, 1 tsp peppermint extract, 1 tsp vanilla, and 2 drops of green gel food coloring. Mix until the color is uniform and pale minty green.
4. Incorporate the Eggs
Add the 2 eggs one at a time, mixing on the lowest speed just until the yellow streaks disappear. Note: Overbeating at this stage introduces air bubbles that will cause the cheesecake to rise and then collapse, creating cracks.
5. The Fold In
Gently fold in the 10 roughly chopped Mint Oreos using a spatula. You want large chunks so they don't disappear into the batter. Pour the filling over the pre baked crust and smooth the top with an offset spatula.
6. The Precision Bake
Bake at 350°F (180°C) for 30 to 35 minutes. You are looking for the edges to be set and slightly puffed, while the center should still jiggle slightly like set gelatin when you gently shake the pan.
7. The Controlled Cool
Turn off the oven and crack the door open about an inch. Let the cheesecake sit in the cooling oven for 30 minutes. Note: This slow temperature drop is the best way to prevent the surface from cracking.
8. Final Chill
Remove the pan from the oven and let it come to room temperature on a wire rack. Cover tightly and refrigerate for at least 4 hours, though overnight is much better for the peppermint flavor to fully permeate the cream.
9. Garnish and Finish
Whisk the 1/2 cup heavy cream and 1 tbsp powdered sugar until stiff, velvety peaks form. Spread or pipe this over the chilled bars. Sprinkle with the 4 crushed Oreos for that final "shattered" look.
Solving Common Problems for a Flawless Dessert Finish
One of the most frustrating things is spending an hour on a recipe only to have it come out looking "off." If your cheesecake looks more like a lunar landscape than a smooth bar, don't panic. Most issues are related to temperature control or aeration.
For example, if your filling is lumpy, it’s almost always because the cream cheese was too cold. You can sometimes fix this by setting the mixing bowl over a pot of simmering water for 30 seconds to soften the fats, then beating again.
Why Your Cheesecake Surface Cracked
Cracks happen when the cheesecake dries out or cools too quickly. When the eggs cook, they create a structure that expands. If the oven is too hot, the top sets before the middle is done. Then, as the center continues to cook and expand, it bursts through the top.
A slow cool down period in the oven (the "carryover" phase) allows the structure to stabilize gradually.
| Problem | Root Cause | Solution |
|---|---|---|
| Soggy Crust | Butter wasn't fully incorporated or crust wasn't pre baked. | Ensure crumbs are like "wet sand" and bake for full 10 mins before adding filling. |
| Grainy Filling | Sugar didn't dissolve or using low-fat cream cheese. | Beat sugar and room temp cheese for at least 3 minutes before adding eggs. |
| Rubbery Texture | Overbeating eggs or overbaking. | Pull from oven while center is still "wobbly." Residual heat finishes the job. |
Just like when balancing the richness in The Fudge Brownie recipe, the key is monitoring the moisture. If you find your bars are too soft to cut, they likely need another 2 hours in the fridge to let the fats fully solidify.
Common Mistakes Checklist
- ✓ Never use "light" or "whipped" cream cheese; the water content is too high and will ruin the set.
- ✓ Don't skip the sour cream the acidity is vital for breaking down the protein strands in the cheese.
- ✓ Always scrape the very bottom of the bowl; sugar often settles there and creates a grainy bottom layer.
- ✓ Resist the urge to open the oven door during the first 25 minutes of baking.
- ✓ Ensure your eggs are truly at room temperature so they emulsify rather than curdling the fat.
Creative Ways to Adapt Your Minty Cheesecake Squares
If you’re a superfan of the "Thin Mint" girl scout cookies, you can easily pivot this recipe to mimic that specific flavor profile. Instead of the crushed Oreo garnish, melt 1/2 cup of dark chocolate chips with a teaspoon of coconut oil and drizzle it in a zigzag pattern over the top.
The coconut oil keeps the chocolate "snappy" but soft enough to bite through without shattering the whole bar.
For a gluten-free alternative, there are now several brands of gluten-free chocolate sandwich cookies that work perfectly for the base. Just be sure to check that your peppermint extract is certified gluten-free, as some cheaper brands use grain based alcohols as a carrier.
If you want a more "adult" version, replace the vanilla extract with a tablespoon of peppermint schnapps. It adds a sophisticated depth and a tiny bit of "burn" that pairs beautifully with a cup of strong black coffee.
Adjusting the Batch Size
If you're baking for a smaller household, you can easily halve this recipe. Use a 9x5-inch loaf pan and reduce the bake time by about 5 to 7 minutes. Since the recipe calls for 2 eggs, just beat them together in a small bowl and use 3 tablespoons of the mixture to get exactly "one egg's worth."
For a double batch (making 32 servings), use a 9x13-inch pan. You won't need to double the salt or the extracts increase them by 1.5x instead to avoid an overpowering mint flavor. The bake time will usually increase by about 10 minutes because the thermal mass is larger.
| Original | Double Batch (9x13) | Adjustment |
|---|---|---|
| 16 oz Cream Cheese | 32 oz | Straight double |
| 1 tsp Peppermint | 1.5 tsp | 1.5x to prevent "toothpaste" flavor |
| 2 Eggs | 4 Eggs | Straight double |
| 35 min Bake | 45-50 min | Increase until jiggle test passes |
Debunking Kitchen Myths
There is a persistent myth that you absolutely must use a water bath (bain marie) for all cheesecakes. While that's true for a tall, 10 inch New York style cheesecake, these bars are shallow enough that a water bath is overkill.
The parchment paper and a lower oven temperature provide enough insulation to prevent the edges from burning before the center sets.
Another common misconception is that you should "beat the air out" of the batter after adding eggs. In reality, you should never have put the air in there to begin with! Once the eggs go in, the goal is purely incorporation.
Air bubbles are the enemy of a dense, velvety bar they expand in the heat and cause the cheesecake to rise like a souffle, only to collapse and wrinkle once it cools.
Best Practices for Keeping Your Leftovers Fresh Longer
Because of the high dairy content, these Mint Oreo Cheesecake Bars need to be kept cold. They will stay fresh in the refrigerator for up to 5 days if kept in an airtight container.
If you leave them uncovered, the cream cheese will absorb "fridge smells" (nobody wants onion flavored mint bars), and the crust will eventually lose its crispness.
Freezing Instructions: These bars freeze beautifully. Wrap individual squares in plastic wrap, then place them in a freezer safe bag. They will keep for up to 3 months. When you're ready to eat, let them thaw in the fridge for 2 hours.
Honestly, I sometimes eat them straight from the freezer the texture becomes almost like a dense fudge.
Zero Waste Tip: Don't throw away those broken Oreo bits at the bottom of the bag! Save them in a jar in the freezer. They make an incredible topping for vanilla ice cream or can be folded into your next batch of brownies.
If you have leftover cheesecake filling that didn't fit in the pan, bake it in a greased muffin tin for 15 minutes for "crustless" cheesecake bites.
Presentation Ideas for Serving Your Decadent Green Treats
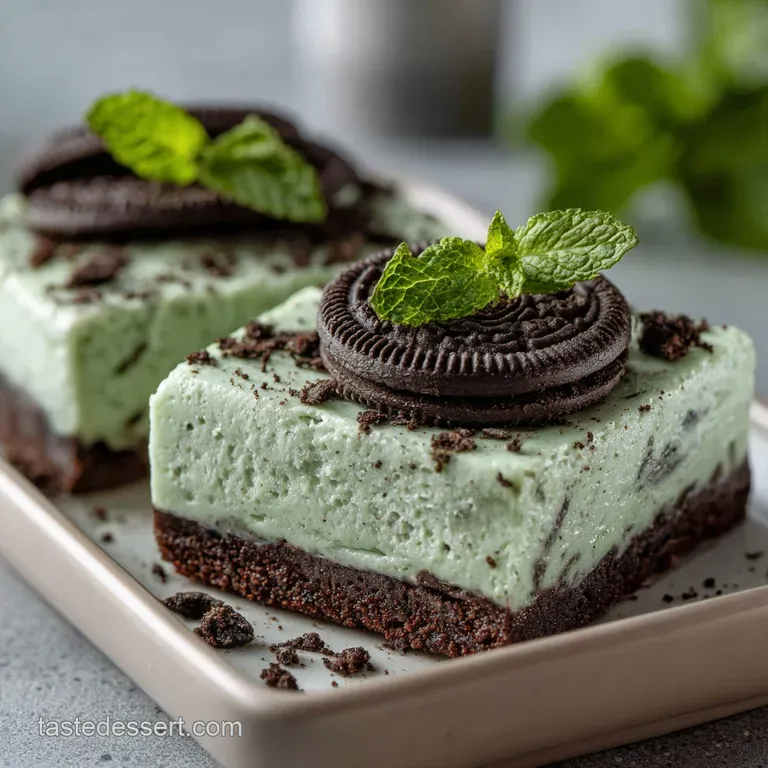
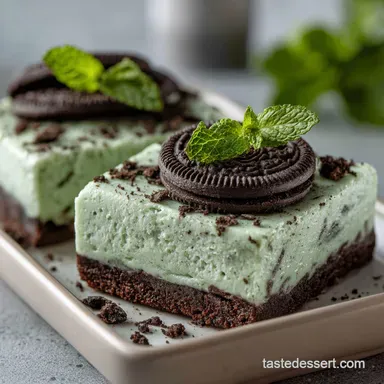
When it comes to serving, less is often more. The contrast of the pale green filling against the dark crust is already quite striking. For a truly professional look, use a piping bag with a star tip to add small dollops of the whipped cream to each individual square rather than spreading it in a flat layer.
Top each dollop with a tiny sprig of fresh mint or a single "Mini Oreo" for a bit of whimsy.
If you're serving these at a party, try cutting them into tiny 1 inch "bites" instead of full bars. They are quite rich, and people often appreciate a smaller portion. Arrange them on a white platter to make the green color pop.
If you want to go the extra mile, a light dusting of cocoa powder over the whipped cream right before serving adds a nice bitter contrast to the sweetness of the bars.
Whatever you do, make sure to let them sit at room temperature for about 10 minutes before everyone digs in. This takes the "chill" off and allows the peppermint flavor to bloom, making the texture feel even creamier on the palate.
Enjoy the process baking these is just as much fun as eating them!

Recipe FAQs
Can I substitute the full fat cream cheese with light or Neufchâtel?
No, stick with full fat bricks. Light cream cheese contains too much water, resulting in a soft, weeping texture that won't set correctly in a bar format.
How long must I chill the bars before slicing them cleanly?
Chill for a minimum of four hours. For the absolute cleanest slices that don't drag the soft filling, refrigerate overnight or place them in the freezer for 20 minutes right before cutting.
How do I prevent my cheesecake bars from cracking during baking?
Turn off the oven and allow them to cool inside for 30 minutes. This slow temperature reduction prevents the structure from seizing too quickly after cooking, which is the primary cause of surface cracks.
How to get room temperature cream cheese quickly for smooth batter?
Submerge the sealed foil bricks in warm water for 10 minutes. If you nail the emulsification of fats here, you'll have better texture control, similar to what’s required in our How to Make recipe for bliss bites.
Is it true that baking the crust first is optional for these bars?
No, pre-baking the crust is essential. Baking the crust for 10 minutes sets the butter binder, preventing the chocolate crumbs from turning soggy once the wet cheesecake filling is poured over them.
What is the best way to store leftovers to maintain texture?
Store them tightly wrapped in an airtight container in the refrigerator. They stay fresh for up to 5 days, but for long term storage, freezing them wrapped individually is recommended.
How to incorporate the peppermint flavor without tasting like toothpaste?
Use pure peppermint extract sparingly and balance with vanilla. Pure extract is much stronger than imitation flavoring, so use only 1 tsp and ensure your sour cream adds adequate tang to cut the sweetness.
Mint Oreo Cheesecake Bars
Ingredients:
Instructions:
Nutrition Facts:
| Calories | 341 kcal |
|---|---|
| Protein | 3.9 g |
| Fat | 23.2 g |
| Carbs | 29.5 g |
| Fiber | 0.8 g |
| Sugar | 21.9 g |
| Sodium | 238 mg |
