The Ultimate Birthday Bash Funfetti Layer Cake
- Unlocking the Magic: Why This Funfetti Cake Recipe Reigns Supreme
- The Anatomy of an Absolutely Perfect Celebration Bake
- Gathering Your Confetti Components: Essential Pantry Staples
- Precision Pointers for Perfect Ingredient Selection
- From Bowl to Oven: Step-by-Step Baking Mastery
- Crafting the Cloud: Whipping Up Dreamy Vanilla Buttercream
- Troubleshooting and Flavor Enhancements Beyond the Basics
- Recipe FAQs
- 📝 Recipe Card
Unlocking the Magic: Why This Funfetti Cake Recipe Reigns Supreme
Creating a truly cracking Funfetti Cake Recipe is more than just mixing ingredients; it’s about bottling the pure, unadulterated joy of childhood celebrations. Forget the dry, often disappointing versions you might remember.
This iteration is designed specifically to deliver a Moist Funfetti Cake experience that stands tall against any boxed mix mimicry. We’ve engineered this blueprint for a spectacular, show stopping, yet surprisingly achievable Funfetti Layer Cake. The goal?
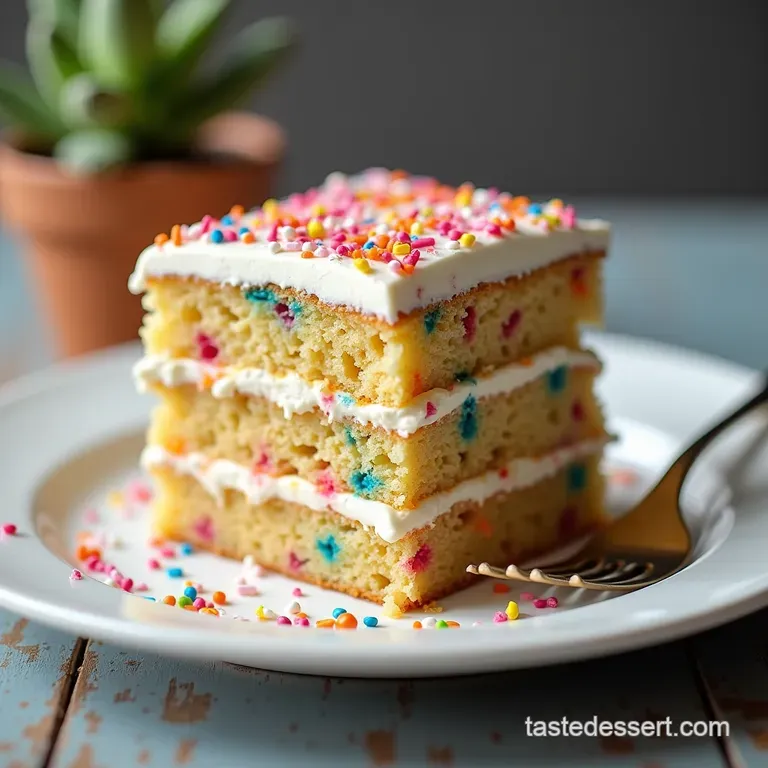
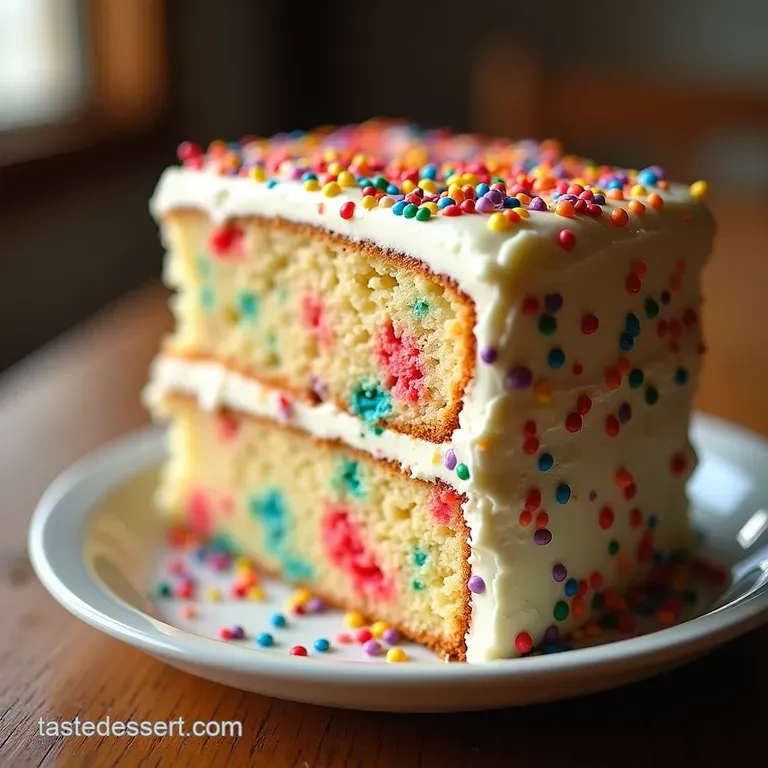
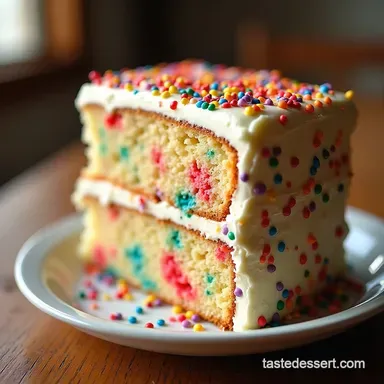
A light, vanilla buttermilk cake, spectacularly speckled with vibrant confetti, crowned with a velvety smooth vanilla buttercream. It’s pure, sweet nostalgia perfected for any occasion.
The Anatomy of an Absolutely Perfect Celebration Bake
The success of a great Funfetti Cake From Scratch lies not just in following steps, but in understanding the role each component plays in the final texture and flavour.
This recipe, designed for two 8 inch rounds, balances richness with airiness, a tightrope walk that yields magnificent results after about 3 hours and 15 minutes of focused effort.
While the difficulty lands at medium primarily due to the need for precise batter emulsion the resulting moistness and vibrant look make every minute worthwhile.
More Than Just Sprinkles: The Secret to a Tender Crumb
Many bakers rush the mixing stage, but that’s where the magic of tenderness happens. Our secret weapon for a light, fluffy texture involves separating the eggs. We cream the butter and sugar with the yolks first, building the foundational richness.
Then, we whip the remaining four egg whites separately until they form stiff, glossy peaks. These airy whites are gently folded in last, providing lift and structure without the heaviness that often plagues vanilla cakes. This technique ensures that even with the addition of flour, the cake remains delicate.
Setting the Scene: What to Expect From This Showstopper
When you dive into this recipe, know that you are aiming for a distinct flavour profile pure, sweet nostalgia elevated by the subtle tang of buttermilk. This cake yields about 12 generous slices.
Be prepared for the colour integration: we are specifically using Jimmies -style sprinkles, not nonpareils, because the Jimmies hold their shape better during baking, preventing the batter from turning into a single, smeared colour mess.
The result is distinct pockets of colour suspended throughout the pale vanilla crumb.
Baking Nostalgia Made Effortlessly Delicious
While some might reach for Funfetti Cake Mix Recipes for a shortcut, replicating this flavour profile from scratch unlocks superior texture. This recipe keeps ingredient sourcing straightforward, relying on standard pantry staples elevated by the use of buttermilk, which reacts beautifully with the leavening agents to tenderize the gluten structure.
It proves that achieving an Easy Funfetti Cake that tastes this incredible doesn’t require complex sourcing, just attention to temperature and technique.
Gathering Your Confetti Components: Essential Pantry Staples
Before preheating the oven to 350° F ( 175° C), ensure your kitchen is stocked. We need a balanced lineup of dry and wet components to achieve the desired crumb.
For the cake layers, this means 3 cups (360g) of all-purpose flour, 1 tablespoon of baking powder, and ½ teaspoon of salt forming our dry base. On the wet side, we rely on 1 cup (227g) of softened unsalted butter, 1 ¾ cups (350g) of granulated sugar, 4 large eggs (separated), 2 teaspoons of vanilla, ¾ cup (180ml) of whole milk, and ½ cup (120ml) of room temperature buttermilk.
Finally, don't forget the showstopper: ⅔ cup (about 115g) of rainbow sprinkles.
Related Recipes Worth Trying
- Easy Cake Batter Blondies Chewy Fudgy and Ready Fast — Unlock the secret to perfect chewy Cake Batter Blondies using just a box of mix These squares taste just like delicious raw batter See the simple 15minute prep
- The Best Buttery UpsideDown Apple Cake Recipe Spiced Delight — Tired of dry sponge This classic UpsideDown Apple Cake features a luscious brown sugar caramel and tart apples Proper teatime perfection Get the foolproof...
- The Proper Posh Very Vanilla Cupcakes Recipe So Moist — Forget bland sponges Bake these foolproof Very Vanilla Cupcakes for a rich moist crumb and deep flavour Perfect homemade vanilla cupcakes from scratch See...
Precision Pointers for Perfect Ingredient Selection
The quality of your inputs directly dictates the quality of your output. For this Best Funfetti Cake , precision matters most when it comes to temperature and type.
Dry Goods Lineup: Flour, Leavening, and the Rainbow Bits
When selecting your rainbow elements, consider What Type of Sprinkles to Use for Funfetti Cake . Hard, bead like nonpareils tend to bleed colour instantly and sometimes dissolve or become gritty.
The superior choice is the classic, rod-shaped "Jimmies," which maintain their integrity during the bake time of 30– 35 minutes, delivering those distinct pops of colour you crave. Ensure your baking powder is fresh, as it is the primary lift agent here.
The Wet Wonders: Achieving Buttermilk Moistness
The single most important instruction for the wet ingredients is that they must be at room temperature butter, eggs, milk, and buttermilk. Room temperature ingredients emulsify (blend smoothly) much better, creating a stable batter that traps air effectively.
This is the secret to that signature Moist Funfetti Cake . The buttermilk’s acidity tenderizes the crumb while ensuring deep moisture retention long after cooling.
Tool Kit Check: Essential Equipment for Layer Success
While you don't need obscure gadgets, having two 8 inch round cake pans, parchment paper (for easy release), and a reliable electric mixer is essential. A rubber spatula is crucial for the gentle folding stages later, and wire cooling racks are non-negotiable for preventing condensation buildup that can steam the bottom of your layers.
From Bowl to Oven: step-by-step Baking Mastery
Preparation starts with getting those pans ready: grease, line the bottoms with parchment, and dust lightly with flour. Next, we tackle the creaming method: beat the softened butter and sugar for a solid three minutes until the mixture is visibly pale and fluffy, then beat in the four egg yolks one-by-one, followed by the vanilla.
In a separate bowl, whisk your flour, baking powder, and salt. Separately again, combine your milk and buttermilk. Now, alternate adding the dry ingredients and the wet liquids to the butter mixture in three additions, starting and ending with the dry components.
Remember, mix just until incorporated no more. Finally, gently fold in the stiffly beaten egg whites, followed by the sprinkles, using sweeping motions to preserve the air. Divide the batter evenly and bake for 30 to 35 minutes.
Crafting the Cloud: Whipping Up Dreamy Vanilla Buttercream
The cake’s light structure demands an equally light topping. Our Funfetti Cake Frosting is a classic American buttercream, slightly leaning towards fluffiness. Start by beating 1 cup (227g) of softened butter until smooth.
Gradually introduce 4 to 5 cups of sifted confectioners' sugar, one cup at a time, scraping the bowl often. Once incorporated, add 1 ½ teaspoons of vanilla and a pinch of salt.
The consistency is adjusted by slowly adding heavy cream or whole milk, one tablespoon at a time, until you achieve a mixture that holds stiff peaks but remains exceptionally light.
Mixing Methods That Guarantee a Lighter Cake Texture
As mentioned, the key to lightness is the air incorporated into the egg whites. When folding them into the main batter, treat them delicately. Use a large spatula and cut straight down the middle of the bowl, sweep along the bottom, and bring the batter up and over the whites.
Rotate the bowl and repeat until the mixture is homogenous any lumps of white should disappear, but excessive stirring will deflate everything.
Baking Temperature Secrets for Evenly Cooked Layers
Baking at the specified 350° F ( 175° C) is vital. Too cool, and the cake spreads too much before setting; too hot, and the outside sets too fast, leading to a dry edge and a potentially sunken middle.
The 30 35 minute bake time ensures the centre is set but not overbaked. The toothpick test is your final confirmation: if it comes out clean, they are ready to rest for 10 minutes in the pan before moving to the rack.
The Art of the Crumb Coat: Stabilizing Your Beautiful Funfetti Cake
Assembly is where amateur cakes often look messy. The solution is the crumb coat. Once the layers are completely cool (this can take up to two hours, and chilling them slightly helps!), place the first layer down and apply a very thin layer of frosting across the top surface.
This traps any loose crumbs clinging to the cake. Chill this layered stack for about 15 minutes until the crumb coat firms up. This stabilized base allows you to apply the final, thick layer of frosting flawlessly.
Piping Perfection: Achieving Professional Frosting Finishes
With the crumb coat chilled, apply the remaining buttercream generously. Use an offset spatula to smooth the sides and top for a sleek, professional finish, or use a piping bag fitted with a star tip for classic swirls.
If you find the frosting becoming too soft while you work, chill the assembled cake for 10 minutes before finalizing the decoration.
Troubleshooting and Flavor Enhancements Beyond the Basics
Even with careful execution, baking can present surprises. Perhaps you’ve heard of Funfetti Cake Dip , but mastering the cake itself requires anticipating issues.
Creative Variations: Taking Your Funfetti Beyond Vanilla
While our base is classic vanilla, experimentation is encouraged. A wonderful twist is infusing citrus: adding the zest of one lemon during the butter sugar creaming stage provides a bright, fresh counterpoint.
Alternatively, for a deeper, richer profile, try browning your butter first melt it until the milk solids toast and smell nutty, cool slightly, and then proceed with creaming. This subtly complex flavour complements the sweetness perfectly.
Storage Strategies for Maximum Freshness and Fluff
To keep this Moist Funfetti Cake at its peak, store it in an airtight container at cool room temperature for up to three days. Refrigeration tends to dry out most butter based cakes, so avoid it unless your environment is excessively hot and humid.
If you need longer storage, the unfrosted layers freeze beautifully wrapped tightly in plastic wrap and foil for up to two months.
Common Pitfalls and How to Avoid Them (Never Dry Again!)
The number one enemy of any homemade cake is dryness. This usually stems from two culprits: over mixing the flour, which builds tough gluten strands, or over baking. Pay close attention to the toothpick test, removing the cake the very second it comes out clean.
If you worry about dry edges, you can always brush the cooled layers lightly with a simple syrup (equal parts water and sugar, boiled and cooled) before applying the Funfetti Cake Frosting .

Recipe FAQs
Why are my Funfetti Cake layers a bit flat and dense, not light and fluffy?
This usually points to a couple of common culprits either your ingredients weren't at room temperature, or you overmixed the batter after adding the flour. Make sure your butter, eggs, and buttermilk are properly warmed up; this helps everything emulsify beautifully.
Also, remember to fold those lovely whipped egg whites in gently!
Can I use any type of sprinkles for this Funfetti Cake, or does it matter?
It absolutely matters, like choosing the right biscuit for your tea! You must use "Jimmies" (the long, rod-shaped ones) rather than "Nonpareils" (the tiny, hard balls). The little Nonpareils tend to bleed their colours disastrously into the batter, turning everything a muddy grey blue while baking.
My buttercream is too runny/stiff how do I fix the consistency?
Don't panic; this is easily rectified! If it’s too runny, add confectioners’ sugar, a tablespoon at a time, and beat it well until it stiffens up. If it’s too stiff (often when the kitchen is chilly), add heavy cream or milk, one teaspoon at a time, until you reach that perfect, spreadable velvety texture.
How should I store leftover Funfetti Cake to keep it tasting fresh?
For short term storage (up to 3 days), keep the cake covered loosely with a cake dome or loosely tented with foil at cool room temperature; this prevents the frosting from getting sticky.
If you need longer storage, slice the cake and freeze it airtight; it’ll taste almost as good as fresh when thawed overnight in the fridge.
I don't have buttermilk; can I make a substitute for this recipe?
Absolutely, no need to pop down to the corner shop! You can easily create a substitute by taking the required amount of whole milk (¾ cup for the recipe) and stirring in one teaspoon of white vinegar or lemon juice.
Give it five minutes to curdle slightly, and voilà you have perfectly usable 'sour milk' for your cake.
Moist Funfetti Layer Cake
Ingredients:
Instructions:
Nutrition Facts:
| Calories | 436 kcal |
|---|---|
| Protein | 3.2 g |
| Fat | 15.3 g |
| Carbs | 39.2 g |
| Fiber | 0.5 g |
| Sodium | 129 mg |
