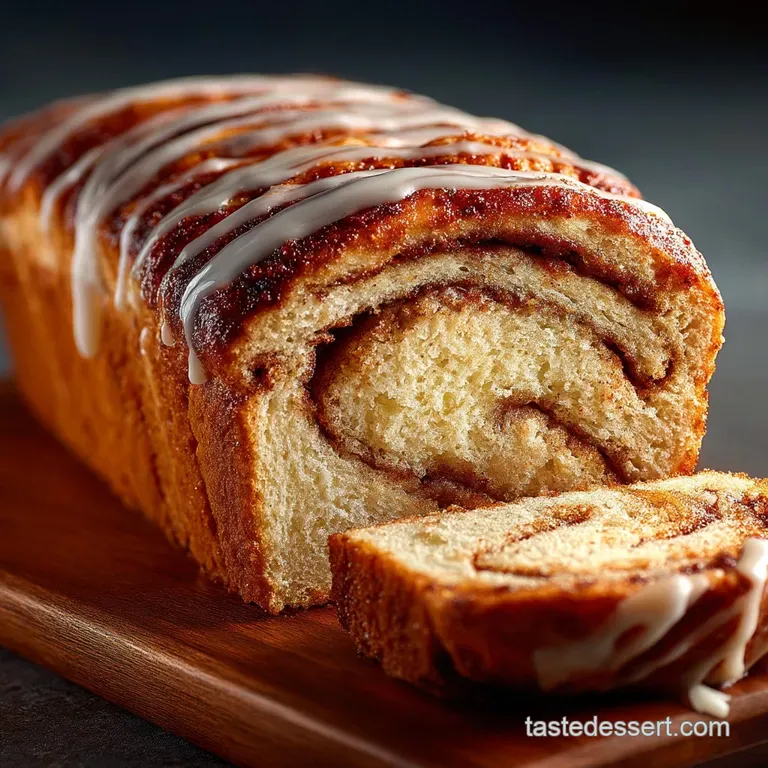
The Morning Glory Loaf Chefs Signature Cinnamon Swirl Bread
- Unlocking the Secret to Truly Soft Cinnamon Bread
- Why This Morning Glory Loaf Will Be Your New Weekend Obsession
- Gathering Your Artisan Baking Toolkit
- The Building Blocks of Perfect Morning Glory Cinnamon Bread
- Mastering the Dough: From Mixing Bowl to First Proof
- The Art of the Swirl: Filling, Rolling, and Slicing the Loaf
- Achieving Golden Perfection in the Oven
- Optimizing Your Bake: Troubleshooting and Chef Tips
- Serving Suggestions, Storage, and Nutritional Insight for Your Homemade Cinnamon Bread
- Creative Variations to Customize This Classic Recipe
- Recipe FAQs
- 📝 Recipe Card
Unlocking the Secret to Truly Soft Cinnamon Bread
The term cinnamon bread conjures up images of warmth, comfort, and deep fragrance, yet many store-bought or basic cinnamon bread recipes often fall short, resulting in a dry, crumbly loaf.
The secret to achieving the quintessential melt-in-your mouth texture lies not just in the spice ratio, but in the foundation of the dough itself. We elevate this classic by adopting a brioche style base.
This method incorporates rich ingredients eggs, milk, and plenty of butter which inhibit excessive gluten development, resulting in a supremely tender crumb that stays moist for days.
This approach moves beyond the simplicity of a quick bread, demanding patience but rewarding the effort tenfold with a bake that truly honors the spice it contains.
Why This Morning Glory Loaf Will Be Your New Weekend Obsession
This specific cinnamon bread recipe easy enough for an intermediate baker to master is designed to be the centerpiece of any weekend brunch. It’s more than just a sweet treat; it’s a commitment to quality and texture that transforms a simple slice into an experience.
The Magic of Brioche Style Dough Structure
Unlike standard white bread, which relies purely on water and flour for structure, our Morning Glory loaf uses whole milk and two large eggs, softening the final texture dramatically.
The generous addition of softened, room temperature butter coats the gluten strands, preventing them from tightening too much during kneading. The result is a richer flavor profile and a delicate, open crumb that is exceptionally receptive to soaking up the vanilla glaze and contrasts beautifully with the dense, caramelized cinnamon swirl.
Flavor Profile Breakdown: Sweetness, Spice, and Everything Nice
The filling is carefully calibrated to offer a balance that is both deeply comforting and complex. We utilize light brown sugar, which imparts necessary molasses notes that complement the assertive warmth of the cinnamon, rather than just delivering raw sweetness.
This deep, warm profile is key to avoiding a one-dimensional dessert bread, ensuring the loaf tastes sophisticated and satisfying.
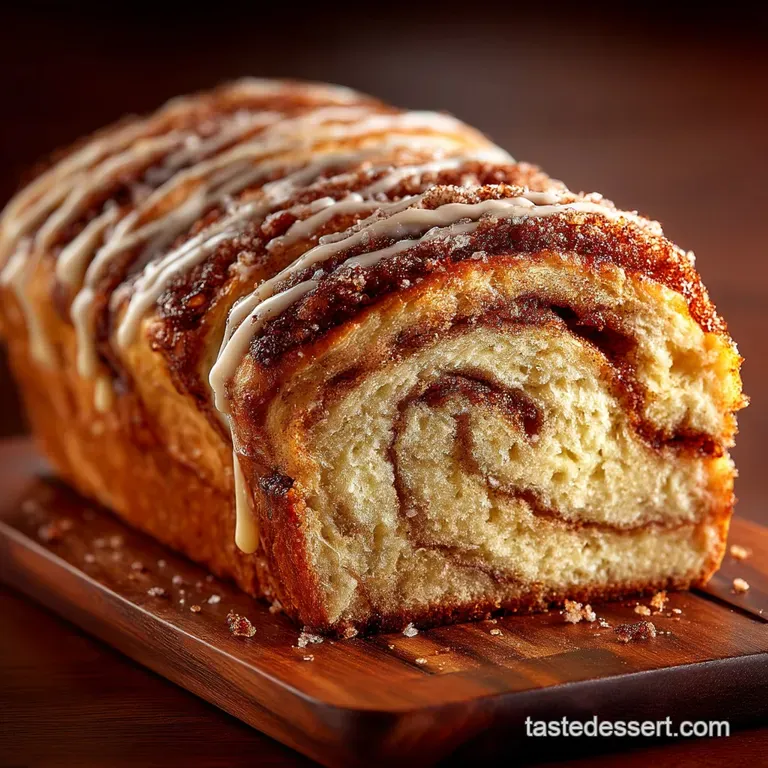
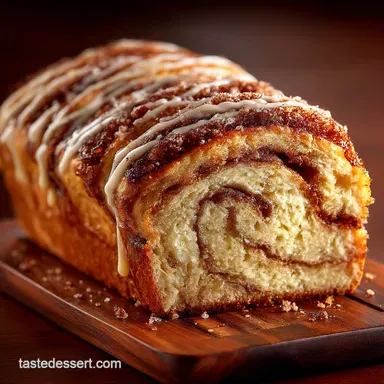
Perfecting the Signature Swirl Technique
The hallmark of a great cinnamon loaf is that striking, clean spiral that runs through the entire slice. Achieving this requires precision during the shaping stage. By incorporating a small amount of flour into the melted butter and brown sugar mixture, we create a stable, thick paste.
This crucial step prevents the filling from dissolving during the long proofing and baking phases, ensuring the swirl remains defined and the sugar caramelizes perfectly inside the dough without leaking out.
The Essential Time Investment: Why Patience is Key
While the active preparation time is brief (about 25 minutes), this is a yeasted loaf, meaning the total process stretches over approximately three and a half hours, most of which is inactive waiting time.
Allowing the dough its full first rise (60– 90 minutes) and its second proof (45– 60 minutes) is non-negotiable. This patient approach is what allows the complex flavors to develop and the yeast to fully inflate the structure, delivering the incredible, cloud like softness we aim for.
Gathering Your Artisan Baking Toolkit
Success in baking often comes down to preparation. Before you even measure your flour, having the right equipment ensures efficiency and consistency. While this bread can be made by hand, a stand mixer greatly reduces the active effort required.
You will also need precise measuring tools, specifically a digital scale, which is the gold standard for accurately measuring flour and preventing a heavy loaf.
The Building Blocks of Perfect Morning Glory Cinnamon Bread
The quality of your final product directly reflects the quality of your raw materials. Treating your ingredients with respect and understanding their function is vital.
Essential Equipment for Dough Success (Stand Mixers and Proofing)
While traditionalists may love the meditative process of kneading by hand for 12 to 15 minutes, a stand mixer fitted with a dough hook is highly recommended for incorporating the high fat content of this brioche style dough.
The mixer ensures the necessary eight to ten minutes of rigorous kneading required to build sufficient gluten structure without overworking the dough, resulting in the perfect texture. For proofing, a large, lightly oiled bowl covered tightly is all that’s needed, ideally placed in a warm, draft free environment.
Choosing the Right Pan for an Even Bake
The standard 9x5 inch (23x13 cm) metal loaf tin is essential. Metal ensures quick, even heat transfer, which results in a golden brown crust and ensures the center of the dense loaf bakes through completely within the 35 to 40-minute window.
Avoid darker non-stick pans, which can cause the crust to over brown before the interior is finished.
Selecting the Best Cinnamon for Maximum Fragrance
Given that this is a cinnamon bread, the quality of your spice matters immensely. Standard supermarket cinnamon is often Cassia, which is powerful but can be bitter. If possible, opt for high-quality Indonesian or Vietnamese cinnamon, which provides a sweeter, warmer, and more fragrant punch.
You’ll be using a full tablespoon of ground cinnamon in the filling, so choosing a premium variety is key to achieving that irresistible aroma that fills your kitchen.
Flour Power: Understanding Protein Content
The recipe calls for 3 ½ cups (420g) of all-purpose flour, which provides a tender but sturdy crumb perfect for slicing. However, if you prefer a loaf with a slightly chewier, more substantial bite closer to what you might find in some commercial cinnamon bread dollywood -style rolls you can substitute the all-purpose flour with bread flour.
Bread flour has a higher protein content, enabling better gluten development and a structure that handles the rich filling exceptionally well.
Mastering the Dough: From Mixing Bowl to First Proof
The initial mixing stage dictates the final outcome. Begin by ensuring your warm milk is between 105° F and 115° F (40– 46° C).
This optimal temperature activates the active dry yeast, combining it with one teaspoon of sugar to create a frothy bloom within ten minutes. Once the yeast is thriving, it is added to the wet ingredients (the remaining sugar, salt, and softened butter, followed by the beaten eggs). The flour is incorporated gradually.
We start on low speed, adding flour half a cup at a time, until a shaggy mass forms. The transition to kneading is critical, developing the elasticity required to hold the swirl shape.
The full 8- 10 minutes of mechanical kneading transforms the sticky mass into a smooth, pliable, and elastic dough ready for its first rest, or bulk fermentation.
Related Recipes Worth Trying
- Buttery Caramel Apple Cinnamon Scones Recipe Tea Time Treat — Ditch the dry biscuits Master these tender Caramel Apple Cinnamon Scones packed with spiced fruit and rich caramel flavour The foolproof technique for flaky...
- The Best Brown Sugar Cinnamon Swirl Banana Bread Recipe — Stop making dry loaves This Cinnamon Swirl Banana Bread is foolproof delivering incredible moisture and a decadent brown sugar swirl Your new favourite...
- Stretchy Cheesy Garlic Breadsticks Homemade Pizzeria Perfection — Forget the freezer aisle Make these easy homemade cheesy breadsticks with a sixingredient dough for the ultimate stretchy garlicky comfort side dish
The Art of the Swirl: Filling, Rolling, and Slicing the Loaf
The beauty of this bread lies in its visual structure. While the dough rests, the filling must be prepared: melted butter, brown sugar, cinnamon, and the essential stabilizing tablespoon of flour are mixed into a thick, luxurious paste.
Once the dough has doubled in size, it is gently punched down to release the fermentation gases, rested for ten minutes, and then rolled into a large 18 x 12 inch rectangle, roughly ¼ inch thick. The filling is spread evenly, leaving a clean border along one of the longest edges.
The rolling process must be tight and uniform, starting from the filled long edge and rolling towards the clean edge. Finally, the seam must be securely pinched and sealed along the entire length a vital step to prevent the treasured sugar filling from bubbling out during the high heat of the oven and causing a sticky, caramelized leak.
Achieving Golden Perfection in the Oven
The final stages involve careful management of temperature and timing to ensure a fully cooked loaf with a deep golden crust.
Activating the Yeast: Temperature Control is Critical
While the yeast was initially activated, maintaining a consistent warm temperature during both the first and second proofing stages is vital for achieving maximum lift. If your kitchen is cool, place the covered dough near a preheating oven or in an oven that has been warmed briefly and turned off.
Insufficient heat results in a slow, weak rise, yielding a dense final loaf.
Kneading for Texture: The Windowpane Test
The efficacy of your kneading is confirmed by the windowpane test: tear a small piece of dough and slowly stretch it between your fingers. If you can stretch it thin enough to see light through it without tearing, the gluten is perfectly developed, guaranteeing a fluffy interior texture.
This check should be performed immediately before the first rise.
Preparing the Luxurious Brown Sugar Filling
As mentioned previously, the inclusion of one tablespoon of all-purpose flour in the filling mixture is the cornerstone of a successful, non-leaking swirl. This small amount of starch absorbs moisture released by the brown sugar as it heats, creating a more viscous paste that stays exactly where you spread it, ensuring a beautiful, defined spiral.
Tight Rolling Technique for a Clean Swirl
A loose roll will result in large air gaps and a messy swirl. To ensure every slice has that photogenic spiral, roll the dough log as tightly as possible, using the tension of the dough to pull it into a neat cylinder before sealing the seam firmly.
The Second Proof: When to Know Your Loaf is Ready
The second proof occurs after the dough is shaped and placed in the loaf pan. It typically takes 45– 60 minutes. The loaf is ready to bake when it looks puffy and has nearly doubled in size, but hasn't ballooned over the edges.
If you gently poke it, the indentation should spring back slowly but not completely this is known as the "jiggle test" or "slow bounce back."
Temperature Calibration and Internal Doneness Checks
Preheat your oven to 350° F ( 175° C). The total bake time is 35– 40 minutes. To confirm the loaf is fully cooked, the crust should be a rich, golden brown. For absolute certainty, use an instant read thermometer.
The internal temperature of the bread should register between 200° F and 205° F (93– 96° C) when inserted into the center.
If the top browns too quickly, tent it loosely with aluminum foil for the final 10– 15 minutes.
Optimizing Your Bake: Troubleshooting and Chef Tips
Even experienced bakers run into minor issues, but most can be easily fixed with key techniques.
Preventing a Dry Loaf or a Sunken Swirl
The most common cause of a dry cinnamon bread is too much flour. Always measure flour accurately using a digital scale or the spoon and-level method. Never scoop directly from the bag.
To prevent the swirl from sinking, ensure your dough is rolled and sealed tightly, and avoid over proofing the loaf during the second rise, as this weakens the gluten structure needed to hold the filling weight.
What to Do If Your Dough Won't Rise
If your dough remains sluggish after 60 minutes, the likely culprit is either cold ingredients or inactive yeast. Re-confirm your water temperature (105– 115° F is the sweet spot). If the yeast was old or stored improperly, it may be dead.
If the issue is temperature, try moving the bowl to a warmer spot or placing it in a turned off oven with the light on the heat generated by the light bulb is often enough to kickstart the fermentation.
Serving Suggestions, Storage, and Nutritional Insight for Your Homemade Cinnamon Bread
This homemade loaf is best enjoyed warm, served alongside a rich, dark coffee or strong English tea. For a decadent brunch idea, use thick slices to make the world’s best cinnamon French toast. The glaze is essential for a sweet finish, adding moisture and visual appeal.
Maximizing Freshness: Freezing and Refrigeration Guidelines
Due to the high fat content, this brioche style cinnamon bread stays soft for about three days when stored tightly wrapped at room temperature. Avoid refrigeration, which can dry out yeasted breads quickly. For longer storage, freeze the unglazed loaf whole or sliced.
Wrap it tightly in plastic wrap, followed by a layer of foil, and freeze for up to three months. Thaw completely at room temperature before glazing.
Nutrition Focus: Carbs, Fats, and Comfort
While providing approximately 360 calories per slice, the nutritional focus here should be on comfort and quality. The fat content comes primarily from the rich butter in the dough, which contributes significantly to the tender texture.
This loaf is meant to be a satisfying, occasional treat rather than a daily staple, providing ample carbohydrates for an energy boost.
Creative Variations to Customize This Classic Recipe
The beauty of homemade baking is customization. Once you've mastered the primary cinnamon bread machine recipe (or traditional method), you can easily adapt the flavor and form.
Dairy Substitutions for a Vegan Friendly Approach
If you require a plant based option, this recipe adapts beautifully. Substitute the whole milk with a full fat almond or soy milk, and replace the butter with a high-quality vegan butter substitute (like Miyoko’s or Earth Balance sticks). Ensure your sugar is certified vegan if necessary.
The texture will remain surprisingly tender, resulting in a delicious dairy-free cinnamon bread .
Adding Texture: Nuts, Raisins, or Chocolate Chips
For an added textural dimension, consider sprinkling ⅓ cup of finely chopped pecans or walnuts over the cinnamon filling before rolling. Alternatively, mixing mini chocolate chips or golden raisins into the filling can offer a delightful contrast.
You could also take inspiration from popular cinnamon bread bites by cutting the log into one-inch thick rounds before the second proof and baking them in a muffin tin for individual servings.
If you happen to have stale leftovers, this dense, rich bread makes for an extraordinary cinnamon bread pudding .

Recipe FAQs
I'm planning a big Sunday brunch. Can I prepare the dough for this Cinnamon Bread ahead of time?
Absolutely! You can cold proof the dough overnight, which is a fantastic method that also develops a deeper, richer flavour. After the initial knead and placing the dough in the oiled bowl (Stage 1), cover it tightly and simply refrigerate it for 8 12 hours.
The next morning, let the dough sit out on the kitchen counter for about an hour to take the chill off before proceeding with the rolling, filling, and second proofing (Stage 2). This turns a long bake into an easy morning prep.
My cinnamon filling always leaks out the bottom and burns! What am I doing wrong?
This is a classic baking day disaster, resulting in a sticky, scorched tin! The key is a firm, watertight seal when shaping the loaf; make absolutely sure you pinch the seam shut tightly along the entire length of the log before placing it in the tin.
Also, don't forget that tablespoon of flour in the filling mixture, as it’s there to help absorb moisture. If your filling is too loose or you overfill, it’s bound to liquefy and escape during the hot oven bake.
Once baked, how should I store this loaf to keep it lovely and soft?
If stored correctly, your morning glory loaf should stay fresh and delicious for 3 to 4 days at room temperature. The most crucial step is preventing moisture loss, so keep the cooled bread tightly wrapped in plastic wrap or foil a dry loaf is a tragedy, after all.
If you want to keep it longer, slice the loaf before freezing it in an airtight container for up to three months. Simply toast the frozen slices straight from the freezer for a quick treat.
Is there a way to make this magnificent Cinnamon Bread a bit healthier or less calorific?
While comfort food is best enjoyed without guilt, you can certainly lighten the load a bit! Try reducing the brown sugar in the filling by up to 25%, and consider skipping the vanilla glaze altogether, as that adds a significant amount of sugar.
You can also swap half the whole milk in the dough for water, or use a low-fat dairy alternative; however, remember that fat contributes greatly to the soft, signature brioche like texture, so the bread may be slightly less tender.
What if I don't have a stand mixer? Can I knead the dough by hand?
Absolutely! Good baking doesn't require fancy gadgets; the recipe notes that hand kneading will take slightly longer around 12 to 15 minutes instead of 8 10 minutes with the machine. Keep kneading until the dough is smooth, elastic, and no longer sticky.
A good trick is the 'windowpane test': gently stretch a small piece of dough until you can see light through it without it tearing. When it passes this test, the gluten is properly developed and ready for its first rise.
Morning Glory Cinnamon Bread
Ingredients:
Instructions:
Nutrition Facts:
| Calories | 7440 kcal |
|---|---|
| Protein | 126.9 g |
| Fat | 252.9 g |
| Carbs | 560.3 g |
| Fiber | 81.9 g |
| Sodium | 41536 mg |
