Peanut Butter Jelly Cheesecake Recipe
- Time: Active 25 minutes, Passive 65 minutes, Total 1 hours 30 mins
- Flavor/Texture Hook: A shatter crisp cookie crust paired with a silky, nut rich filling and bright fruit swirls.
- Perfect for: Milestone birthdays, weekend projects, or impressing nostalgia loving adults.
- Achieve the Ultimate recipepeanut butter jelly cheesecake with Precision
- The Science of Balanced Sweetness and Saltiness
- Essential Timing and Texture Benchmarks
- Sourcing Your Creamy and Salty Ingredients
- Selecting the Right Tools for Success
- Executing the Marble and Bake Technique
- Avoiding Common Pitfalls and Texture Issues
- Adapting for Dietary Needs and Preferences
- Scaling for Different Crowds
- Kitchen Truths and Bake Myths
- Preserving Freshness and Reheating for Best Results
- Enhancing the Experience with Thoughtful Pairings
- Recipe FAQs
- 📝 Recipe Card
Achieve the Ultimate recipepeanut butter jelly cheesecake with Precision
I still remember the first time I tried to swirl jelly into a cheesecake batter. I was about twenty, living in a tiny apartment, and I thought I could just "wing it" with a jar of cheap preserve and some cold cream cheese. It was a disaster, honestly.
The jelly sank to the bottom like a stone, and the filling was so lumpy it looked more like cottage cheese than a refined dessert. But that aroma, the way the house smelled like toasted peanuts and warm fruit, stayed with me. It was a scent that demanded I figure out the mechanics of the bake.
We have all been there, staring at a cracked surface or a soggy bottom. But after years of experimenting in my own kitchen, I found that the secret isn't just in the ingredients, but in the temperature and the timing. This recipepeanut butter jelly cheesecake is the result of those mistakes.
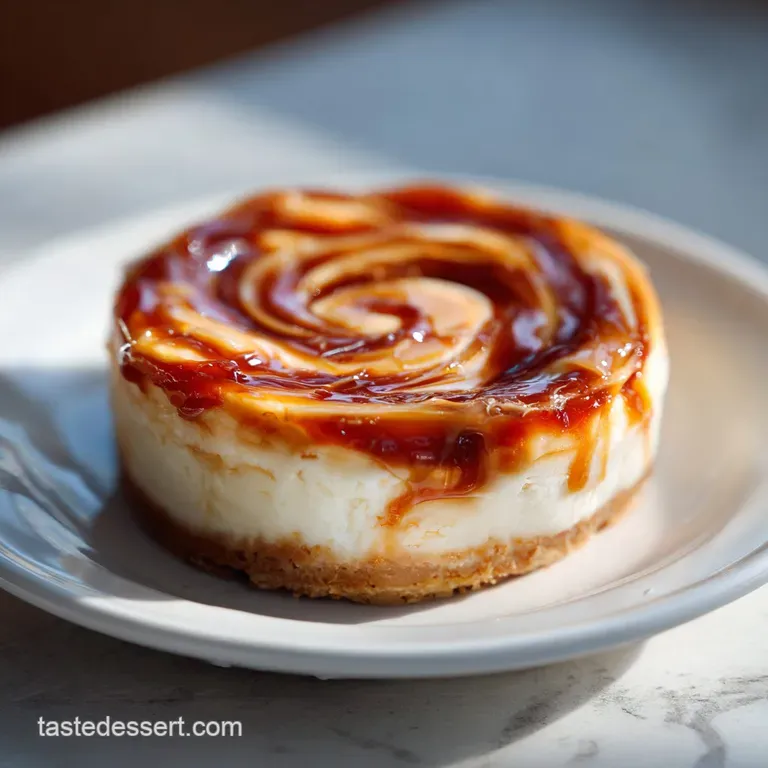
It is a thick, indulgent slice of childhood that actually holds its shape when you cut into it. We are talking about a velvety texture that doesn't just melt; it coats the palate in a way that makes you want to close your eyes and ignore the world for a minute.
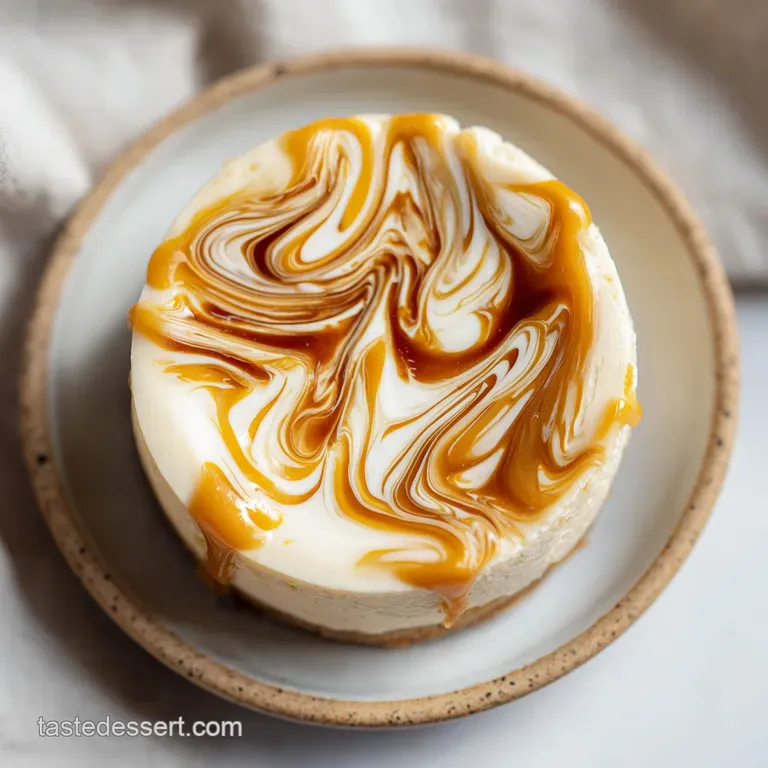
Trust me, once you see those purple swirls against the tan peanut butter base, you'll know exactly why we put in the effort.
The Science of Balanced Sweetness and Saltiness
The Emulsion Stability of Nut Fats: Peanut butter introduces extra oils that can break a traditional cheesecake emulsion, so we use Greek yogurt to provide a protein rich anchor that keeps the fats suspended.
Sugar Saturation and Texture: The cane sugar doesn't just sweeten; it hygroscopically binds to the moisture in the cream cheese, preventing the water from turning into steam and causing large, unsightly cracks.
Quick Decision Guide for Your Method
| Method | Texture | Time | Best For |
|---|---|---|---|
| Full Water Bath | Silky, custard like | 75 minutes | Special occasions where looks are everything |
| Steam Oven Trick | Dense, traditional | 60 minutes | Quick weekend treats for the family |
| No Bake Swap | Light, mousse like | 20 minutes | Hot summer days when the oven is too much |
Every time I set out to bake this, I think about how different fats react. When you use natural peanut butter, the oil separation is your biggest enemy. That is why we look for a specific texture during the creaming stage. You want to see the Philadelphia cream cheese and the peanut butter become a single, monochromatic shade of light tan. If you see streaks, keep mixing. It is similar to the technique I used for my New York Style recipe, where the gradual incorporation of ingredients prevents air bubbles from ruining the finish.
Essential Timing and Texture Benchmarks
Getting this right requires hitting a few specific numeric marks. If you pull it too early, you have a puddle; too late, and you have a dry sponge. We want that middle ground where the edges are set but the center still has a slight, rhythmic wobble.
- Numeric Checkpoint 1: Ensure all cold ingredients reach 21°C (70°F) before mixing to prevent "cheese pellets."
- Numeric Checkpoint 2: Bake until the internal temperature reaches 66°C (150°F) in the center.
- Numeric Checkpoint 3: Cool the cake in the turned off oven with the door ajar for exactly 60 minutes to prevent thermal shock cracks.
Sourcing Your Creamy and Salty Ingredients
The magic of the recipepeanut butter jelly cheesecake lies in the contrast between the salt in the nuts and the sugar in the fruit. Do not settle for subpar ingredients here.
- 10 oz peanut butter sandwich cookies: These provide the structural base. Why this? The cream filling in the cookies acts as an extra binder for the crust.
- 24 oz Philadelphia cream cheese: Use the full fat blocks. Why this? low-fat versions contain too much water and will make the cheesecake weep.
- 1 cup creamy natural peanut butter: Look for one where the only ingredients are peanuts and salt. Why this? Natural oils provide a better mouthfeel than processed vegetable oils.
- 0.75 cup granulated cane sugar: Provides a clean sweetness without the molasses notes of brown sugar.
- 0.5 cup plain Greek yogurt: Adds a necessary tang to cut through the heavy fats.
- 0.5 cup grape jelly: The classic companion. Why this? Jelly has a smoother "swirlability" than chunky preserves or jams.
- 4 tbsp unsalted butter: Melted to bind the crumbs.
- 3 large eggs: These must be room temperature to emulsify properly.
- 1 tsp pure vanilla extract: Enhances the nuttiness.
- 1 tsp fresh lemon juice: Brightens the jelly swirl.
- 0.25 tsp sea salt: To sharpen all the flavors.
| Original Ingredient | Substitute | Why It Works |
|---|---|---|
| Grape Jelly | Raspberry Preserves | Adds a tart, seed textured contrast. Note: Strain seeds for a smoother look. |
| PB Cookies | Graham Crackers | Classic honey sweet base. Note: Add 2 tbsp extra peanut butter to the crumbs. |
| Greek Yogurt | Sour Cream | Similar acidity and fat content. Note: Slightly less protein, so the set will be softer. |
Selecting the Right Tools for Success
You don't need a professional kitchen, but a few specific items make this recipepeanut butter jelly cheesecake much easier to manage. Honestly, don't even bother trying to mix this by hand unless you want a serious arm workout and a lumpy cake. A stand mixer or a high-quality hand mixer is your best friend here.
- 9 inch Springform Pan: Essential for removing the cake without a disaster.
- Food Processor: To turn those cookies into a fine, sandy dust.
- Silicone Spatula: For scraping the very bottom of the bowl where the unmixed cheese likes to hide.
- Large Roasting Pan: If you choose the water bath method for that shatter proof top.
Chef's Tip: Wrap the outside of your springform pan in two layers of heavy duty aluminum foil. Even the "leak proof" pans often fail when submerged in a water bath, and nothing ruins a crust faster than a soak in hot water.
Executing the Marble and Bake Technique
1. Build the Foundation
Pulse the 10 oz peanut butter sandwich cookies in a food processor until they look like coarse sand. Add the 4 tbsp melted butter and 0.25 tsp sea salt, then pulse again until the mixture holds together when squeezed. Press this firmly into the bottom of your springform pan.
I like to use the bottom of a flat measuring cup to get a perfectly even layer.
2. Emulsify the Filling
Beat the 24 oz cream cheese and 0.75 cup cane sugar at medium speed until the mixture looks velvety and smooth. This should take about 3 minutes. Add the 1 cup peanut butter, 0.5 cup Greek yogurt, and 1 tsp vanilla. Scrape the sides of the bowl religiously.
3. Incorporate the Air
Add the 3 large eggs one at a time. Mix on the lowest speed possible until just combined. Over mixing at this stage incorporates too much air, which leads to the cake rising like a souffle and then collapsing into a canyon of cracks.
4. Prep the Fruit Element
In a small bowl, whisk 0.5 cup grape jelly with 1 tsp lemon juice. If the jelly is too stiff, microwave it for 10 seconds. You want a consistency that pours easily but isn't watery.
5. Create the Marble
Pour half the peanut butter batter over the crust. Drop small spoonfuls of half the jelly mixture on top. Pour the remaining batter over that, and finish with the rest of the jelly. Use a thin knife or a skewer to swirl the jelly in a figure eight pattern.
Stop before the colors blend into a muddy brown.
6. The Controlled Bake
Place the pan in a preheated 165°C (325°F) oven. If using a water bath, pour boiling water into the roasting pan until it reaches halfway up the sides of the springform. Bake for 65 minutes until the edges are slightly puffed and golden.
7. The Cooling Phase
Turn off the oven and prop the door open with a wooden spoon. Let it sit for 1 hour. This slow temperature drop is the absolute best way to ensure a flat, crack free surface.
8. The Final Chill
Remove from the oven and run a thin knife around the edge to loosen the cake. Chill in the fridge for at least 6 hours, or ideally overnight. This is when the fats solidify and the flavor matures.
Avoiding Common Pitfalls and Texture Issues
One of the biggest heartbreaks is spending money on 24 oz of cream cheese only to have the cake turn out grainy. It usually happens because of a temperature mismatch. If your eggs are cold and your cheese is warm, the fat seizes up. It’s a basic law of thermodynamics in the kitchen.
Maintaining Structural Integrity
| Problem | Root Cause | Solution |
|---|---|---|
| Grainy Filling | Cold eggs added to warm cheese | Ensure all ingredients are 21°C before mixing. |
| Soggy Crust | Water bath leaked into the pan | Use extra wide heavy duty foil or a silicone sleeve. |
| Surface Cracks | Over beating air into the eggs | Mix on low speed and use a water bath to regulate heat. |
Common Mistakes Checklist
- ✓ Never skip the room temperature step for the cream cheese (prevents lumps).
- ✓ Avoid over mixing once the eggs are added (prevents cracking).
- ✓ Don't open the oven door during the first 45 minutes (prevents sinking).
- ✓ Pat the bottom of the pan on the counter before baking (releases air bubbles).
- ✓ Use a warm, wet knife to slice the chilled cake for clean, professional edges.
Adapting for Dietary Needs and Preferences
If you want a more intense fruit flavor, try using a blackberry or raspberry preserve. The tartness of the berries plays incredibly well with the heavy, savory notes of the peanut butter. For those looking for a different profile, I often think of the layers in The Fudge Brownie recipe, where texture is king.
Comparison of Fresh vs. Shortcut Methods
| Feature | Fresh Fruit Compote | store-bought Jelly |
|---|---|---|
| Preparation Time | 15 minutes | 0 minutes |
| Flavor Profile | Tart and bright | Sweet and nostalgic |
| Texture | Chunky/Rustic | Smooth/Uniform |
Decision Shortcut
- If you want a crunchier base, swap the sandwich cookies for 10 oz of honey roasted peanuts pulsed with graham crackers.
- If you want a lighter texture, replace the Greek yogurt with an equal amount of whipped heavy cream folded in at the very end.
- If you want a deeper flavor, add a tablespoon of espresso powder to the cookie crust mixture.
Scaling for Different Crowds
Scaling a cheesecake isn't as simple as doubling everything. When you go up in size, the heat takes much longer to reach the center, which often leads to overcooked, dry edges.
- Cutting the Recipe in Half: Use a 6 inch springform pan. Reduce the bake time to about 45 minutes. For the eggs, beat one egg in a cup and use half of it to get that 1.5 egg measurement accurately.
- Doubling for a Crowd: It is actually better to bake two separate 9 inch cakes rather than one giant one. If you must use a larger pan (like a 12 inch), lower the oven temp by 15°C and increase the time by 20-30 minutes, checking the internal temp frequently.
Kitchen Truths and Bake Myths
Myth 1: You must use a water bath. While it helps, you can achieve a great result by placing a pan of water on the rack below the cheesecake. This creates a moist environment without the risk of a leaky foil wrap ruining your crust.
Myth 2: Cracks mean the cake is ruined. Absolutely not. If your recipepeanut butter jelly cheesecake cracks, simply cover the top with a layer of extra peanut butter ganache or a thin layer of warmed jelly. It tastes the same and looks intentional!
Preserving Freshness and Reheating for Best Results
Storage: This cake lives happily in the fridge for up to 5 days. Keep it covered with plastic wrap or a cake dome to prevent it from absorbing the "fridge smell" of onions or leftovers. For the best texture, let a slice sit at room temperature for 15 minutes before eating.
Freezing: This is a champion of the freezer. Wrap individual slices in parchment paper, then foil, and place in a freezer bag for up to 3 months. Thaw overnight in the fridge. Do not thaw on the counter, or the condensation will make the crust mushy.
Zero Waste Tip: If you have leftover cookie crumbs, save them in a jar! They make an incredible topping for vanilla ice cream or a "dirt" pudding. You can also mix leftover jelly with a little balsamic vinegar for a quick salad dressing.
Enhancing the Experience with Thoughtful Pairings
To really make this recipepeanut butter jelly cheesecake stand out, think about what you serve alongside it. A glass of cold milk is the obvious choice, but a bitter espresso or a dark roast coffee provides a sophisticated counterpoint to the sugar.
If you are hosting a dinner party, consider a small dollop of unsweetened whipped cream on the side. The lack of sugar in the cream helps reset the palate between bites of the dense, sweet cheesecake. For a truly "delightful" spread, you might serve this alongside my German Chocolate Cake recipe to give guests a choice between nutty, fruity bliss and deep, coconut chocolate richness. No matter how you serve it, the combination of salty peanut butter and sweet grape jelly is a timeless winner that never fails to bring a smile to the table.

Recipe FAQs
Can I use natural peanut butter instead of commercial creamy peanut butter?
Yes, but with caution. Natural peanut butter introduces more free oil, which can destabilize the batter emulsion; ensure it is thoroughly stirred into the cream cheese until completely homogeneous.
How to prevent the cheesecake from cracking during cooling?
Turn off the oven and leave the door ajar. A slow, gradual temperature decrease prevents thermal shock, which is the primary cause of surface cracking in rich desserts.
How to properly swirl the jelly without sinking it to the bottom?
Warm the jelly slightly and mix it with a dash of lemon juice. This slightly thins the jelly's viscosity, allowing it to suspend better within the thick peanut butter batter rather than sinking upon baking.
Is it true that Greek yogurt can replace sour cream in cheesecake recipes?
Yes, it is a standard substitution. Greek yogurt provides similar acidity and protein structure to sour cream, helping to cut the richness, though the final texture might be slightly firmer.
How long does the finished cheesecake need to chill before serving?
Chill for a minimum of six hours, ideally overnight. This setting time allows the fats to fully solidify and the structural integrity of the filling to stabilize for perfect slicing.
How to ensure the crust isn't soggy after using a water bath?
Wrap the springform pan tightly in two layers of heavy duty aluminum foil. Even minor leaks during the water bath can penetrate the crust, so focus on creating a secure, waterproof seal around the base.
What is the best way to incorporate the eggs to avoid a tough texture?
Add the eggs one at a time on the lowest possible speed. Over beating eggs introduces too much air, causing the cake to rise rapidly and then fall, resulting in a dry or crumbly final product. If you master this gentle incorporation, you will see better results across many creamy baked goods.
Peanut Butter Jelly Cheesecake

Ingredients:
Instructions:
Nutrition Facts:
| Calories | 572 kcal |
|---|---|
| Protein | 13g |
| Fat | 41g |
| Carbs | 44g |
| Fiber | 2g |
| Sugar | 29g |
| Sodium | 218mg |
