Grilled Chicken Fajitas: Smoky Sizzling Proper Pub-Style Recipe
- Unlocking the Sizzle: The Ultimate Guide to Proper Grilled Chicken Fajitas
- The Science of Sizzle: Why This Marinade Delivers Maximum Flavor
- Essential Components: Ingredients for Authentic Grilled Chicken Fajitas
- The Fajita Method: Grilling and Sautéing Instructions
- Mastering the Grill: Troubleshooting & Chef's Techniques
- Meal Prep & Leftovers: Storing Your Fajita Fixings
- Perfect Pairings: What to Serve With Your Grilled Chicken Fajitas
- Recipe FAQs
- 📝 Recipe Card
Unlocking the Sizzle: The Ultimate Guide to Proper Grilled Chicken Fajitas
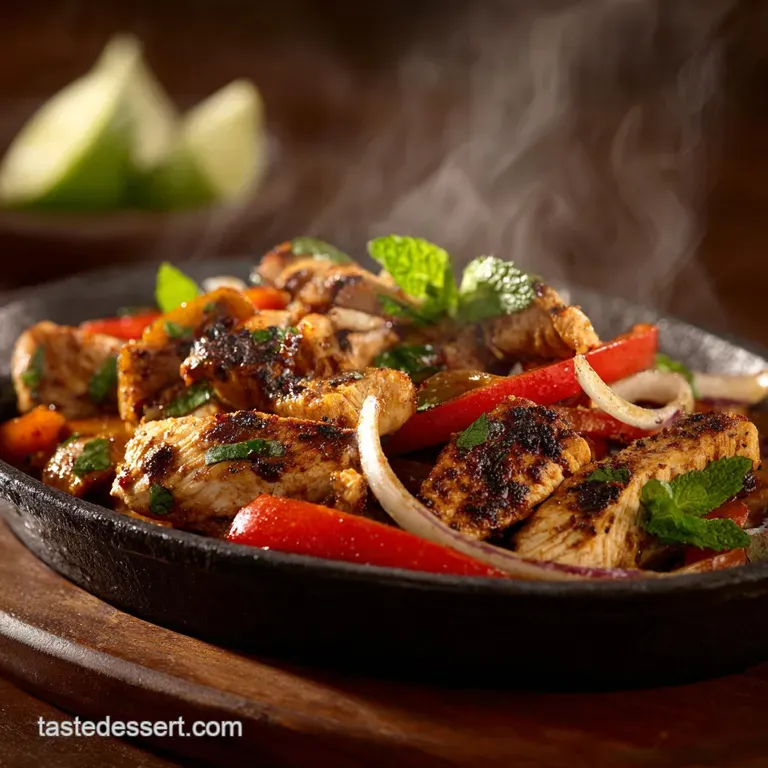
That smell, right? When the cast iron skillet full of peppers and onions hits the table, hissing like a tiny volcano. That is the true magic of fajitas, the moment your entire dining room lights up. It’s impossible not to feel instantly hungry when you hear that satisfying sizzle approaching your table.
I used to think proper fajitas were a complex, restaurant only dish, but I was so wrong. This smoky, grilled version is a total weeknight lifesaver because the prep takes fifteen minutes and the grill does all the hard work.
It's affordable, fast, and infinitely customizable, which is exactly what we need after a long, chaotic day.
This isn't just any recipe; this is the smoky, zesty marinade that locks in the flavor and gives you that perfect pub-style char. Let’s stop talking and start slicing some peppers and prepping the grill, shall we?
The Science of Sizzle: Why This Marinade Delivers Maximum Flavor
The History of the Pub-Style Tex-Mex Classic
Fajitas originated in South Texas ranchlands, typically using simple, affordable cuts cooked quickly over fire. They were designed to be wrapped in warm tortillas and eaten immediately.
We are taking that simple concept and elevating it slightly, focusing on flavor layering and achieving that theatrical "sizzle" inherent in the best Tex-Mex restaurants.
What Makes This Recipe "Proper Pub-Style"?
It’s all about the crucial dual cooking method, trust me on this. First, we get intense smoky char on the exterior of the sliced chicken using high heat on the grill. Then, we use screaming hot cast iron to flash sauté the pre-sliced vegetables right before serving, ensuring maximum sizzle and crunch.
This two-step process is non-negotiable for success and flavor depth.
Navigating the Medium Difficulty Level for Beginners
Listen, the individual steps are ridiculously easy, but the timing is the tricky bit. The difference between chewy, dried out grilled chicken and succulent perfection is knowing your grill temperatures and managing the resting time.
Don't worry, I made all the mistakes already, so you don't have to stress about coordination.
The Role of Acidity: Lime Juice Tenderization
Lime juice is the absolute MVP of this marinade, period. The acidity gently breaks down the outer protein structure of the chicken, allowing the smoky spices to penetrate deeply. This essential tenderizing process prevents the meat from getting tough and dry during the over high heat grilling.
Achieving Deep Smoke Flavor Without a Smoker
We rely heavily on smoked paprika here, not just the mild sweet stuff. Using a tablespoon of good quality smoked paprika instantly tricks your brain into thinking the chicken spent hours over wood chips. That beautiful, appetizing red color on the finished chicken?
That's the paprika working its flavorful magic.
Why We Grill the Chicken First (Maximizing Crust)
We cook the chicken strips immediately after marinating them to get maximum over high heat exposure and char. This rapid cooking forms a fantastic exterior crust before the internal juices evaporate, which is essential for texture.
Allowing it to rest afterwards keeps it ridiculously juicy before it gets reunited with the sizzling veg.
Essential Components: Ingredients for Authentic Grilled Chicken Fajitas
Selecting the Best Cut of Chicken for Fajitas
I prefer boneless, skinless chicken breast because it cooks quickly and slices beautifully into uniform thin strips. If you want something richer that is nearly impossible to dry out, grab some boneless, skinless chicken thighs instead.
Thighs need a few extra minutes on the grill, but they are incredibly forgiving and moist.
The Onion and Pepper Cut: Achieving Tender Crispness
Uniformity is crucial for this vegetable component. Slice your bell peppers and onion into strips of roughly 1/4 inch thickness, making sure they are all similar in size. This consistency ensures they cook evenly and hit that sweet spot of tender crispness without turning mushy in the hot pan.
Dry Spice Arsenal: Paprika, Cumin, and Oregano Notes
We are building flavor depth using simple, classic pantry staples for this recipe. Ground cumin brings that necessary earthy warmth and a depth of savoriness. Meanwhile, dried oregano adds a Mediterranean brightness that wonderfully cuts through the richness of the char.
Smart Swaps for Allergy Considerations
Sometimes you run out of things, I totally get it! Here are the quick fixes I use when the necessary grocery run didn't happen this week.
| Ingredient | My Recommended Swap | Why It Works |
|---|---|---|
| Fresh Lime Juice | Lemon Juice + Apple Cider Vinegar | Provides the required acidity and sharpness. |
| Smoked Paprika | Regular Paprika + Dash of Liquid Smoke | Maintains the vital smoky depth of flavor. |
| Olive Oil | Avocado Oil or Canola Oil | Use any over high heat, neutral cooking oil for grilling. |
| Dried Oregano | Dried Thyme or Marjoram | Offers a similar herbaceous, savory profile. |
| Chicken Breast | Boneless Chicken Thighs | Fattier, juicier, much harder to overcook on the grill. |
The Fajita Method: Grilling and Sautéing Instructions
Step 1: Crafting the Deep Penetrating Marinade
Whisk together your lime juice, oil, minced garlic, and all the dry spices until they form a beautiful, thick, reddish brown paste. Slice your boneless chicken into strips before marinating this maximizes the surface area exposed to the tenderizing acid and flavor.
Marinate for a minimum of 30 minutes, but 2 hours in the fridge is truly the sweet spot for maximizing the smoky flavor profile.
Step 2: over High heat Grilling for Perfect Char Marks
Preheat your grill (or heavy duty grill pan) to medium high heat, aiming for around 400°F. Lightly oil the grates using tongs and a paper towel so the chicken doesn't stick and tear when you flip it.
Lay the chicken strips down, giving them space so they can char properly, and listen for that immediate, satisfying hiss. Cook for 3- 4 minutes per side until you see gorgeous char lines and the internal temperature hits 165°F.
Step 3: Flash Sautéing the Vegetables for Maximum Sizzle
While the cooked chicken rests (more on that later), turn your attention to the skillet. Get a large cast iron pan screaming hot over the highest heat with a couple of tablespoons of over high heat oil. Add the sliced peppers and onions, season lightly, and let them sit for a full minute before stirring.
You want those beautiful edges to caramelize and soften slightly, achieving that ideal tender crisp texture, definitely not mushy.
Step 4: The Final Assembly and Resting Process
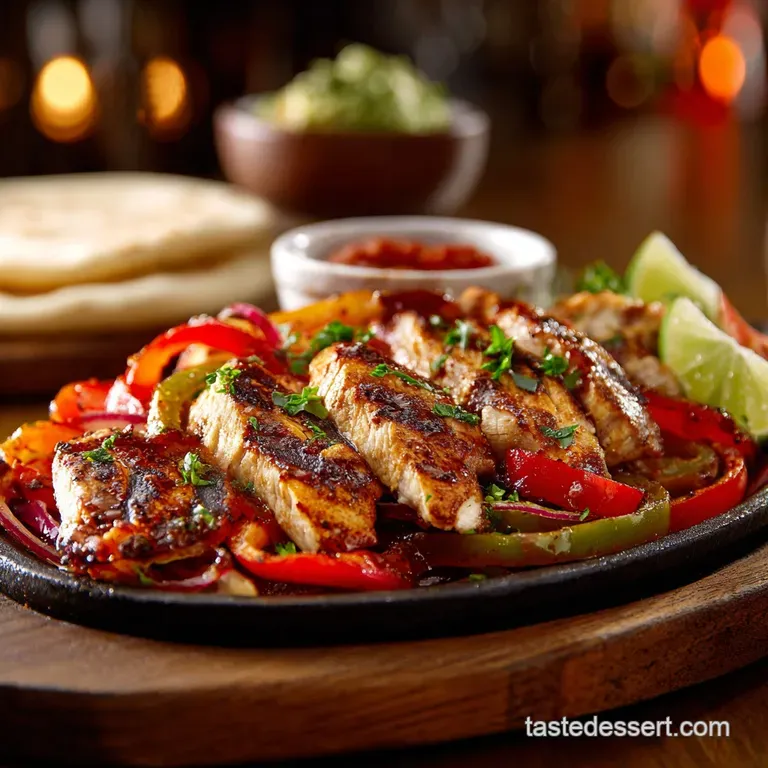
Transfer the rested, grilled chicken strips directly into the piping hot vegetable skillet. Toss everything together vigorously for about 30 seconds to rewarm the meat and fully combine all the flavors. Serve the resulting sizzling mixture immediately, using warm flour tortillas and a mountain of fresh toppings.
Mastering the Grill: Troubleshooting & Chef's Techniques
Avoiding Rubberiness: Temperature Control for the Chicken
The biggest fajita mistake I ever made was slicing the raw chicken, throwing it into the marinade, and then leaving it in the acidic bath for six hours, thinking "more is better." Wrong, totally wrong. The lime juice can start chemically cooking the chicken if left too long, resulting in a firm, rubbery texture.
Fix: Never marinate for more than four hours, and always pull the chicken off the grill exactly when it hits 165°F internal temperature.
The Secret to Non-Stick Vegetable Sautéing
If your gorgeous peppers are sticking and burning before they soften, your pan wasn't hot enough, or you skimped on the oil quantity. The absolute key here is using high heat like, uncomfortable heat and a quick flash cook in a heavy bottomed skillet. If you struggle with over high heat cooking and prefer hands off meals, you might enjoy my guide on Slow Cooker Chicken Cacciatore: The Effortless Italian Feast instead.
The "Resting" Mistake That Ruins Juiciness
Please, please, please do not skip resting the grilled chicken after it comes off the heat. When meat cooks, the muscle fibers contract and push all the liquid to the center of the strip.
If you cut it or toss it into the skillet right away, all that beautiful juice floods your cutting board instead of staying in the meat. Resting for 5- 10 minutes allows those juices to fully redistribute throughout the meat, guaranteeing a moist, succulent bite every single time.
Chef's Note: Tenting the chicken loosely with foil while it rests prevents it from cooling down too quickly, ensuring it stays warm enough for that final quick toss into the sizzling skillet.
Meal Prep & Leftovers: Storing Your Fajita Fixings
Best Practices for Refrigerating Cooked Chicken
Once the grilled chicken and the sautéed vegetables have cooled completely, store them together in a single airtight container in the refrigerator. They will last safely for 3 to 4 days, making for incredibly easy packed lunches or quick wraps the following day.
Freezing Marinated Chicken (Raw)
This fajita recipe is phenomenal for serious meal prep! You can prep the sliced raw chicken, pour the full marinade over it, and freeze the whole Ziploc bag flat. It will keep perfectly for up to 3 months.
To use it, simply thaw the bag overnight in the refrigerator; the critical marinating happens passively as the chicken thaws, which is super efficient.
Reheating Fajitas While Preserving the Sizzle Texture
Avoid the microwave at all costs, seriously; it makes the peppers soggy and the chicken dry. The best way to revive that fresh sizzle texture is to toss the mixture back into a hot cast iron skillet with a tiny splash of neutral oil.
High heat for 2- 3 minutes is all it takes to warm everything through and crisp up the pepper edges again.
Perfect Pairings: What to Serve With Your Grilled Chicken Fajitas
Fajitas are a party on a plate, but they truly need good co-stars to shine brightly. Naturally, warm flour tortillas are an absolute must, along with a mountain of homemade guacamole, cooling sour cream, and fresh pico de gallo.
Don't forget a generous sprinkle of fresh cilantro, which adds a crucial burst of herbaceous brightness.
If you're hosting a whole Tex-Mex spread, you might want to look beyond plain white rice for a side dish. My Skillet Cheesy Chicken and Veggie Rice Healthy One Pan Dinner in 35 Minutes has some great flavor ideas for a simple rice side that would pair perfectly. For those who want more creamy comfort food on the side, maybe look at a simple Chicken and Broccoli Noodle Casserole: Easy, Cheesy, and Creamy Comfort served in smaller portions. We love having delicious options for everyone at the table!

Recipe FAQs
Why is my grilled chicken dry and tough?
This is usually a sign of overcooking. Ensure your chicken reaches an internal temperature of exactly 165°F (74°C) and no more, using an instant read thermometer. Secondly, always rest the grilled chicken breast for 5 to 7 minutes before slicing it against the grain to retain those crucial juices.
I don't have a grill. Can I cook these fajitas indoors?
Absolutely. A cast iron skillet or heavy griddle pan on the stovetop works perfectly. Cook the marinated chicken strips first on high heat to get a good char, remove them, and then quickly sauté the vegetables in the same pan to preserve the smoky flavor.
How long can I safely store leftover fajitas, and can I freeze them?
Leftovers should be stored in an airtight container in the refrigerator for up to 3 days. While the cooked chicken freezes well for up to 3 months, it is not recommended to freeze the cooked peppers and onions as they will become mushy upon thawing.
What is the secret to getting that great fajita "sizzle" when serving?
The sizzle is achieved by heating your serving vessel, usually a cast iron skillet or a dedicated fajita plate, until it is smoking hot. Transfer the freshly cooked ingredients onto the hot plate immediately before it hits the table to create that signature sound and aroma.
How can I ensure the smoky flavor really penetrates the chicken?
The key is marination time; aim for a minimum of 4 hours, or ideally, 8 to 12 hours (overnight) for the deepest flavor absorption. Ensure you use high-quality smoked paprika, and that the acidic ingredients like lime juice and vinegar fully coat the chicken before chilling.
Can I use beef or shrimp instead of chicken for this recipe?
Yes, this marinade is excellent for skirt steak or flank steak, which are the traditional cuts for fajitas. If using shrimp, reduce the marinating time drastically to only 30 minutes, as the high acidity of the lime juice can begin to cure or break down delicate seafood.
Can this recipe be adapted for a vegetarian or vegan diet?
Easily! Replace the chicken with firm pressed tofu, thick sliced portobello mushrooms, or sliced zucchini and bell peppers. Ensure the vegetable substitute is tossed thoroughly in the marinade and cooked quickly on high heat to develop a caramelized crust.
Proper Grilled Chicken Fajitas Recipe
Ingredients:
Instructions:
Nutrition Facts:
| Calories | 199 kcal |
|---|---|
| Protein | 3.7 g |
| Fat | 7.9 g |
| Carbs | 28.8 g |
