Thanksgiving Dressing: the Ultimate Old Fashioned Make-Ahead Comfort
- Moving Beyond 'Stuffing': Why Proper Dressing Deserves Center Stage
- The Definitive Make and Ahead Thanksgiving Dressing Strategy
- Essential Components for the Ultimate Thanksgiving Dressing
- Required Equipment for Effortless Assembly
- Step and by-Step Method: Preparing the Ploughman’s Dressing Base
- Baking Instructions for the Optimal Golden Finish
- Expert Tips for Troubleshooting and Flavor Customization
- Post and Feast Storage and Reheating Guidelines
- Recipe FAQs
- 📝 Recipe Card
Moving Beyond 'Stuffing': Why Proper Dressing Deserves Center Stage
Let's just be honest: if you call it "stuffing" when it was baked in a separate pan, we need to talk. We are making Dressing today, and it is mandatory for Thanksgiving. It’s the ultimate comfort food. Seriously.
For years, I made the same mistake. I'd rush, use fresh bread, dump too much liquid, and end up with a dense, heavy, moist brick of savory mush that looked sad next to the turkey. I was convinced I just wasn’t a "dressing person." Turns out, I was just making it wrong.
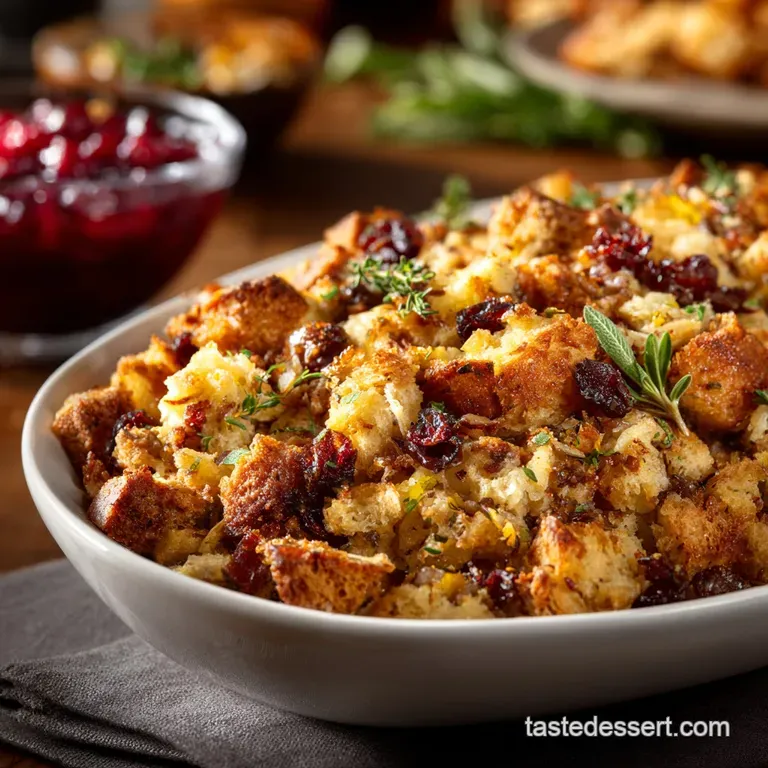
The key to the ultimate homemade dressing is balance. You need the deep, earthy flavor of sage and browned butter, yes, but more importantly, you need a texture paradox: an interior that is incredibly moist, held together by just enough egg and stock, encased in a shatteringly crisp, golden crust.
This Proper Ploughman’s Dressing recipe nails that every single time. It’s brilliant.
The Definitive Make and Ahead Thanksgiving Dressing Strategy
The most stressful part of Thanksgiving is the last two hours. The turkey is resting (or should be), the gravy is simmering, and suddenly you realize you still have four hot sides to get into the oven. Total chaos.
This is why we treat Thanksgiving Dressing like a casserole. It’s designed to be completely assembled, ready to bake, and chilling comfortably in the fridge for 24 hours. Who wants to be chopping celery and sweating butter while the guests are arriving? Not me.
The make and ahead factor here is not just convenient; it actually makes the dressing taste better, giving all those beautiful aromatics time to meld into the stale bread cubes.
The Distinction: Stuffing vs. Dressing Explained
Technically, the difference is simple: Stuffing goes inside the bird. Dressing bakes separately outside the bird.
I always prefer dressing for two big reasons. First, food safety. Second, texture!
A Crucial Warning
When you bake stuffing inside the turkey, it absorbs all the juices. You must ensure the internal temperature of that stuffing hits 165°F (74°C) to be safe. Achieving that temperature often means overcooking the bird. Just don't risk it. Bake your Thanksgiving Dressing separately.
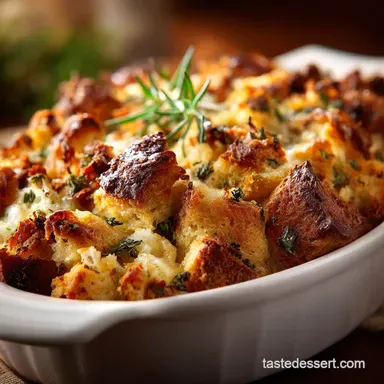
Achieving the Gold Standard: Perfecting the Golden Crust
The goal is not a uniform brown top. The goal is rugged, uneven, buttery, crunchy pockets of flavor. We get this by controlling three things:
- Butter: We toss the bread cubes in melted butter before the liquid goes in. This creates a waterproof layer on some of the cubes, ensuring they can crisp up instead of dissolving.
- Pan Size: Use a wide, shallow 9x13 inch pan. Maximum surface area equals maximum crust potential.
- Two and Stage Baking: Baking covered keeps the middle moist. Baking uncovered (and slightly hotter) at the end delivers the crunch.
Sunday Prep, Thursday Feast: A Stress and Free Timeline
This is how I schedule my Thanksgiving Dressing prep. It makes Thursday completely painless.
- Sunday Evening: Buy or bake the bread. Cube it up. Leave it spread on baking sheets overnight to dry out completely. (Or bake it low and slow to stale it.)
- Wednesday Morning: Chop all the celery and onions (the mirepoix). Store them sealed in the fridge.
- Wednesday Afternoon (Active Prep): Sauté the aromatics, assemble the entire dressing mixture, and transfer it to the baking dish. Cover tightly. Refrigerate.
- Thursday (The Feast): Pull the dish out about 30 minutes before the turkey comes out of the oven. Bake covered, then uncovered, right when the turkey is resting. Perfection.
Essential Components for the Ultimate Thanksgiving Dressing
This recipe relies on good, simple ingredients treated with respect. There are no fancy cheeses or confusing additions (unless you want them, see the end). It’s all about the bread and the butter.
We are using nearly an entire pound of butter here. Yes. Embrace the richness. (If you’re worried about that, maybe stick to mashed potatoes.) The flavor comes from using fresh sage and thyme. Honestly, don't even bother with the dried, dusty herbs you found in the back of the cabinet.
They won't cut it.
Required Equipment for Effortless Assembly

- Large, Deep 9x13 inch Baking Dish: Essential for that crust factor.
- A Truly Massive Mixing Bowl: You need room to fold without crushing the bread cubes. Trust me, if you think your bowl is big enough, grab the next size up.
- Large Skillet: For sautéing the mirepoix slowly.
- Sharp Chef's Knife: For all that chopping!
Choosing the Right Foundation: Bread Types and Texture Management
This is non and negotiable: You must use a rustic, slightly chewy, sturdy bread. Sourdough or a good French boule (the kind with a thick crust) are perfect. They have structure.
Never, ever use soft sandwich bread. It simply dissolves into mush when you add the stock. The goal is that when you bite into the dressing, you still feel the individual, tender bread cube.
| Bread Preparation | Resulting Texture |
|---|---|
| Fresh/Soft Bread | Gluey, dense, heavy, absorbs liquid too fast. |
| Dried/Stale Bread | Crisp exterior, absorbent interior, holds shape beautifully. |
The Aromatic Trinity: Sage, Thyme, and Stock Secrets
Our trinity onion, celery, and garlic needs to be fully softened and cooked gently in the butter before the herbs go in. This process, known as sweat sautéing, takes about 10 minutes. Don't rush it.
When you add the garlic, sage, and thyme, let them simmer for just a minute or two until the kitchen smells incredible. That means the flavor has infused into the fat, and that fat is what coats the bread.
The stock must be hot when you mix it with the eggs. This helps temper the eggs (preventing chunks) and also dramatically improves the absorption rate into the bread. And please, use good quality chicken or turkey stock. Watered and down stock equals watery flavor.
Prep Work: Ensuring Your Bread is Perfectly Staled
We need the bread dry, but not burnt.
- The Air Dry Method (Best): Cube the bread and spread it in a single layer on baking sheets for 12– 24 hours, uncovered, in a cool, dry spot.
- The Oven Method (Faster): If you forgot, cube the bread and bake it in a 275°F (135°C) oven for about 15 minutes. It should feel crunchy and dry, like a giant crouton, but not actually toasted or browned.
Related Recipes Worth Trying
- Thanksgiving Side Dishes: The Best Sourdough Dressing (Never Soggy) — Thanksgiving Side Dishes are better with this crispy sourdough dressing recipe. It features fresh sage, apple, and toasted hazelnuts, making it one of the...
- Thanksgiving Side Dishes: The Butchers Sourdough, Sage Sausage Dressing — Thanksgiving Side Dishes just got an upgrade. This robust, make-ahead dressing combines sourdough and cider kissed sausage. Its one of the best Thanksgiving...
- Thanksgiving Side Dishes: Crispy Maple Glazed Brussels Sprouts Recipe — Thanksgiving Side Dishes just got an upgrade! Master this Easy Thanksgiving Side Dish featuring crispy sprouts glazed in maple and bacon fat. A savory sweet...
Step and by-Step Method: Preparing the Ploughman’s Dressing Base
Right then. Let's crack on.
Sautéing the Mirepoix and Infusing the Butter
Melt your generous 8 tablespoons of butter in the skillet over medium heat. Add the finely diced onion and celery. Cook until they are completely translucent about 8 to 10 minutes. Add the garlic, sage, and thyme, along with salt and pepper. Stir constantly for 90 seconds.
You want to see tiny bubbles and smell that glorious sage aroma. Remove from heat immediately. Let it cool for five minutes.
Hydration Management: Combining the Stock and Bread Cubes
Remember those dry bread cubes? Toss them first in the half and cup of extra melted butter. This is key for that crispy finish.
Pour the slightly cooled aromatic mixture over the buttered cubes in the huge mixing bowl. Toss gently.
Now for the stock. Whisk the two lightly beaten eggs into the hot stock. Pour 3 cups of the liquid over the bread and aromatics. Stop. Start folding the mixture gently using a spatula, working from the bottom up. Do not stir it like soup.
The squeeze test is everything: Grab a small handful. Squeeze it lightly. It should hold its shape and feel fully saturated, but liquid should not stream out. If it feels crumbly or dry, add the remaining quarter cup of stock slowly, folding after each addition.
The Overnight Rest: Chilling the Assembled Dish
Grease your baking dish well. Transfer the dressing mixture, scooping it in gently. Do not press or compress the mixture. A light touch allows air pockets to remain, which helps the inside stay fluffy. Cover it tightly with plastic wrap or foil.
Refrigerate for at least 6 hours, and up to 24 hours. This rest deepens the flavor and allows the bread to fully set its structure.
Baking Instructions for the Optimal Golden Finish
Final Ascent: Achieving that Crisp, Top and Down Layer
When you are ready to bake, preheat the oven to 375°F (190°C). Pull the dish out of the fridge and let it sit on the counter while the oven heats up.
- Covered Bake: Cover the dish tightly with foil. Bake for 30 minutes. This steam bath ensures the internal bread cubes are fully cooked and moist.
- Uncovered Crisp: Remove the foil. If you want maximum crust, bump the oven temperature up to 400°F (200°C) for the remaining 15 to 20 minutes. The top should turn deep, dark gold. It’s done when the edges are bubbling and crisp.
Let it rest for 10 minutes before serving.
Expert Tips for Troubleshooting and Flavor Customization
Avoiding the Soggy Middle: Density and Pan Size
As noted before, don't press the mixture into the pan. If you are doubling the recipe for a massive crowd, use two 9x13 inch pans instead of one gigantic, deep casserole. A thick layer traps steam and guarantees a mushy center.
Scaling the Recipe: Adjusting Ratios for a Crowd
If you need to double the ingredients, do not double the liquid immediately. Increase the stock by only about 75%. You can always add more liquid, but you can’t take it away. Test the moisture level slowly.
Nutritional Breakdown of This Hearty Dressing
Look, this is not diet food. It is the ultimate Thanksgiving comfort food. It’s full of butter, bread, and savory goodness. (And it’s worth every single calorie, in my opinion.)
Savory Variations: Adding Sausage or Mushrooms
Want to jazz it up? I’ve got you.
- Sausage Upgrade: Before adding the celery and onion, brown about 1 pound of bulk sweet or spicy Italian sausage (casing removed) in the pan. Drain off excess fat (leave about 2 tablespoons), then proceed with the recipe, adding the celery and onion to the sausage fat.
- Mushroom & Herbs: Sauté 1 cup of sliced cremini mushrooms separately until they release their liquid and start to brown. Add them to the bread mixture with the aromatics. For an earthy boost, swap out 1/4 cup of the chicken stock for dry sherry.
Post and Feast Storage and Reheating Guidelines
Your beautiful Thanksgiving Dressing will store well in an airtight container in the fridge for up to four days.
To Reheat: The microwave will technically work, but it sacrifices that lovely crispiness. The best way is to spread the leftovers in an oven and safe dish, cover it with foil, and bake at 350°F (175°C) until warm (about 15 minutes).
Then, remove the foil and bake for another 5– 10 minutes to crisp the top again. Serve with extra gravy!

Recipe FAQs
Since this is a make-ahead recipe, how long can I keep my Thanksgiving Dressing in the fridge before baking?
You can assemble the entire dish (stages 1-3) and keep it tightly covered in the refrigerator for up to 24 hours; just ensure you bring the dressing nearly to room temperature for 30 minutes before baking to guarantee even cooking throughout.
Help! How do I stop my dressing from having a dreaded 'soggy bottom'?
The secret to avoiding a soggy bottom is two-fold: ensure the bread is truly stale or dried out before mixing, and crucially, avoid tightly compressing the mixture when transferring it to the baking dish, allowing steam to circulate and crisp the base.
What’s the difference between this "Dressing" recipe and traditional stuffing?
The main difference is where it's cooked: dressing is baked in a separate dish (as this recipe calls for), while stuffing is traditionally cooked inside the turkey cavity, though both usually share a similar herb, bread, and aromatic base.
I fancy adding some extra bits what are the best ingredients for jazzing up this Ploughman’s Dressing?
For a proper feast, try folding in pre-cooked pork sausage meat and diced Granny Smith apples for a touch of sweetness, or for a deeper flavour, swap some stock for dry sherry and add sautéed wild mushrooms.
Can I freeze the leftovers, and what is the best way to reheat them?
Yes, leftovers freeze beautifully; cool the dressing completely, wrap tightly, and store for up to 3 months, then reheat smaller portions in the oven (covered) until piping hot to retain moisture.
Proper make-ahead Thanksgiving Dressing
Ingredients:
Instructions:
Nutrition Facts:
| Calories | 400 kcal |
|---|---|
| Fat | 24 g |
| Fiber | 3 g |
