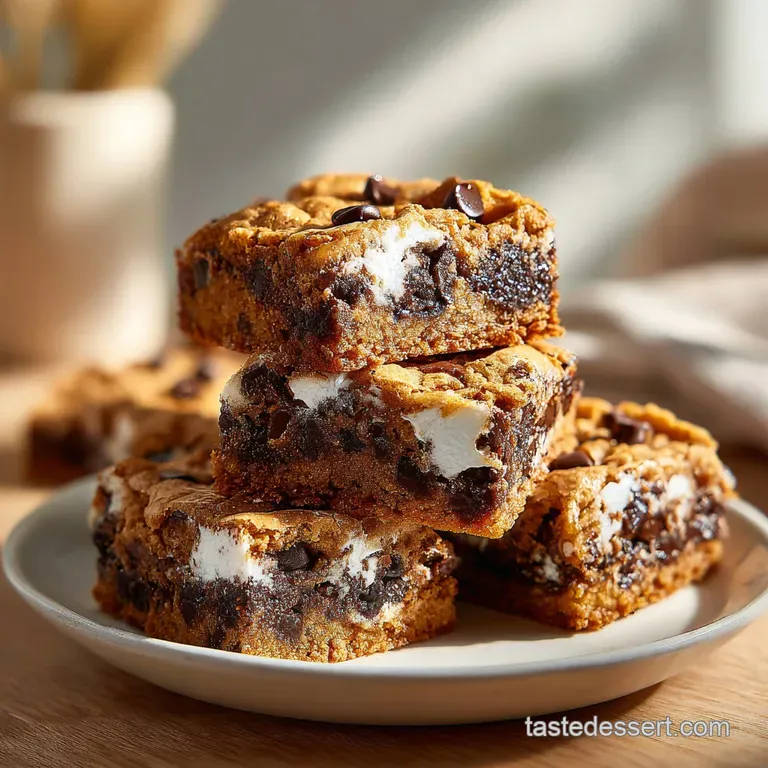
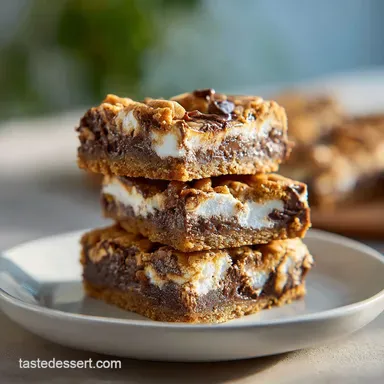
Buttery Smores Cookie Bars
- Time: Active 15 minutes, Passive 25 minutes, Total 40 minutes
- Flavor/Texture Hook: Toasted, buttery, and gooey with a cookie base crunch
- Perfect for: Weekend family treats, backyard style parties, or curing a late night sweet tooth
- The Magic of Gooey Smores Cookie Bars
- Technical Specs for This Toasted Dessert
- Selecting Ingredients for Your Toasted Layers
- Necessary Kitchen Tools for Seamless Baking
- Transforming Dough into Melty S'mores Layers
- Professional Fixes for Common Baking Mistakes
- Joyful Flavor Twists for Unique Bars
- Storage Strategies for Maintaining Fresh Texture
- Delightful Ways to Present Your Sweets
- Recipe FAQs
- 📝 Recipe Card
The Magic of Gooey Smores Cookie Bars
The smell of toasted sugar is basically a time machine. Every time I slide a pan of these into the oven, I'm instantly back at that messy camping trip three years ago where it rained so hard we had to huddle in the tent eating cold crackers.
We never got our campfire that night, but the craving stuck with me, leading to a long obsession with transforming those flavors into something we could enjoy in a warm, dry kitchen.
These aren't your standard thin cookies. We're talking about a thick, dense graham cracker foundation that supports a literal landslide of melting chocolate and marshmallow. When you pull them out, the top marshmallows should have a slight shatter to their golden crust, while the center remains a molten, velvety secret.
It took me four tries to get the ratio of fluff to dough right so the middle didn't just evaporate into the atmosphere, and trust me, the result is worth every sticky finger.
We're going to build these in stages, focusing on how the flavors and textures stack up. From the saltiness of the butter to the way the milk chocolate bars melt differently than the chips, every layer has a job.
You don't need a tent or a sleeping bag for this, just a craving for something that tastes like a summer night under the stars, minus the mosquitoes.
Technical Specs for This Toasted Dessert
The way these bars behave in the heat depends entirely on the moisture balance between the dough and the fluff. If the dough is too dry, it won't hold the "filling" in place, and if the oven is too hot, the marshmallows will liquefy before the cookie base sets.
The Physics of the Toasted Pull: Starch gelatinization in the graham crumbs creates a sturdy wall that prevents the marshmallow fluff from seeping into the bottom crust.
The high sugar content in the fluff undergoes the Maillard reaction quickly, giving us that charred campfire flavor while the interior stays soft.
| Feature | Oven Baked Bars (This Recipe) | Classic Campfire S'mores |
|---|---|---|
| Texture Contrast | Soft dough meets gooey center | Crunchy cracker meets firm chocolate |
| Preparation Time | 40 minutes total | 5 minutes per unit |
| Batch Capability | Feeds 16 people at once | One person at a time |
Building these layers is a technique heavy process that rewards patience. If you're looking for a slightly different texture, you might also love my Smores Brownie Bars recipe, which brings a deeper cocoa punch to the party.
Selecting Ingredients for Your Toasted Layers
Choosing the right components is what makes this recipe stand out from a basic box mix. We aren't just using flour; we're essentially making a graham cracker from scratch and then turning it into a cookie dough.
Component Analysis
| Ingredient | Science Role | Pro Secret |
|---|---|---|
| Graham Cracker Crumbs | Provides structural grit and honey notes | Pulse whole crackers for varied textures |
| Light Brown Sugar | Humectant that keeps dough chewy | Pack it tight for accurate moisture |
| Marshmallow Fluff | Creates the permanent "goo" factor | Room temp fluff spreads much easier |
| Milk Chocolate Bars | Melts into pools of silky fat | Use high-quality bars for better flow |
For the dry goods, you'll need 1.25 cups of all purpose flour and 1 cup of graham cracker crumbs. Don't skip the 0.25 tsp of fine sea salt - it's the only thing standing between "delightful" and "too sweet." You'll also need 0.5 tsp of baking powder to give the base just enough lift so it isn't a brick.
The fat is crucial: 0.5 cup of unsalted butter, melted and slightly cooled. If it's too hot, it'll scramble your 1 large egg. Round this out with 0.75 cup packed light brown sugar and 1 tsp of pure vanilla extract for that homemade aroma.
For the fillings, grab 1.5 cups of semi sweet chocolate chips, 1 cup of marshmallow fluff, 1.5 cups of mini marshmallows, and 2 milk chocolate bars broken into rectangles.
| Original Ingredient | Substitute | Why It Works |
|---|---|---|
| Marshmallow Fluff | Large Marshmallows (melted) | Similar sugar profile. Note: Will be stickier and harder to spread |
| Milk Chocolate Bars | Dark Chocolate Bars | Higher cacao content. Note: Reduces sweetness and adds bitterness |
| Semi Sweet Chips | Chocolate Chunks | Larger surface area. Note: Creates bigger pockets of melted chocolate |
Necessary Kitchen Tools for Seamless Baking
Having the right gear prevents the marshmallow from becoming a permanent part of your pan. I once tried making these without parchment paper and let's just say that pan ended up in the trash.
- 8x8 inch square baking pan: The size is non negotiable for the thickness we want.
- Parchment paper: Essential for lifting the bars out safely.
- Stand mixer or hand mixer: Such as a KitchenAid, to ensure the egg and sugar are fully emulsified.
- Offset spatula: This makes spreading the fluff over the sticky dough a breeze.
- Large glass bowl: For melting the butter and mixing your dry ingredients.
Chef's Tip: Lightly grease the parchment paper even if it says "non stick." Marshmallows are nature's glue and they will find a way to stick to anything.
Transforming Dough into Melty S'mores Layers

This is where the magic happens. We're transforming separate piles of sugar and flour into a cohesive, layered masterpiece. Keep your eye on the texture of the dough - it should feel like wet sand.
- Preheat your oven to 180°C (350°F). Line your 8x8 pan with parchment paper, leaving an overhang on the sides. Note: This creates a "sling" for easy removal.
- Whisk together 1.25 cups flour, 1 cup graham crumbs, 0.5 tsp baking powder, and 0.25 tsp salt.
- In your mixer, beat the cooled 0.5 cup melted butter with 0.75 cup brown sugar until it looks grainy but combined.
- Add the egg and 1 tsp vanilla. Beat on medium speed for 2 minutes until the mixture lightens in color.
- Fold in the dry ingredients using a spatula. The dough will be thick and heavy.
- Press about two thirds of the dough into the bottom of the pan. Bake for 8 minutes until the edges are just barely set.
- Remove from oven and immediately spread 1 cup of marshmallow fluff over the warm base. Note: The heat helps the fluff melt into the corners.
- Sprinkle 1.5 cups chocolate chips and 1.5 cups mini marshmallows over the fluff. Press the 2 broken chocolate bars into the gaps.
- Flatten small pieces of the remaining dough with your hands and scatter them over the top.
- Bake for another 15 to 18 minutes until the marshmallows are browned and bubbling.
Wait at least 30 minutes before slicing. If you cut them while they are screaming hot, the center will flow out like lava. If you're looking for a similar handheld treat that skips the fluff, check out this NoCampfire Smore Cookie recipe for a more traditional cookie experience.
Professional Fixes for Common Baking Mistakes
Even the best bakers run into trouble when marshmallows are involved. They are unpredictable little puffs of sugar that love to disappear if you don't treat them right.
Why Your Fluff Vanished
If your marshmallow layer seems to have evaporated, it's usually because the oven was too hot or the bars were baked too long. Marshmallow fluff is mostly air and sugar; high heat causes the air to escape and the sugar to dissolve into the dough.
Always stick to the 180°C (350°F) setting.
Why Your Bars Crumble
If the bars shatter when you cut them, the dough likely lacked enough moisture or the graham crumbs were too coarse. Ensure your egg is at room temperature to help it emulsify with the fat, creating a stronger protein bond in the dough.
| Problem | Root Cause | Solution |
|---|---|---|
| Greasy bottom | Butter was too hot when adding egg | Let melted butter sit for 10 mins before mixing |
| Burnt marshmallow top | Rack was too high in the oven | Bake on the middle rack only |
| Raw dough in middle | Too much fluff in one spot | Spread fluff evenly to the edges for heat distribution |
Common Mistakes Checklist
- ✓ Pack your brown sugar firmly to ensure the correct moisture to flour ratio.
- ✓ Don't skip the "par bake" step for the bottom crust or it will be soggy.
- ✓ Use a hot knife dipped in water to slice through the sticky marshmallow layer.
- ✓ Let the bars cool completely in the pan to allow the chocolate to set.
- ✓ Use semi sweet chips to balance the milk chocolate bars; otherwise, it's sugar overload.
Joyful Flavor Twists for Unique Bars
Once you've mastered the basic version, it's fun to play with the profile. I've found that adding a layer of peanut butter under the fluff creates a flavor very similar to a certain famous peanut butter cup, which is never a bad thing.
Precision Checkpoints
- Internal Temperature: The center fluff should reach 165°F to be safely set but gooey.
- Dough Weight: Each half of your dough should weigh approximately 240g for even layering.
- Cooling Time: 60 minutes is the minimum for "clean" square cuts.
If you want a different vibe, try swapping the graham crumbs for crushed Biscoff cookies. This adds a cinnamon ginger kick that works beautifully with the chocolate. For those who love a bit of fruit, a thin layer of raspberry jam under the chocolate chips turns these into a decadent "black forest" style s'more. For another spin on the classic cookie format, you might enjoy this Chocolate Chip Cookie recipe which focuses on that same gooey center.
| Servings | Pan Size | Cook Time | Adjustments |
|---|---|---|---|
| 8 People | 9x5 Loaf Pan | 30 minutes | Halve all ingredients; bake longer |
| 16 People | 8x8 Square | 25 minutes | Standard recipe as written |
| 32 People | 9x13 Rect. | 35 minutes | Double all ingredients; use 2 eggs |
Storage Strategies for Maintaining Fresh Texture
Storing these is a bit different than a standard brownie because of the marshmallow. If you leave them out uncovered, the marshmallow fluff will eventually start to absorb moisture from the air and get "weepy."
Fridge Storage: Keep them in an airtight container for up to 5 days. I actually prefer them slightly chilled, as the chocolate takes on a fudgy texture that contrasts with the soft fluff.
Freezing Guide: You can freeze these for up to 2 months. Wrap individual bars in plastic wrap and then place them in a freezer bag. To eat, let them thaw at room temperature for an hour. Don't microwave them for too long or the marshmallow will explode!
Zero Waste Tip: If you have leftover graham cracker crumbs, don't toss them. Toast them in a pan with a little butter and sugar, then sprinkle them over vanilla ice cream. It's like a deconstructed s'more in a bowl.
You can also save any broken chocolate bar pieces to fold into your next batch of morning pancakes.
Delightful Ways to Present Your Sweets
Presentation is half the fun with a dessert this messy. I love serving these on a wooden board to lean into that rustic, outdoorsy feel. Since they are quite rich, small squares are usually enough for most people, but I won't judge if you go for a "jumbo" cut.
Achieving Clean Slices
To get those crisp, bakery style edges, place the entire pan in the fridge for an hour before cutting. Use a long, sharp chef's knife. Between every single cut, wipe the blade clean with a damp paper towel. This prevents the marshmallow from the previous cut from tearing the dough of the next one.
- If you want a salty kick, sprinkle flaky sea salt over the bars the moment they come out of the oven.
- If you want a "charred" look, use a kitchen torch on the top marshmallows for 5 seconds before serving.
- If you want a sundae, serve a warm bar with a scoop of salted caramel ice cream.
Regarding common myths, many people think you can't use marshmallow fluff in baking because it will "melt away." In reality, the fluff is stabilized by the surrounding dough and the egg in the recipe, which helps it hold its volume even under heat. Another myth is that you must use brand name graham crackers.
Any honey flavored wheat cracker will work, provided you grind it to a fine sand consistency. Transforming these simple pantry staples into a layered dessert is one of the most rewarding things you can do in a kitchen. Enjoy every gooey, chocolatey bite!

Recipe FAQs
Can I substitute the graham cracker crumbs with vanilla wafers?
No, you should stick to graham crackers for authenticity. The texture and subtle honey flavor of the crumbs are essential for mimicking the S'mores experience; wafers will result in a softer, sweeter base.
How to prevent the marshmallow fluff layer from sinking into the crust?
Par-bake the bottom dough layer for 8 minutes first. This partial baking sets the crust structure, creating a barrier that prevents the high moisture fluff from soaking into the raw dough beneath it.
Must I use both chocolate chips and chocolate bars in the recipe?
Yes, this dual approach creates the best texture. The chips melt into small pockets of intense flavor, while the larger bar pieces remain slightly more solid until cut, giving you varied chocolate experiences in every bite.
How to achieve a perfectly toasted, slightly crisp marshmallow top?
Use the highest rack setting for the last 5 minutes of baking, or use a kitchen torch. If using the oven, monitor closely; the sugar in the fluff toasts quickly and will burn if left unattended.
What is the secret to slicing these bars without them becoming a sticky mess?
Chill the entire pan thoroughly for at least one hour before slicing. For the cleanest cuts, use a long knife heated under hot water and wiped dry between each slice; this prevents the melted chocolate and fluff from dragging.
Can I make this recipe ahead of time?
Yes, the bars are excellent made a day ahead of time. Store them tightly covered at room temperature; the flavors actually deepen overnight, and if you enjoyed controlling the dough consistency here, you'll find that same principle applies when aging dough for shortbread.
Is it true that the baking temperature needs to be lower than a standard cookie?
Yes, 180°C (350°F) is the ideal temperature. Baking lower prevents the marshmallow fluff from liquefying completely and escaping the confines of the cookie base, ensuring the gooey center stays intact.
Smores Cookie Bars Recipe
Ingredients:
Instructions:
Nutrition Facts:
| Calories | 308 kcal |
|---|---|
| Protein | 3.0 g |
| Fat | 13.1 g |
| Carbs | 46.9 g |
| Fiber | 1.8 g |
| Sugar | 32.8 g |
| Sodium | 178 mg |
