Sugar Cookie Icing: Stable Royal Frosting Recipe
- The Secret to Flawless Sugar Cookie Icing: Achieving the Baker Street Shine
- The Science of Stability: Why Meringue Powder is Essential
- Sourcing Your Toolkit: Detailed Guide to Icing Components
- Mastering the Method: Step-by-Step for Perfect Consistency
- Troubleshooting the Glaze: Chef’s Critical Tips and Common Errors
- Prep Ahead: Shelf Life and Optimal Storage Techniques
- Beyond the Base: Creative Uses and Cookie Pairings
- Recipe FAQs
- 📝 Recipe Card
The Secret to Flawless Sugar Cookie Icing: Achieving the Baker Street Shine
There is nothing quite like the smell of a newly baked batch of sugar cookies mixed with the bright, sweet scent of vanilla and almond extract. But let’s be real, the real magic happens when the decorating starts.
If you’ve ever wrestled with sticky, messy glazes that refuse to dry, then this brilliant Sugar Cookie Icing recipe is your absolute lifesaver.
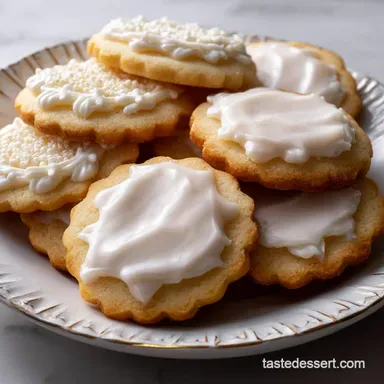
This is the famous Royal Icing the one that sets hard, shiny, and lets you create those incredible layered designs without any smudging. It means you can actually stack those gorgeous holiday biscuits without the whole beautiful structure collapsing into a pile of sticky, coloured goo.
Trust me, I ruined an entire batch of Christmas cookies before I learned this trick, and now I never go back.
This definitive guide will walk you through every single step, from selecting the right ingredients to achieving the perfect piping and flooding consistencies. We are going to master this glorious Sugar Cookie Icing together, and you will never fear a batch of undecorated biscuits again.
Let’s crack on!
What Sets Royal Icing Apart from Simple Glaze
Most home cooks start with a simple powdered sugar and milk mix, which is delicious but remains frustratingly soft and tacky. That simple glaze is great for drizzling, but terrible for true decoration.
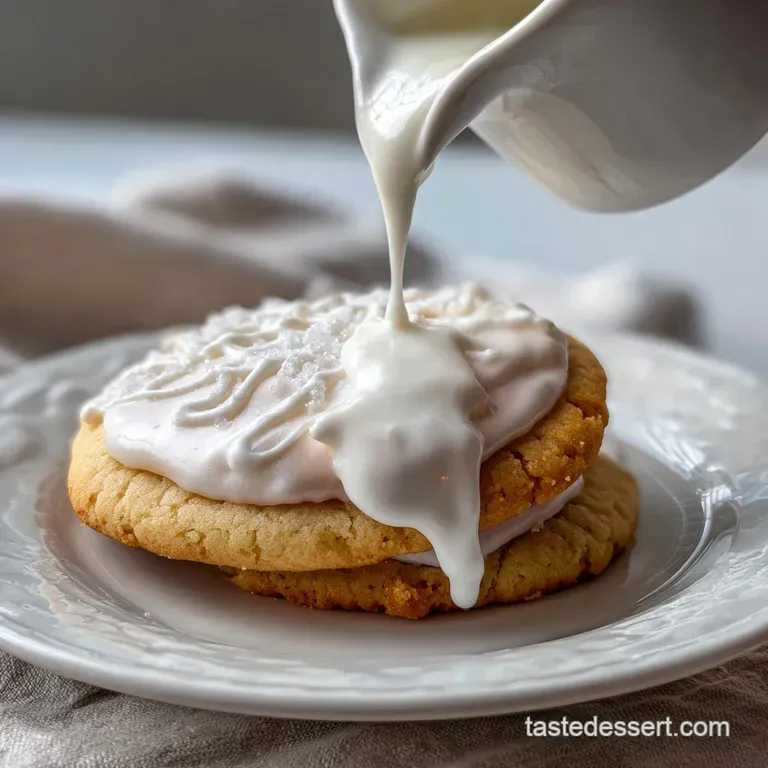
Royal Icing, on the other hand, is completely stable because it contains meringue powder (or egg whites), which acts as a binder and causes the icing to cure or harden when exposed to air. This results in the flawless, beautiful surface finish needed for professional looking designs.
It's the only way to get true definition and that desirable, crisp "snap" when you bite into the cookie.
Required Equipment for the Perfect Batch
Do you need a stand mixer? Technically, no, but using one will save your arm and give you exponentially better results. The key to perfect Sugar Cookie Icing is whipping air into it for volume and structure.
- Stand Mixer or Hand Mixer: Essential for beating the icing until it reaches that crucial stiff peak stage. Don't try to mix this by hand unless you have a serious grudge against your biceps; it takes 5– 7 minutes of vigorous work!
- Sifter: Truly non-negotiable. Sifting the powdered sugar prevents lumps that will clog your fine piping tips later on.
- Squeeze Bottles or Piping Bags: These are necessary for managing the thinner, "flood cookie icing" consistency without making an absolute mess.
Understanding the Consistency Scale (Piping vs. Flooding)
This is the single most important lesson when making proper Sugar Cookie Icing for decorating . You need two distinct textures, known in the cookie world by the "second count."
- Piping (15 20 Second Icing): This is the thicker texture. When you drag a knife through it, the line should disappear (or blend back together) in 15 to 20 seconds. This consistency is used to create the stiff outline, acting like a dam to contain the flood.
- Flooding (5 8 Second Icing): This is the thinner texture. When you drag a knife through it, the line should disappear quickly, taking about 5 to 8 seconds. This flows easily to fill in the outline, resulting in a smooth, flat surface.
The Science of Stability: Why Meringue Powder is Essential
Meringue powder is what guarantees that flawless, shiny finish and ensures that you get sugar cookie icing that hardens reliably every single time. It is essentially dried egg whites, sugar, and stabilizers (like corn starch and citric acid).
Using the powder means you don't have to worry about raw egg safety, and it offers better stability and shelf life compared to fresh egg whites. This stable, reliable base is why it’s considered the Best Frosting For Decorating Cookies .
Sourcing Your Toolkit: Detailed Guide to Icing Components
Every single ingredient plays a crucial part in the texture and stability of this particular Sugar Cookie Icing . Skimp on quality here and you risk a gritty finish or icing that never dries properly.
The Role of Cream of Tartar in Meringue Powder
Cream of tartar is often included in commercial meringue powder blends, and it serves a brilliant purpose: it stabilizes the whipped egg proteins. It ensures the icing holds its structure and volume for hours, giving you plenty of time to work.
If you are making a homemade meringue powder substitute, a pinch of cream of tartar is essential for achieving the necessary stiff peaks.
Why Powdered Sugar Quality Matters Most
You need real, fine powdered sugar (confectioners’ sugar), and you absolutely must sift it. Powdered sugar often includes a tiny amount of cornstarch to prevent clumping, which is fine, but any remaining lumps will ruin the silky smooth texture we are after. Do not use granulated sugar.
| Ingredient | Role | Viable Substitution |
|---|---|---|
| Powdered Sugar | Bulk, sweetness, structure | Granulated sugar blended to a powder with 1 tsp cornstarch per cup. |
| Meringue Powder | Stabilization, hardening agent | Pasteurized dried egg white powder (rehydrated); results vary. |
| Extract | Flavoring | Vanilla bean paste, lemon zest, or food grade essential oil (use sparingly). |
| Water | Hydration, thinning | Milk or lemon juice (adjusting the drying time slightly). |
Choosing the Right Water or Liquid Base
Warm water is usually the best choice because it helps the powdered sugar and meringue powder dissolve faster, resulting in a smoother, less gritty finish. However, you can substitute a portion of the water with lemon juice for a cleaner, slightly tart flavour.
Just remember to add your liquid slowly you can always add more, but taking it out involves adding more sugar, which throws the measurements off.
Adjusting Sweetness: Extract and Flavoring Substitutions
I love using vanilla extract, but I always use clear imitation vanilla. Why? Because pure vanilla extract has a brownish tint that can muddy your pure white icing or slightly skew delicate colours like pale pinks or blues. Trust me, clear is best here.
If you want to use almond extract, go easy; that stuff is potent! You can also incorporate flavouring with a link to my [Cookie Milk: The Ultimate Brown Butter Vanilla Infusion] base, replacing the water with the intensely flavored milk for a richer icing.
Mastering the Method: step-by-step for Perfect Consistency

When learning How To Make Icing For Sugar Cookies , the mixing process is the key to stability. This is where we build the robust structure needed for perfect piping.
The Critical Mixing Sequence
First, measure out all your dry ingredients (powdered sugar, meringue powder, and salt). Give them a quick whisk in the bowl of your mixer before adding any liquid. Then, add the extract and most of the water (start with 6 tablespoons).
Begin mixing on the lowest speed until the mixture looks like a thick, grainy paste. Once the sugar stops flying everywhere, increase the speed to medium high.
Achieving Stiff Peak Consistency for Outlining
Whip the mixture for a solid 5 to 7 minutes. It will start out glossy and greyish, but as you whip, it will transform. Listen to the sound of your mixer; it should change pitch as the mixture thickens and incorporates air. You are aiming for stiff, matte peaks.
The icing should lose its glossiness and look opaque, almost like marshmallow fluff. This stiff icing base is what you will use for your piping consistency (the 15 second icing).
Thinning the Icing for Effective Flooding
Once you have your stiff base, separate the batches you plan to colour. Now, we add water very slowly to the batch intended for flooding. We’re talking drops, or tiny quarter teaspoon additions. Stir it thoroughly after each addition. You are looking for a beautiful, molten consistency.
This thin mixture is your essential Flood Cookie Icing . When you lift your spatula and drizzle some back into the bowl, the ribbon should sink back into the surface quickly remember the 5 8 second count!
When to Stop Whipping: Preventing Over Aeration
You must stop whipping once those stiff peaks are achieved. Why? If you keep beating past that point, you introduce too much air. While volume sounds good, too much air leads to tiny pinprick bubbles that rise to the surface of your finished cookie, creating a bumpy, pockmarked look once dry.
If you see huge clumps of bubbles in your bowl, you might have overdone it.
Troubleshooting the Glaze: Chef’s Critical Tips and Common Errors
Even the most seasoned baker makes a mistake occasionally when dealing with a temperamental recipe like this cookie icing recipe . Here are the two most common failures and how to fix them instantly.
Fixing Icing that is Too Runny or Too Stiff
If your icing is too runny (it dissolves back into itself in under 5 seconds), it means you added too much water. The fix is easy: add another tablespoon of sifted powdered sugar and mix it in. Check the consistency again. Repeat until you hit the target consistency.
If it's too stiff (it takes over 20 seconds to dissolve), add water, literally one single drop at a time , until it loosens up.
Preventing Color Bleeding (The Water-to-Dye Ratio)
Colour bleeding happens when a dark colour (like black or red) is applied next to a light colour (like white) and the moisture from the wet icing causes the colours to run together. The main culprit is usually too much liquid food coloring . Always use gel food colouring .
Gel is highly concentrated, so you need far less volume, which means less excess moisture going into your perfect Sugar Cookie Icing .
Chef’s Note: Mix your colours 15– 30 minutes before decorating. Colours deepen as they sit. If you make black right before piping, it might look dark grey, but it will be truly black an hour later. Adjust accordingly!
Eliminating Air Bubbles Before Decorating
Remember how I said over whipping causes bubbles? You can usually fix this before decorating. Once your icing is mixed to the correct consistency and loaded into your piping bags or squeeze bottles, let it rest on the counter for 10- 15 minutes.
Then, gently tap the bottle/bag on the counter a few times. This forces the larger air pockets to rise to the top where they can be popped or squeezed out.
Coloring Your Icing Like a Professional (Gel vs. Liquid)
Always use gel or paste food colouring. Never, ever use the cheap liquid drops from the grocery store for royal icing; they thin the consistency dangerously and create awful, watery colours.
I suggest keeping a set of quality concentrated gel colours specifically for your sugar cookie icing for decorating .
Prep Ahead: Shelf Life and Optimal Storage Techniques
One of the great joys of this Sugar Cookie Icing recipe easy is that you can make it far in advance of your baking day. It stores beautifully, provided you treat it correctly.
How Long Prepared Royal Icing Lasts
Once prepared, this royal frosting for cookies can be stored in the refrigerator for up to two weeks . Always store it in an airtight container. The key is preventing a hard crust from forming on the surface.
Storing Unused Icing: The Water Barrier Method
When you store the icing, press plastic wrap directly onto the surface before sealing the container. Alternatively, some bakers pour a tiny layer of water (about half a teaspoon) over the top of the icing before sealing, creating a protective barrier against the air.
When you’re ready to use it, just pour off the water and gently stir the icing until smooth.
Fixing Icing After Storage (Re-whipping)
When you pull the icing out of the fridge, it will be quite stiff. It needs to be brought back to room temperature (about an hour) before use. Then, give it a quick whip using your hand mixer on low speed for about 30 seconds.
If it's still too stiff, add a drop or two of water to restore the correct piping or flooding consistency.
Beyond the Base: Creative Uses and Cookie Pairings
This incredible royal icing isn't just for classic holiday cut-outs. It's fantastic for adding a professional touch to other baked goods.
You can use the stiff consistency to pipe intricate patterns onto plain shortbread or even to mimic the look of traditional glaze on my recipe for [Baked Chocolate Chip Donuts with Chocolate Icing Recipe: Easy Bake!]. This simple, stable finish ensures your baked goods look polished and delicious.
When paired with a reliable base, like my [Sugar Cookie Recipe: Sweet, Simple, and Delicious], you get a stunning, delicious result.
I guarantee that once you master the second count and understand the stability provided by meringue powder, you will never go back to those sticky, soft glazes. This sugar cookie icing recipe is truly the secret to decorating success!

Recipe FAQs
Why is my royal icing too thick for flooding the cookie?
Your icing is likely still in the piping consistency stage, which is necessary for borders and detailing. To achieve flooding consistency, gradually mix in very small amounts of water (half a teaspoon at a time) until the icing runs smoothly off a spoon and the ribbon disappears back into the bowl within 8-10 seconds.
Be careful not to thin it too quickly, as a slight excess of water can ruin the structural integrity.
How long does royal icing take to fully dry and harden so the cookies can be stacked?
The drying time depends heavily on the humidity of your environment and the thickness of the icing layer. Generally, a thin layer will crust over in about 30 minutes, but it needs 6 to 8 hours to be completely dry, stackable, and resistant to smudging.
For the fastest, hardest dry, consider placing the decorated cookies near a fan or using a dedicated food dehydrator set to the lowest temperature.
I see tiny pinprick holes or craters appearing on my dried icing. How can I fix this?
These imperfections are caused by trapped air bubbles, especially common when using the flooding method to cover large areas. After applying the icing, gently use a scribe tool or toothpick to pop any visible bubbles, or lift and drop the cookie sharply onto the counter a few times to encourage the air to rise.
This small step ensures a perfectly smooth, glassy finish upon drying.
Can I change the flavor of the icing beyond basic vanilla?
Absolutely; flavor extracts are the easiest way to customize your icing and offer layers of complexity to your cookies. Use clear extracts, such as almond, lemon, or peppermint, to ensure the color remains pristine and does not darken.
Avoid using oil-based extracts, as they can interfere with the drying and stability of the meringue powder base.
How long can I safely store leftover royal icing?
Properly prepared royal icing stores very well in an airtight container at room temperature for up to two weeks, or refrigerated for up to four weeks. If storing, place a piece of plastic wrap directly onto the surface of the icing before sealing the container to prevent a hard crust from forming.
Always re-mix thoroughly before use, as the mixture may separate slightly.
Why is my dark colored icing bleeding into the white base layer?
Color bleeding usually happens when the base layer of icing isn't fully cured before the contrasting color is applied, or if the cookies are stored in a high humidity environment. Ensure your white base is completely rock hard (ideally dried overnight) before adding dark colors like black or red details.
Using high-quality gel food coloring instead of liquid coloring also minimizes the introduction of excess moisture.
Can I make this royal icing recipe vegan or egg-free?
Traditional royal icing relies on meringue powder for stability, but you can create a successful egg-free glaze using Aquafaba, which is the liquid drained from a can of chickpeas. Whip the Aquafaba with powdered sugar and a touch of cream of tartar to achieve stiff peaks, similar to meringue.
While the final hardness might vary slightly, this yields a remarkably stable vegan option.
Stable Sugar Cookie Icing Recipe
Ingredients:
Instructions:
Nutrition Facts:
| Calories | 800 kcal |
|---|---|
| Protein | 0.0 g |
| Fat | 0.0 g |
| Carbs | 211.5 g |
