The Ultimate Homemade Confetti Celebration Cake
- Unlocking Peak Nostalgia: Why This Homemade Funfetti Cake Reigns Supreme
- The Secret to the Fluffiest Rainbow Speckled Layers
- Assembling Your Confetti Collection: What You'll Gather
- The Reverse-Creaming Method: Mastering the Moist Technique
- Building and Baking Your Perfect Funfetti Cake Layers
- Crafting the Silky Vanilla Frosting Finish
- Troubleshooting and Extending the Shelf Life of Your Masterpiece
- Creative Twists on the Classic Rainbow Profile
- Recipe FAQs
- 📝 Recipe Card
Unlocking Peak Nostalgia: Why This Homemade Funfetti Cake Reigns Supreme
There are few desserts that possess the immediate, joyous recall power of a classic Funfetti Cake . It's the visual shorthand for celebration, that perfectly speckled canvas screaming "Happy Birthday!" But too often, the version we buy leaves us wanting dry, artificial tasting, and lacking the pure, buttery depth we remember.
This recipe is designed to obliterate that memory and replace it with the genuine article. We are diving deep into crafting a Homemade Funfetti Cake that is intensely moist, perfectly fluffy, and bursting with colour, proving that the effort of Baking Funfetti Cake from scratch is infinitely rewarding.
This isn't just cake; it's a textural masterpiece wrapped in childhood memories, destined to be the star of any gathering.
The Secret to the Fluffiest Rainbow Speckled Layers
Achieving that ethereal, cloud like texture while ensuring the cake remains supremely moist is the holy grail of baking. For these Yummy Funfetti Treats , we’re bypassing the traditional creaming method where butter and sugar are beaten until pale and fluffy.
That method often incorporates too much air too quickly, leading to a quicker set and a drier final product.
Defining the Ultimate Birthday Experience
The foundation of an unforgettable Celebratory Cake Recipes list must include texture. Our goal is a crumb that yields softly under the slightest pressure, one that doesn't require a chug of milk to swallow.
The sheer presence of sprinkles can sometimes impede the rise, but by using a specific mixing technique, we mitigate this risk entirely.
A Baker's Promise: Texture Guaranteed
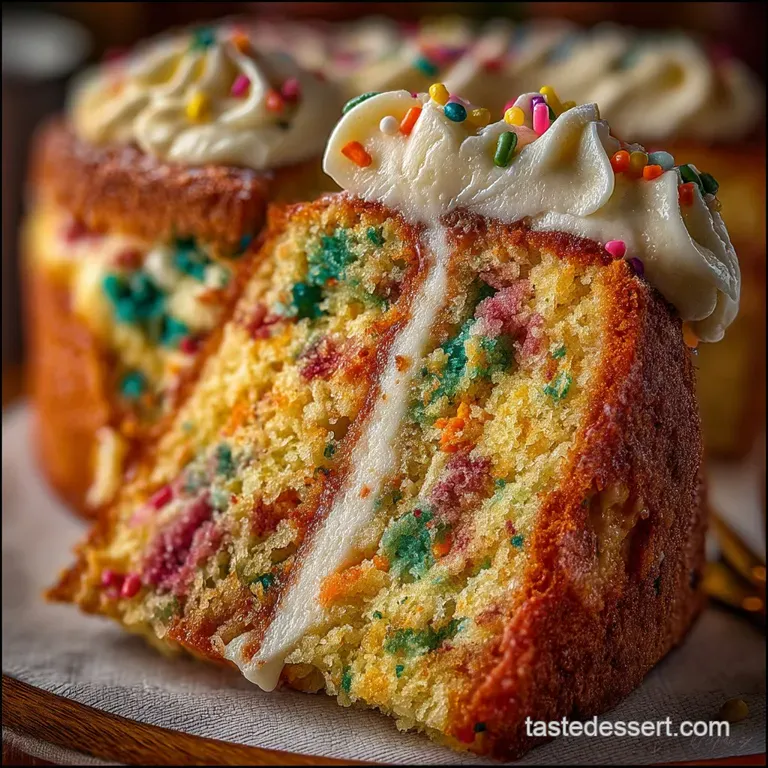
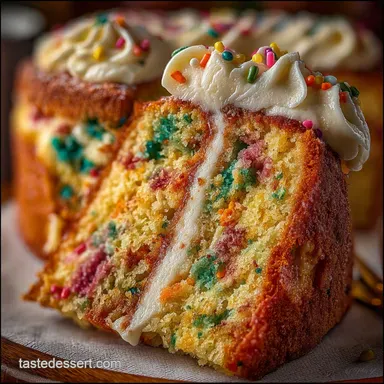
We are employing the reverse creaming method , sometimes called the one-bowl method. This technique coats the flour particles with fat before adding the liquid. This process inhibits gluten development significantly, resulting in an incredibly tender crumb.
When you bite into this Funfetti Cake Recipe , the structure will be fine, delicate, and perfectly cohesive a true testament to method over simple ingredient reliance.
Farewell to Dry Cake: Our Moisture Mantra
Moisture retention in this Easy Funfetti Cake Recipe comes from two main factors: temperature consistency and the fat-to-flour ratio managed by the reverse creaming approach.
By ensuring our butter is softened (but not oily) and our eggs and milk are at room temperature, we create a homogenous emulsion that traps moisture beautifully during baking, guaranteeing you never serve a dry slice again.
Assembling Your Confetti Collection: What You'll Gather
To ensure a smooth baking process, especially when tackling a technique like reverse creaming, preparation is paramount. Having everything ready before you turn on the mixer prevents rushed additions, which are the enemy of a stable batter.
This entire Funfetti Cake Inspiration starts with gathering the right arsenal.
The Essential Building Blocks for the Cake Batter
For the foundational layers of our Funfetti Cake Desserts , you will require three cups of standard all-purpose flour, precisely 1 ¾ cups of granulated sugar for sweetness balanced by ½ teaspoon of fine salt, and a full tablespoon of fresh baking powder for lift.
Crucially, you need one cup (two sticks) of unsalted butter, softened to true room temperature, four large eggs, also room temperature, and one cup of whole milk to provide the necessary richness and liquid content. Finally, two teaspoons of high-quality vanilla extract will provide that classic aromatic backdrop.
Curating the Perfect Buttercream Components
The Funfetti Cake Frosting needs to be silky enough to spread effortlessly but sturdy enough to hold those magnificent layers. For this, plan on 1 ½ cups (three sticks) of softened unsalted butter paired with a generous 6 cups of sifted powdered sugar to ensure a smooth, grit free finish.
A mere pinch of salt will balance the sweetness, complemented by 1 ½ teaspoons of vanilla extract and 4 to 6 tablespoons of heavy cream or whole milk to achieve the perfect spreading consistency.
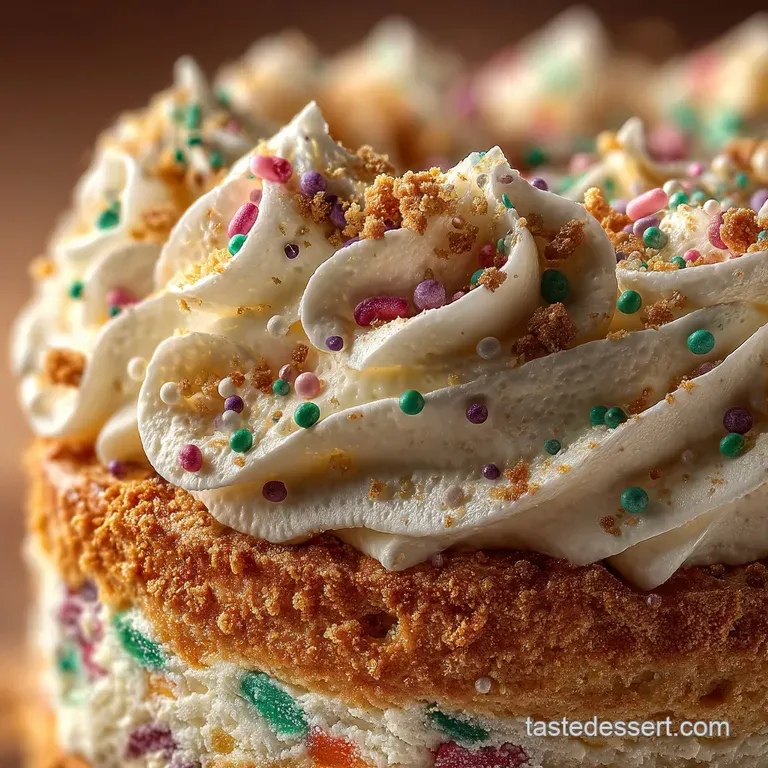
Pro Tip: Selecting Jimmies That Don't Bleed Color
This is perhaps the most critical aesthetic decision when Baking Funfetti Cake . You must use jimmies —the rod-shaped sprinkles. Avoid nonpareils (the tiny, round, hard ones).
Nonpareils are notorious for bleeding their dye into the white batter during mixing and baking, resulting in a greyish, murky hue rather than distinct rainbow flecks. Jimmies hold their integrity beautifully.
Specialized Equipment for Superior Results
While you can manage with hand mixers, a stand mixer fitted with the paddle attachment is highly recommended for the reverse creaming method, as it handles the dense initial mixture much more effectively.
You will also need two 8 inch round cake pans, parchment paper for lining, and wire cooling racks to allow even air circulation once they emerge from the oven.
The Reverse Creaming Method: Mastering the Moist Technique
This method is what separates a standard cake from a truly premium Homemade Funfetti Cake . Begin by combining all your dry components the flour, sugar, baking powder, and salt directly in your mixer bowl. Give this a quick whisk to distribute the leavening agent evenly.
Next, introduce the softened butter, cut into small chunks. Mix this on low speed until the mixture looks homogenous, resembling coarse, damp sand. The fat now fully coats the starch and protein molecules in the flour, physically shielding them from hydrating too rapidly later.
This barrier keeps the crumb open and tender, a fundamental step for any seriously moist cake.
Related Recipes Worth Trying
- The Ultimate Fudge Brownie Cupcakes with Cookie Dough Frosting — Bake these intensely fudgy brownie cupcakes crowned with safetoeat cookie dough frosting A truly decadent dessert showstopper
- Chewy Cake Batter Chocolate Chip Cookies Recipe — Get the best of both worlds with these soft chewy cake batter chocolate chip cookies Infused with yellow cake flavourthey are unbelievably easy to make
- The Best Moist Chocolate Cupcakes with Mint Chip Frosting — Whip up a batch of intensely moist Chocolate Cupcakes with Mint Chocolate Chip Frostingthe perfect teatime treat Foolproof cake batter guaranteed
Building and Baking Your Perfect Funfetti Cake Layers
Once your dry ingredients and butter have formed that sandy mixture, it's time to introduce the liquids. In a separate bowl, gently whisk your room temperature eggs, milk, and vanilla. Slowly pour this wet mixture into the mixer bowl while running the mixer on the lowest speed.
Once the initial liquid is mostly incorporated, increase the speed to medium and beat for just about one minute until the batter looks smooth. Stop the mixer immediately. Now, gently and I mean gently —fold in your ¾ cup of rainbow jimmies using a rubber spatula.
You want to swirl them in, not beat them in. Divide the batter evenly between your prepared 8 inch pans, which should already be greased, floured, and lined with parchment circles.
Bake at 350° F ( 175° C) for 30 to 35 minutes, testing for doneness with a clean skewer.
Crafting the Silky Vanilla Frosting Finish
A cake this celebratory requires a worthy topping. Our Funfetti Cake Frosting is a classic American buttercream elevated by precision mixing, ensuring it’s light enough not to crush the delicate cake layers.
Stage One: Dry Ingredients Meeting the Fat
Begin by whipping your softened butter in the mixer until it is visibly pale and fluffy this can take a solid three to five minutes on medium speed. This aeration step is crucial before sugar is introduced. Once the butter looks like whipped cream, reduce the speed to low.
Incorporating Liquids for an Airy Crumb Structure
It’s time for the sugar. Add your 6 cups of sifted powdered sugar one cup at a time, allowing each addition to fully incorporate before adding the next. Once all the sugar is in, the mixture will be quite stiff. Now, add the vanilla extract, a pinch of salt, and start with 4 tablespoons of heavy cream.
Whipping to Cloud Like Perfection
Increase the mixer speed to medium high. This is where the magic happens for this Celebratory Cake Recipes component. Beat the frosting continuously for another full three to five minutes. The frosting will transform from heavy and stiff to incredibly light, voluminous, and airy.
If the frosting seems too stiff to spread easily on your cooled cake, add the remaining cream one tablespoon at a time until you achieve a luscious, easily spreadable texture perfect for creating stunning Funfetti Cake Desserts .
Troubleshooting and Extending the Shelf Life of Your Masterpiece
If you find your cake layers are dome shaped after baking, it simply means the edges set faster than the centre. Use a long serrated knife to carefully level the tops before frosting. If your frosting seems soupy, chill the entire bowl in the refrigerator for 15 minutes and re-whip.
For a longer shelf life, these Yummy Funfetti Treats freeze exceptionally well. Once the cake is fully frosted, place it uncovered in the freezer for two hours until the frosting is rock hard. Wrap the entire cake tightly in two layers of plastic wrap, followed by a layer of aluminum foil.
It will keep beautifully for up to three months; thaw overnight in the refrigerator before serving.
Creative Twists on the Classic Rainbow Profile
While the classic white cake with rainbow jimmies is timeless, you can adapt this Funfetti Cake Recipe to suit specific themes. For a sophisticated look, try swapping the rainbow jimmies for gold or metallic sprinkles, pairing it with a light caramel buttercream.
Alternatively, use freeze dried strawberry powder mixed into the batter for a pink hued strawberry Funfetti Cake Inspiration , which pairs wonderfully with a cream cheese frosting instead of vanilla.
Optimal Storage for Maximum Freshness
Once fully assembled, the best way to store your cake is covered at cool room temperature for up to two days, provided your kitchen isn't overly warm. If you used a dairy heavy filling or frosting and anticipate leaving it out for more than 12 hours, refrigeration is the safer bet.
Allow the cake to sit at room temperature for at least an hour before serving to ensure the buttercream softens back to its optimal creamy texture.
Best Practices for Freezing Your Celebration Layers
For the absolute best result, freeze the layers before assembly. After cooling completely, wrap each bare layer tightly in plastic wrap, then in foil. When ready to bake, let them thaw on the counter for about an hour before unwrapping and frosting. This locks in maximum moisture prior to frosting.
Ingredient Swaps for Dietary Considerations
While this specific recipe relies on gluten and dairy for its signature reverse creamed texture, you can modify the frosting significantly. For a dairy-free finish, substitute the butter with a high-quality vegetable shortening or vegan baking sticks, whipping them exactly as detailed.
Ensure your sprinkles are certified gluten-free if necessary, as some cheaper brands contain wheat starch.
Decorating Ideas Beyond the Standard Swirl
To elevate the look of your Easy Funfetti Cake Recipe , consider a "sprinkle drip." After applying the final coat of frosting, gently pour thinned white chocolate ganache over the top edge, allowing it to drip artfully down the sides. Immediately press extra sprinkles into the wet drip.
For a very clean, modern presentation, cover the entire cake in a thin layer of white frosting, then press the sprinkles vertically around the bottom third only, creating a defined "sprinkle border."

Recipe FAQs
Why did my homemade Funfetti Cake turn out a bit dull and grey instead of bright rainbow?
Ah, that’s a classic beginner’s blunder, mate! The likely culprit is the type of sprinkles you used; if you grabbed nonpareils (the tiny hard balls), they bleed their dye when mixed into wet batter, turning everything murky.
Always use jimmies (the rod-shaped ones) for this recipe, as they hold their colour much better.
I'm worried about the reverse creaming method; can I just use my usual creaming method for this Funfetti Cake?
You absolutely can, but you'll miss out on that signature, impossibly soft texture! The reverse creaming method coats the flour in fat first, which inhibits gluten development, resulting in that tender crumb we’re aiming for.
If you switch, make sure your butter is properly creamed with the sugar before adding the eggs one at a time.
How long will this lovely Funfetti Cake last, and is it okay to freeze it?
This cake is best eaten within 3 days when stored tightly covered at room temperature it really doesn't like the fridge drying it out. If you need to keep it longer, it freezes beautifully unfrosted; wrap the cooled layers tightly in plastic wrap and then foil, and they’ll be perfect for up to two months.
My frosting is too stiff/runny after mixing; what’s the quick fix for buttercream consistency?
Buttercream is a bit fussy, isn't it? If it’s too stiff, pop in an extra tablespoon of heavy cream or milk and beat it again on medium speed until it loosens up. If it’s looking too soupy, slowly add powdered sugar, one quarter cup at a time, until it reaches that perfect, spreadable consistency think slightly thicker than peanut butter.
Can I make this cake ahead of time, or do I need to bake it on the day of the party?
You can certainly be strategic about your timing! The cake layers can be baked up to two days ahead, cooled completely, and stored tightly wrapped. It’s often easier to frost them the day before the event, letting the crumbs set overnight, but aim to have it fully assembled no more than 24 hours prior for the freshest flavour.
Ultimate Funfetti Cake
Ingredients:
Instructions:
Nutrition Facts:
| Calories | 358 kcal |
|---|---|
| Protein | 6.0 g |
| Fat | 18.8 g |
| Carbs | 47.5 g |
| Fiber | 0.8 g |
| Sodium | 63 mg |
