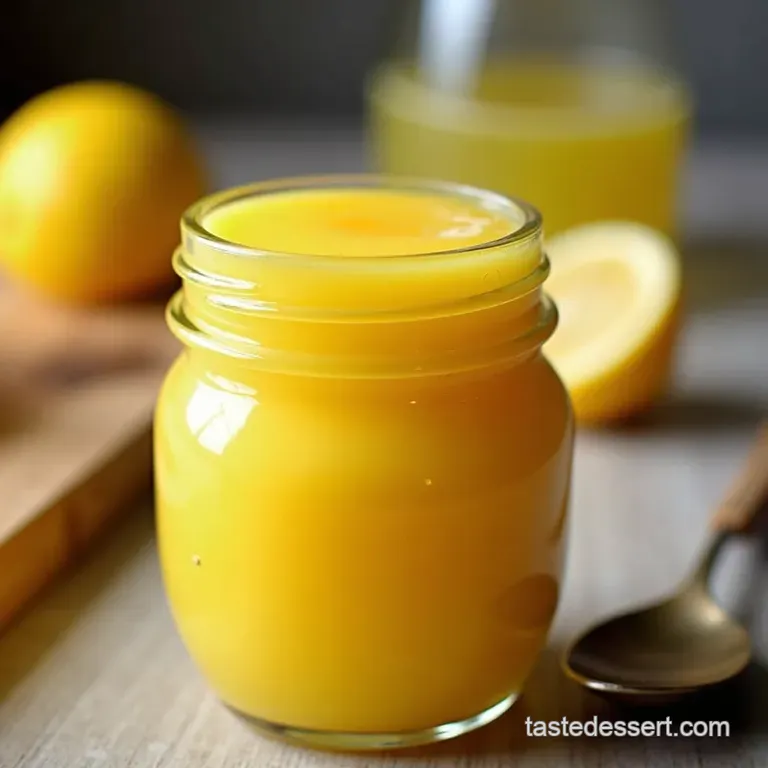
Sunshine in a Jar the Ultimate Homemade Lemon Curd
- Why Homemade Lemon Curd Outshines Store-Bought Spreads
- Decoding the Magic: What Makes This Recipe Exceptional
- Essential Components for Peak Flavor Intensity
- Sourcing and Selecting Your Key Elements
- Mastering the Gentle Heat: Cooking the Mixture to Perfection
- The Crucial Stage: Thickening Without Scrambling
- Prolonging Freshness: Storage and Preservation Techniques
- Creative Applications Beyond the Scone
- Recipe FAQs
- 📝 Recipe Card
Why Homemade Lemon Curd Outshines store-bought Spreads
As a chef, I always say that the secret to any great bake or dessert lies in a cracking foundation, and you can't beat homemade Lemon Curd . It’s sunshine in a jar, really bright, tangy, and utterly luxurious.
When you compare it side-by-side with the wobbly, often overly sweet supermarket stuff, the difference is staggering. store-bought versions frequently rely on stabilizers, artificial colourings, and sometimes, concentrate rather than the vibrant, fresh zest and juice that defines true excellence.
Crafting this filling yourself allows you to control the sugar levels and, crucially, maximize that intense, fresh citrus punch that elevates everything from a simple scone to a complex Lemon Curd Cake .
Decoding the Magic: What Makes This Recipe Exceptional
This particular Lemon Curd Recipe , which I call "Sunshine in a Jar," is the gold standard. It’s vibrant, intensely zesty, and possesses a smooth, almost custard like texture that simply sings on the palate.
Ditch the artificial flavourings; this recipe relies solely on fresh lemon juice and zest, rich egg yolks, and high-quality butter to create a silken filling. Achieving this level of silkiness moves the Homemade Lemon Curd With Eggs from a mere spread to a foundational component in premium baking.
Setting the Standard: Achieving Velvety Smoothness
The difficulty level for this recipe is classified as Medium. This isn't due to a complex list of ingredients in fact, they are remarkably few but rather the demanding, meticulous nature of the cooking stage. Success hinges entirely on gentle, indirect heat.
We use a double boiler method to ensure the eggs cook slowly and evenly. When followed correctly, this meticulous approach results in a texture that is profoundly smooth, free of lumps, and utterly satisfying.
The Tang Factor: Balancing Sweetness and Citrus Zing
The true hallmark of memorable curd is the balance between the sugar and the lemon. For this batch, yielding approximately 1.5 cups, we incorporate 3/4 cup (150g) of fine granulated sugar against 1/2 cup (120ml) of freshly squeezed lemon juice.
This ratio ensures that while the sweetness mellows the sharpness of the acid, the citrus note remains assertive, cutting beautifully through rich pastry or creamy cheesecake bases. This sharp tang is what makes it indispensable for a classic Lemon Curd Tart .
A Chef's Introduction to Perfect Lemon Curd
This process requires about 15 minutes of active cooking time, following a 15-minute preparation phase. It’s the ideal technique for producing a Quick Homemade Lemon Curd that tastes like it simmered all day.
Remember, while the active time is short, the minimum chilling time of 3 hours is non-negotiable; this resting period allows the custard structure to fully set into that perfect spoonable consistency.
Essential Components for Peak Flavor Intensity
To create this superior curd, we are relying on the inherent quality of just a few core ingredients. We use three whole large eggs alongside three additional large egg yolks. The yolks are critical; they provide the necessary richness and lecithin, which acts as a powerful emulsifier to stabilize the mixture and contribute significantly to that luxurious mouthfeel.
The entire process is estimated to take around 3 hours and 45 minutes total, though active work is less than half an hour.
Sourcing and Selecting Your Key Elements

Before we begin assembling our Lemon Curd Desserts , ensuring our ingredients and tools are ready is paramount. A perfect result is often determined before the whisk even touches the bowl.
The Necessary Kitchen Arsenal: Tools for Success
You will need a medium, heatproof bowl, ideally made of stainless steel or glass, which will sit atop a small saucepan containing about an inch of simmering water to form your double boiler. A balloon whisk is your best friend here, as constant agitation is required during cooking.
Finally, a fine mesh sieve is not optional; it is essential for achieving the ultimate silkiness.
Zest vs. Juice: Maximizing Lemon Impact
For maximum impact, only use freshly squeezed lemon juice bottled juice simply cannot replicate the brightness derived from the volatile oils present in fresh fruit. We call for 1/2 cup of juice. Complementing this, we incorporate 2 tablespoons of finely grated lemon zest.
It is vital that you only grate the bright yellow outer skin, avoiding the bitter white pith underneath, which can easily ruin the delicate flavour profile.
Butter Quality: The Secret to Richness
The final component that delivers incredible depth is butter. We incorporate 6 tablespoons (85g) of cold, unsalted butter, cubed small. Using high-quality, high fat butter is the secret weapon that lends the finished curd its characteristic richness and glossy sheen, making it perfect for topping a Lemon Cheesecake or filling a Lemon Curd Pie .
Related Recipes Worth Trying
- The Perfect Blackberry Lemon Cake Roll Recipe Foolproof Swirl — Master the stunning Blackberry Lemon Cake Roll This easy Swiss roll recipe features a light lemon sponge and tart berry swirl Perfect makeahead dessert
- Healthy Chicken Piccata Lightened Up Lemon Caper Chicken — Ditch the heavy butter This Healthy Chicken Piccata recipe delivers all the zesty flavour you love in under 30 minutes An easy lightened up Italian chicken...
- Easy 30Minute Lemon Garlic Shrimp Scampi Pasta Recipe — Forget takeaway This foolproof easy Shrimp Scampi Pasta recipe delivers bright garlicky flavour in just 30 minutes A true weeknight triumph
Mastering the Gentle Heat: Cooking the Mixture to Perfection
The first step involves setting up your double boiler so the water in the saucepan is at a gentle simmer not a vigorous boil. In the heatproof bowl, whisk together the eggs, yolks, sugar, lemon juice, and zest until they are just combined. Place this bowl over the simmering water.
This is where patience comes into play: you must now whisk continuously for 12 to 15 minutes. The mixture must cook slowly, allowing the proteins in the eggs to gently set without seizing up.
The Crucial Stage: Thickening Without Scrambling
This phase demands unwavering focus, as the difference between silken curd and scrambled eggs is a matter of seconds and temperature control.
Whisking Technique: Preventing Egg Coagulation
Constant, gentle whisking ensures that the hot liquid is evenly distributed and prevents any part of the egg mixture from sitting still against the warm bowl surface for too long, which causes instant coagulation. Keep the whisk moving in broad, slow strokes around the base and sides of the bowl.
Achieving the Nappe Stage: Testing for Readiness
The curd is ready when it has thickened considerably. To test this, achieve what chefs call the "nappe" stage: dip the back of a spoon into the mixture and run your finger across the coated surface. If the line stays clean and doesn't run back together, it’s ready.
Alternatively, use a thermometer; the mixture should register between 170° F and 175° F ( 77° C to 80° C).
The Final Polish: Straining for Ultimate Silkiness
The moment the curd reaches temperature, immediately remove the bowl from the heat source. This step cannot be skipped: pour the entire hot mixture through your fine mesh sieve into a clean vessel.
This straining action removes any tiny flecks of overcooked egg or zest pieces, ensuring that your Lemon Curd achieves that signature, professional smoothness.
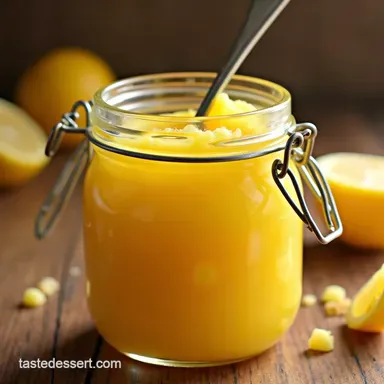
Prolonging Freshness: Storage and Preservation Techniques
After straining, it is time to enrich the flavour and stabilize the structure. While the curd is still very hot, begin whisking in your cold, cubed butter, one cube at a time, ensuring each piece is fully incorporated and emulsified before adding the next.
Finally, whisk in the small pinch of salt to balance the flavour profile.
Refrigeration Longevity for Homemade Lemon Curd
Pour the finished curd into sterilized, airtight jars. To prevent a rubbery skin from forming on the surface as it cools, press a piece of plastic wrap directly onto the surface of the curd within the jar.
This Homemade Lemon Curd With Eggs will need a minimum of three hours in the refrigerator to fully set. Once chilled, it should hold its shape beautifully.
Troubleshooting Common Texture Issues
If, despite your best efforts, the curd seems a little thin after chilling, this might indicate insufficient cooking time or perhaps too much juice relative to the yolks. The solution is simple: gently reheat the thin curd over the double boiler, continuing to whisk until it thickens further, ensuring it reaches that 170° F threshold.
Do not try to thicken already cooled curd by microwaving, as this usually results in lumps.
Unexpected Ways to Incorporate This Bright Filling
The applications for this bright filling extend far beyond traditional scones. It is sublime layered with Greek yogurt and granola for a sophisticated breakfast parfait. Use it as the star filling in a classic Lemon Curd Tart shell, or even pipe swirls onto cupcakes before topping with buttercream.
Nutritional Snapshot: A Look at the Decadence
While undeniably rich, this is a pure dessert component. Based on an estimated 8 servings, you are looking at approximately 230 250 calories per serving, predominantly coming from the natural fats in the egg yolks and butter, balanced against the sugar content. Treat it as the decadent focal point it is!
Creative Applications Beyond the Scone
Once you have perfected your Quick Homemade Lemon Curd , the possibilities are endless. Consider using it as the tangy layer beneath a light frosting on a Lemon Curd Cake or folding it gently into whipped cream to create a light, ethereal mousse.
For those who love a sharper finish, it's the perfect base for a no-bake Lemon Cheesecake that requires no gelatin, relying instead on the egg yolks to set firmly once chilled.

Recipe FAQs
My lemon curd is runny and won't set up! What did I do wrong?
That’s a common pickle, usually caused by not cooking it long enough or not using enough egg yolk for structure. For a proper set, the curd must reach around 170°F (77°C) or coat the back of a spoon thickly this is called the 'nappe' stage.
Make sure you don't skip the chilling time, as it firms up significantly in the fridge!
How long can I keep homemade Lemon Curd in the fridge, and should I cover it?
Properly stored, your luxurious lemon curd should keep beautifully for up to two weeks in the refrigerator. To prevent that dreaded rubbery skin from forming on top, always press a piece of cling film or plastic wrap directly onto the surface of the curd before sealing the jar.
Why is my curd lumpy? Did I scramble the eggs?
Lumps almost always mean the eggs cooked too quickly you've likely had direct heat or the water in your double boiler was boiling too vigorously. Always cook it gently over simmering water and whisk constantly. The good news is you can usually save it by pushing the entire mixture through a very fine mesh sieve!
Can I make this curd without a double boiler? I don't fancy getting the hob messy.
While a double boiler (bain marie) is the gold standard for gentle heat, you can use a heatproof bowl balanced over a saucepan of barely simmering water, as detailed in the instructions. The key is that the bottom of your bowl must not touch the water, or you risk shocking the eggs into scrambling.
Patience, like waiting for the kettle to boil, is essential here!
I only have bottled lemon juice; can I use that instead of fresh for my Lemon Curd?
Oh, dear, I strongly advise against it if you want that bright, vibrant flavour we are aiming for. Bottled juice simply lacks the essential oils found in the fresh zest and juice, leading to a rather flat, sometimes metallic taste.
For a true taste of sunshine, you must use freshly squeezed lemons it makes all the difference!
What's the best way to use up a big batch of this tangy curd?
You've got a winner on your hands! Besides the classic scone accompaniment (don't forget the clotted cream!), it's divine spooned over plain Greek yogurt for breakfast, or used as the base filling for a proper lemon meringue tart. For a simple treat, just spread it thickly on toasted crumpets!
Ultimate Homemade Lemon Curd
Ingredients:
Instructions:
Nutrition Facts:
| Calories | 1978 kcal |
|---|---|
| Protein | 28.6 g |
| Fat | 120.9 g |
| Carbs | 113.8 g |
| Fiber | 3.4 g |
| Sodium | 746 mg |
