The Ultimate Unicorn Cake: Magic Made Easy
- The Ultimate Unicorn Cake Recipe: Magic Made Easy
- The Ultimate Unicorn Cake Recipe: Overview & Components
- Mastering the Magic: Why This Recipe is Perfect
- Ingredients, Tools, and Essential Substitutions
- Step-by-Step Guide to Baking & Decorating Your Majestic Cake
- Pro Tips and Common Unicorn Cake Decorating Mistakes
- Storage and Make-Ahead Instructions
- Perfect Pairings and Serving Your Unicorn Birthday Cake
- Nutrition Information
- Recipe FAQs
- 📝 Recipe Card
The Ultimate Unicorn Cake Recipe: Magic Made Easy
Listen, I get it. You scrolled past a perfect, towering Unicorn Cake on Pinterest and thought, nope, impossible . You pictured sinking 12 hours and ending up with a lopsided, melting mess.
I’m here to tell you that the magic is real, and it’s surprisingly stable. This Unicorn Cake Recipe is my absolute go-to for show stopping birthdays because it relies on two crucial things: high fat, stable layers and the velvety structure of Swiss Meringue Buttercream.
We’re trading speed for stability, ensuring those vibrant rainbow swirls actually look like the fantasy creature they’re supposed to represent.
If you’re ready to bake a Unicorn Birthday Cake that smells like pure joy and looks straight out of a fairy tale, grab your mixer. We are making dreams edible.
The Ultimate Unicorn Cake Recipe: Overview & Components
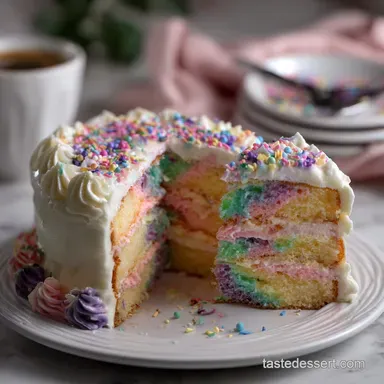
This recipe produces a gorgeous, four layer, high impact Unicorn Cake with a crisp white base and dazzling pastel mane.
| Component | Time Commitment | Key Feature |
|---|---|---|
| Cake Layers | 30 mins (Bake) | High fat vanilla white cake for density and stability. |
| Swiss Meringue Buttercream | 45 mins (Make/Cool) | Stable, pipeable, non-sweating frosting. |
| Decorating & Assembly | 90 mins (Prep/Chill) | Critical chilling phases (crumb coat and final coat) are non-negotiable for success. |
| Total Time | 2 hours 20 mins | Includes cooling and chilling between steps. |
Structure Breakdown: Cake Layers vs. Frosting
We are using four 6 inch layers. Why four? It adds the necessary height to look majestic, and smaller layers are structurally easier to handle. The cake itself must be robust enough to support the weight of the thick Swiss Meringue mane and the Unicorn Cake Topper . If you want a similar look but need a less complex option, check out my recipe for Texas Sheet Cake: Moist Chocolate with Fudge Glaze — it’s always a crowd pleaser!
Sourcing the Essential Unicorn Topper Kit
Don't panic about sculpting! The secret to the "easy Unicorn Cake " look is a ready-made kit. You need a gold horn, two glittery ears, and edible gold dust for dusting. Get these online.
Trust me, spending 10 minutes dusting a store-bought horn beats spending an hour trying to mold fondant.
Preparing Your Workspace for Decoration
Temperature control is crucial. When doing detailed Unicorn Cake Decorating , your room should be cool ideally below 70°F (21°C). If it's too warm, your beautiful Swiss Meringue will start to slump right off the cake before you even finish piping the mane.
Mastering the Magic: Why This Recipe is Perfect
We are skipping the classic creaming method (beating butter and sugar until fluffy) and opting for the Reverse Creaming Method for the cake layers.
The Science (The Why):
- Reverse Creaming: By mixing the butter directly into the flour first, we coat the flour proteins (gluten) in fat before they can hydrate with the liquid ingredients (milk/eggs). This limits gluten development, resulting in a velvety , incredibly tender crumb that doesn't dome or crack easily, making layering a breeze.
- Swiss Meringue: This frosting is superior to basic American buttercream for tall cakes. Why? Because the sugar and egg whites are gently heated together first, dissolving the sugar completely and cooking the egg whites for safety and stability. When whipped, it creates a satin smooth, dense foam that holds its shape beautifully and is less painfully sweet than American buttercream. It’s non-negotiable for a perfect Unicorn Birthday Cake finish.
Ingredients, Tools, and Essential Substitutions
This rich, magical creation clocks in at 1186 calories per slice, so you know we are using the good stuff real butter and high-quality cake flour.
The Chemistry of Fluffy Vanilla Layers (Yields 12 Servings)
| Magic Item (Original Ingredient) | Quantity | Why It’s Non-Negotiable |
|---|---|---|
| Cake Flour | 3 cups | Low protein content guarantees a light, soft crumb. |
| Granulated Sugar | 2 cups | Provides structure and keeps the cake moist. |
| Baking Powder & Salt | 1 Tbsp / 1 tsp | Leavening and flavor balance. |
| Unsalted Butter (Room Temp) | 1 cup (2 sticks) | High fat content for tenderness (Reverse Creaming). |
| Egg Whites | 4 large | Gives the cake a beautiful, clean white color. |
| Whole Milk | 1 ¼ cup | Moisture and richness. |
| Clear Vanilla Extract | 2 tsp | Flavor without adding brown color. |
Ingredient Swaps and Expert Substitutions
Sometimes you’re missing an ingredient, but please be honest about the trade offs!
| Original Magic Item | Best Substitute | Scientific Function & Trade Off |
|---|---|---|
| Cake Flour | All-Purpose Flour (scoop & level) minus 2 Tbsp per cup, add 2 Tbsp cornstarch | Cornstarch lowers the protein content, mimicking cake flour for a tender crumb. Results in slightly less airy cake. |
| Egg Whites | Whole Eggs (4 large) | Provides moisture and binding. The cake will have a yellow tint, not pure white. |
| Unsalted Butter | high-quality Margarine Stick | Provides necessary fat for the emulsification and tender crumb. Flavor may be slightly muted compared to butter. |
| Whole Milk | Full Fat Greek Yogurt (reduced by ¼ cup, thinned with water) | Acid activates the leavener and acts as a binder. Adds a subtle, pleasant tang, perfect if you prefer less sweetness. |
Need a completely different flavor base? If you’re looking for a slightly healthier, yet equally moist option, my gluten-free Carrot Cake: The Ultimate Moist Recipe is fantastic.
Essential Equipment for Layering and Piping
- Four 6 inch round cake pans
- Piping bags (1M or 2D tip for the mane)
- Offset spatula (essential for smooth icing)
- high-quality gel food coloring (pink, purple, blue, teal liquid coloring is too weak!)
- Turntable (non-negotiable for smooth sides!)
step-by-step Guide to Baking & Decorating Your Majestic Cake

Prep Time: 90 minutes (mostly chilling and decorating) | Cook Time: 30 minutes
1. Baking the Four Perfectly Flat Cake Layers (30 Mins)
- Prep the Dry: Preheat oven to 350°F (175°C). Grease and line your four 6 inch pans with parchment paper circles. In a large bowl, whisk together the cake flour, sugar, baking powder, and salt.
- Reverse Cream: Cut the room temp butter into cubes. Add it to the dry mixture. Beat on low speed until the mixture resembles coarse sand, completely coating the flour in fat. This is the Unicorn Cake science kicking in!
- Add Wet: In a separate bowl, gently whisk the egg whites, milk, and clear vanilla extract. Pour this into the butter/flour mix in three stages, beating on medium low just until combined. Do not overmix! The batter should be thick, like heavy pancake batter.
- Bake: Divide the batter evenly among the four prepared pans. Bake for 28 to 32 minutes, or until a wooden skewer comes out clean. Let them cool in the pans for 10 minutes before turning out onto a wire rack to cool completely (about 1 hour). Crucial: They must be completely cool before frosting.
2. Creating the Smooth Crumb Coat and Final Icing Layer
- Make the Frosting: Prepare the Swiss Meringue Buttercream (the recipe for this should be done ahead of time, chilling while the cakes cool).
- Stack: Place the first layer on your cake board/platter. Frost the top and add the next layer. Repeat until all four layers are stacked.
- The Crumb Coat (The Seal): Apply a very thin, almost see-through layer of white frosting all over the cake. This traps any stray crumbs. Put the cake in the refrigerator for 20 minutes. This chill time is the secret to a stable Unicorn Cake .
- The Final Coat: Once the crumb coat is firm to the touch, apply a thick, smooth layer of white frosting using your offset spatula and turntable. Scrape the sides until perfectly smooth. Chill again for 15 minutes.
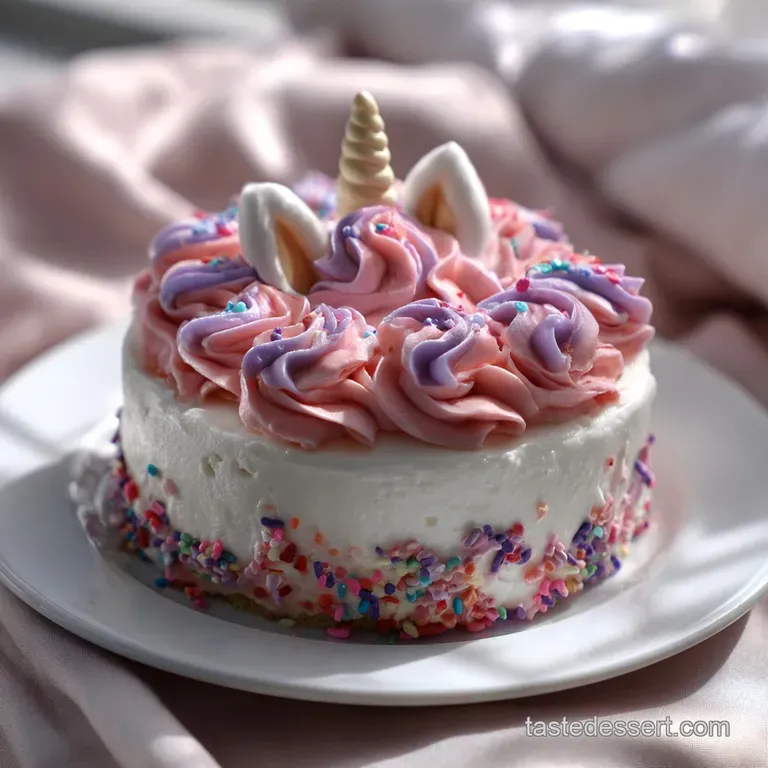
3. How to Achieve the Vibrant Rainbow Swirls
- Color the Mane: Divide the remaining white buttercream into four small bowls. Color each one a vibrant pastel (pink, blue, purple, teal).
- Load the Bag: Take one large piping bag fitted with your star tip (like a Wilton 1M). Using an offset spatula, spoon alternating vertical stripes of each colored frosting inside the bag, making sure the colors run all the way down to the tip.
- Pipe: Starting at the back of the cake, near the top edge, pipe small rosettes and swirls down the side and trailing onto the cake board, forming the magnificent unicorn mane. This colorful Unicorn Cake Decorating is the fun part!
4. Placing the Horn and Piping the Mane Detail
- Horn Placement: Carefully insert the gold unicorn horn into the very center of the top layer. Place the ears on either side.
- Final Touches: Add small, edible sugar pearls or sprinkles near the base of the horn for extra sparkle. Step back and admire your majestic Unicorn Cake !
Pro Tips and Common Unicorn Cake Decorating Mistakes
Don't sweat the small stuff we all make errors. Here are the most common hiccups when tackling a layered cake, and how to fix them instantly.
| Common Decorating Disaster | Root Cause | The Fix |
|---|---|---|
| Cake is Sliding/Leaning | Warm layers or insufficient chilling (Prep time skipped!) | Chill the crumb coated cake for 30 minutes. Insert a central dowel or wooden skewer through the middle layers for support. |
| Buttercream is Graining/Broken | Butter temperature was too cold or the meringue was too hot when mixing. | Gently heat 1/4 cup of the broken buttercream over a double boiler until barely melted, then stream back into the mixing bowl while whipping rapidly. |
| Color Bleeding into White Frosting | High water content in gel coloring or layers were frosted too thick/slowly. | Always use high-quality gel pastes. Work quickly, and chill the crumb coat thoroughly before the final layer. |
| Mane Swirls Deflate | Using too much liquid food coloring or piping in a very hot environment. | Switch to gel coloring only. Put the piping bag in the fridge for 10 minutes if the frosting feels warm and soft. |
Storage and make-ahead Instructions
The great news about using Swiss Meringue for your Unicorn Cake is that it is incredibly durable! This makes it a perfect choice for planning a big party.
Freezing Fully Decorated Unicorn Cakes Safely
You can completely bake and decorate this Unicorn Cake up to two weeks ahead of time!
- Chill: Place the finished cake (without the topper add that right before serving) in the freezer uncovered for 30 minutes to firm the frosting.
- Wrap: Once the frosting is rock hard, tightly wrap the cake in two layers of plastic wrap, followed by a layer of aluminum foil.
- Thaw: To serve, unwrap the frozen cake completely while still frozen. Transfer it to the fridge overnight (8- 10 hours) to thaw slowly. Bring to room temperature 1- 2 hours before serving.
Recommended Storage
- Fridge: This cake stores beautifully for up to 5 days, covered, in the refrigerator.
- Reheating: Do not reheat cake! Simply bring it to room temperature for optimal flavor and texture (about 2 hours outside of the fridge). Cold cake is dense and dry; room temp cake is moist and light.
Perfect Pairings and Serving Your Unicorn Birthday Cake
Best Methods for Cutting Tall Layer Cakes
Use a long, thin, sharp chef’s knife. Run the knife under very hot water and dry it off immediately between every single cut . This ensures a clean, non-smearing cut that slices right through the layers of your magnificent Unicorn Cake .
Recommended Side Treats and Drinks
Since this Unicorn Cake is rich, sweet, and visually dazzling, pair it with simple, refreshing drinks like lemonade or sparkling cider. For a fun, complementary breakfast treat the next morning (maybe for the birthday kid?), try making French Toast Pancakes: The Best Fluffy Brunch Fusion .
Go forth and bake! This is the only Unicorn Cake guide you'll ever need.
Nutrition Information
| Nutrient | Amount |
|---|---|
| Calories | 1186 kcal |
| Protein | 9.5 g |
| Fat | 64.5 g |
| Carbs | 143.5 g |
| Fiber | 1.8 g |
| Sugar | 104.2 g |
| Sodium | 202 mg |

Recipe FAQs
How do I make a stable Unicorn Cake at home?
The key to making a show stopping Unicorn Cake at home is using high fat, stable cake layers, as this recipe requires for structural integrity. Stability is achieved by minimizing excess moisture in the layers, which prevents sagging under the weight of multiple tiers and heavy buttercream. If you prefer a richer chocolate base for contrast, consider checking out the stability notes in our Tuxedo Cake Recipe: Decadent Chocolate Layer Cake.
Can this recipe be adapted into Unicorn Cake Pops?
No, this specific recipe is designed for structural, multi layered cakes, not for cake pops, which require a dense, crumbly base mixed with binder. For cake pops, you need fully baked and cooled cake scraps mixed with frosting until they form a moldable dough.
Trying to use these light layers will likely result in a sticky, unworkable mixture.
How do I create a professional looking Unicorn Cake Topper?
To create a professional topper, use fondant or gum paste for the horn and ears, allowing them ample time (at least 24 hours) to dry fully before insertion. Ensure your layers are chilled solid before stacking and frosting, which stabilizes the entire structure before you add any heavy decorations like toppers.
A cold cake is much easier to handle and decorate without incident.
What is the best way to store a completed Unicorn Cake?
Yes, you can store the finished cake, but it must be refrigerated due to the high volume of buttercream used in this recipe. Keep the cake in an airtight container to protect the delicate colors and prevent the frosting from absorbing refrigerator odors.
Bring it to room temperature for about one hour before serving for the best flavor and texture.
Do I need special equipment to achieve the tall, smooth sides?
While professional equipment helps, you do not strictly need it; the technique is more critical than the tools. Use a long offset spatula and a bench scraper held firmly against the side of the cake to achieve smooth sides during the crumb coat and final frosting layers. This technique is similar to achieving a perfect finish on a no-bake dessert like our Pumpkin Cheesecake Shooters Ultra Creamy No-Bake Dessert Shots, requiring patience and smooth motion.
How do I make the different colored unicorn horn swirls?
To achieve the swirled effect on the horn, knead small amounts of gel food coloring into separate portions of white fondant or gum paste. Twist the colored pieces together gently without fully mixing them, then roll the composite dough into a long rope before wrapping it around your central support dowel.
Is it possible to draw a Unicorn Cake if I cannot bake?
While this recipe focuses on the baking aspect, yes, drawing a Unicorn Cake is an excellent creative outlet utilizing the same color palettes. For drawing the structure, focus on creating stable geometric shapes for the layers first, much like how the stable layers in this recipe support the weight.
You can use bright, contrasting colors for a similar visual impact.
Ultimate Unicorn Cake Recipe
Ingredients:
Instructions:
Nutrition Facts:
| Calories | 1186 kcal |
|---|---|
| Protein | 9.5 g |
| Fat | 64.5 g |
| Carbs | 143.5 g |
| Fiber | 1.8 g |
| Sugar | 104.2 g |
| Sodium | 202 mg |
