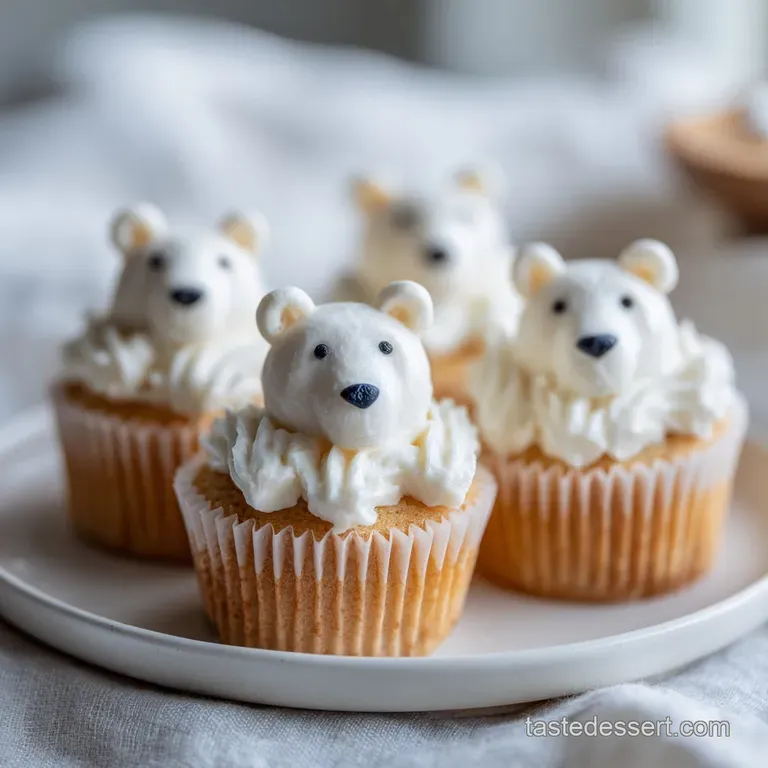
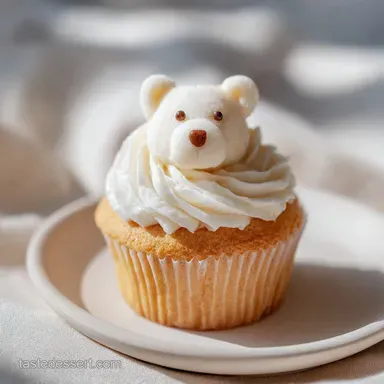
Polar Bear Cupcakes: Fluffy Vanilla and Coconut
- Time: Active 30 minutes, Passive 20 minutes, Total 50 minutes
- Flavor/Texture Hook: Fluffy vanilla with a coconut crunch
- Perfect for: Winter parties or kids' holiday baking
Creating Whimsical Polar Bear Cupcakes
Forget the idea that you need a professional sculpting kit or expensive fondant to create something show stopping for your next winter gathering. I used to think that "cute" food was reserved for those with infinite patience and a set of tiny silver tweezers, but that's a total myth.
You don't need a pastry degree, and you certainly don't need to spend six hours molding ears out of sugar paste.
The secret to these adorable creatures isn't in the complexity, it's in the texture. We are treating the cupcake surface like a blank canvas, using shredded coconut to mimic arctic fur and simple candy pieces to build a face that has genuine personality.
When you bite into one, you get that classic, velvety vanilla cake followed by the satisfying shatter of a candy melt snout. It's a sensory experience that feels much more sophisticated than a standard store-bought treat.
We've all seen those "Pinterest fails" where the bears look more like melting snowmen, but that usually happens because the base recipe is too domed or the frosting is too soft. We are going to fix all of that today.
I’ll show you how to get that flat top and that perfectly "Arctic White" frosting that stays exactly where you put it. Let's get into why this specific method works so well for our chilly friends.
Why This Method Works
- Fat Coating Strategy: By mixing cubed butter directly into the flour and sugar, we coat the flour particles in fat, which limits gluten development and creates a tight, velvety crumb.
- Reverse Creaming Lift: This technique prevents the cupcakes from mounding too high in the center, giving us a flat surface that's much easier to decorate with our polar bear features.
- Clear Vanilla Aesthetics: Using clear vanilla extract in the frosting ensures the bears stay a pristine, snowy white rather than an off white or cream color.
- Shredded Texture Grip: The high fat content in the buttercream acts as a glue for the shredded coconut, providing a realistic "fur" look while adding a subtle crunch.
| Feature | Classic Method | Our Fast "Reverse" Method |
|---|---|---|
| Texture | Airy and open | Dense, velvety, and fine |
| Surface | Domed and peaked | Flat and stable |
| Prep Style | Creaming butter/sugar | Rubbing butter into flour |
The flat top is non negotiable here. If your cupcakes peak like a mountain, your bear’s snout will slide right off, and he’ll look like he’s looking at his own toes. By keeping the crumb tight and the top level, we create a sturdy foundation for the heavy candy melts and marshmallows.
| Bear Component | Size/Weight | Time | Visual Cue |
|---|---|---|---|
| Vanilla Base | 2/3 full liner | 18-20 minutes | Springs back when touched |
| Frosting Mound | 2 tbsp approx. | 5 minutes | Holds a stiff peak |
| Snout Melt | Standard size | Instant | Centered on the lower half |
Selecting Your Arctic Elements
Every artist needs the right materials, and for these Polar Bear Cupcakes, the quality of your vanilla and the texture of your coconut are the stars of the show. If you've ever made chocolate cupcakes with sour cream, you know how important moisture balance is, but here we are also focusing on the visual "whiteness" of the ingredients.
Component Deep Dive
| Ingredient | Role in the Art | Pro Secret |
|---|---|---|
| All Purpose Flour | Structural frame | Sift it with the sugar to ensure no lumps |
| Unsalted Butter | Moisture and richness | Use room temperature (18°C) for easy mixing |
| Shredded Coconut | Visual "fur" texture | Use unsweetened to control the sugar levels |
| Clear Vanilla | Color preservation | Regular vanilla turns frosting "parchment" colored |
- 1.5 cups (190g) all purpose flour: This provides the essential structure. Why this? Keeps the bear’s head from collapsing under the weight of decorations.
- 1 cup (200g) granulated sugar: For sweetness and moisture. Why this? Sugar helps create a tender crumb through moisture retention.
- 1.5 tsp baking powder: Our primary leavening agent.
- 0.5 tsp salt: To balance the sweetness of the frosting.
- 0.5 cup (115g) unsalted butter, cubed: For the base. Why this? Cubing it at room temp allows it to integrate into the flour easily.
- 1 large egg: The binder for our cake.
- 0.5 cup (120ml) whole milk: Adds fat and liquid for a silky batter.
- 2 tsp pure vanilla extract: For the cake base flavor.
- 1 cup (225g) unsalted butter, softened: For the buttercream.
- 3 cups (375g) powdered sugar, sifted: The body of our "snow."
- 3 tbsp heavy cream: To achieve that velvety, spreadable consistency.
- 1 tsp clear vanilla extract: To keep the frosting bright white.
- 1 cup (75g) unsweetened shredded coconut: For the fur.
- 12 white candy melts: These become the bear’s snout.
- 24 edible black sugar pearls: The perfect "soulful" eyes.
- 12 large black heart shaped sprinkles: For the nose.
- 24 mini marshmallows: To be snipped into ears.
Essential Decorating Tools
You don't need a huge arsenal, but a few specific items make the assembly line move much faster. When I first made these, I didn't have a cookie scoop, and my bears all looked like they were different subspecies because their "heads" were different sizes.
- Muffin Tin (12 cup): Standard size is best for the proportions of the candy melts.
- Electric Hand Mixer: Essential for getting that frosting stiff enough to hold the "fur."
- Kitchen Scissors: You'll need these to cut the marshmallows on a diagonal. It's much cleaner than trying to use a knife.
Chef's Tip: If your kitchen is warm, chill your candy melts in the fridge for 10 minutes before assembling. This prevents the heat from your fingertips from leaving dull smudges on the "snout."
Crafting Your Polar Bears

Now we get to the fun part. Think of this as a construction project. We are building from the ground up, starting with a solid foundation and finishing with those tiny details that bring the bear to life. If you've tried making cotton cheesecake cupcakes, you know how much precision matters, but these are much more forgiving!
- Preheat and Line: Set your oven to 350°F (175°C) and place your liners. Note: This ensures the oven is stable before the batter goes in.
- Whisk Dry Ingredients: Combine flour, sugar, baking powder, and salt in your large bowl.
- Rub in Butter: Add the 115g of cubed butter and mix on low until it looks like coarse sand. Note: This is the reverse creaming secret for a flat top.
- Add Liquids: Pour in the egg, milk, and 2 tsp vanilla. Beat until just combined.
- Bake the Bases: Fill liners 2/3 full and bake for 18-20 minutes until they spring back when touched.
- Whip the Frosting: Beat 225g butter until pale, then slowly add powdered sugar, clear vanilla, and heavy cream until stiff peaks form.
- Apply the Mound: Use a scoop to put a generous ball of frosting on each cooled cupcake.
- Texture the Fur: Roll the frosted top in the shredded coconut until fully coated and "fuzzy."
- Construct the Snout: Press a candy melt into the lower center and use a dot of frosting to stick the heart sprinkle on top.
- Add Final Details: Press the sugar pearls in for eyes and stick the marshmallow halves on top for ears.
Solving Decorative Dilemmas
Sometimes the arctic conditions in your kitchen aren't perfect. If your frosting feels like it's melting faster than a glacier, don't panic. The most common issue I see is the "sliding snout," where the candy melt slowly migrates toward the bottom of the cupcake.
Why Your Bear Looks Sad
If your bear looks a bit droopy, it’s usually a temperature issue. If the cupcakes aren't 100% cool to the touch (check the bottom!), the frosting will liquefy at the base. Also, if you use "desiccated" coconut instead of "shredded" coconut, the fur will look more like sand than hair.
| Problem | Root Cause | Solution |
|---|---|---|
| Snout falls off | Frosting is too soft | Chill the frosting for 15 mins before piping |
| Ears won't stick | Marshmallow is too dry | Dip the cut side in a tiny bit of water or corn syrup |
| Yellowish bears | Regular vanilla used | Only use clear vanilla or whitener gel |
Common Mistakes Checklist
- ✓ Never frost a warm cupcake; the bear will literally melt away.
- ✓ Sift your powdered sugar; lumps look like "ice chunks" in your bear's fur.
- ✓ Cut marshmallows with clean, dry scissors to get a sharp "ear" shape.
- ✓ Don't overmix the batter after adding the milk, or the cake will be tough.
Adjusting the Batch Size
If you're hosting a massive winter gala or just baking for a quiet night in, you might need to scale this. Because of the "reverse creaming" method, this recipe scales beautifully, but you have to be careful with the leavening agents.
Scaling Down (6 Cupcakes): Cut everything exactly in half. For the egg, whisk it in a small bowl and use 2 tablespoons of the mixture. Reduce the bake time by about 2-3 minutes since the oven won't be as crowded.
Scaling Up (24 Cupcakes): Double the ingredients, but only use 1.5 times the salt and baking powder. This prevents the cupcakes from tasting "metallic" or rising too aggressively.
You should bake these in two separate batches rather than crowding two trays onto one rack, as this ensures even airflow and those flat tops we need.
Arctic Myths and Legends
There’s a common misconception that you should use "shorter" liners for these to make the bear heads look more prominent. Actually, standard liners provide the necessary wall support to keep the cupcake sides straight, which helps the frosting mound sit perfectly on top.
Another myth is that you must use coconut. If you have a coconut hater in the house, you can achieve a similar "fur" look by using a small "grass" piping tip (like a Wilton 233) with the white buttercream. It takes longer, but the visual result is just as whimsical.
Preserving Your Bears
If you have leftovers (which is rare!), you need to protect that delicate coconut texture. Shredded coconut can dry out and become "crunchy" in a bad way if left exposed to the air.
- Storage: Keep these in an airtight container at room temperature for up to 3 days. If your kitchen is very warm, the fridge is okay, but it can dry out the cake.
- Freezing: You can freeze the unfrosted cupcakes for up to 2 months. I don't recommend freezing the fully decorated bears, as the marshmallows and candy melts can "bloom" or get sticky when thawing.
- Zero Waste: If you have leftover shredded coconut, toast it in a pan and use it as a topping for yogurt or oatmeal. Leftover frosting can be sandwiched between two cookies!
Elegant Serving Ideas
To really lean into the "art" of the dish, think about the color palette of your serving platter. I love using a slate grey or a deep navy blue plate to make the white "snow" of the cupcakes pop.
The Arctic Tablescape
Create a "landscape" by scattering extra shredded coconut across the platter to look like fallen snow. You can even place a few sprigs of fresh rosemary upside down to look like snow covered pine trees.
The Hot Cocoa Pairing
Nothing beats the visual of a Polar Bear Cupcake sitting next to a steaming mug of hot chocolate. The steam slightly softens the marshmallow ears, making them even more pleasant to eat. It's the ultimate winter "hygge" moment.
- 1. Arctic Blue
- Use light blue cupcake liners to suggest icy water.
- 2. Holly Red
- Add a tiny red bow made of frosting to the "neck" for a festive touch.
- 3. Evergreen
- Garnish the plate with rosemary for a forest feel.
Decision Shortcut: If you want Maximum Cuteness, use the heart shaped sprinkles for the nose. If you want Faster Assembly, use a black jelly bean or a chocolate chip for the nose.
If you want Adult Sophistication, skip the marshmallows and just do the coconut "fur" with the pearl eyes.
These Polar Bear Cupcakes are more than just a sugar fix; they are a way to bring a little bit of whimsical art into your kitchen. Whether you're making them with kids or for a sophisticated winter party, that first "crack" of the candy melt snout is guaranteed to bring a smile to everyone's face. Happy baking!

Recipe FAQs
How to ensure the bear faces do not melt off?
Wait until the cupcakes are completely cool before frosting. If the cake retains any residual heat, the butter based frosting will lose its structure and slide right off the surface.
Is it necessary to sift the powdered sugar for the frosting?
Yes, always sift your powdered sugar. Lumpy sugar creates an uneven texture that looks like gritty ice chunks rather than the smooth, snowy look required for polar bear fur.
How to get clean edges on the marshmallow ears?
Use clean, dry kitchen shears to snip the marshmallows in half. If the sticky interior of the marshmallow pulls at the scissors, lightly coat the blades with a tiny amount of powdered sugar to ensure a sharp, clean cut.
How to avoid a tough cake texture?
Stop mixing as soon as the milk is incorporated into the batter. Overworking the flour after the liquid is added develops excess gluten, which ruins the tender crumb; if you enjoyed perfecting this delicate texture, you can apply the same mixing discipline to our Strawberry Shortcake Cupcakes.
Can I use a hand mixer for the butter and flour mixture?
Yes, use the low speed setting. Continue mixing only until the butter and flour create a texture resembling coarse sand, as this stage is crucial for achieving the proper cake density.
How to achieve stiff peaks in the frosting?
Beat the mixture on high speed after adding the heavy cream. Beating at a high speed incorporates enough air to hold the weight of the candy melt snout and marshmallow ears without sagging.
Is it okay to bake at a higher temperature to save time?
No, stick to the 350°F (175°C) temperature. Using a higher heat causes the cupcakes to rise too quickly and collapse in the center, which ruins the flat surface needed to display the polar bear faces.
Whimsical Polar Bear Cupcakes
Ingredients:
Instructions:
Nutrition Facts:
| Calories | 549 kcal |
|---|---|
| Protein | 3.1 g |
| Fat | 30.4 g |
| Carbs | 67.2 g |
| Fiber | 1.3 g |
| Sugar | 52.5 g |
| Sodium | 154 mg |
