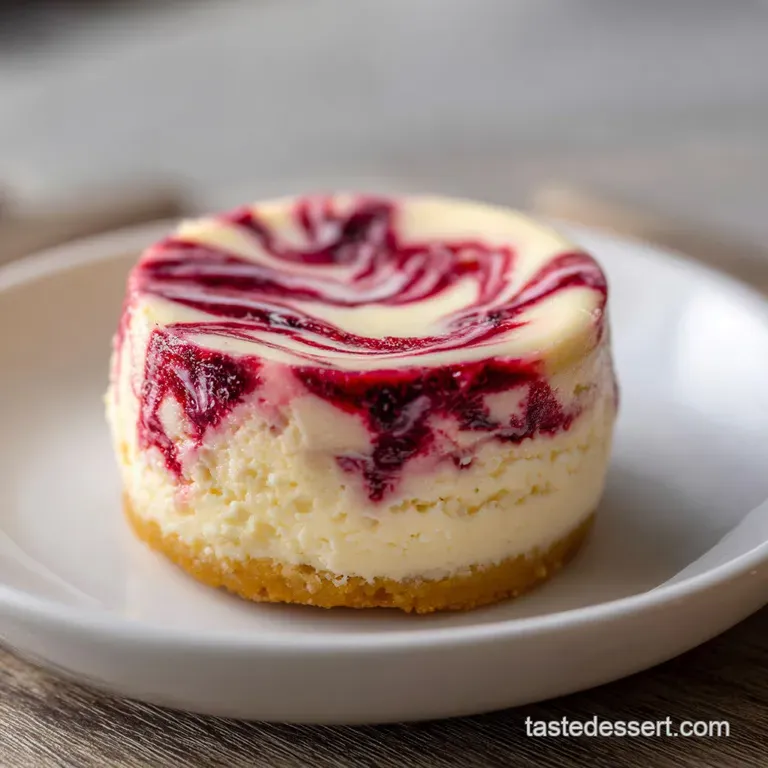
Ultimate White Chocolate Cheesecake with Raspberry

- Time: Active 25 minutes, Passive 1 hours 15 mins, Total 1 hours 40 mins
- Flavor/Texture Hook: Silky, tart, and buttery
- Perfect for: Holiday gatherings, anniversaries, or dinner parties
- Perfecting Ultimate White Chocolate Cheesecake with Raspberry
- The Secret to Silky Texture
- Key Metrics for Success
- Essential Components and Substitutes
- Necessary Tools for Baking
- Your Step-By-Step Baking Plan
- Troubleshooting Common Baking Issues
- Flavor Tweaks and Adaptations
- Proper Storage Guidelines
- Serving and Presentation Secrets
- Myths About Cheesecake
- Recipe FAQs
- 📝 Recipe Card
Perfecting Ultimate White Chocolate Cheesecake with Raspberry
The scent of melting Ghirardelli white chocolate filling the kitchen is pure bliss, especially when it mingles with the sharp, bright aroma of simmering berries. Indulge in the ultimate white chocolate cheesecake with raspberry swirl, a dessert sensation you'll adore.
It is a dish that feels like a celebration before you even take the first bite.
I remember my first attempt at this cake years ago. I was so worried about the dreaded center crack that I practically hovered over the oven door. After a few messy trials, I realized that cheesecake is less about luck and more about managing temperature and moisture.
When you get that velvety texture just right, the way it melts on your tongue is nothing short of transformative.
This recipe takes those classic flavors and balances them so they are not cloying. The tartness of the berries cuts through the richness of the white chocolate, while the graham cracker crust adds a necessary salty, crunchy snap.
Whether you are a seasoned baker or a nervous beginner, we are going to walk through the exact steps to ensure your cake looks like it came from a high end bakery.
The Secret to Silky Texture
1. The Cocoa Butter Emulsion
Structural Integrity: White chocolate contains cocoa butter, which acts as a stabilizer that sets firmer than cream cheese alone. This creates a dense, velvety mouthfeel that holds its shape without becoming rubbery.
2. Moisture Controlled Fruit Swirl
Preventing Bleeding: Using cornstarch in the raspberry reduction ensures the swirl stays suspended in the batter. Without it, the fruit juice would weep into the cheesecake, creating soggy pockets and dulling the white chocolate flavor.
3. The Residual Heat Method
Gentle Finishing: Turning off the oven and cracking the door allows the cake to finish setting through carryover heat. This gradual temperature drop prevents the proteins from recoiling, which is the primary cause of surface cracks.
| Crust Thickness | Filling Temp | Cool Time | Visual Cue |
|---|---|---|---|
| 1/4 inch | 150°F (internal) | 60 minutes | Slight center wobble |
| 1/2 inch | 155°F (internal) | 90 minutes | Set edges, jiggly center |
| 3/4 inch | 160°F (internal) | 120 minutes | Firm to the touch |
Using the right technique is just as vital as following the steps. Much like the precision needed for The Homemade Funfetti recipe, managing your oven temperature ensures the texture remains light and airy rather than heavy and dense.
Key Metrics for Success
| Component | Science Role | Pro Secret |
|---|---|---|
| Full fat Cream Cheese | Structural fat base | Use room temperature blocks only to prevent tiny white lumps |
| White Chocolate | Flavor and stability | Melt slowly over a double boiler to avoid graininess |
| Large Eggs | Protein binder | Add one at a time on low speed to avoid whipping in air |
Success in baking often comes down to the temperature of your ingredients. If your cream cheese is even slightly cold, you will end up with a lumpy batter that no amount of whisking can fix.
Essential Components and Substitutes
To make this Ultimate White Chocolate Cheesecake with Raspberry, you will need a few pantry staples and some high-quality dairy.
- Graham cracker crumbs (1.5 cups): These provide the sandy, sweet foundation. Why this? They hold butter well for a sturdy base.
- Substitute: Digestive biscuits or vanilla wafers for a similar crunch.
- Granulated sugar (1 cup + 3 tbsp + 2 tbsp): Divided for the crust, coulis, and filling. Why this? It sweetens while aiding in the browning of the crust.
- Substitute: Caster sugar for an even smoother dissolve.
- Unsalted butter (6 tbsp): Melted to bind the crust. Why this? Fat carries the cinnamon flavor through the base.
- Substitute: Salted butter (just omit the extra pinch of salt).
- Ground cinnamon (0.5 tsp): Adds warmth to the base.
- Substitute: Nutmeg for a more floral, spicy note.
- Fresh or frozen raspberries (6 oz): The star of the swirl. Why this? Their acidity balances the heavy white chocolate.
- Substitute: Blackberries or strawberries for a different berry profile.
- Lemon juice (1 tsp): Brightens the fruit flavors.
- Cornstarch (1 tsp): Thickens the coulis.
- Full fat cream cheese (32 oz): The main body of the cake.
- White Chocolate (10 oz): I recommend Ghirardelli for its meltability.
- Pure vanilla extract (1 tsp): Rounds out the sweetness.
- Salt (0.5 tsp): Crucial for contrast.
- Large eggs (4): Provides the lift and set.
For those who love a bit of variety, you might find that the richness of these ingredients reminds you of the decadence found in The Oh My recipe, where quality chocolate is the absolute hero of the dish.
Necessary Tools for Baking
- 9 inch Springform Pan: This is non negotiable for a clean release.
- Electric Hand Mixer or Stand Mixer: Necessary for achieving a smooth emulsion.
- Fine Mesh Strainer: Essential for removing raspberry seeds from the coulis.
- Large Roasting Pan: To serve as the water bath (bain marie).
- Heavy Duty Aluminum Foil: To wrap the bottom of the pan and prevent leaks.
Your step-by-step Baking Plan
1. The Foundation Phase
Mix 1.5 cups graham cracker crumbs, 3 tbsp sugar, 0.5 tsp cinnamon, and 6 tbsp melted butter. Press firmly into the bottom of your springform pan and bake at 350°F (180°C) for 10 minutes until fragrant and slightly darkened.
2. The Coulis Reduction
Simmer 6 oz raspberries, 2 tbsp sugar, and 1 tsp lemon juice in a small saucepan for 5 minutes. Add the cornstarch slurry and cook for 1 minute until thickened and glossy.
3. For the Tart Raspberry Coulis
Press the warm berry mixture through a fine mesh strainer to remove seeds. Note: This ensures the swirl is silky and does not interrupt the creamy texture of the cake.
4. The Emulsion Phase
Beat 32 oz room temperature cream cheese and 1 cup sugar on medium speed until no lumps remain. Note: Scraping the bowl frequently is the only way to ensure a uniform batter.
5. For the Silky White Chocolate Filling
Gently fold in 10 oz melted and slightly cooled white chocolate, 1 tsp vanilla, and 0.5 tsp salt. Mix until the color is consistent and the batter looks like liquid velvet.
6. Adding the Eggs
Add 4 large eggs one at a time on the lowest speed. Stop mixing the moment the yellow streaks disappear to prevent incorporating too much air.
7. The Marble & Bake Phase
Pour the filling over the crust, then drop spoonfuls of the raspberry coulis on top. Use a wooden skewer to swirl the berries into the batter until a beautiful marble pattern forms.
8. The Water Bath
Wrap the pan in three layers of foil and place it in a roasting pan filled with 1 inch of hot water. Bake at 325°F (160°C) for 1 hour 15 mins until the edges are set but the center still wobbles.
9. The Controlled Cooldown
Turn off the oven and crack the door slightly, leaving the cake inside for 1 hour. Note: This slow descent in temperature is your best defense against surface cracks.
10. The Final Chill
Remove the cake from the water bath and refrigerate for at least 6 hours, or ideally overnight. Wait until the cake is fully cold before attempting to release the springform sides.
Troubleshooting Common Baking Issues
Why Your Cheesecake Cracked
Cracks usually happen because of sudden temperature changes or over mixing the eggs. When you beat eggs at high speed, you trap air bubbles that expand in the oven and collapse during cooling, causing the surface to shatter.
Why Your Crust Is Soggy
This is almost always a water bath failure. If the aluminum foil has even a tiny pinhole, water will seep in and turn your crisp graham cracker base into mush.
| Problem | Root Cause | Solution |
|---|---|---|
| Lumpy Batter | Cold cream cheese | Use a microwave to warm cheese in 10 sec bursts |
| Runny Center | Underbaked | Check internal temp reaches 150°F before cooling |
| Seeping Fruit | Coulis too thin | Simmer longer with cornstarch to reach syrup stage |
Common Mistakes Checklist
- ✓ Bring all dairy and eggs to room temperature for at least 2 hours before starting.
- ✓ Use wide, heavy duty foil and wrap the pan high up the sides to block water.
- ✓ Avoid opening the oven door during the first hour of baking to keep heat steady.
- ✓ Wipe your knife with a warm, damp cloth between every single slice for clean edges.
Flavor Tweaks and Adaptations
1. The White Mocha Twist
Add 1 tablespoon of instant espresso powder to the white chocolate batter. The coffee notes deepen the cocoa butter flavor and create a sophisticated, latte inspired profile that pairs beautifully with the berries.
2. The Almond Crunch Variation
Swap the graham crackers for crushed amaretti cookies and add 0.5 tsp of almond extract to the filling. This gives the cake a nutty, marzipan like quality that feels very European. For another frozen inspired treat, you might look at The Homemade Ice recipe for ideas on layering different textures.
3. gluten-free Adaptation
Simply replace the graham cracker crumbs with your favorite gluten-free ginger snaps or a gluten-free graham substitute. Since the filling is naturally thickened with eggs and white chocolate, no other changes are needed.
| Method | Time | Texture | Best For |
|---|---|---|---|
| Standard Bake | 1 hours 40 mins | Silky Custard | Dinner Parties |
| No Bake Swap | 30 minutes | Mousse like | Hot Summer Days |
| Mini Cakes | 25 minutes | Dense & Rich | Easy Serving |
Proper Storage Guidelines
Fridge Storage: Keep your cheesecake in the refrigerator for up to 5 days. Ensure it is tightly covered with plastic wrap or stored in an airtight container so it doesn't absorb fridge odors like onions or garlic.
Freezer Instructions: This cake freezes remarkably well. Wrap the fully chilled cake (or individual slices) in a double layer of plastic wrap and then a layer of foil. It will stay fresh for up to 2 months. Thaw overnight in the fridge before serving.
Zero Waste Tip: If you have leftover raspberry coulis, do not toss it! It is incredible swirled into morning yogurt, drizzled over vanilla ice cream, or shaken into a gin cocktail for a fruity punch.
Serving and Presentation Secrets
1. The "Clean Slice" Technique
To get those "Instagram worthy" slices, use a thin bladed knife. Dip the knife into a tall glass of hot water, wipe it dry, and make one clean downward cut. Wipe the blade clean and re dip before every single slice to prevent the red swirl from smearing across the white base.
2. The Garnish Balance
Right before serving, add a few fresh, whole raspberries to the top of the cake. A light dusting of powdered sugar or some white chocolate curls (made by running a vegetable peeler along the edge of a chocolate bar) adds a professional touch without much effort.
Myths About Cheesecake
One common misconception is that a water bath is optional. While you can bake a cheesecake without one, the edges will likely brown and the texture will be more like a dense cake than a creamy custard.
The water bath keeps the air moist and the temperature around the pan strictly at 212°F (100°C), which is the boiling point of water.
Another myth is that you need to beat the batter for a long time to make it "fluffy." In reality, cheesecake should be dense and creamy. Over beating introduces air, which leads to a "soufflé" effect where the cake rises high and then crashes, leaving a crater in the middle.
Low and slow is the rule of thumb for the perfect Ultimate White Chocolate Cheesecake with Raspberry.

Recipe FAQs
Can I skip the water bath when baking this cheesecake?
No, skip it at your own risk. The water bath (bain marie) insulates the batter, ensuring a slow, gentle cook that prevents the edges from overbaking and the center from cracking.
What is the best temperature to bake the white chocolate cheesecake?
Start at 325°F (160°C) and reduce heat later. Bake initially at this temperature until the edges are set, then turn the oven off and crack the door for the controlled cool down phase.
How to prevent the raspberry swirl from bleeding into the white chocolate batter?
Thicken the raspberry coulis with cornstarch. Simmer the fruit reduction until it becomes syrupy; this stabilizes the moisture so it stays suspended when swirled.
Is it true I must use room temperature cream cheese for a lump free filling?
Yes, room temperature is essential. Cold cream cheese will not fully emulsify with the sugar and white chocolate, resulting in small, unmixed lumps throughout your finished cake.
How to melt white chocolate without burning or making it seize?
Melt at 50% power in 20-second intervals. Stir between each interval to evenly distribute the heat and prevent scorching the milk solids in the chocolate.
What should I do if I don't have a springform pan for this recipe?
Line a standard 9 inch cake pan meticulously with foil. Double or triple wrap the outside, extending the foil high above the filling line to ensure a watertight seal against the water bath.
Can I substitute the graham cracker crust with something else?
Yes, substitute with digestive biscuits or vanilla wafers. This change slightly alters the flavor profile but maintains the necessary crumbly texture needed for a firm base; the principles for building a sturdy crust are similar to those used for achieving a non-soggy base in our Maple Pecan Pie recipe.
White Chocolate Raspberry Cheesecake

Ingredients:
Instructions:
Nutrition Facts:
| Calories | 606 kcal |
|---|---|
| Protein | 8.8 g |
| Fat | 41.9 g |
| Carbs | 50.3 g |
| Fiber | 0.9 g |
| Sugar | 44.1 g |
| Sodium | 382 mg |
