Bake Tuna Mornay in Creamy Cheesy Goodness

- Let's Talk About Tuna Mornay
- A Little Slice of History
- Why You'll Love This Dish
- Getting Ready to Cook
- Essential Ingredients Guide
- Cooking Like a Pro: Mastering the Bake Tuna Mornay
- Pro Tips & Secrets to Perfect Tuna Mornay
- Perfect Presentation for Your Casserole
- Storage & Make-Ahead Tips
- Creative Variations for Fun!
- Complete Nutrition Guide
- Expert FAQ Solutions
- Encouraging Conclusion
- 📝 Recipe Card
Let's Talk About Tuna Mornay
Have you ever had one of those nights where you just want a cozy dinner that feels like a warm hug? that’s exactly how i felt when i decided to bake tuna mornay in creamy cheesy goodness for my family one chilly evening.
I was flipping through my old cookbook, and this comforting dish jumped out at me. you know how certain dishes just take you back to your childhood? that’s this one for me!
Tuna casserole is a classic, but the tuna mornay takes it up a notch. the rich, creamy sauce blends perfectly with tender tuna, making every bite feel like a nostalgic trip down memory lane.
Honestly, who doesn't love a good cheese pull from a hot, baked dish, right?
A Little Slice of History
So, what's the story behind this dish? it originally hails from australia and britain , where it was a staple in family homes.
Back in the day, it was a way to use up pantry staples like canned tuna and cheese. fast forward to today, and it’s still a popular choice for family dinner ideas because let’s be real, who has time for complicated meals?
Nowadays, it’s loved for its quick prep and delicious outcomes; just think of it as the best comfort food recipe that brings everyone together.
Now, let’s break down what you’re getting into: it takes about 50 minutes from start to finish, including prep and cooking time.
It’s sweet, simple, and perfect for anyone who isn’t afraid to use a can opener. plus, it serves 4 to 6 people , making it a solid choice for those nights when you’ve got the crew over.
And when you consider the cost? it's a budget friendly meal that won’t break the bank!
Why You'll Love This Dish
Now, let’s chat about the perks. first off, tuna is a powerhouse of nutrition packed with protein and omega-3s that are great for your heart.
Seriously, it’s a healthy option without skimping on that comforting feeling we all crave from a warm casserole.
This dish shines when it comes to special occasions, too. whether it's a sunday family dinner or a cozy gathering with friends, the baked tuna dish is great for sharing.
The beauty of this recipe is its versatility! you can sneak in some veggies, or even swap out the pasta for a gluten-free option.
Plus, it’s child approved perfect when you’re looking for kid-friendly meals .
Wanna switch things up? try adding some spice or experimenting with different cheeses. the flavor possibilities make this creamy tuna recipe rather exciting! because who doesn’t love a good cheesy tuna bake topped with crunchy breadcrumbs?
It's one of those easy dinner recipes that you’ll find yourself coming back to over and over again.
Getting Ready to Cook
Alright, if you’re excited, i can’t blame you! you’re probably itching to find out what you need to gather. a mix of pantry staples likely awaits you, and some great things are spot on for this dish.
Next up, we’ll dive into the list of ingredients so you can start this stellar cooking adventure.
So, get those pots ready, grab your whisk, and let’s make a dish that will result in cheesy goodness and a full belly!
Essential Ingredients Guide
When it comes to whipping up a comforting baked tuna dish , knowing your ingredients is half the battle. let’s dig into a little cheat sheet for what you need to nail that bake tuna mornay in creamy cheesy goodness.
Premium Core Components
First off, let’s talk premium core components . Having the right stuff on hand can make or break your delicious dish.
Measurements : You’ll want 4 tablespoons of unsalted butter and 2 cups of whole milk.
That’s about 57g and 480ml in case you’re rocking the metric system!
Quality indicators : for tuna, look for cans labeled “solid white” or “chunk light,” which generally mean better texture. go for shredded sharp cheddar cheese to give that extra bite we all love.
Storage guidelines : tuna lasts up to 3-5 years in a can. no need for panic; just make sure it’s in a cool, dry place.
Cheese? keep it wrapped and in the fridge. it should be good for about 2-4 weeks .
Freshness tips : always check for a clean smell when you open canned tuna. for cheese, if it’s crumbly or moldy, toss it out.
Fresh ingredients are the name of the game, folks!
Signature Seasoning Blend
Now, onto that signature seasoning blend . This is where the magic happens!
Essential spice combinations : A sprinkle of salt , pepper , and a dash of garlic powder can take your dish from bland to oh-so-grand.
Herb selections : Let’s not forget fresh parsley. That bright green adds a lovely pop and balances the creaminess. Just chop it fine!
Flavor enhancers : A tablespoon of Dijon mustard adds a mild tang that contrasts beautifully with the cheese. Trust me, you’ll thank me later!
Regional variations : some folks throw in a bit of paprika for an australian vibe, while others might be brave and toss in bay leaves for a british twist.
No wrong moves here, just deliciousness!
Smart Substitutions
Got some dietary restrictions? No problem! Smart substitutions are your best friend.
Common alternatives : If you’re out of cheddar, mozzarella or even a dairy-free cheese alternative works too.
Emergency replacements : In a pinch? Swap tuna for canned chicken or even chickpeas for a veggie twist!
Seasonal options : When cucumbers and zucchini are fresh in summer, throw ’em in instead of peas for a light touch.
Kitchen Equipment Essentials
You’ll need some kitchen equipment essentials to bring your casserole dreams to life.
Must have tools : Grab a large pot for your cheese sauce, a whisk, and a baking dish about 9x13 inches . That’s the sweet spot for a family meal.
Alternative options : Don’t have a whisk? Use a fork! No baking dish? A deep skillet works too. We're here for solutions, not excuses!
Preparation tips : Always melt your butter on medium heat to keep it controllable and non-burnt.
Storage solutions : After cooking, cover leftovers with foil to keep it fresh in the fridge for up to 3 days .
Now that we’ve broken down the essentials, it's time to dive into cooking. you’ll be on your way to baking a delicious tuna casserole that’s bound to be the star of any family dinner.
Stick around, and let’s jump right into the step-by-step instructions. you won’t want to miss it!
Cooking Like a Pro: Mastering the Bake Tuna Mornay
So, you want to cook like a professional? let’s dive into the wonders of the bake tuna mornay in creamy cheesy goodness.
Honestly, it’s one of those comfort food recipes that wraps you in a hug. you’ve got tuna, cheese, and a dash of nostalgia you can't go wrong, right?
Essential Preparation Steps
Before we start whipping up this easy dinner recipe , let’s take a moment for mise en place . that fancy french term just means “everything in its place.
” gather your ingredients, chop your parsley, and measure out your milk. having everything set saves time and makes the cooking feel smoother like you're gliding along a buttery hot pan!
Now, onto time management . when you’re cooking, especially with a dish like this one, timing is everything. while your cheese sauce simmers and thickens, use that time to prep your tuna and pasta.
Honestly, multitasking is key here.
Then there’s organization . keep your workspace tidy. i’m telling you, a clean kitchen equals a happy cook! and let's not forget about safety considerations .
Be sure to use oven mitts when pulling that hot casserole out no one wants a burnt arm for the sake of a cheesy tuna bake.
Step-by-step Process
Time to get cooking! Here’s a clear breakdown of how to make this legendary casserole.
Preheat the Oven : Preheat your oven to 375° F ( 190° C) . Set the vibe right from the start.
Make the Cheese Sauce :
- Melt 4 tablespoons of unsalted butter over medium heat.
- Once melted, whisk in 1/4 cup of flour and let it bubble for about 2 minutes ; this creates your roux.
- Gradually pour in 2 cups of milk , whisking non-stop for about 5- 7 minutes until thick. You want a nice creamy texture.
- Stir in 2 cups of shredded cheddar cheese until it’s all melty and lovely. Add a sprinkle of salt, pepper, garlic powder, and onion powder .
Prepare the Casserole Mix :
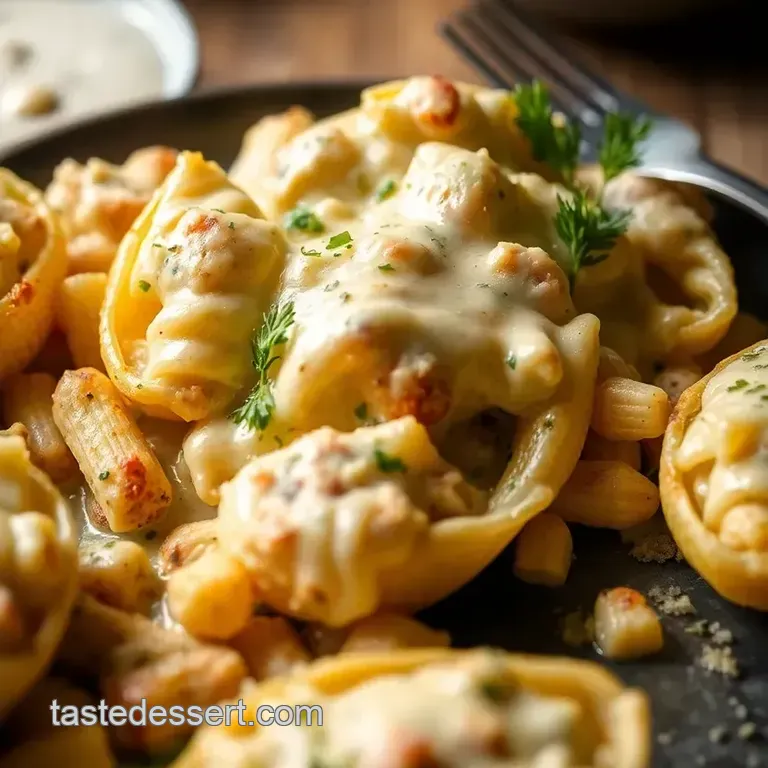
- In a separate bowl, toss together drained tuna , 1 cup of frozen peas , and if you’re feeling it, 1 cup of cooked macaroni . Give it a good mix.
- Pour your heavenly cheese sauce over that mixture and fold it together gently.
Assemble and Bake :
- Pour everything into a greased 9x13 inch baking dish .
- Sprinkle 1/2 cup of breadcrumbs mixed with 2 tablespoons of melted butter on top for that crispy goodness.
- Bake for 25 minutes until it’s bubbly and golden brown. Let it cool for a bit before serving. Trust me, the wait is worth it!
Expert Techniques
When you’re going for that perfect baked tuna dish , a few pro tips can help you shine.
Quality Checkpoints : Always taste your cheese sauce before you pour it over the tuna mix. Is it cheesy enough? Adjust the seasoning if it’s lacking something.
Temperature Control : Ensure your oven is properly preheated. It makes all the difference. You want that perfect golden crust, not a burnt mess.
Troubleshooting tips : if your sauce is too thick, add a splash of milk to loosen it up before mixing it with the tuna.
If it’s too thin, simmer it a bit longer.
Success Strategies
Now, let’s talk about those potential pitfalls and how to avoid them.
Common Mistakes : Don’t skip the cooling time after baking. If you serve it too hot, the texture might be off, and you’ll risk a cheesy explosion!
Quality assurance : if you have leftovers (let’s be real, it’s hard not to eat it all), store it in an airtight container.
Heat it up slowly in the oven to keep that creamy texture intact!
Make-ahead options : this dish is perfect for meal prep. you can assemble it a day ahead, store it in the fridge, and just pop it in the oven when you're ready to feast.
And just like that, you’re on your way to making a kick butt bake tuna mornay! it’s not just a great tuna casserole ; it's a dish that brings everyone to the table.
With its creamy and cheesy goodness, you’ll find yourself looking for excuses to whip this up for family or friends.
Additional Information
If you’re curious about different ways to spice up your tuna mornay recipe , consider experimenting with veggies. tossing in some fresh spinach or mushrooms can elevate your dish further.
Plus, i love online cooking tutorials for visual perception; they can teach you additional baking techniques for casseroles . so grab your fork, dig in, and enjoy every cheesy, melty bite!
Pro Tips & Secrets to Perfect Tuna Mornay
Oh my gosh, you’ve decided to try that bake tuna mornay in creamy cheesy goodness ! let’s make sure this dish is absolute perfection.
First off, a little secret from my kitchen: add a splash of dijon mustard to your cheese sauce. it totally ramps up the flavor without being overpowering.
And don’t be shy with the spices! a bit of garlic and onion powder goes a long way in giving your cheesy tuna bake that extra oomph.
Want a time saving hack? make your cheese sauce ahead of time! you can simmer the ingredients, let them cool, and toss them in the fridge until you’re ready to whip everything together.
Talk about a quick weeknight meal!
When it comes to enhancing flavors, consider adding a pinch of nutmeg . sounds odd, right? but trust me, it adds a wonderful depth that elevates this creamy tuna recipe to something truly special.
Not to mention, if you want to impress, don’t forget to sprinkle on some fresh parsley for a pop of color!
Perfect Presentation for Your Casserole
Now, let’s chat about how to really make your tuna casserole shine when it comes out of the oven. Great presentation can turn an easy dinner recipe into a fancy feast!
For plating, scoop generous portions into bowls rather than serving straight from the baking dish. Layer it up with some crisp greens on the side to break up that hearty casserole.
Garnish ideas? a sprinkle of paprika or some crispy bacon bits on top brings both visual appeal and an extra layer of flavor to your savory dish.
And don’t forget about color! fresh veggies can really liven things up, and i love using bright green peas and vibrant parsley.
Storage & make-ahead Tips
Life gets busy, and having a game plan for leftovers is essential. your baked tuna dish can last in the fridge for about 3-4 days if stored properly.
Just cover it tightly to keep that cheesy goodness intact.
If you want to save some for later, you can freeze it too! just let it cool completely, then pop it in an airtight container.
It’ll be good for about a month. when you’re ready to dig in, just thaw it overnight in the fridge and then reheat in the oven.
Hands-up if you’ve ever forgotten to defrost something? been there, done that. don't worry, you can also microwave it! just make sure to cover it loosely, though, or you'll end up with a messy microwave.
Creative Variations for Fun!
Now, let’s get creative. A beloved part of any tuna mornay recipe is making it fit your mood. Want extra veggies? Toss in some sautéed spinach or zucchini! Don’t like tuna? Use shredded chicken or add some shrimp instead and whip up a seafood mix!
And here's a fun seasonal twist: October calls for pumpkin! Add a bit of pumpkin puree into your cheese sauce for a cozy fall vibe.
Got dietary restrictions? Switching to gluten-free tuna bake ? Just swap out the flour for almond flour or a store-bought gluten-free blend. Trust me, nobody will even notice the difference!
Complete Nutrition Guide
This heartwarming dish brings comfort, but it’s also not without its perks. did you know that tuna is packed with protein and omega-3 fatty acids? ideal for staying fit and healthy! if you’re looking at portion guidance, this baked pasta recipes serves about 4-6, so feel free to adjust if you need more.
When you’re mixing your ingredients, pop in some seasonal veggies, like broccoli, for added nutrients. Honestly, it’s a win-win!
Expert FAQ Solutions
Common question: What if I don’t have a specific cheese? No worries, cheese substitutes like mozzarella or vegan options work well too.
Another frequent concern? Baking times. Keep an eye on that golden top! If the edges start to brown too much, cover it with foil to keep it from burning.
When it comes to success tips, remember to mix well and not to rush the cheese sauce. A well blended sauce means a creamier finish!
Encouraging Conclusion
So there you have it everything you need to create that dreamy bake tuna mornay in creamy cheesy goodness ! this dish is all about comfort, and trust me, you’ll want to make it again and again.
Whether you’re diving into a family dinner with kids or hosting friends, this cheesy tuna bake is sure to impress.
So, roll up those sleeves! you got this, and i can’t wait to hear how it turns out!
Bake Tuna Mornay In Creamy Cheesy Goodness