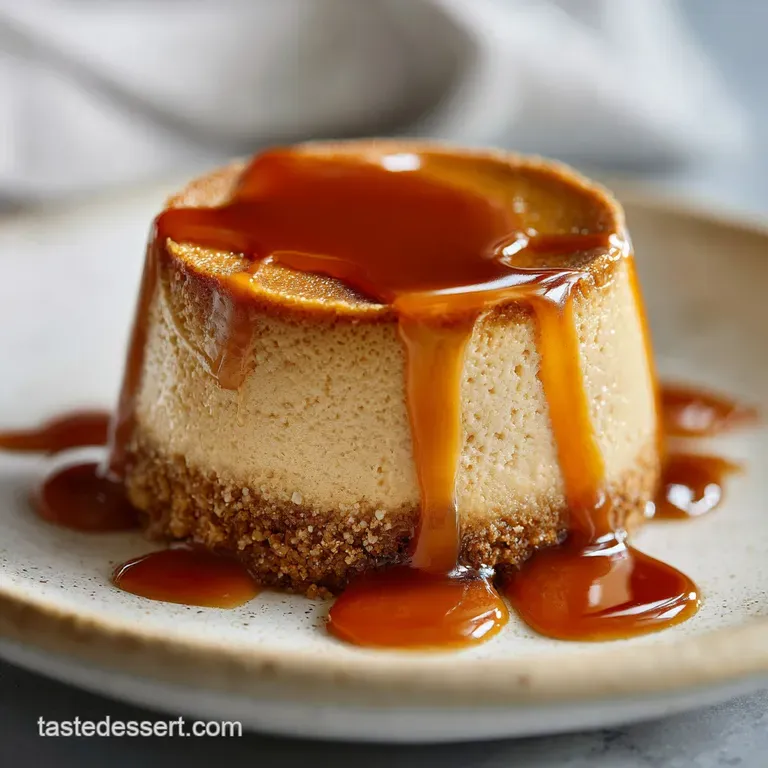
Baked Caramel Cheesecake with Salted Swirl
- Time: Active 25 minutes, Passive 1 hours 30 mins, Total 1 hours 55 mins
- Flavor/Texture Hook: Velvety cream cheese with a buttery biscuit shatter
- Perfect for: Holiday gatherings or a sophisticated weekend treat
- Achieving the Most Velvety Baked Caramel Cheesecake Ever
- Essential Specifications for This Baked Caramel Cheesecake
- Strategic Component Analysis of the Ingredients
- Shopping List for Your Caramel Masterpiece
- Essential Equipment for a Flawless Result
- The Detailed Step by Step Process
- How to Fix Common Problems
- Scaling Guidelines for Different Needs
- Debunking Common Kitchen Myths
- How to Store and Keep Fresh
- Perfect Complements for Caramel Flavors
- Recipe FAQs
- 📝 Recipe Card
Achieving the Most Velvety Baked Caramel Cheesecake Ever
I remember the first time I pulled a tray out of the oven and the aroma of toasted sugar hit me like a warm hug. It was a cold Tuesday, and I was determined to conquer the crack that dreaded canyon that opens up in the middle of a cheesecake when you least expect it.
I had seen so many recipes that promised a smooth top but delivered a lunar landscape instead. This time, I watched the salted caramel swirl into the cream cheese, creating amber rivers that smelled like a high end candy shop.
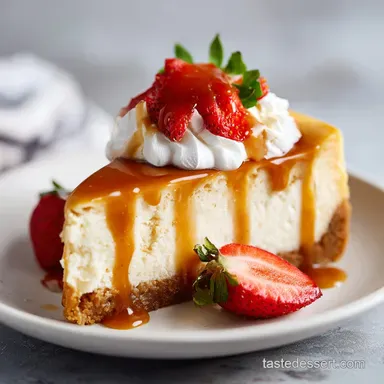
When that first slice slid onto the plate, the texture wasn't just soft; it was heavy in the way only a true Philadelphia caramel cheesecake recipe should be. The base had this satisfying shatter under the fork, and the filling felt like silk against the tongue.
We've all been there, staring through the oven glass, praying for no bubbles. I've made the mistakes the overbeating, the cold eggs, the impatient cooling so you don't have to.
Trust me on this, once you master the gentle dance of room temperature ingredients, you'll never go back to store-bought. We are aiming for a result that is rich, decadent, and carries that unmistakable tang of sour cream. Let's get into how we transform these simple components into something truly remarkable.
Essential Specifications for This Baked Caramel Cheesecake
The Physics of the Velvet Swirl: By incorporating room temperature eggs last and on low speed, we prevent air entrainment that causes the cake to puff and then collapse. This stability ensures the caramel stays suspended in the batter rather than sinking to the bottom.
| Method | Time | Texture | Best For |
|---|---|---|---|
| Standard Oven | 60 mins | Ultra creamy and dense | Traditional enthusiasts |
| Water Bath | 70 mins | Silky, custard like, pale | Avoiding any cracks |
| Convection | 50 mins | Slightly toasted edges | A quicker turnaround |
The choice of method really depends on your oven's personality. I personally swear by the water bath because it provides a gentle, moist heat that protects the delicate proteins in the 900g Philadelphia Cream Cheese. If you are looking for a different vibe, you might enjoy the technique used in my New York Style recipe.
Chef Science Tip
Freeze your crushed biscuit base for 10 minutes before pouring in the filling. This "flash sets" the butter, preventing the crust from absorbing the moisture of the cheesecake batter and turning soggy.
Strategic Component Analysis of the Ingredients
| Ingredient | Science Role | Pro Secret |
|---|---|---|
| Cream Cheese | Provides structural fat | Use the full fat blocks for the best mouthfeel |
| Sour Cream | Softens the protein web | Adds a necessary lactic tang to balance sugar |
| Granulated Sugar | Hygroscopic moisture retention | Whisk with cheese first to "scour" out lumps |
| Large Eggs | Protein binder for setting | Add one at a time to maintain the emulsion |
Choosing high-quality vanilla bean paste is another one of those little moves that changes everything. It adds those tiny black specks that signal to everyone that this is a truly homemade baked caramel cheesecake.
Shopping List for Your Caramel Masterpiece
- 250g Digestive biscuits or Graham crackers: These provide the structural foundation. Why this? Digestion biscuits offer a nuttier, less sweet profile than standard graham crackers.
- 100g Unsalted butter, melted: This acts as the glue for your base. Why this? Unsalted allows you to control the exact seasoning of the crust.
- 1 tbsp Light brown sugar: Adds a hint of molasses to the crunch.
- 1/2 tsp Sea salt: Essential for sharpening the buttery notes.
- 900g Philadelphia Cream Cheese: Ensure this is completely softened. Why this? This brand has the specific fat to moisture ratio required for a stable bake.
- 200g Granulated sugar: Provides sweetness and a smooth texture.
- 200ml Sour cream: Use room temperature to avoid curdling.
- 1 tsp Vanilla bean paste: For a deep, floral aroma.
- 4 Large eggs: These must be at room temperature to emulsify properly.
- 120ml Prepared salted caramel sauce: This gets swirled into the batter.
- 150ml Salted caramel sauce: Reserved for the final, glossy topping.
- 1 pinch Flaky sea salt: For that final hit of savory contrast.
If you find yourself running low on vanilla, you could always pivot toward the flavor profile found in The Homemade Funfetti recipe, though for this specific dish, the caramel is the star.
| Original Ingredient | Substitute | Why It Works |
|---|---|---|
| Sour Cream | Greek Yogurt (full fat) | Similar acidity; slightly tangier and denser. |
| Digestive Biscuits | Gingersnaps | Adds a spicy, warm kick to the base. |
| Light Brown Sugar | Dark Brown Sugar | More molasses; deeper color and stickier texture. |
Essential Equipment for a Flawless Result
You don't need a professional kitchen, but a few specific tools will make your life much easier. First, a 9 inch springform pan is non negotiable. It allows you to release the delicate sides without flipping the cake over, which would be a disaster for our caramel topping.
A stand mixer or a powerful hand mixer is also vital. You need enough power to beat the cream cheese into a completely smooth state before adding the other ingredients. Finally, a large roasting pan is needed if you choose the water bath method, along with heavy duty aluminum foil to wrap the bottom of your springform pan.
This keeps the water from seeping into your buttery biscuit base.
The Detailed step-by-step Process

Phase 1: Constructing the Base
- Preheat the oven to 325°F (160°C). Note: A lower temperature prevents the edges from overcooking before the center sets.
- Pulse 250g digestive biscuits in a food processor until they look like fine sand.
- Combine the crumbs with 100g melted butter, 1 tbsp light brown sugar, and 1/2 tsp sea salt.
- Press the mixture firmly into the bottom of a 9 inch springform pan. Note: Use the bottom of a flat glass to get an even, compacted layer.
- Bake the crust for 10 minutes until fragrant and slightly golden.
Phase 2: Building the Caramel Emulsion
- Beat 900g Philadelphia cream cheese and 200g granulated sugar on medium speed until completely smooth and velvety.
- Incorporate 200ml sour cream and 1 tsp vanilla bean paste, scraping down the sides of the bowl frequently.
- Add 4 large eggs one at a time, mixing on the lowest speed just until combined. Note: Overmixing here introduces air bubbles that cause cracking.
Phase 3: The Signature Swirl and Bake
- Pour half the batter over the crust, then drizzle 120ml salted caramel sauce over the top.
- Layer the remaining batter and use a knife to gently swirl the caramel through the cheesecake.
- Wrap the pan in foil, place in a roasting tin with 1 inch of hot water, and bake for 60 minutes until the edges are set but the center still jiggles slightly.
- Turn off the oven and leave the door ajar for 1 hour. Note: This slow cooling is the secret to a crack free surface.
How to Fix Common Problems
Why Your Cheesecake Has Surface Cracks
Cracking is almost always caused by a sudden change in temperature or overbeating the eggs. When eggs are whipped too much, they act like a soufflé, rising high and then collapsing as they cool. If you see a crack forming, don't panic.
You can often "heal" small ones by gently rubbing the surface with a warm, offset spatula once it has cooled slightly.
Why Your Crust Is Soggy
A soggy crust usually happens because water from the water bath leaked through the foil. Always use two or three layers of wide, heavy duty aluminum foil. If the damage is already done, you can try placing the cheesecake back in a low oven (without the water bath) for 10 minutes after it has cooled, though this is a risky move for the filling.
| Problem | Root Cause | Solution |
|---|---|---|
| Lumpy Filling | Cold Cream Cheese | Microwave cheese in 10 second bursts until soft. |
| Rubbery Texture | Overbaked Eggs | Remove from oven when the center still "wobbles" like Jell O. |
| Caramel Sinking | Batter Too Thin | Ensure the cream cheese is beaten thick before adding eggs. |
Common Mistakes Checklist
- ✓ Ensure all dairy and eggs are at true room temperature (leave out for 2 hours).
- ✓ Don't skip the "scrapping the bowl" step; hidden lumps of cheese will ruin the texture.
- ✓ Use a water bath to keep the baking environment moist and stable.
- ✓ Resist the urge to open the oven door during the first 45 minutes of baking.
- ✓ Let the cake cool in the oven with the door cracked to prevent thermal shock.
Scaling Guidelines for Different Needs
If you want to make a smaller version of this easy baked caramel cheesecake, you can halve the recipe and use a 6 inch pan. You'll need to reduce the baking time by about 15 to 20 minutes. Keep a close eye on that "jiggle" factor it's your best indicator of doneness.
For a larger crowd, doubling the recipe requires two separate 9 inch pans rather than one giant one. Baking a very deep cheesecake often leads to the outside becoming dry before the inside is safe to eat.
When baking two at once, ensure there is at least two inches of space between the pans for air circulation, and you might need to add 10 minutes to the total time.
Debunking Common Kitchen Myths
One common myth is that you must use a water bath for a good result. While it certainly helps, you can achieve a great baked caramel cheesecake with condensed milk or sour cream additions by simply placing a pan of water on the rack below the cheesecake. This creates steam without the risk of leaks.
Another misconception is that the cheesecake is done when a toothpick comes out clean. If a toothpick comes out clean, you have overbaked it! The center must remain slightly wobbly. The residual heat (carryover cooking) will finish the job as the cake cools on the counter.
How to Store and Keep Fresh
Proper storage is the difference between a delightful dessert and a fridge flavored disappointment. Once the cheesecake has reached room temperature, wrap the entire pan tightly in plastic wrap and refrigerate for at least 6 hours, though overnight is better.
This allows the fats to solidify and the flavors to meld.
- Fridge: Keep in an airtight container for up to 5 days.
- Freezer: You can freeze the whole cake (without the top caramel layer) for up to 3 months. Wrap in foil and then a freezer bag. Thaw in the fridge for 24 hours before serving.
- Zero Waste Tip: If you have leftover crust crumbs, toast them in a pan and sprinkle them over vanilla ice cream. Any leftover caramel sauce can be stirred into your morning coffee for a luxurious start to the day.
Perfect Complements for Caramel Flavors
This best baked caramel cheesecake is quite rich, so it benefits from something tart or salty to cut through the density. A side of fresh raspberries or a dollop of unsweetened whipped cream works wonders.
If you're feeling adventurous, a glass of tawny port or a strong espresso provides a beautiful bitter contrast to the sugary caramel.
If you enjoy the profile of this dessert, you should definitely try the Maple Pecan Pie recipe. It shares that deep, caramelized sugar vibe but with a completely different, crunchy texture. Or, if you want something with a bit of a visual "wow" factor, my Red Velvet Marble recipe offers a similar creamy cheesecake element but with a cocoa infused twist.
I really hope you give this homemade baked caramel cheesecake a try. It’s one of those recipes that makes your whole house smell like a dream and makes you feel like a professional pastry chef the moment you unclip that springform side. Just remember: patience is the most important ingredient.
Let it cool, let it set, and the reward will be the most velvety slice of heaven you've ever tasted. Happy baking!

Recipe FAQs
Should I use a water bath when baking this cheesecake?
Yes, it is strongly recommended. A water bath provides gentle, moist, and consistent heat, which prevents the edges from setting too quickly and drastically reduces the risk of surface cracks.
How do I prevent my cheesecake from cracking after it cools?
Minimize air incorporation and cool gradually. Overbeating eggs introduces air that causes rising and subsequent collapse; turn the oven off and crack the door once baking is complete to allow for a slow temperature transition.
How long does the prepared caramel need to chill before swirling?
Chill the caramel until it is slightly thickened, but still pourable. If the caramel is too cold or too stiff, it will drag through the batter instead of swirling smoothly; you want the viscosity to be similar to warm honey.
Is it okay to substitute the sour cream with regular milk?
No, substituting milk will result in a less stable structure. The acidity in sour cream tenderizes the cream cheese proteins, ensuring a velvety texture; milk lacks this necessary fat content and acid balance.
How to ensure the cream cheese mixture is completely smooth before adding eggs?
Beat the cream cheese and sugar together on medium speed until lump free, scraping down the bowl frequently. This scouring action removes hidden lumps that would otherwise create a grainy final texture, a technique similar to achieving a smooth emulsion in our Classic Homemade Éclairs recipe.
Can I bake this cheesecake a day ahead of serving?
Yes, chilling overnight yields the best flavor and set. Bake it completely, cool it slowly in the turned off oven, then cover and refrigerate for at least 12 hours before slicing.
How to achieve that perfect buttery crunch in the biscuit base?
Bake the crust separately for 10 minutes before adding the filling. This step flash sets the butter, creating a barrier that prevents the wet filling from soaking into the crumbs, a principle of moisture control also vital when preparing bases for pies like our Proper Pumpkin Pie recipe.
Baked Caramel Cheesecake
Ingredients:
Instructions:
Nutrition Facts:
| Calories | 631 kcal |
|---|---|
| Protein | 8.9 g |
| Fat | 43.6 g |
| Carbs | 51.6 g |
| Fiber | 0.8 g |
| Sugar | 41.8 g |
| Sodium | 445 mg |
