The Artisans Secret Rustic Basil and Garlic Noknead Bread

Unlocking Flavor: Why This Basil and Garlic No Knead Bread Requires Zero Effort
Few things impress quite like presenting a magnificent, crackling loaf of homemade bread, yet the idea of hours spent stretching and folding can deter even the most enthusiastic cooks.
This Basil and Garlic No Knead Bread recipe removes all complexity, relying on the magic of time, rather than brute force, to develop a deeply satisfying flavor and structure.
This technique yields a truly rustic Basil and Garlic Bread that rivals any bakery loaf, boasting a chewy, open crumb and a gloriously blistered crust. If you've been searching for the definitive no knead garlic bread recipe , this is your final destination it proves that effortless effort leads to superior results.
The Science of Time: Gluten Development Without the Sweat
The secret behind successful no knead bread recipe lies in bulk fermentation. Unlike traditional methods where vigorous kneading aligns the gluten strands, we utilize a long, slow 12 to 18-hour rest period at room temperature.
During this extensive period, the water fully hydrates the flour, and the tiny amount of instant dry yeast (just 1/4 teaspoon) works diligently, producing organic acids and gases. These acids not only give the bread its complex, slightly sour character but also weaken the protein structure just enough to allow the gluten network to form naturally and evenly all without requiring you to break a sweat.
A Proper Baker's Cheat Sheet for Artisan Results
While the overall process spans many hours, the active preparation time for this homemade artisan bread is incredibly minimal, requiring less than 15 minutes across mixing and shaping stages. This truly is a proper baker’s cheat sheet.
Success hinges entirely on patience and precise measurement. Using tepid water (approximately 100° F/ 38° C) is key to giving the yeast a gentle start, and ensuring accurate flour and liquid ratios 3 cups of strong bread flour paired with 1 1/2 cups plus 2 tablespoons of water guarantees the high hydration necessary for that signature airy crumb.
The Perfect Pairing: Matching Loaf to Meal
The robust, aromatic infusion of mellow garlic and fragrant basil makes this loaf incredibly versatile. This no-knead garlic bread is elevated beyond a mere side dish; it’s a centerpiece.
Slice it thick and serve it alongside a robust Minestrone or a French onion soup, where the hearty crust can absorb rich broths. Alternatively, for a simple delight, pair warm slices with good quality extra virgin olive oil and a dash of flake salt for dipping.
It also serves brilliantly as the carbohydrate hero on a Mediterranean style cheeseboard, complementing sharp cheeses and cured meats beautifully.
Essential Components for the Perfect Rustic Loaf
Achieving that magnificent, deep flavored crust and aromatic interior requires careful selection of both ingredients and equipment. The beauty of this recipe is that it uses common pantry staples, enhanced by fresh, high-quality aromatics.
Sourcing the Best Aromatic Additions (Basil and Garlic)
The flavor profile of this bread starts with a simple, yet essential, oil infusion. We use 2 tablespoons of extra virgin olive oil to gently sauté 4 large cloves of minced fresh garlic.
Crucially, the garlic must be cooked only until fragrant about 30 to 60 seconds to mellow its pungency without browning it, which would otherwise introduce bitterness. Once removed from the heat, 1/4 cup of finely chopped fresh basil leaves is stirred into the warm oil.
Allowing this mixture to cool completely before mixing into the flour ensures the yeast is not killed by residual heat, safeguarding the integrity of the rise.
Precise Measurements and Ingredient States (Warm Water vs. Cold)
For the core dough structure, use 3 cups of high-quality strong bread flour (or good all-purpose flour) combined with 1 1/2 teaspoons of fine sea salt and just 1/4 teaspoon of instant dry yeast. The small amount of yeast prevents the dough from over fermenting too quickly, allowing the long flavor development time.
The water must be tepid (lukewarm), measuring 1 1/2 cups plus 2 tablespoons (380 ml) in total. This precise level of hydration is critical; it creates the necessary sticky, slack dough that allows for the passive development of gluten over time.
Tools of the Trade: Preparing Your Dutch Oven
The iconic crust associated with professional Artisan Bread Recipes is achievable at home using a heavy bottomed, oven safe vessel. The 5 to 6-quart Dutch Oven Bread method is paramount here.
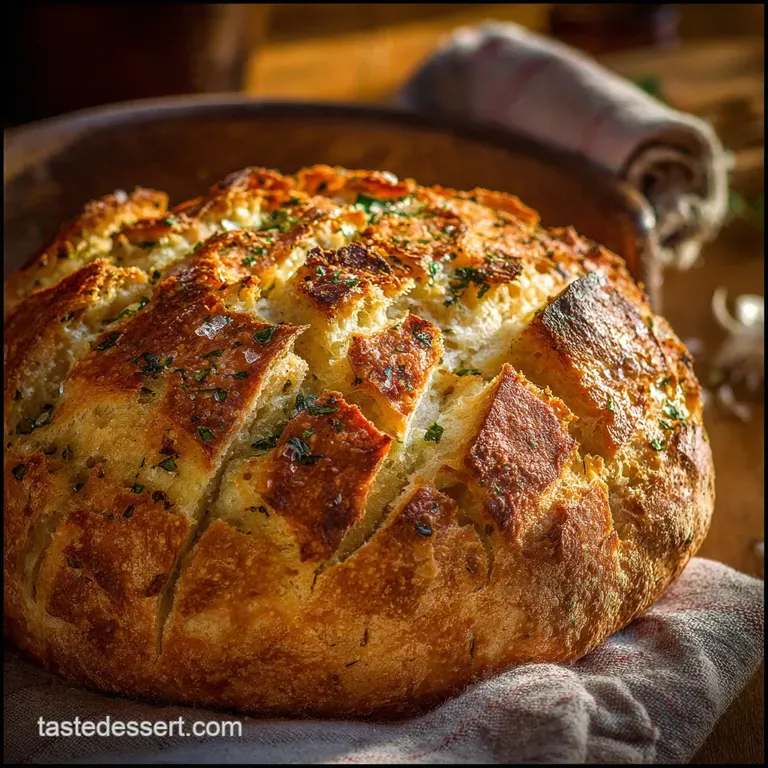
The cast iron pot, preheated to a scorching 450° F ( 230° C), acts as a miniature steam oven. The trapped moisture released by the dough during the initial bake keeps the crust soft long enough to allow for incredible oven spring, resulting in a thin, light, and dramatically blistered exterior.
You will also need parchment paper for safely lowering the dough into the scorching pot and a proofing basket (banneton) or a bowl lined with a linen tea towel for the final proof.
Related Recipes Worth Trying
- Golden Comfort Creamy Roasted Butternut Squash Mac and Cheese Recipe — This Butternut Squash Mac and Cheese uses roasted squash for ultimate creamy texture and hidden veg Its a healthier Mac and Cheese Recipe that tastes...
- Ultimate Baked Broccoli Macaroni and Cheese Recipe with Panko Crunch — The ultimate comfort food This baked broccoli macaroni and cheese is elevated with a silky Gruyère Mornay sauce and a buttery Panko crust Pure cheesy goodness
- Sheet Pan Turkey Meatloaf and Broccoli Quick Glazed Minis Crispy Veg — This Sheet Pan Turkey Meatloaf and Broccoli recipe is a cracking weeknight winner Quick healthy meal prep with sticky glazed turkey minis and perfectly...
The Simple Method: Transforming Dough from Shaggy to Sublime
The methodology for making this Rustic Basil and Garlic Bread is split into three distinct, low-effort stages, maximizing flavor and texture development.
The Initial Mix: Achieving the Right Hydration
In a large bowl, whisk your dry components flour, salt, and instant yeast before pouring in the tepid water and the completely cooled garlic basil oil infusion. Using a wooden spoon or spatula, mix only until the flour is hydrated and incorporated into a sticky, shaggy mass.
Resist the urge to aggressively mix or try to smooth it out; over mixing negates the benefits of the slow fermentation method. The dough should look messy, wet, and incredibly sticky.
The Long Ferment: Managing the First Rise (12-18 Hours)
Cover the mixing bowl tightly with plastic wrap or a secure lid and place it in a cool spot at room temperature (ideally 68– 72° F). This is the crucial stage: the bulk fermentation. Allow the dough to rest undisturbed for 12 to 18 hours.
After this time, the dough should have more than doubled in size, be visibly covered in bubbles, and possess a pleasant, slightly acidic aroma, signifying successful flavor development.
The Fold and Proof: Shaping for Structure
The dough will be extremely slack. Scrape it gently onto a lightly floured surface, using rice flour if possible, as it prevents sticking better than wheat flour. Stretch the dough into a rough rectangle and execute a gentle envelope fold: fold the bottom third up, and the top third down.
Flip the dough over, seam side down, and lightly pull the edges toward the center to create a round, taut surface tension (a boulé ). Place this ball, seam side up , into your prepared, heavily floured proofing basket.
Cover loosely and allow the dough to undergo its final proof for 1.5 to 2 hours. It should look puffy but not fully doubled.
High Heat Transfer: Achieving the Magnificent Crust
Thirty minutes before the end of the final proof, place your empty Dutch oven (with the lid on) into the oven and preheat the oven to a searing 450° F ( 230° C). This extreme heat is vital. When ready to bake, carefully remove the searing hot pot.
Gently invert the dough from the basket onto a piece of parchment paper. Score the top of the loaf once or twice using a sharp blade. Using the parchment paper as a sling, carefully lower the dough into the Dutch oven. Bake covered for the first 30 minutes. This traps essential steam.
After 30 minutes, remove the lid and reduce the heat slightly to 425° F ( 220° C). Continue baking uncovered for 15 to 20 minutes until the crust is a deep, resonant golden brown and sounds hollow when tapped.
Mastering Your Bake: Advanced Tips and Troubleshooting
Success in making your perfect Basil and Garlic No Knead Bread involves understanding a few key principles related to handling highly hydrated dough and extreme heat.
Troubleshooting Common No-Knead Hiccups (Tacky Dough, Flat Loaves)
If your dough feels excessively tacky and difficult to handle, use flour sparingly but sufficiently during the shaping stage. The starchiness of rice flour is particularly effective on a wet no-knead garlic bread dough, preventing adhesion to the work surface or proofing basket lining.
Flat loaves are often the result of insufficient heat or skipping the crucial preheat stage. If the pot isn't hot enough, the dough won't receive the initial intense blast needed for the "oven spring." Always ensure your Dutch oven has been preheating for a full 30 minutes at the maximum required temperature.
Another cause of flatness is over proofing during the final stage; if the dough deflates when you try to score it, it was proofed too long.
Extending Freshness: Best Practices for Storage
The most critical step immediately after baking is the cooling process. You must transfer the loaf directly from the Dutch oven to a wire rack and allow it to cool for at least 60 minutes.
Cutting the bread while it is still hot releases steam that is necessary for setting the internal crumb structure, leading to a dense, gummy center. Once fully cool, store the bread cut-side down on a cutting board or wrapped tightly in a clean linen bag or tea towel at room temperature for up to three days.
Avoid refrigerating, as this accelerates staling.
Flavor Infusion Alternatives: Swapping Herbs and Spices
While the basil and garlic flavor combination is classic, the versatility of this Artisan Bread Recipes base allows for easy modification. For a warm, savory variation, substitute the fresh basil with 2 tablespoons of finely chopped fresh rosemary and mix 1/4 cup of grated aged Parmesan cheese into the dough with the dry ingredients.
Alternatively, if fresh basil is unavailable in winter, 1 tablespoon of dried oregano or mixed Italian herbs can be used, though the flavor will be less bright. For a richer, wetter addition, try adding 1/4 cup of drained, chopped sun-dried tomatoes, being sure to reduce the water measurement by 2 tablespoons to maintain the correct hydration balance.
Calorie and Nutritional Breakdown (Per Slice Estimate)
Based on an estimate of 10 generous servings per large loaf, each slice of this Rustic Basil and Garlic Bread contains approximately 190 to 210 calories. This lightened estimate includes about 3 grams of fat (primarily healthy monounsaturated fats from the olive oil), 5 grams of protein, and 35 grams of carbohydrates.
It offers a satisfying carbohydrate source with roughly 2 grams of dietary fiber per serving.

Recipe FAQs
Crikey, my dough looks like a sticky mess! Is it supposed to be this wet and floppy?
Yes, absolutely! This no-knead method relies on a high water content (hydration) to allow the gluten to develop naturally over time, rather than requiring any heavy manual work. It should be very slack, wet, and bubble ridden after the first rise don't be tempted to add loads of extra flour at this stage, or you’ll end up with a dense brick instead of a proper airy crumb.
I'm keen for a slice, but 18 hours is a bit of a marathon. Can I rush the rise a bit?
Patience is a virtue, my friend! While you can put the dough in a warmer place to speed the initial bulk fermentation (perhaps 4 6 hours), the deep, complex, artisanal flavour that lovely tang only develops during the long, slow, cool fermentation.
For the best flavour profile and a magnificent, structured crumb, stick to the overnight rest; trust the process, it’s worth the wait.
I haven't got a fancy Dutch Oven, what’s the next best kit for getting that cracking crust?
Not to worry! The Dutch oven is preferred because it traps the steam released by the dough, which is essential for generating that gorgeous, blistered crust. If you don't have one, use a heavy oven safe casserole dish with a tight fitting lid (like cast iron), or bake the loaf on a pizza stone and place a deep roasting tray filled with boiling water on the rack below to create an artificial steam bath.
How long will this lovely loaf stay fresh, and what's the best way to store my Basil and Garlic No Knead Bread?
This Basil and Garlic No Knead Bread is truly at its prime within the first 24 hours after baking, with that glorious crust still maintaining its crackle. The traditional and best way to store it is wrapped tightly in a linen cloth or a paper bag at room temperature never put bread in the fridge, as it causes it to go stale faster.
If you can't eat it all, slice and freeze it in an airtight bag for up to three months, toasting slices as needed.
I want to try a twist can I use dried herbs or change the flavour additions?
Fresh basil provides a cleaner, brighter flavour that holds up well against the mellow garlic, so it's always the preferred choice. If fresh basil is completely unavailable, you can substitute it with 1 tablespoon of dried oregano or mixed Italian seasoning, mixed directly into the dry ingredients.
For a punchy variation, try stirring in a handful of chopped sun-dried tomatoes or some grated parmesan cheese during the initial mix.
Basil Garlic No Knead Dutch Oven Loaf

Ingredients:
Instructions:
Nutrition Facts:
| Calories | 196 kcal |
|---|---|
| Protein | 2.7 g |
| Fat | 1.9 g |
| Carbs | 22.1 g |
| Fiber | 3.5 g |
| Sodium | 4028 mg |
