Skillet Cheesy Chicken and Veggie Rice: the Low-Carb, One-Pan Wonder

- The Ultimate One-Pan Weeknight Wonder: Skillet Cheesy Chicken and Veggie Rice
- Why This Skillet Bake Delivers Maximum Flavor
- Essential Components for Your Skillet Cheesy Chicken and Veggie Rice
- The Chef’s Method: Step-by-Step Skillet Mastery
- Achieving Skillet Perfection: Troubleshooting and Pro Tips
- Prep Ahead and Storage Solutions
- The Perfect Partners for Your Cheesy Skillet Bake
- Recipe FAQs
- 📝 Recipe Card
The Ultimate One-Pan Weeknight Wonder: Skillet Cheesy Chicken and Veggie Rice
Is there anything better than walking in the door after a long day and smelling creamy, cheesy goodness wafting from the kitchen? The aroma of paprika dusted chicken and melting cheddar is instant comfort food.
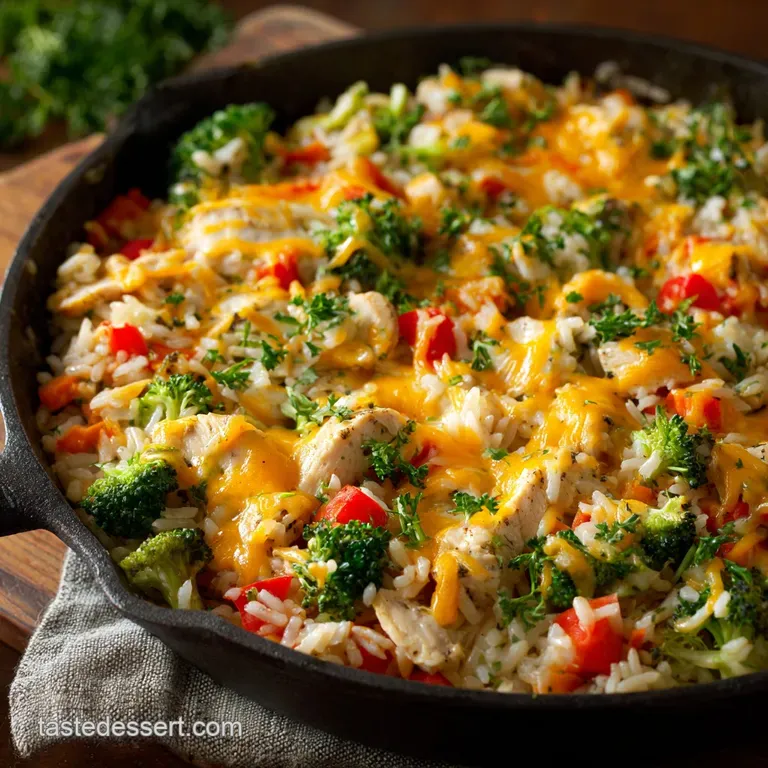
This skillet cheesy chicken and veggie rice is the meal you crave when you need warmth, flavor, and that spectacular, bubbling golden brown cheese crust.
Life is chaos, and weeknights demand speed, efficiency, and zero fuss. This recipe is genuinely a lifesaver because it uses just one pan, which means cleanup takes maybe three minutes, tops.
Plus, ditching traditional rice for the veggie ‘rice’ base keeps it surprisingly light, proving you absolutely do not need heavy carbs to feel satisfied and cozy.
I’ve made every version of cheesy chicken known to man, from casserole to soup, but this low-carb skillet version is the one that stuck. It’s reliable, adaptable, and packed with flavor, and I’m going to share all my tricks including the one mistake I kept making with the stock so yours turns out perfect every single time.
Let’s crack on.
Why This Skillet Bake Delivers Maximum Flavor
Trading Carbs for Comfort: The Veggie ‘Rice’ Revolution
The genius here is using cauliflower and maybe some broccoli, finely pulsed, as our absorbent base. Unlike traditional rice, veggie 'rice' soaks up the creamy sauce instantly , meaning you get flavor penetration into every single morsel.
It cooks lightning fast, resulting in a quicker overall dinner, and delivers great texture without being starchy.
Quick Prep, Quicker Clean-Up: The Joy of One-Pan Cooking
When you cook everything in one pan, you’re not just saving washing-up time; you’re layering flavor. Those little brown bits stuck to the bottom of the skillet after searing the chicken are called fonds , and they are pure flavor gold.
By deglazing the pan with the stock later, you pull all that deep, meaty essence right into your sauce.
What Makes This Recipe Truly ‘Set and Forget’
This meal is designed for busy cooks who hate babysitting a stove. Once the chicken is seared and the sauce is built, you dump the veggie ‘rice’ in, give it a stir, and then you just let it steam and bubble.
The cream cheese provides necessary stability, ensuring the sauce stays rich and doesn't separate while it finishes cooking.
The Maillard Reaction: Browning the Chicken for Depth
I cannot stress this enough: sear the chicken well . Patting the chicken dry and using high heat creates that gorgeous, caramelized crust known as the Maillard reaction. This simple step adds savory depth and texture that boiled or steamed chicken simply cannot replicate. If you want maximum flavor in your Oven Fried Chicken Recipe: Crispy Buttermilk Thighs Drums , you know searing is essential, and it’s critical here too.
Creating the Rich, Absorbent Base
We use a combination of unsalted butter, sharp aromatics (onion, garlic), and full fat cream cheese for the base. The butter carries the flavor of the spices and vegetables, while the cream cheese melts into an incredibly smooth, luxurious binder.
This ensures the sauce clings beautifully to the cauliflower ‘rice’ without being watery.
The Golden Ratio of Creaminess and Cheese Pull
For the ultimate cheesy skillet, you need two types of dairy. We use cream cheese for the creamy body and sharp cheddar for the tang and glorious cheese pull.
Pro Tip: We mix some cheddar into the sauce before baking, and then reserve a nice amount for that glorious golden crust right at the end.
Essential Components for Your Skillet Cheesy Chicken and Veggie Rice
Ingredient Checklist: Pantry Staples and Fresh Produce
This recipe relies on basic ingredients you probably already have, but quality matters. Don’t skimp on the smoked paprika; it adds a crucial layer of smoky sweetness. Using low-sodium chicken stock gives you control over the final salt level, which is important since the cheddar is already quite salty.
Choosing the Right Cut: Best Chicken Options
I usually use boneless, skinless chicken breast cut into 1 inch cubes for quick searing and uniform cooking. If you prefer a richer flavor and guaranteed juiciness, you can absolutely swap to boneless, skinless chicken thighs. Just remember to trim any excess fat before cutting them up.
Swapping Out the Base: Alternatives to Cauliflower and Broccoli
This is a veggie forward meal, so feel free to mix up the 'rice.' If you absolutely hate cauliflower, you can use pre-shredded cabbage (often labeled as coleslaw mix, minus the dressing).
You could also use grated zucchini, but be warned: zucchini releases a massive amount of water, so you might need to squeeze it dry first!
Dairy Decisions: Maximizing Melt and Tanginess
| Ingredient | Role in Recipe | Substitution Idea |
|---|---|---|
| Chicken Breast | Lean Protein | Chicken Thighs (longer cook time, more fat) |
| Cauliflower ‘Rice’ | Low-Carb Base | Shredded Cabbage or Broccoli Stems, Riced |
| Sharp Cheddar | Flavor & Crust | Monterey Jack or Smoked Gouda (for melt) |
| Cream Cheese | Creamy Body/Binder | Mascarpone (will be slightly sweeter) |
| Chicken Stock | Liquid & Depth | Full fat Coconut Milk (for an even richer finish) |
Chef’s Note: Always, always grate your own cheese for skillet recipes. Pre-shredded cheese contains cellulose powder (anti caking agent), which prevents proper melting and can leave your gorgeous sauce grainy. Nobody wants a grainy cheese sauce!
The Chef’s Method: step-by-step Skillet Mastery
Phase 1: Searing the Protein
First, cube your chicken and season it aggressively with salt, pepper, and that lovely smoked paprika. Heat 2 tablespoons of oil in your 12 inch oven safe skillet over medium high heat until it shimmers.
Sear the chicken pieces until they have a beautiful golden crust on all sides this should take about 5– 7 minutes, and they don't need to be fully cooked yet. Remove the chicken to a bowl and try very hard not to sneak a bite.
Phase 2: Building the Aromatic Foundation
Reduce the heat to medium and add the butter to the skillet. Once melted, toss in your diced onion and red pepper and sauté them until they are soft and glistening (about 5 minutes).
Next, stir in the minced garlic and dried thyme for about one minute until the air smells utterly heavenly; avoid burning the garlic, or the whole dish is ruined.
Phase 3: Incorporating the Veggie ‘Rice’ and Liquid
Pour in the chicken stock and immediately scrape up all those browned fonds from the bottom of the pan this is the magic step! Once it’s simmering, reduce the heat to low, whisk in the cubed cream cheese and Dijon mustard until the sauce is silky smooth.
Now, stir in the cauliflower ‘rice’ until every grain is coated in the creamy sauce, cover the pan, and let it steam for 4– 5 minutes until tender crisp.
Phase 4: The Cheesy Finish and Resting Time
Stir the reserved, seared chicken and most of the grated cheddar (4 oz) back into the mixture. It’s already looking delicious! Sprinkle the remaining cheddar (2 oz) over the top, then place the skillet under a high broiler (grill) for 2– 4 minutes until the cheese is melted, bubbling, and just starting to brown in spots.
Keep a very close eye on the broiler; it can turn perfect into burnt charcoal in seconds. Let the skillet rest for 5 minutes before garnishing with parsley and diving in.
Achieving Skillet Perfection: Troubleshooting and Pro Tips
Preventing a Watery Skillet: Moisture Management
This is where people struggle the most: cauliflower releases moisture, especially if it was frozen. If, after simmering, your sauce looks a bit too soupy, simply remove the lid and let the mixture simmer uncovered for 2– 3 minutes before adding the cheese.
This allows the excess liquid to evaporate quickly, concentrating the flavors and thickening the sauce naturally.
The Critical Role of Skillet Size and Heat Distribution
You absolutely need a 12 inch skillet for this recipe; anything smaller and the ingredients will pile too high and steam instead of lightly simmering. A cast iron skillet is ideal because it retains heat so well, creating superior browning, but a heavy stainless steel pan works great too.
Just ensure your skillet is rated safe for the oven or broiler!
Seasoning Layer by Layer: Ensuring Even Flavor
Never wait until the end to season your dish. We seasoned the chicken first, then we seasoned the aromatics, and you should taste and adjust the sauce right after the cream cheese has melted. Taste often! If you want to check out another brilliantly seasoned low-carb meal, my recipe for Taco Stuffed Zucchini Boats: Easy Low Carb Cheesy Dinner uses this layer-by-layer method beautifully.
Prep Ahead and Storage Solutions
Can I Prep the Veggie ‘Rice’ Ahead of Time?
Yes! You can certainly chop all the vegetables and cube the chicken up to 24 hours in advance. If you are ricing the cauliflower yourself, you can keep the ‘rice’ in the fridge for up to three days. Having everything measured and ready makes this a true 20 minute dinner.
Safe Storage and Reheating Leftovers
Leftovers of this Skillet Cheesy Chicken and Veggie Rice are fantastic, maybe even better the next day. Store any excess tightly sealed in the fridge for up to 4 days .
When reheating, the best method is to portion it into an oven safe dish, add a tiny splash of stock or water (1 tbsp), cover it with foil, and bake at 350°F (175°C) until piping hot, about 15– 20 minutes. Microwaving works, but it can dry out the chicken.
Freezing the Skillet Bake: Best Practices for Texture
Does this freeze well? You bet, with a small caveat. The dairy might separate slightly upon thawing, but the texture of the veggie 'rice' holds up surprisingly well. Cool the entire dish completely, transfer it to a freezer safe, air-tight container, and freeze for up to 3 months.
Thaw overnight in the fridge and reheat gently in the oven as described above.
The Perfect Partners for Your Cheesy Skillet Bake
Since this skillet bake is rich and wonderfully savory, you need something bright and acidic to cut through all that glorious cheese. A simple, crisp green salad tossed with a sharp lemon vinaigrette is ideal. Honestly, sometimes I just serve it with a pile of pickled jalapeños on the side.
If you are looking for a light, refreshing finish, you need something that cleanses the palate after all that richness. I highly recommend pairing this with my easy, zero fuss dessert: the Red White and Blue Fruit Skewers with Cheesecake Y: No-Bake, Easy Summer Dessert . It’s a bright, cold, perfect ending.
 : PIN FOR LATER")
Recipe FAQs
Can I use traditional rice instead of the cauliflower or veggie rice?
Yes, you can substitute traditional white or brown rice, but the cooking time and liquid amount must change dramatically. If using uncooked white rice, you would need to add approximately 1.5 cups of broth, cover the skillet, and simmer for 15-20 minutes until the liquid is fully absorbed before adding the chicken and cheese.
Why is my veggie rice skillet coming out watery or soggy?
Cauliflower releases a significant amount of moisture, especially if you are using pre-frozen ‘rice.’ To prevent a watery dish, make sure you cook the cauliflower uncovered for the initial few minutes to allow steam to escape and moisture to evaporate before adding the broth and other ingredients.
How should I store leftovers, and can I freeze this dish?
Leftovers store very well in an airtight container in the refrigerator for 3 to 4 days. While technically you can freeze this meal, the texture of the cauliflower rice and the consistency of the melted cheese may degrade upon thawing and reheating, often resulting in a slightly grainy or mushy texture.
My chicken pieces turned out a bit dry. What did I do wrong?
Dry chicken is typically the result of overcooking, especially since the chicken is cooked twice once on the stovetop and again when simmering with the rice. Ensure your chicken is cut into uniform, medium sized pieces, and stop cooking immediately when the internal temperature reaches 165°F (74°C) for food safety.
What are good substitutes for the suggested cheese blend?
If you prefer different flavor profiles, excellent substitutes for cheddar or mozzarella include Gruyère for a nutty, earthy flavor, or smoked Gouda for added depth and complexity.
For a dairy-free option, use a high-quality shredded vegan cheese blend or simply top the dish with a generous dusting of nutritional yeast.
Can I make this Skillet Bake vegetarian?
Absolutely. Substitute the chicken with 1 cup of drained and rinsed chickpeas or white beans, adding them toward the end of the cooking process just to warm them through. Alternatively, you can use pre-browned plant based sausages or large slices of sautéed portobello mushroom to mimic the savory texture of the chicken.
How can I add some heat or spice to the recipe?
For an extra kick, try sautéing a diced jalapeño or a pinch of red pepper flakes along with the garlic and onion at the start of the recipe. You can also stir in 1-2 teaspoons of chipotle paste or a dash of your favorite hot sauce right before you add the cheese for baking.
Cheesy Chicken And Cauliflower Rice Skillet Bake

Ingredients:
Instructions:
Nutrition Facts:
| Calories | 499 kcal |
|---|---|
| Protein | 19.5 g |
| Fat | 37.8 g |
| Carbs | 24.4 g |
