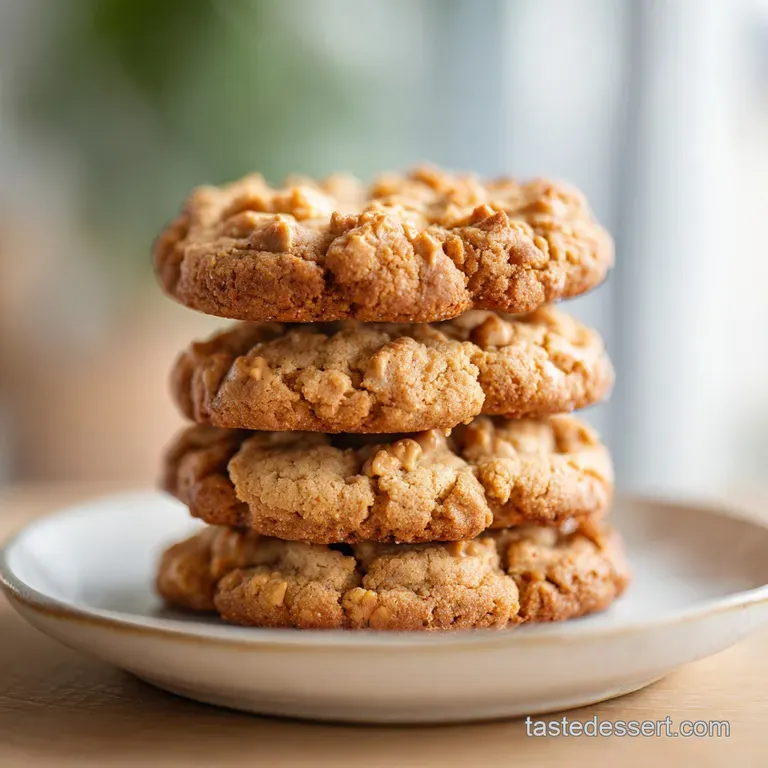
Thick and Chewy Peanut Butter Cookies
- Time: Active 15 minutes, Passive 10 minutes, Total 25 minutes
- Flavor/Texture Hook: Shatter crisp edges with a velvety, dense center
- Perfect for: After school snacks, holiday cookie swaps, or beginner bakers
- Master these thick and chewy peanut butter cookies
- Why that fudge texture works
- Essential cookie metrics and timing
- Pantry staples for better baking
- Tools for consistent cookie results
- Step by step baking guide
- Fixing common peanut butter problems
- Creative flavor and texture swaps
- Adjusting for the whole family
- Myths about peanut butter baking
- Freshness and long term storage
- Pairing treats for maximum joy
- Recipe FAQs
- 📝 Recipe Card
Master these thick and chewy peanut butter cookies
I’ll never forget the Tuesday afternoon my kitchen smelled like a literal peanut factory in the best way possible. I was trying to recreate a cookie I’d had at a local bakery, but mine kept coming out like dry, sandy hockey pucks. I realized I was over baking them and using the wrong sugar.
Once I swapped to dark brown sugar and pulled them out while they still looked "raw," the game changed completely.
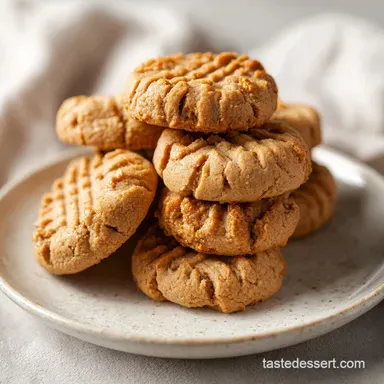
There is a specific joy in pulling a tray of these out of the oven. The way the crosshatch pattern catches the light, and that first bite where the salty peanut butter hits the sweet sugar crystals it’s a delightful transformation of simple ingredients.
You don't need fancy equipment, just a big bowl and the willpower not to eat all the dough before it hits the pan.
We've all been there, staring at a crumbly cookie that falls apart before it reaches your mouth. This version stays together, offering a satisfying weight and a texture that borders on candy. Trust me, once you see those golden edges against the pale, soft middle, you'll know you’ve nailed it.
Why that fudge texture works
- Molasses Hydration: Dark brown sugar contains more moisture than light versions, which keeps the dough from drying out during the bake.
- Fat Saturation: Combining butter and peanut butter creates a high fat environment that inhibits gluten formation, resulting in a tender crumb.
- Sodium Reaction: Baking soda reacts with the acidic molasses in the sugar to provide a quick lift without the "cakey" texture of baking powder.
- Egg Emulsification: A room temperature egg binds the fats and sugars together, creating a stable structure that doesn't spread into a flat puddle.
The Physics of the Center
The secret to that dense, fudge like interior is the ratio of sugar to flour. By keeping the flour count relatively low (190g), we ensure the sugars caramelize and hold onto the fats from the peanut butter. This creates a "tight" crumb that feels heavy and satisfying rather than light and airy.
If you're looking for another classic texture to compare, you might notice similarities in how we balance fats in my Proper Job Chewy recipe. Both rely on high-quality moisture retention to stay soft for days.
| Desired Texture | Bake Time | Visual Cue | Mouthfeel |
|---|---|---|---|
| Ultra Fudgy | 8 minutes | Center looks wet | Melts instantly |
| Classic Chewy | 10 minutes | Edges are golden | Soft with a slight bite |
| Crispy Snap | 12 minutes | Fully browned top | Firm and crunchy |
It is important to remember that cookies continue to cook on the hot baking sheet for several minutes after you pull them out of the heat. This "carryover cooking" is the difference between a velvety middle and a dry one. Always err on the side of looking slightly underdone.
Essential cookie metrics and timing
Timing is everything when you're working with high fat doughs. If the oven isn't hot enough, the butter melts before the structure sets, leading to thin cookies. If it's too hot, the outside burns while the inside stays liquid. We are aiming for that sweet spot where the heat penetrates just enough to set the proteins.
| Component | Fresh Homemade | store-bought Mix | Impact |
|---|---|---|---|
| Fat Source | Real Butter (115g) | Palm Oil/Shortening | Better flavor and "melt" |
| Sugar Quality | Dark Brown Sugar | Light Brown/White | Richer molasses depth |
| Texture | Dense and Velvety | Airy and Crumbly | Homemade feels more premium |
The contrast between the fresh butter and the salty peanut butter is what makes this homemade version stand out. You just can't get that specific sweet and savory balance from a box.
Pantry staples for better baking
To get these cookies right, you need to be specific about your ingredients. Don't grab the "natural" peanut butter that you have to stir; the oil separation will ruin the structural integrity of your bake. Stick to the standard, creamy, shelf stable variety like Jif or Skippy for the most consistent results.
- 1 cup (250g) creamy peanut butter: Why this? Provides the primary fat and protein structure.
- 1/2 cup (115g) unsalted butter: Why this? Softened butter allows for better aeration during creaming.
- 3/4 cup (150g) dark brown sugar: Why this? Packed for moisture and a deep caramel flavor.
- 1/2 cup (100g) granulated white sugar: Why this? Creates those essential crisp, sugary edges.
- 1 large egg: Why this? Must be room temperature to emulsify properly with fats.
- 1 tsp vanilla extract: Why this? Rounds out the saltiness of the peanuts.
- 3/4 tsp baking soda: Why this? Provides lift and aids in browning.
- 1/2 tsp fine sea salt: Why this? Sharpens the sweet notes in the dough.
- 1 1/2 cups (190g) all purpose flour: Why this? The framework that holds everything together.
| Ingredient | Substitute | Why It Works |
|---|---|---|
| Unsalted Butter | Salted Butter | Works fine; just reduce added salt to 1/4 tsp. |
| Dark Brown Sugar | Light Brown Sugar | Same sweetness but cookies will be slightly paler. |
| All purpose flour | 1:1 gluten-free Blend | Note: Use a blend with xanthan gum for structure. |
Choosing the right flour is also vital. All purpose provides just enough gluten to give the cookie "chew" without making it tough. If you used bread flour, they would be too bready; cake flour would make them fall apart.
Tools for consistent cookie results
You don't need a professional kitchen, but a few specific items make a huge difference. A heavy duty baking sheet (like a Nordic Ware aluminum pan) ensures the heat is distributed evenly so you don't end up with burnt bottoms and raw tops.
Chef Tip: Freeze your baking sheets for 5 minutes between batches. Putting cold dough on a hot tray causes the bottom to melt instantly, leading to excessive spreading.
A cookie scoop is also a game changer for this recipe. It ensures every cookie is exactly the same size, which means they all finish baking at the exact same time. If you have some small and some large, the small ones will be burnt crisps by the time the large ones are ready.
step-by-step baking guide

- Prepare the environment. Preheat your oven to 180°C and line two large baking sheets with parchment paper. Note: Parchment prevents sticking and helps with even browning.
- Cream the fats. In a large bowl, beat the 115g softened butter, 250g peanut butter, 150g dark brown sugar, and 100g white sugar. Beat for 3 minutes until pale and fluffy.
- Add the liquids. Crack in the room temperature egg and pour in the 1 tsp vanilla extract. Mix until the yellow streaks of the egg disappear.
- Whisk dry essentials. In a separate small bowl, toss together the 190g flour, 3/4 tsp baking soda, and 1/2 tsp salt.
- Combine the mixtures. Gradually add the dry ingredients to the wet. Mix until just a few streaks of flour remain.Note: Over mixing here leads to tough, bread like cookies.
- Form the balls. Scoop about 2 tablespoons of dough (roughly 40g) and roll into a smooth ball between your palms.
- Create the pattern. Place balls 5cm apart on the tray. Use a fork to press down firmly in a "criss cross" pattern. Press until the cookie is about 1cm thick.
- Bake the tray. Slide into the center rack for 9 to 10 minutes. Bake until the edges are just barely set and golden.
- The cooling phase. Let the cookies sit on the hot pan for 5 minutes. Wait until they are firm enough to move without breaking.
- Final rest. Transfer to a wire rack to cool completely. This sets the internal fudge like texture.
Fixing common peanut butter problems
Sometimes, even with the best intentions, things go sideways. The most common issue I see is cookies that look like greasy puddles. This usually happens if the butter was melted instead of softened, or if the kitchen was too warm.
Why Your Cookies Spread
If your cookies are merging into one giant sheet, your dough is too warm. The fat is melting before the flour structure can set. Simply pop the dough balls in the fridge for 15 minutes before baking.
This chills the butter, so it takes longer to melt in the oven, giving the baking soda time to do its work.
Why Your Cookies Are Crumbly
A sandy, dry texture usually means there was too much flour or the cookies were over baked. Always fluff your flour with a spoon before measuring it into a cup, or better yet, use a kitchen scale to hit that 190g mark exactly.
If they are already baked and dry, try storing them in a sealed container with a slice of white bread the cookies will absorb the moisture from the bread.
| Problem | Root Cause | Solution |
|---|---|---|
| Burnt Bottoms | Dark baking sheet | Use parchment paper or a lighter colored pan. |
| Raw Centers | Oven too hot | Lower temp to 170°C and bake 2 minutes longer. |
| No Crosshatch | Dough too sticky | Dip your fork in granulated sugar before pressing. |
Common Mistakes Checklist
- ✓ Using "Natural" oil top peanut butter (causes separation)
- ✓ Using cold eggs (prevents a smooth emulsion)
- ✓ Measuring flour by packing it into the cup (adds too much)
- ✓ Baking on a hot tray from a previous batch (causes spreading)
- ✓ Pulling them out too late (leads to crunchy, dry cookies)
Creative flavor and texture swaps
While I love the classic version, sometimes you want to transform it into something a bit more decadent. If you're a fan of the chocolate peanut butter combo, you can easily adapt this into something like my Hershey Kiss Thumbprint Cookies recipe.
Salty and sweet combinations
Try pressing a few flakes of Maldon sea salt onto the tops of the cookies immediately after they come out of the oven. The contrast between the crunchy salt and the sweet peanut butter is incredible.
You could also fold in 1/2 cup of dark chocolate chips or chopped honey roasted peanuts for an extra crunch that breaks up the velvety texture of the dough.
Texture and Crunch Swaps
If you prefer a bit of a "shatter" in your bite, swap the creamy peanut butter for extra crunchy. It won't affect the chemistry of the bake, but it adds a lovely rustic feel to the finished product.
You can also roll the dough balls in extra granulated sugar before pressing them with the fork to create a sparkling, crispy crust.
| Premium Add in | Budget Swap | Flavor Impact | Savings |
|---|---|---|---|
| Chopped Macadamias | Salted Peanuts | Richer but less "nutty" | Save $4.00 |
| Vanilla Bean Paste | Imitation Vanilla | Subtle floral notes | Save $10.00 |
| Dark Choc Chunks | Mini Choc Chips | Bigger melty pockets | Save $1.50 |
Adjusting for the whole family
If you're baking for a crowd, you can easily double this recipe. Just be careful with the leavening agents; when doubling, I usually only increase the baking soda to 1 1/4 tsp rather than a full 1 1/2 tsp to avoid a metallic aftertaste.
For a half batch, beat one egg in a small bowl and use exactly half of it (about 25g) to keep the liquid ratio perfect.
For those who enjoy a bit of history with their sweets, you might find it interesting that the classic "fork mark" was originally recommended by makers like Jif back in the 1930s to help the dense dough bake evenly. It’s a tradition that serves a functional purpose!
Myths about peanut butter baking
Myth: You must chill the dough overnight for flavor. While some doughs benefit from a long rest, peanut butter cookies are already so flavor dense that you don't need to wait. A quick 15 minute chill is helpful for structure, but 24 hours won't noticeably change the taste profile.
Myth: Natural peanut butter makes "healthier" cookies. In baking, "natural" usually just means "unstable." The lack of stabilizers in natural PB means the oil will leak out, leaving you with a cookie that is both greasy and dry at the same time. Use the processed stuff for the best texture.
Freshness and long term storage
Storage: These cookies stay delightfully soft for up to 5 days if kept in an airtight container at room temperature. To keep them extra moist, tuck a small piece of parchment paper between the layers so they don't stick together.
Freezing: You can freeze the baked cookies for up to 3 months. However, I prefer freezing the unbaked dough balls. Roll them, press them with the fork, and freeze them on a tray. Once solid, toss them into a freezer bag.
You can bake them straight from frozen just add 2 minutes to the total bake time.
Zero Waste: If you end up with a few stale cookies, don't throw them away! Crush them up and use them as a base for a cheesecake crust or sprinkle them over vanilla bean ice cream. The salty sweet crumbs are a fantastic topping for a bowl of Amish Peanut Butter recipe inspired pudding.
Pairing treats for maximum joy
Nothing beats the classic combination of a warm peanut butter cookie and a tall glass of ice cold whole milk. The fat in the milk helps wash away the sticky richness of the peanut butter, refreshing your palate for the next bite.
If you're feeling adventurous, try making easy cookie ice sandwiches. Take two completely cooled cookies, place a scoop of softened chocolate or banana ice cream in the middle, and gently press them together. Wrap them in plastic wrap and freeze for an hour.
It’s the ultimate transforming summer treat that feels like a homemade masterpiece.

Recipe FAQs
Can I substitute light brown sugar for dark brown sugar?
Yes, but expect a texture change. Dark brown sugar contains more molasses, which adds crucial moisture that keeps these cookies extra chewy; light brown sugar will yield a slightly drier result.
How do I prevent the cookies from spreading into flat puddles?
Chill the dough for 15 minutes before baking. If your dough is too warm, the butter melts before the flour structure sets, causing excessive spread; chilling the fat solidifies it temporarily.
How long should I bake these cookies for a truly fudgy center?
Bake for 8 to 9 minutes at 180°C. The edges should be barely golden, and the center must still look visibly wet when you remove them from the oven, as carryover cooking will finish the process.
Is it necessary to use creamy peanut butter instead of natural/stir free?
Yes, stick to creamy, stabilized peanut butter. The added stabilizers prevent oil separation, which is critical for achieving the dense, uniform structure required for chewy cookies.
How do I make the classic criss cross pattern without the dough sticking to the fork?
Dip the fork in granulated sugar before pressing. Press down firmly twice, rotating the fork 90 degrees between presses, until the dough is about 1cm thick.
Can I use baking powder instead of baking soda for a softer cookie?
No, avoid substituting baking powder for soda here. Baking soda reacts with the acidic molasses in the dark brown sugar to provide the right lift and browning for this dense texture; baking powder creates a cakier result.
How should I store leftover cookies to maintain maximum chewiness?
Store airtight at room temperature for up to 5 days. For longer storage, freeze the unbaked dough balls; mastering this chilling technique is also key for successful assembly in my Classic Ice Cream Sandwiches recipe.
Chewy Peanut Butter Cookies
Ingredients:
Instructions:
Nutrition Facts:
| Calories | 167 kcal |
|---|---|
| Protein | 3.7 g |
| Fat | 9.3 g |
| Carbs | 18.4 g |
| Fiber | 0.6 g |
| Sugar | 11.2 g |
| Sodium | 139 mg |
